Quantcast
Channel: Rick Strahl's Web Log
Viewing all 670 articles
Browse latest View live

Angular Select List Value not binding with Static Values

$
0
0

Last week I upgraded an existing Angular application from 1.3 to 1.4rc. For the most part this migration was smooth, but I ran into one subtle change that bit me and took a while to track down. Angular 1.4 changes the behavior of <SELECT> element binding when binding static items. Specifically 1.4 and forward requires that the type of values bound matches the type of the actual values that are attached to each option. In other words if you have a numeric type and you’re binding to static option values (which are strings) the binding will fail to show the proper result value.

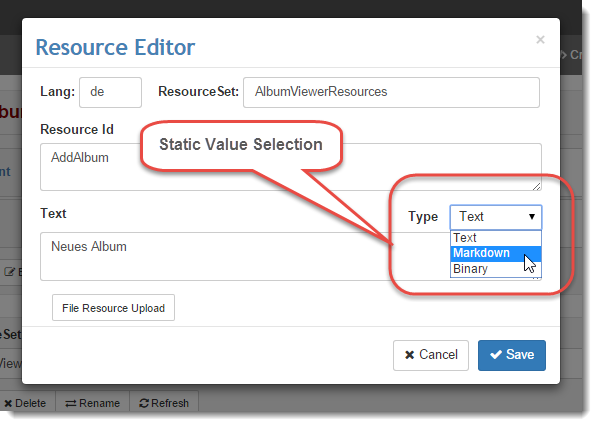
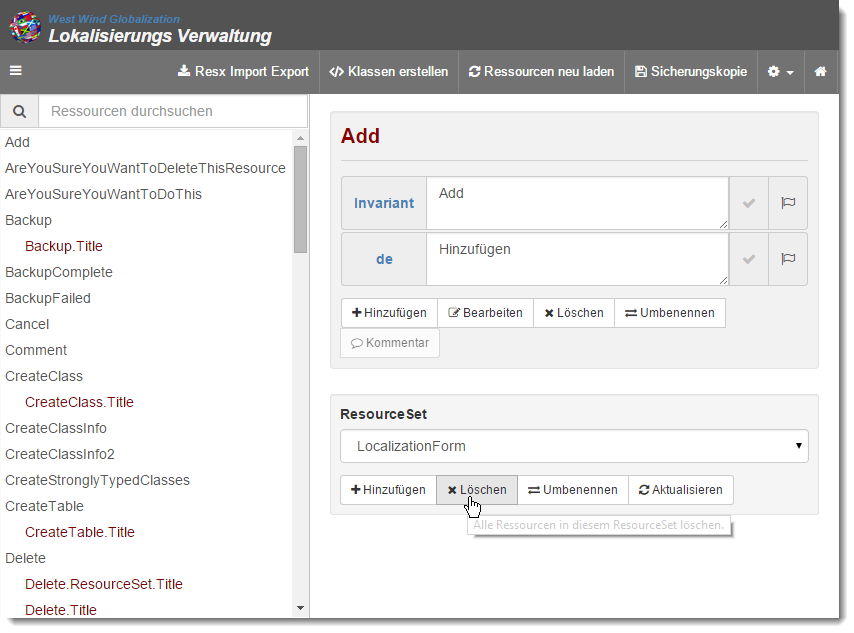
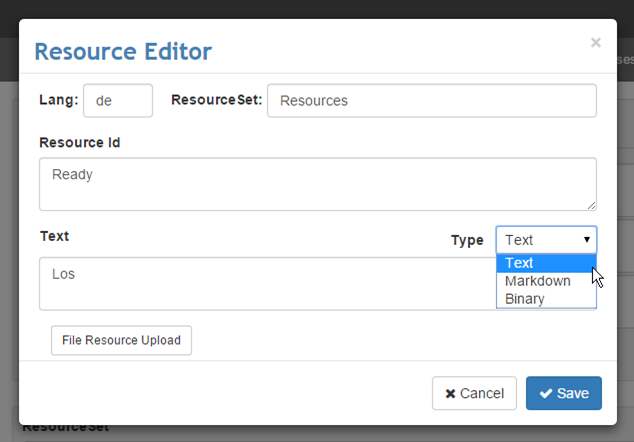
To make this clearer lets look at an example. In the Westwind.Globalization Localization form I have a simple form where I can select the type of resource that I’m localizing for. I have 3 fixed values in that dropdown as you can see in this screenshot:

StaticValueSelection

In the application, the dropdown list is bound to the model via view.activeResource.ValueType which is a numeric value.

In Angular 1.3 I was simply able to bind these static values using ng-model like this:

<select  class="form-control-small"ng-model="view.activeResource.ValueType"><option value="0">Text</option><option value="2" >Markdown</option><option value="1">Binary</option></select>

and this worked just fine. When initially displaying the page the model value was pre-selected in the list and when I made a selection the ValueType property on the model was updated. Life was good.

Angular 1.4+: Binding Type Changes

Starting with Angular 1.4 the binding behavior is changing in that bindings must match their types exactly to the model value types. In Angular 1.3 the binding logic was a bit more loose so comparing a string value and a numeric value would result in equality. In Angular 1.4 this loose comparison is no longer used and values have to match exactly.

This is a problem if you are using static values that are assigned in HTML and which are always string values, but when your model’s values are non string values. In the example above, I’m binding to static HTML option values that are strings from a model that is using a numeric value.

This causes two problems:

  • On inbound binding the model value always selects the first item
    (ie. the initial value never binds properly so the first item is selected)
  • On outbound binding the model is bound with a string value rather than a number
    (ie. after selection the value is invalid)

The outbound issue in turn can cause problems when taking the data and pushing it back to the server to save. Since the server is expecting a numeric value this causes either a JSON unbinding error, or – more likely – the value is ignored and the default value is used instead (0 – Text) regardless of what the user selected.

Advertisement

More heinously though – the UI displays the selection correctly. Until the data is refreshed from the server – an incorrect out of sync value is actually displayed which made this doubly difficult to track down.

If you’re updating an existing application like I did this is a very subtle change – this code used to work fine in 1.3 and prior. Now in 1.4 this binding as is, is broken and it’s a subtle thing to detect.

Note: This doesn’t affect all Bindings

To be clear this is a very specific problem that occurs only if you are binding a non-string model value to a static list of values that you hardcode in HTML, which is probably not all that often.

This is not a problem if you are:

  • Binding string values – since the values are strings anyway
  • Binding dynamic binding values that you assign via ng-repeat/ng-option

Most of the time we bind dynamic data, and if you do that you are likely binding the proper value types that Angular knows about. The most common scenario is exactly like I describe above where Angular is not used to populate the list data, but you are binding a non-string value in ng-model.

Fixing the Problem with a tiny Angular Directive

When I ran into this problem initially, I created an issue in the Angular Github repository, and what follows was the suggestion for the proper way to bind static values which involves using a custom directive. In fact, the Angular documentation was updated as a result of this report– nice.

So there are a number of ways to address this problem, but after playing around with a few of them the easiest and most reusable solution is to use a custom a number conversion directive as recommended in the bug report. 

The following is a convert-to-number directive which essentially parses numeric values to strings for binding and strings to numbers on unbinding:

app.directive('convertToNumber', function() {return {
        require: 'ngModel',
        link: function (scope, element, attrs, ngModel) {                
            ngModel.$parsers.push(function(val) {                    return parseInt(val, 10);
            });
            ngModel.$formatters.push(function (val) {                    return '' + val;
            });
        }
    };
});

To use this directive, you simply add it to the <select> control like this:

<select class="form-control-small"ng-model="view.activeResource.ValueType" 
convert-to-number><option value="0">Text</option><option value="2" >Markdown</option><option value="1">Binary</option></select>

And voila, it works. I now get my list pre-selected again on inbound binding, and my result value after a selection is a number.

Summary

While the solution to this problem is simple enough, this is one of those things that are very difficult to detect and figure out. And even once you figure it out, how the heck do you arrive at the workaround for this? I applaud the Angular team for responding very quickly to the bug report I posted and immediately adding the workaround to the Angular Select documentation which is great. I still wonder though whether I would have thought of looking there to find the workaround if I ran into this.

Again, this is kind of an edge case but I know I have quite a few forms and pages with static selection lists where this issue might crop up. I’m bound to forget so writing it down here  might jog my memory in the future or at least let me find it when I can’t remember that I did…

Related Links

© Rick Strahl, West Wind Technologies, 2005-2015
Posted in Angular  JavaScript  

Right To Left (RTL) Text Display in Angular and ASP.NET

$
0
0

rtlYesterday I got a request for my Westwind.Globalization library about better support for Right To Left (RTL) language editing. The request was a simple one: When editing resources in our resource editor the editor should support RTL display for any locale that requires RTL, which makes good sense. I’m as guilty as the next guy to sometimes ignore forget that not all languages use left to right to display and edit text.

Westwind.Globalization is a bit unique in its use of localized resources in that the front end app ends up displaying any number of resource locales simultaneously since we display all of the localized versions for each resource Id for editing.

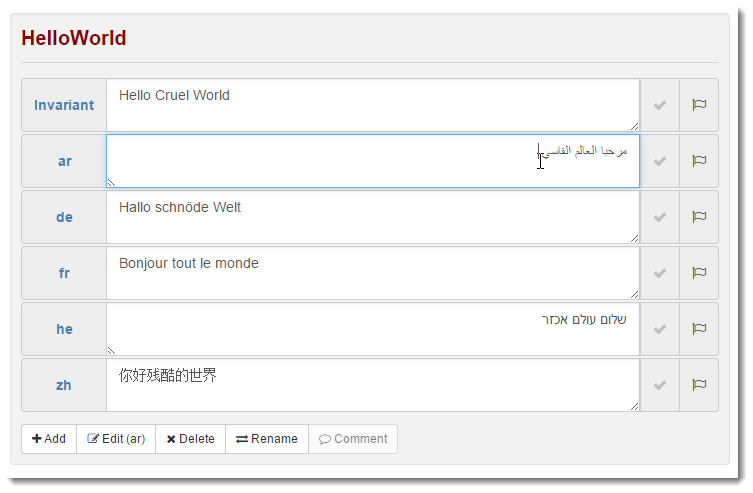
After some experimentation on how to actually provide the RTL information to the client application I ended up with an UI that looks like this:

Notice the Arabic and Hebrew languages showing with Right to Left display and that can be edited that way as well.

ASP.NET RTL Language Detection

So how can you detect Right To Left support? In this Web Resource Editor resources are served from the server running an ASP.NET Web application and the backend has a routine that returns all resources matching a given resource id. So as I navigate resources a service call is made to return an array of all the matching resources. One of the properties returned for each resource is whether the locale Id requires RTL display.

The actual routine that returns a list of resources works like this:

[CallbackMethod()]public IEnumerable<ResourceItemEx> GetResourceItems(dynamic parm)
{string resourceId = parm.ResourceId;string resourceSet = parm.ResourceSet;return Manager.GetResourceItems(resourceId, resourceSet, true).ToList();}

The key is the ResourceItemEx class which is serialized to JSON in the result. Specifically ResourceItemEx contains an IsRtl property looks up RTL status based on the LocaleId using the following code:

public bool IsRtl
{get{var li = LocaleId;if (string.IsNullOrEmpty(LocaleId))
            li = CultureInfo.InstalledUICulture.IetfLanguageTag;var ci = CultureInfo.GetCultureInfoByIetfLanguageTag(LocaleId);
        _isRtl = ci.TextInfo.IsRightToLeft;return _isRtl.Value;    }set{
        _isRtl = value;
    }
}private bool? _isRtl;

This code looks up a Culture by its locale ID and queries the TextInfo.IsRightToLeft property to determine whether the language supports RTL or not which is the set on the internal value. This calculated value is then read for each of the resources, when the resource list is serialized.

Advertisement

The end result is this JSON that is served to the Angular client app:

[
  {"IsRtl": false,"ResourceList": null,"ResourceId": "HelloWorld","Value": "Hello Cruel World","Comment": null,"Type": "","LocaleId": "","ValueType": 0,"Updated": "2015-05-24T02:14:21.4396383Z","ResourceSet": "Resources"},
  {"IsRtl": true,"ResourceList": null,"ResourceId": "HelloWorld","Value": "مرحبا العالم القاسي","Comment": null,"Type": null,"LocaleId": "ar","ValueType": 0,"Updated": "2015-05-24T02:14:21.4396383Z","ResourceSet": "Resources",},
]

This data is consumed by an Angular Service and Controller which eventually binds the data into the HTML UI.

RTL in the Browser

Browsers have Right To Left support using the dir HTML attribute that you can place on any HTML element or container.

<body dir="rtl">

The other options are ltr and auto the latter of which is the default and will be used depending on the user’s current locale configured in the browser.

You can also control RTL using the direction CSS tag:

.rtl {direction: rtl;}

In most applications you are likely to apply explicit text direction either by automatically letting the browser take care of it or setting the value globally at a top level element like  body or html.

However, in my Web Resource Editor I need to display values for multiple locales in a single page so I have to specify the dir attribute (or CSS class that uses the direction style) on particular controls.

When the server returns the list of resources the HTML pages uses an ng-repeat loop to create a ‘list’ of controls that make up each ‘row’ for each resource id that consists of the locale Id label, the textarea and the save and translate buttons.

The RTL setting specifically needs to be assigned to the textarea control, and my first cut of this used a slightly messy Angular expression in the dir attribute:

<textarea id="value_{{$index}}" name="value_{{$index}}"class="form-control"data-localeid="{{resource.LocaleId}}"ng-model="resource.Value"dir="{{resource.IsRtl ? 'rtl' : '' }}"></textarea>

resource in this $scope context is the ng-repeat item that’s the resource item retrieved from the service and resource.IsRtl holds the value to set binding to.

It works and sets the binding properly and I get my RTL bindings for the HE and AR text as shown in the original picture.

Creating a ww-rtl Angular Directive

While the above works fine, it’s kinda messy. You have to write conditional expression and use expression syntax. It turns out that this initial fix wasn’t the only place where this is needed. There are 5 or 6 other places (and counting) that also needed to apply this same behavior, so I figured it’d be nice to build something more reusable.

Ideally I’d want to simple say:

ww-rtl="resource.IsRtl"

The directive takes an expression that should evaluate to a boolean value. If the expression is true the control or element should get the dir=”rtl” attribute set, otherwise the attribute should be removed or blank.

While I’ve been using Angular for a while, I’ve not been creating a lot of directives, so it took me a little bit to figure out exactly how to watch a model value and detect when the model changes. The logic is quite simple actually, but it’s not quite so straightforward arriving at that simple solution due to the quirky API that Angular directives use (and which is why I haven’t been using it a lot).

The ww-rtl directive is essentially a binding directive, meaning that it needs to watch a binding value and then change DOM behavior when the value changes – specifically by applying the dir attribute to the element with the appropriate value.

Here’s the directive:

app.directive('wwRtl', function() {return {
        restrict: "A",
        replace: true,
        scope: {
            wwRtl: "@"},
        link: function($scope, $element, $attrs) {var expr = $scope.wwRtl;
            $scope.$parent.$watch(expr, function(isRtl) {var rtl = isRtl ? "rtl" : "";                $element.attr("dir", rtl);
            });
        }
    }
});

Pretty small… and cryptic, yes?  Let me explain :-)

This creates a directive for ww-rtl (wwRtl), which looks only at attributes (restrict: "A"). The attribute itself is replaced (with nothing in this case). I create a private scope for this control and I bind the ww-rtl attribute to an wwRtl property on the scope.

The meat is in the link() function which sets up a watch that monitors the expression. The expression is the attribute value that I can just grab of the scope ($scope.wwRtl). I can assign that expression to the scope $watch() function which now monitors this expression for changes. Note I use the watch on the parent scope which contains the actual expression to evaluate (resource.IsRtl).

The $watch() function gets a callback whenever the watched expression changes and passes the new value into the callback. This value the result of the evaluated expression – ie. true or false in this case. Based on that value I can now change the elements dir attribute to rtl or blank and voila the Right to Left display of the control will change.

Here’s what the applied directive now looks like:

<textarea id="value_{{$index}}" name="value_{{$index}}"class="form-control"data-localeid="{{resource.LocaleId}}"ng-model="resource.Value"ww-dir="resource.IsRtl">                    </textarea>

And it works the same as the previous code but looks a lot nicer with more obvious intent.

Adding a Resource and RTL

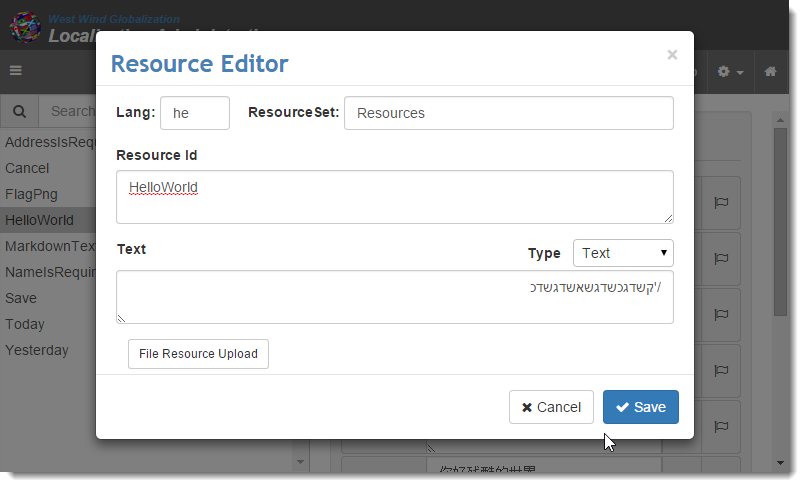
As mentioned there are a few other places where RTL needs to be displayed. For example here’s the Add/Edit Resource form which also displays resource text:

ResourceEditRtl

and I can easily reuse the attribute here. When editing a resource, the ww-rtl attribute works great – I simply bind the existing resource.IsRtl value and it just works.

But – it’s not so straight forward with a new resource. The problem is that the resource.IsRtl property is not set from the server when a new resource is created, so IsRtl is not actually set accurately.

To fix this I added a server callback that’s fired when the use exits the locale field:

[CallbackMethod]public bool IsRtl(string localeId)
{try{var li = localeId;if (string.IsNullOrEmpty(localeId))
            li = CultureInfo.InstalledUICulture.IetfLanguageTag;var ci = CultureInfo.GetCultureInfoByIetfLanguageTag(localeId);return ci.TextInfo.IsRightToLeft;
    }catch {}return false;
}

Note the catch block used in case the user puts in a locale that’s not supported on the server in which case we assume the default mode of LTR is used.

On the client side this is hooked up to a blur operation of the Locale Id text box:

<input type="text" class="form-control"ng-model="view.activeResource.LocaleId"placeholder="Locale Id"ng-blur="view.onLocaleIdBlur()" />

which is then hooked up with this controller method:

vm.onLocaleIdBlur = function(localeId) {if (!localeId)
            localeId = vm.activeResource.LocaleId;

        localizationService.isRtl(localeId)
            .success(function(isRtl) {
                vm.activeResource.IsRtl = isRtl;
            });
    },

The code uses a localizationService that fronts all the $http calls to the backend service which in this case is nothing more than an $http.get() call that handles any errors.

This works great – so now when the user enters a RTL locale ID (or the locale is already set to RTL) the textbox switches to RTL mode. Type an LTR locale and it flips right back to that format.

Simplify?

Using an API callback for this might be overkill. In my application which is an admin interface the overhead of an API call is minor. If it’s not for you you can try to just hardcode the handful of top level locales that are Right to Left:

ar,dv,fa,he,ku,nqo,pa,prs,ps,sd,syr,ug,ur

And cache them in an array. You can then check newly entered locale ids against the values in the array.

If you want to see exactly what specific locales on your machine are available that support RightToLeft you can try running this code (in LinqPad of course!):

void Main()
{foreach(var culture in CultureInfo.GetCultures(CultureTypes.AllCultures)
                       .Where(c=> c.TextInfo.IsRightToLeft))
    {
        Console.WriteLine( culture.IetfLanguageTag + " " + culture.EnglishName);
    }
}

which should give you a good idea what locales require RTL.

Summary

Right to Left display may feel like an edge case for those of using Left to Right displays and I’m as guilty as the next person for not thinking of that when I initially created the Web Resource Editor in Westwind.Globalization. However, it was easy enough to add at least basic editing support for this functionality into the editor along with gaining some better understanding on how to apply RTL in browser based applications.

Resources

© Rick Strahl, West Wind Technologies, 2005-2015
Posted in Localization  Angular  ASP.NET  

Interactive ASP.NET Resource Linking and Editing with Westwind.Globalization

$
0
0

One of the most effective ways to improve localization workflow in an application is to have easy access to resources from within a running application. It’s useful to see your resources, and then be able to click on the resource content and jump directly to editing that resource. Further it’s pretty nice to be able to switch an application into a specific language easily to see the results of localizations immediately.

I’ve been putting the final touches on the next version of my Westwind.Globalization library and one of the last pieces that were rebuilt have been the interactive resource linking features. Westwind.Globalization is a localization library for .NET that allows storing resources in various kinds of databases (MS SQL, MySql, SqLit, SqlCe) which makes it much more dynamic to create, edit and generally manage resources. Because the resources are in a database they can be easily edited and the resource linking feeds into this by making it possible to directly link your Web content to the localization resource administration form and the in-context resource.

This allows not only for localization, but also for basic CMS like features that allow for admin editable user content in the page. Together with the Markdown support for resources as a baked in feature of the library, it’s actually quite easy to build runtime customizable interfaces. It isn’t going to replace a full featured CMS system, but if you have a few pieces of content that need to be user editable in an otherwise custom coded site this can certainly provide that flexibility.

In this post I’ll describe how the resource linking features in Westwind.Globalization work as well as describe some of the logic of how it’s implemented. You might find this useful if you have a need in your own applications to link content quickly to other resources either on the web or in your own applications.

What is Resource Linking?

Let’s start by demonstrating what the resource linking features in Westwind.Globalization look like. Here’s a short animated GIF that demonstrates the typical workflow for resource editing:

The flag icons are links that bring up the Web based resource editor with the selected resource preselected. At this point the resource is in context with the cursor jumping directly to the editable resource text, ready for editing. In this redesign of the Westwind.Globalization the resource editor in particular has gone through a lot of tweaking to make it efficient to use via keyboard, so you can quickly navigate, add and edit resources without taking your hands off the keyboard. For example, pressing Ctrl-Enter saves the current entry and jumps to the next resource entry and tabs/shift tab cycle through the resource entries. If a resource doesn’t exist you’re jumped straight into the Add Resource dialog to add a new resource so no extra clicks to add.

To facilitate turning resource editing on and off in your own pages the library also provides a small JavaScript based button/icon to enable resource editing on the page. You can see the opaque icon on the bottom right of the page, which when clicked turns on the resource links on the page.

Hooking up the Resource Linking

To be clear, the resource linking in the example above does not happen automatically. It relies on at least one extra attribute on an element to designate an HTML element as ‘resource linkable’.

Whether you’re using client side or server side resources you still have to add the actual resource links (ie. Razor tags (@), WebForms Script (<%: %>), or client side binding expressions like Angular ({{ expr }} or ng-bind values) in order for resources to render. If you want resources to be linkable/editable  an additional attribute on either the actual element or a container where you want the edit icon to appear is also required.

The process works by requiring a data-resource-id and data-resource-set attribute to be present on elements. The data-resource-set attribute can exist either on the actual element or on any parent element in the DOM hierachy up the chain. If a data-resource-id  element is found, the a helper function searches out the data-resource-set and then proceeds to inject an element into the page that represents the resource link icon.

For typical pages this means that you can declare the data-resource-set at the body tag or other view level DOM element:

<body data-resource-set="LocalizationForm">

Then for each for the controls you bind you can just wrap the controls with data-resource-id attributes.

Here’s an example using server side Razor syntax in ASP.NET MVC or WebPages:

<body data-resource-set="LocalizationForm"><div class="page-title"data-resource-id="PageTitle">@DbRes.T("PageTitle", "LocalizationForm")</div><span data-resource-id="HelloWorld">@LocalizationForm.HelloWorld</span></body>

The example demonstrates both the string based DbRes resource binding (which can use any configured Resource store including Resx interchangably in any application) and strongly typed resources.

Using WebForms you can use the same approach of marking up either wrapping HTML markup or the actual WebForms controls:

<label data-resource-id="MetaTag"> Meta Tag (meta:resourcekey= lblHelloWorldLabel.Text):</label><asp:Label ID="lblHelloLabel" runat="server" meta:resourcekey="lblHelloWorldLabel"></asp:Label><label data-resource-id="StronglyTypedDbResource">Strongly typed Resource Generated from Db (uses ASP.NET ResourceProvider)</label><span data-resource-id="HelloWorld"><%= Resources.HelloWorld %></span>

This works fine is essentially identical to raw markup. If you are using meta:resourcekey tags, you can also use a custom WebForms control I’ll describe later on, that can automatically generate the data-resource-id link icon for any WebForms control that includes localizable properties.

Using a pure client side interface with AngularJs you can use the following:

<div><p data-resource-id="CreateClassInfo">{{::view.resources.CreateClassInfo}}</p><p data-resource-id="CreateClassInfo2">{{::view.resources.CreateClassInfo2}}</p></div>

You can apply the same mechanism to any other kind of client side template framework. This approach works with HandleBars templates or Ember scripting – heck it works with any kind of HTML. The resource linking can be attached to any HTML elements and works on both client and server side.

Adding resource edit links with data-resource-id is optional. It may not be necessary to expose every resource id this way, but using this declarative client side mechanism you have a choice of whether and where to add the resource editing feature if at all.

Advertisement

Getting the Resource Linking to Work

The markup above on its own doesn’t provide the linking features – a bit of script code and CSS markup is required to provide the logic and display features.

To get resource linking to work you need to do the following:

  • Add the required JavaScript references to your page
  • Add CSS to provide the Resource Link display
  • Enable Resource Editing by calling showResourceIcons()/removeResourceIcons() 
    or use the built in Icon/Button calling showEditButton()
  • Mark up elements to edit with data-resource-id and data-resource-set

Enabling Resource Editing with JavaScript

The JavaScript required to launch the resource edit linking is minimal. There are two approaches.

The first is to just add the resource edit button to the page and let it handle enabling and disabling edit mode (example uses an MVC Razor page):

<script src="//ajax.googleapis.com/ajax/libs/jquery/1.11.3/jquery.min.js" type="text/javascript"></script>@if (allowResourceEditing)
{<script src="~/localizationAdmin/scripts/ww.resourceEditor.js"></script><script>// enable resource editing - button on bottom rightww.resourceEditor.showEditButton(
            { adminUrl: "./localizationAdmin/" }
        );</script>}

This adds the Resource Edit button shown in the animated gif above which is a nice drop in way to get resource editing to work with a one liner.

If you want more control and hook enabling and disabling of resource  linking to your own application logic you explicitly enable and disable the resource linking:

@if (allowResourceEditing)
{<script src="~/localizationAdmin/scripts/ww.resourceEditor.js"></script><script>
        var toggleEditMode = false;
        $("#btnEditResources").click(function() {
            toggleEditMode = !toggleEditMode;if(toggleEditMode)
                ww.resourceEditor.showResourceIcons({ adminUrl: "./localizationAdmin/" });elseww.resourceEditor.removeResourceIcons();
        });</script>}

Here you are hooking the click event of some button that can act as a toggle and call showResourceIcons() and  removeResourceIcons() to toggle the edit state.

Protect Access to Resource Editing

Note the server side allowResourceEditing variable in both implementations. You don’t want the public to edit your site :-) Since resource editing is rather an administrative task you’ll want to isolate the resource editing code so that only admin or otherwise authorized users have access to this functionality.

Adding the CSS

You’ll also need a bit of CSS for the resource link icons, and the edit toggle button/icon. The resource icons are rendered as absolutely positioned and layered transparently on top and slightly above the element that is wrapped which is managed through a bit of CSS.

.resource-editor-icon, .resource-editor-icon:hover,  .resource-editor-icon:visited {position: absolute;display: inline;height: 13px;width: 13px;     text-decoration: none;z-index: 999999;opacity: 0.35;margin: -14px 0 0 -2px;cursor: pointer;
}.resource-editor-icon:hover {opacity: 1;         
}.resource-editor-icon:before {font-family: fontawesome;content: "\f024"; /* flag */font-size: 9pt;color: red;        
}
.resource-editor-button { z-index: 999999;color: white; background-color: DarkGreen;opacity: 0.35; position: fixed;bottom: 10px;right: 20px;padding: 7px 9px 5px 10px; border-radius: 50%; }.resource-editor-button.off {background-color: #b64545; }.resource-editor-button:before{font-family: fontawesome;content: "\f024"; /* flag */font-size: 14pt; }.resource-editor-button:hover {font-family: fontawesome;opacity: 0.65; }

This CSS relies on FontAwesome for the flag icon. However, if you don’t use FontAwesome just remove the FontAwesome font reference and pick any other character:

font-family: arial; content: "#";

The edit resource button is rendered as a fixed position semi-transparent object that stays in the bottom right corner of the screen and is clickable at anytime to toggle the resource edit mode. When clicked resource icons appear and disappear depending on the status and the button itself changes color from green (active) and red (inactive).

How does it work?

Behind the scenes the ww.resourceEditor class is used to retrieve all data-resource-id elements in the page. When it finds one it picks out the data-resource-set and if both of those are available generates a new element into the page which is injected just before the element that holds the data-resource-id attribute. The element is absolutely positioned with the CSS so it sits right on top of the source element in the top left corner.

The generated HTML (minus the comments) looks something like this:

<!-- injected element --><res-edit class="resource-editor-icon"title="Edit resource: Add"></res-edit><!-- original element --><button class="btn btn-sm btn-default ng-binding"title="Add new ResourceSet"ng-click="view.onAddResourceClick()"data-resource-id="Add"><i class="fa fa-plus"></i> Add</button>

I’m using a custom res-edit HTML element for the injected element rather than a link or other official tag to avoid styling interference. This minimizes layout CSS conflicts as much as possible, but it doesn’t eliminate them completely. In testing on a variety of forms and applications I find that in most cases the resource editing works fairly well, shifting things on the page slightly but not drastically. Because the resource editing feature is an optional attribute if there is a problem with a particular control you can always remove the attribute for editing, or create another element that more appropriately represents the proper location in the document if the element is crucial for editing.

The ww.resourceEditor.js that drives this code is installed alongside the LocalizationAdmin interface and referenced from there. You can check out the code on GitHub if you’re curious, but here is the relevant code that creates the resource links and embeds them into the page.

showResourceIcons: function(options) {
    self.removeResourceIcons();var opt = self.options;
    $.extend(opt, options);
    self.options = opt;var set = $("[data-resource-set]");if (set.length < 1) {
        console.log("resourceEditor: No 'data-resource-set' attribute defined");return;
    }var $els = $("[data-resource-id]");if ($els.length < 1) {
        console.log("resourceEditor: No 'data-resource-id' attributes found");return;
    }

    $els.each(function() {var $el = $(this);var resId = $el.data("resource-id");var pos = $el.position();var $new = $("<res-edit>")
            .addClass("resource-editor-icon")
            .css(pos)
            .data("resource-element", this) // store actual base element.attr("target", "resourceEditor")
            .attr("title", "Edit resource: " + resId)
            .click(self.showEditorForm);

        $new.insertBefore($el);
    });

    $(window).bind("resize.resize_ww_resourceeditor",function() {
            ww.resourceEditor.removeResourceIcons();
            ww.resourceEditor.showResourceIcons(options);
        });
},
removeResourceIcons: function () {
    $(window).unbind("resize.resize_ww_resourceeditor");
    $(".resource-editor-icon").remove();
},

The key feature is the element creation where the $new variable is created. The original element item is attached in the data element to provide a reference back to the original control which that the resource id references when the icon is clicked.

When clicked the target routine picks out the data-resource-id and data-resource-set and builds up a link which is navigated with a window.open() call:

showEditorForm: function(e) {
    e.preventDefault();var $el = $($(this).data("resource-element"));var resId = $el.data("resource-id");var resSet = $el.data("resource-set");var content = $el.text() || $el.val() || "";
    content = $.trim(content);if (content && content.length > 600)
        content = "";if (!resSet) {var $resSets = $el.parents("[data-resource-set]");if ($resSets.length > 0)
            resSet = $resSets.eq(0).data("resource-set");
    }

    window.open(self.options.adminUrl + "?ResourceSet=" + encodeURIComponent(resSet) +"&ResourceId=" + encodeURIComponent(resId) +"&Content=" + encodeURIComponent(content),
        self.options.editorWindowName, self.options.editorWindowOpenOptions);
},

Web Forms Support

The original versions of Westwind.Globalization were built in the age of Web Forms, and this new release distances itself a bit from the purely WebForms based approach. Nowhere is this more prominent than in this resource linking functionality. In the past I hooked into the meta-resource key architecture of Web forms which allowed the server side to automatically generate resource links for resources based on the any [Localizable] properties on any given control.

This process worked well at the time, but it’s extremely limited to WebForms for one, and also adds a ton of overhead on the server when resource icons are rendered as the processing has to walk the entire control hierarchy and scan for localizable attributes. Further it’s not always obvious where the resource icons should be displayed since in some cases the Localizable attributes might point at non-visible or related elements. In short, while it was nice for some simple cases there were also a host of problems.

In the new version of Westwind.Globalization you now have a choice between using the same mechanism I described above, of manually marking up HTML or Control markup using the data-resource-id and data-resource-set attributes. Using this mechanism you get full control over where the icons pop up and what they link to. You can decide which resource ids you actually want to link and you can ignore a bunch of the superfluous stuff that is localizable that nobody ever actually localized…

DbResourceControl

If you liked the old behavior using the DbResourceControl which enabled resource editing no a page by walking the control hierarchy, that control is still available, and has been updated to use the new client side attribute syntax for controls. So rather than generating the flag control HTML into the page at render time, the new version only renders the attributes on the relevant controls.

To use this you can add the localization control to the bottom of your page:

<loc:DbResourceControl ID="DbResourceControl1" runat="server" EnableResourceLinking="true" />

You still need to add the JavaScript scripts and edit activation code as before:

<script src="LocalizationAdmin/bower_components/jquery/dist/jquery.min.js"></script><script src="LocalizationAdmin/scripts/ww.resourceEditor.js"></script><script>ww.resourceEditor.showEditButton(
        {
            adminUrl: "./localizationAdmin"}
    );</script>

Then any ASP.NET controls on a page  are automatically marked up with data-resource-id and data-resource-set attributes:

<div class="form-group"><label class="control-label" for="form-group-input"><asp:Label runat="server" ID="lblName" Text="Name" meta:resourcekey="lblName" /></label><asp:TextBox runat="server" ID="txtName" Text="" class="form-control" /></div><div class="form-group"><label class="control-label" for="form-group-input"><asp:Label runat="server" ID="lblCompany" Text="Company" meta:resourcekey="lblCompany" /></label><asp:TextBox runat="server" ID="txtCompany" Text="" class="form-control" /></div><div class="well-sm well"><asp:Button runat="server" ID="btnSumbit" Text="Save"  meta:resourcekey="btnSubmit"CssClass="btn btn-primary" /></div>

The resource control will automatically pick up any ASP.NET control and add links to it, whether meta-resourcekey values are assigned to it or not. The generated icons will default to a .Text property if it exists, and otherwise use the first localizable property available.

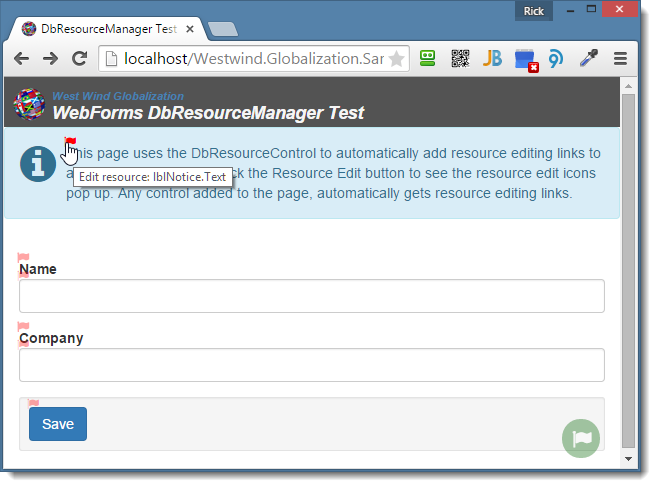
Here’s what the above form looks like including the resource linking toggle and resource editing icons activated:

WebFormsResourceEdit

Note that using the DbResourceControl is totally optional. If you want you can use the same explicit resource markup syntax described earlier and as shown for MVC applications, by explicitly marking data-resource-id attributes on your controls or containers. This is more effort, but it gives you more control.

If you are heavily use meta-resourcekey attributes for your localization bindings, then using the DbResourceControl can be useful, but if you are using other mechanisms (like strongly typed resources) in your WebForms apps, then using direct data-resource-id is a better choice.

Summary

Efficient resource linking and editing can make for a much easier workflow when localizing applications. The ability to see resources in real time as you are editing them and what effect they have on the user interface can be an invaluable tool to make you more productive in your localization process.

When I redesigned this library my goal was to make the process of editing resources easy and efficient so that localization becomes a bit less of a pain both during development when getting the localizable content set up, as well as later on actually localizing that content. The goal has been to optimize the workflow and I hope that this has been accomplished in this iteration of the tool…

Resources

© Rick Strahl, West Wind Technologies, 2005-2015

How to manage Content in NuGet Packages?

$
0
0

As many of you have probably noticed I’ve been preoccupied the rewrite/repackaging of my Westwind.Globalization library of late and I’m trying to make this library more approachable and easier to get started with. One thing I’ve been struggling with over this beta period is how to best lay out the NuGet packages to make the library as easy as possible to use and get started with while also making it reasonably maintainable.

One of the things to make it easier to get started has been to provide some ‘starter’ content as part of the NuGet package. That is provide a sample page along with a small set set of sample resources that can be imported and let new users both test whether resource loading from the database is working as well as letting her play and see the localized data actually working with the ability to make changes and see the changes reflected in the running application immediately.

You may have noticed the question mark in this post – this means that I’m especially looking for some insights, discussion and ideas how to best approach how to break out the packages  for this library. I have a plan and I’ll talk about it, but it’s not set in stone so if you have any insight or suggestions I would love to hear about it in the comments.

West Wind Globalization current Package Layout

To set the stage here let me describe the current package layout of Westwind.Globalization. Currently there are two NuGet packages:

  • Westwind.Globalization
    This is the core package that contains the custom database .NET ResourceManager, the core Database access manager API that deals with serving ResourceSets as well as providing the resource editing and management functionality. There are also libraries for importing and exporting Resx resources and creating strongly types classes etc. In essence it’s all the core, non-Web functionality that can work in any type of .NET project including MVC and Web API projects that don’t use the Web Resource Editor.
  • Westwind.Globalization.Web
    This is the ASP.NET Web specific package that contains two separate ASP.NET ResourceProviders, support for the localization administration Web Resource Editor, as well as some WebForms specific features to support meta:resourcekey bindings and a design time resource provider. This package currently also includes the above mentioned sample page and Resx resource files that can be imported into the resource editor.

Take 1 – Include the Data in one of the main NuGet Packages

I’m pretty sure the current package layout is not going to last.The ‘core’ package is fine – it contains only an assembly with the core functionality that will work in any project. If you’re using a non-Web project, or an MVC project where no ASP.NET resource Provider is used and you don’t need the Web Resource Editor the Core package alone works. Clean, simple, minimal and no fuss.

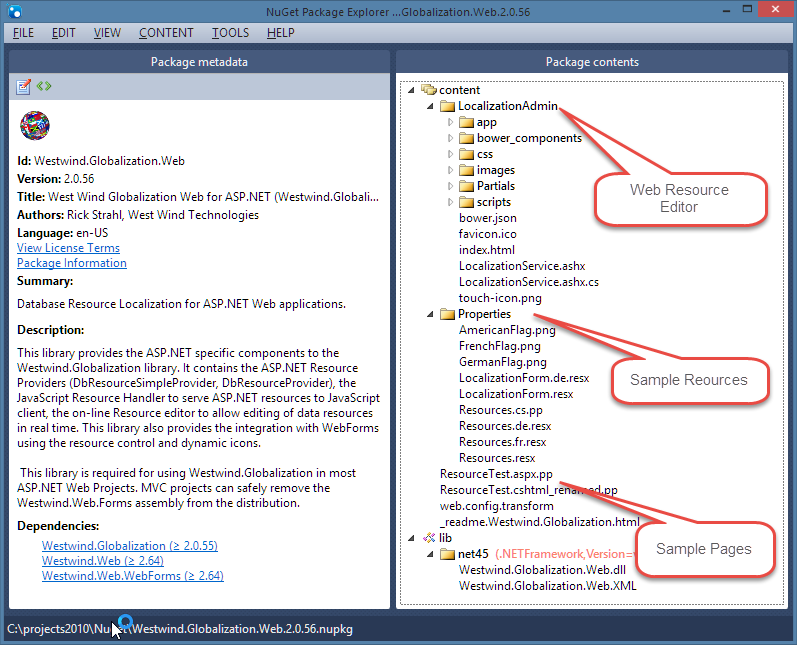
The Web package is the problem child. It’s the one that adds all this ‘additional’ content. Specifically if you look at the package layout I have this:

NuGetPackage

IOW – that’s a lot of ‘extra’ content for a NuGet package.

Pros:

For new projects and getting started it’s obviously very nice to have everything in one package – you install one package and everything you need is there. There’s no searching around trying to find the ‘right’ package, it’s just there.

Cons:

There’s a lot of ‘clutter’ obviously. A lot of stuff gets added to your project – a lot of stuff that you probably will have to remove after you’ve done your initial installation. But even worse with the package layout like this if you delete say all the sample content, and then later do a NuGet Update-Package all that content is restored right back into your project.

Advertisement

Take 2 – A Starter Package

My current thinking is to create a third package – a Westwind.Globalization.Web.Starter package that contains only the sample content. The idea is that you would typically install the starter package into Web projects once, then remove the Westwind.Globalization.Web.Starter package from packages.config and then never see the sample content again during updates or reinstalls. Developers that have used the library before then also don’t have to deal with the extra content as they can just install the raw .Web package.

Note that I would still leave in the LocalizationAdmin interface which is essentially a self contained Web application. I consider it an integral part of the Westwind.Globalization.Web library and I think it belongs into a new project (more on this below). Since the package is geared to be placed into a Web I expect that most if not all people using the library will be using the Web Resource Editor so I think that’s a fair assumption.

Pros:

Allows for cleaner updates (once the starter package is removed). Developers who are experienced don’t have to install the starter package and don’t have to clean up their projects.

Cons:

I have to make sure that I steer new users to the Starter package and explain that they can remove the starter package from packages.config (can’t do this from the NuGet browser as that would uninstall the dependencies as well). Extra maintenance overhead for the extra package as you want to keep the version numbers in sync (even if nothing changes in the content of the package.

Moar???

This is where I’m curious for feedback :-) How do you manage NuGet packages that hold a lot of content? What would you like to see as a consumer of NuGet packages which is probably the most important point.

There’s a fine line between not enough abstraction and too much clutter.

Should this library be broken up into even more packages? Break out the WebResourceEditor as a separate package so all content is sparated out completely from the .Web package? Or does that just create a NuGet package hell?Personally I have to say I’m not a huge fan of libraries with a ton of NuGet references. You know the ones where you do a search for the library in the NuGet browser and you find two pages worth of libraries that pop up with no clear idea which one to load. Ok this isn’t that bad, but you get the idea. It’s nice to have just one thing to install, but there are trade offs obviously. I personally am not a fan of NuGet packages that I install where 5 other packages are pulled in where you often don’t have any idea exactly what they do and what dependencies they have.

For me there’s also the matter of maintaining a bunch of NuGet packages. Making a change to packages up the chain often requires that you rebuild them to ensure the latest versions of packages are loaded for the dependencies (because of NuGet’s inability for options to automatically pick the highest version which sucks).

NuGet really isn’t well suited for content because it does a terrible job of letting you put in content only once and once the content is there does a terrible job updating stuff (some stuff gets updated other stuff is left alone because it has changed – which can be very unpredictable with the only reliable way to update content being deleting the content then updating).

I appreciate any input for discussion…

© Rick Strahl, West Wind Technologies, 2005-2015

Strongly typed AppSettings Configuration in ASP.NET 5

$
0
0

ASP.NET has long had an AppSettings style configuration interface that you see used by most applications. AppSettings in current versions of ASP.NET (4 and prior) is based on very basic string based key value store that allows you to store and read configuration values at runtime. It works reasonably well if your configuration needs are simple, but it quickly falls apart if your configuration requirements are more complex. The biggest issues are that by default you have access to the ‘AppSettings’ key only – with a bit more verbose of a syntax to access other sections. The other big downfall of this tooling is that the values stored have to be strings when often configuration values need to be at the very least numeric or logical values that have to be converted.

New Configuration System in ASP.NET 5

The configuration system in ASP.NET 5 has been completely overhauled and entire web.config/app.config mechanism has been thrown out in favor of a new pluggable system. The default configuration implementation uses a config.json file as storage, but the system is pluggable so other providers can be used instead as well as at the same time. For example, the default project template uses both config.json and environment variables, the latter of which override values in the .json file.

Default AppSettings

A new stock ASP.NET 5 project created with Visual Studio comes with a default AppSettings class which is meant to replace the old AppSettings functionality. Let’s start by looking of how this is hooked up.

Configuration settings are represented by a class that is mapped to configuration values that are stored in the configuration store. By default this store is a JSON file, but it can come from a number of sources. Here’s the default AppSettings class:

public class AppSettings{public string SiteTitle { get; set; }}

You can add properties to this class and those properties then become configuration values that you can match in your configuration file which by default is config.json – again with  default settings here from  a new project:

{"AppSettings": {"SiteTitle": "WebApplication2",},"Data": {"DefaultConnection": {"ConnectionString": "Server=(localdb)\\mssqllocaldb;Database=aspnet5-WebApplication1-414415dc-a108-49f3-a5e3-fdc4cf24ef96;Trusted_Connection=True;MultipleActiveResultSets=true"}
    }
}

The properties of the AppSettings property in the config.json are mapped to your AppSettings class.

Hooking up Configuration

As most system components in ASP.NET 5, configuration is hooked up via dependency injection and configured during startup of the application. It starts in the Startup class with the Startup method which is the entry point to any ASP.NET 5 application and configures basic feature support:

public class Startup{
public IConfiguration Configuration { get; set; }
public Startup(IHostingEnvironment env) {// Setup configuration sources.var configuration = new Configuration() .AddJsonFile("config.json") .AddJsonFile($"config.{env.EnvironmentName}.json", optional: true); configuration.AddEnvironmentVariables(); Configuration = configuration; }

}

Here the configuration provides is set up and support for Json file and Environment variable storage is defined. Notice that there are also two configuration files, the config.json and config.[Environment].json where

Once the application is bootstrapped, the ConfigureServices method is fired in the same class which is used to essentially hook up and configure  behavior of various components. One of the things you can do in this method is to map configuration values to a configuration class.

public void ConfigureServices(IServiceCollection services) {// Add Application settings to the services container.services.Configure<AppSettings>(Configuration.GetSubKey("AppSettings"));

… }

This code basically maps the AppSettings configuration key to an instance of your configuration class. You can map more than one configuration class here so it’s possible to make your configuration more modular – think of this like separate configuration sections in the old style.

Advertisement

Using Configuration Values

If you now want to use configuration values in your application you can inject the value into your code or Razor content.

This example injects AppSettings into a Controller:

public class HomeController : Controller{private IOptions<AppSettings> AppSettings;public HomeController(IOptions<AppSettings> appSettings)
    {
        AppSettings = appSettings;
    }public IActionResult Index()
    {string siteName = AppSettings.Options.SiteTitle;return View();
    }
}

which is likely the most common scenario on how you would use a configuration object in your Web code. From here you can pass the AppSettings into view if required.

Injecting AppSettings into a View

You can also inject AppSettings directly into a view using the new @inject tag (although that seems dubious at best) and in fact that’s what the Shared _layout template does by default:

@inject IOptions<AppSettings> AppSettings<!DOCTYPE html><html><head><meta charset="utf-8" /><meta name="viewport" content="width=device-width, initial-scale=1.0" /><title>@ViewBag.Title -@AppSettings.Options.SiteTitle</title>

It injects the AppSettings class and uses the Options to display the Site title in the header. I suppose the injection in this case makes sense since the _Layout template doesn’t have an explicit model associated, but for any other type of view I’d recommend passing any configuration object as part of your model rather than injecting it.

Adding additional Configuration Values

If you want to add additional configuration values, you simply add a new property to your configuration class and add a key to the config.json file.

Add the property:

public class AppSettings{public string SiteTitle { get; set; }public int MaxListCount { get; set; } = 15;
}

and also add the value in the config.json:

{"AppSettings": {"SiteTitle": "My Lovely Application","MaxListCount":  20
    }}

Technically you don’t have to add the value in the file, but you should make sure that the two match.

Then if you want to access this value in your code you should be able to do:

public IActionResult Index()
{string siteName = AppSettings.Options.SiteTitle;int maxItems = AppSettings.Options.MaxListCount;  // 20return View();
}

and you should get a value of 20 based on the value we have stored in the config file. Note that the value is a number and automatically converted for you unlike in the old ASP.NET configuration system.

Nested Configuration

Ok strongly typed configuration is nice for simple types, but it’s even nicer if you are dealing with more complex configurations. You can create nested types for nested configuration storage. So for example we could change AppSettings to:

public class AppSettings{public string SiteTitle { get; set; }public int MaxListCount { get; set; } = 15;public ThemeOptions ThemeOptions { get; set; } = new ThemeOptions();
}public class ThemeOptions{public string ThemeName { get; set; } = "Default";public string Font { get; set; } = "'Trebuchet MS','Trebuchet','sans serif'";
}

and our config.json to:

"AppSettings": {"SiteTitle": "My Lovely Application","MaxItems": 20,"ThemeOptions": {"ThemeName": "WaveBot","Font": "'Helvetica Neue',Arial,'sans serif'"}
},

Then to use it in our HomeController:

string theme = AppSettings.Options.ThemeOptions.ThemeName; // WaveBot

Nice.

Adding a new Configuration Class

Having a single configuration class works, but sometimes you need more than a single piece of configuration. If you’re building a self-contained component for example, you won’t want to mix in your configuration settings with the standard AppSettings – it’s much cleaner to have a completely separate configuration key.

To do this we first need a new class. Here’s an example:

public class LoggingConfiguration{public LogModes LogMode { get; set; } = LogModes.TextFile;public string LogFile { get; set; } = "~/logs/ApplicationLog.txt";public string ConnectionString { get; set; }public int LogDays { get; set; } = 7;
}public enum LogModes{
    TextFile = 0,
    Database = 1,
    XmlFile = 2
}

Now we need to register this class as a configuration source in the ConfigureServices code in Startup.cs so ASP.NET knows about it and can inject the class:

public void ConfigureServices(IServiceCollection services)
        {// Add Application settings to the services container.services.Configure<AppSettings>(Configuration.GetSubKey("AppSettings"));            services.Configure<LoggingConfiguration>(Configuration.GetSubKey("LoggingConfiguration"));

Then I need to add the key to my config.json:

"LoggingConfiguration": {"LogMode": "XmlFile","LogFile": "~/logs/MyApplicationLog.xml","ConnectionString": "","LogDays": 10
},

Next I need to inject into my point of use – the Controller in this case:

private IOptions<AppSettings> AppSettings;private IOptions<LoggingConfiguration> LoggingConfiguration;public HomeController(IOptions<AppSettings> appSettings,IOptions<LoggingConfiguration> loggingConfig)
{
    AppSettings = appSettings;
    LoggingConfiguration = loggingConfig;
}

And finally I can use the values in my controller code:

string logFile = LoggingConfiguration.Options.LogFile;int days = LoggingConfiguration.Options.LogDays;

And voila – we now have our custom configuration values and even a custom configuration object.

But, hold on – not so fast. There is a problem…

Enums are not Serialized

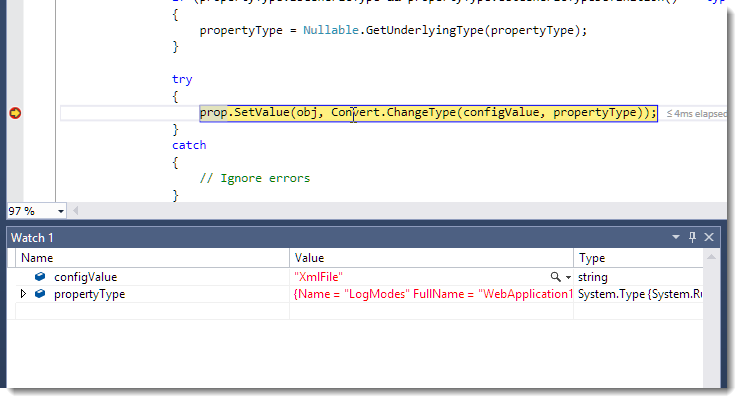
Above I mentioned that serialization from JSON is capable of strongly typed values – and that’s not entirely true. This enum value:

var mode = LoggingConfiguration.Options.LogMode;

is not properly deserialized. The mode value in this case always comes up with the default value set as the class property default (TextFile).

Unfortunately, this is a bug (in beta4) in the runtime code and unless you want to dig into runtime code and modify it we’re stuck with this behavior. For now – if you don’t want to change anything – stay away from enum values but it looks like this issue is fixed for the next beta/rc release.

In my next post I’ll describe how we can track down this runtime bug, fix it and actually apply it to the running application.

Other Configuration Sources

The JSON configuration is the most obvious configuration store because it actually shows up in your project as a file. But you can also use other configuration stores like EnvironmentVariables, INI files and a UserSecrets store. You can also build your own by extending the configuration interfaces which are relatively easy to create.

Configuration sources are applied only if you configure them as part of the startup configuration. For example, in this application I added:

var configuration = new Configuration()
    .AddJsonFile("config.json")
    .AddJsonFile($"config.{env.EnvironmentName}.json", optional: true);if (env.IsEnvironment("Development"))
{// This reads the configuration keys from the secret store.
    // For more details on using the user secret store see http://go.microsoft.com/fwlink/?LinkID=532709configuration.AddUserSecrets();
}
configuration.AddEnvironmentVariables();

Configuration providers are cumulative and last one that has a match wins. So if I configure my JSON.config file with SiteName but then add an environement variable with the key I’m looking for the environment variable wins – that’s the value used.

How does this work?

Behind the scenes the configuration system consists of two major components: the configuration provider whose responsibility it is to capture the configuration values as key value pairs, and an OptionsModel that essentially exposes that dictionary as the strongly typed object source (or key values) that you created.

In your application you typically interact only with the IOption<T> instance of the strongly typed class you provided – the raw IConfiguration class is not injectable by default and I couldn’t see an easy way to get access to this raw store of the parsed configuration data. The configuration class is typically accessible only during startup configuration where you’ll see the string based path syntax used, while in application code you are likely to see the injected IOption<T> strongly typed values instead.

So typically you get a hold of the configuration via injection of the options:

public HomeController(IOptions<AppSettings> appSettings,IOptions<LoggingConfiguration> loggingConfig)

The Options object is populated when the application starts, and unlike classic ASP.NET applications, changes to config.json or any other of the configuration files don’t automatically restart the Web application with the changes applied.

You might think that it would be easy to parse a JSON object to an a model class, but that’s not how the system actually works. Instead the input configuration source is parsed into a string dictionary first. For the JSON provider this means parsing the JSON object into a tokenized JSON list (using Json.net’s JsonReader) and then creating the keys for each of the non-complex properties.

Internally configuration information is initially stored as a string dictionary that represents keys as a ‘path string’ in the format of:

AppSettings:SiteTitle
AppSettings:ThemeOptions:ThemeName

You essentially build a configuration ‘path’ that describes the same structure you’d see in a config.json file replacing each . with a :

{"AppSettings": {"SiteTitle": "My Lovely Application","MaxItems": 20,"ThemeOptions": {"ThemeName": "WaveBot","Font": "'Helvetica Neue',Arial,'sans serif'"} },"LoggingConfiguration": {"LogMode": "XmlFile","LogFile": "~/logs/MyApplicationLog.xml","ConnectionString": "","LogDays": 10 },

}

Because the data is parsed into string keys and values first, it’s possible to present the layout with just about any provider. So with environment variables you can declare an environment variable like this:

SET DATA:APPSETTINGS:THEMEOPTIONS:THEMENAME=Console
dnx . web

In a live environment you’d either setup these environment variables as part of your global configuration or you set them as part of a startup command script you run before the application is launched from the command line with dnx . web for example.

If you’re debugging inside of Visual Studio with IIS Express there’s a Debug option that allows you to set environment variables as part of the startup:

EnvironmentVars

If you’re on a live standalone server you can set system level keys, as you can on Azure by setting the values in the Azure Portal for your Web application. Be careful if you end up using global environment variables so that you don’t duplicate keys!

Environment variables are useful for some override scenarios but I don’t think they are a great solution for most configuration options. I’d consider using them only for overriding configuration values that are otherwise set in a common configuration. Curious to hear other use cases where environment variables make sense.

User Secrets Store

The ASP.NET runtime also includes a user secrets store which is a command line tool that adds values to a machine only store. The only way to get values in and out of that service is via a command line tool that uses a secret key which is great for configuration values that are user or machine specific and should not be shared in source control. You have to explicitly add the values and those values.

You can find out more about how this works on the GitHub documentation page for the DNX Secret Documentation. Personally I had issues getting the tool to work – I kept getting errors related to a missing assembly on Beta4. But I’ve had this working in previous versions so this is likely just a glitch in my configuration.

Summary

These configuration changes are a big improvement over the old string only configuration system. Having strongly typed POCO resources to hold configuration information is the way to go. In the past I’ve used my Westwind.ApplicationConfiguration library for providing many of the same features (and a bit more), and I’m happy to see that I probably can retire that library and just use the existing config system in ASP.NET 5 now.

There’s a little more complexity here and as with anything in ASP.NET 5 you have to deal with the dependency injection to get the values into your app. There’s also some inconsistency with how you use the config values between the startup confguration (string paths/values) vs the strongly typed classes that are injected. While all of this works just fine for ASP.NET applications, I’m not so sure that it will work so well if you need to build configuration features into your own components where you might not so easily have access to the DI features – it’ll bear some experimenting.

Overall I like what I see and the way configuration works now addresses most of the complaints I’ve had about the AppSettings API that existed in older versions of .NET natively.

Although I ran into that Enum bug I mentioned, that’s a bug that’s already addressed in future releases. In my next post I’ll describe how to drill into the problem runtime code, fix it in the beta 4 build I’m using and then use it in my own application. Until then…

© Rick Strahl, West Wind Technologies, 2005-2015
Posted in ASP.NET vNext  ASP.NET  

IPad Scroll Issues with Fixed Content

$
0
0

scrollimageI’ve run into problems with scrolling <div> tags with iOS Safari on a number of occasions and each time, I end up wasting untold amounts of time. In typical mobile apps I create, I tend to have a header area, a content area and in some cases a footer area. The content area is wedged between the header and the footer (or the bottom of the document if there is no footer) and the content needs its own scroll functionality rather than what the built-in browser scrollbar provides.

To make this work I use absolutely positioned headers and footers (if used – typically for phone sizes only) using ‘fixed’ styling.

All of this works great in desktop browsers and just about any mobile browser. It works fine even on an iPhone, but when running on an iPad more often than not (but not always – apparently it depends on the type of content) the content area will simply not scroll.

When it happens the content appears to ‘stick’ where the page behaves as if there where no scrollbars at all – not on the page or the content area. No amount of rotating and refreshing makes it work. Oddly though it’s not every page using the same scrollable content container layout. The content styling on the container is applied to most pages in the application, yet frequently the failure occurs only on a few or even just one of the content pages – even though the content is hosted in the same freaking scrolling container.

positions:fixed and –webkit-overflow-scrolling

As I’ve written about before, iOS doesn’t do smooth <div> tag scrolling by default. In order to get a div to scroll you have to use the –webkit-overflow-scrolling: touch style to force scrolling to work smoothly. Most reasonably modern mobile browsers (ie. Android 4.x and newer and even Windows Phone) do just fine with smooth scrolling by default, but iOS and old Android browsers need this special CSS hint to avoid the extremely choppy default scrolling.

According to rumors Apple does this on purpose to discourage custom scroll schemes in browsers to more or less force usage of the stock browser scrollbar. The reasoning is that the stock scrolling is very efficient while custom scrolling is supposed to be confusing and also is a resource hog for battery life. Whatever the reasoning – the behavior sucks when you run into it and while I can appreciate the ideology behind it, it’s just not realistic to expect that you won’t need quality custom scrolling in a mobile Web app.

The problem with using ‘stock’ scrolling is that applications that use sticky headers can’t effectively use the stock scrollbar, especially if the app also has to run on the desktop where the scrollbar is a big content hogging control and it just looks plain wrong to have a scrollbar next a non-scrolling region.

So in most applications headers tend to be created as ‘sticky’ elements that take up the width of the viewport, with a scrollable content area that contains the relevant content for the application.

For typical content that might look like this:

.content-container {position: absolute;left: 0;top: 80px;bottom: 1px;width: 100%;z-index: 11;overflow-x: hidden;overflow-y: scroll;-webkit-overflow-scrolling: touch;
}

Now if you also end up using a fixed header you might add something like this:

.banner { position: fixed;
top: 0;
left: 0;
height: 58px;
width: 100%;
background: #7b0105;background-image: linear-gradient(to bottom, #7b0105 0%, #b8282c 100%);color: #e1e1e1;border-bottom: solid 1px #7b0105;
padding-top: 7px;
z-index: 9999; }

Notice the position: fixed style, which would appear to be the most obvious thing for sticky headers.

Now all issues of positions fixed aside, the above actually worked just fine for my application on every browser except on an iPad. And then only on a few content pages. The above is basically a base container layout into which other content is loaded for each page. In this case Angular views inside of the content-container element. Out of 10 pages though 2 of them would fail to scroll properly. Bah…

Remove or Override –webkit-overflow-scrolling

After doing a bit of research I’ve found that there are many problems with scrolling on iOS and most of them are related to the use of –webkit-overflow-scrolling. Countless questions regarding the ‘sticky’ scrolling and ‘stuck’ scrolling which I’m referring to here where you try to scroll the div and instead the entire page tries to move up – it appears as if the entire document is clipped without scrolling enabled at all.

The first – unsatisfactory – solution was to remove the –webkit-overflow-scrolling style (or setting it to auto) from the CSS class and the problem pages would become ‘un-stuck’. But unfortunately the scroll behavior went to shit as well as the nasty choppy scrolling returned.

This might be a reasonable solution if the content you’re trying to work with doesn’t need to scroll very much. If you only need to scroll a single screen or less, this might be just fine. However, if you have longer content that scrolls more than a screen the default scroll choppiness is really unacceptable so this is not going to work.

Use position:absolute instead

The better solution however is to  simply replace position:fixed with position:absolute if possible.

Position fixed and absolute are somewhat similar in behavior. Both use x,y positioning in the view port and both are outside of the DOM document flow so other content is not affected by the placement of containers. Both require zIndex positioning to determine vertical priority in the view stack.

Position fixed keeps the element pinned at whatever position you set it to regardless of the scroll position of the browser. This makes sense in some scenarios where you actually want to scroll the entire page but leave content in place. The key to remember is to not use it when you build have your own scrollable content on the page.

It turns out in my case I don’t really need position:fixed because I manage the position and size of the container and toolbar headers and footers myself anyway. I know where everything is positioned and keep the content area effectively wedged in the middle of the statically sized elements. By way of CSS and media queries I can force the header to the top and the footer on the bottom using fixed sizes which means I can safely use position:absolute.

And yes by simply changing the position:fixed to position:absolute in the header:

.banner {position: absolute;…

}

My problem that I spend an hour trying to work around was resolved.

It’s a simple, but non-obvious solution and I’m not the first to discover it. But it also wasn’t one of the solutions I ran into while searching either at least not an easily discovered one.

In most cases when you’re doing mobile layouts you can probably get just fine by using position:absolute instead of position:fixed because you’re bound to control the viewport positioning of the top level container elements yourself. And if you really need fixed positioning, you can often use JavaScript to force the content to stay in position. And anywhere else but at the top level position:fixed doesn’t really make sense.

One place where position:fixed comes up a lot  is with the Bootstrap CSS framework. Bootstrap uses position:fixed for header and footer navbars and you can easily run into the issues described here using default Bootstrap layouts. I avoid the Bootstrap headers and footers, but the fixed positioning is just one of the many problems I’ve had with them. However, I have fallen prey to copying part of the Bootstrap header styling which is probably why I ended up with position:fixed in the first place when I created my custom headers. Live and learn.

I hope by writing this down this time I might burn this lesson into my brain as I’ve discovered this very problem before and forgot it about it, only to struggle with it again. Hopefully this post will jog my memory next time, and maybe some of you find this a useful reminder as well…

Related Resources

© Rick Strahl, West Wind Technologies, 2005-2015
Posted in CSS  HTML5  

Using and Debugging External Source Code Packages in ASP.NET 5

$
0
0

bugIn my last ASP.NET 5 post I talked about using the new strongly typed Configuration system in ASP.NET 5. While I was working with the example code, I ran into a DNX runtime library bug that caused Enum values to not get parsed properly from the configuration data into the strongly typed classes. My first instinct was to take a look and see why this particular code wasn't working.

One of the really cool aspects of the new DNX runtimes is that project dependencies are loaded from  'packages', and these packages can be either loaded from NuGet or from a source code location. As long as the source code follows the packaging rules – a root src folder with src with subfolders that contain project.json files – those packages in the folder can be discovered and used directly from source code, just like a package downloaded from NuGet. Thanks to the Roslyn compiler technology, compilation is now fast enough to make it possible to compile code on the fly, and that's what makes it possible to go directly from source code to executing in memory code without a requirement for intermediate physical assemblies.

Now that ASP.NET is fully open source, we can pull down a project from GitHub as source code, point the project package configuration to look at the root folder and then add the package as source code in your own project. Once you do this you can use the debugger to step into the code and even make changes to the underlying code – the project essentially becomes part of your own project. This takes the sting out of trying to check out external source code in your own applications.

In this post I'll demonstrate how you can debug and change an external Microsoft package from source code and integrate it into your own project with only a few simple steps. The cool thing about this – in terms of what we're used to in full framework .NET – is that this is soooo much easier to do with the DNX and this feature opens up a host of new capabilities and potential for much richer sharing of code.

Let's see how this works.

Setting the Stage – A Bug in Microsoft Runtime Library Code

So to set the stage here in my last post I was talking about strongly typed configuration values and I had set up a strongly typed class with some complex configuration values in the class. DNX can map the configuration store values from the source store to the strongly typed classes. However, I ran into bug in one of the Microsoft runtime libraries as  I found that Enum values were not properly parsing from the config file.

To sum it up: I have a configuration class like this:

public class LoggingConfiguration{public LogModes LogMode { get; set; } = LogModes.TextFile;public string LogFile { get; set; } = "~/logs/ApplicationLog.txt";public string ConnectionString { get; set; }public int LogDays { get; set; } = 7;
}

I then inject the configuration class into a Controller class:

public HomeController(IOptions<AppSettings> appSettings,IOptions<LoggingConfiguration> loggingConfig)

and then try to read it from within the controller code:

var mode = LoggingConfiguration.Options.LogMode;string logFile = LoggingConfiguration.Options.LogFile;int days = LoggingConfiguration.Options.LogDays;

For more info on how this all works see the previous article, but long story short all configuration values properly set from the config.json file that holds the custom config values, except for the Enum value which is never set from the config file. There's a bug in beta4 that fails to parse the Enum value.

Let's see what the problem is by looking at the source code.

Advertisement

The Hard Part – Finding the right Project

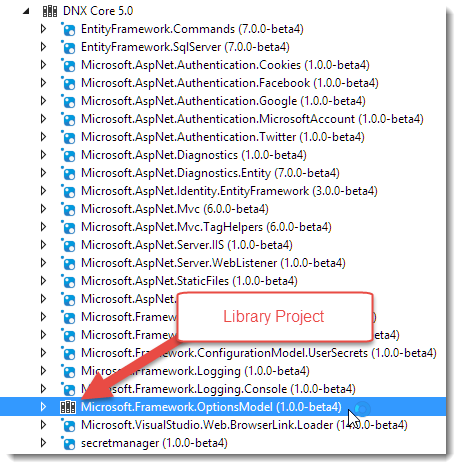
So I know the problem is in one of the Microsoft runtime libraries. It would seem logical that you find the code for this in the Configuration project. This is where I started, but after browsing through the source code I quickly found that it doesn't contain anything related to actual assignment of resources. The Configuration pieces deal with retrieving content from configuration stores and parsing them into key value pair based dictionaries. The actual project that holds the code responsible for taking the dictionary data and assigning it to an options model is the Options project. Yeah, totally obvious that!

I managed to find the code by guessing at a few projects and doing a search – in this case for SetProperty() (initially) and SetValue(). Like I said finding the right project to import is the hardest part and the best way to find is likely to blast out a question on Twitter and have somebody from the team tell you were stuff lives or else plan spending a while browsing source code and guessing at where stuff lives.

Downloading the Source Code Project

With the hardest part out of the way and the right project in place lets see how we can use that project in our code. First clone or fork the project from GitHub.

git clone https://github.com/aspnet/Options.git

which gives you a local copy of the project.

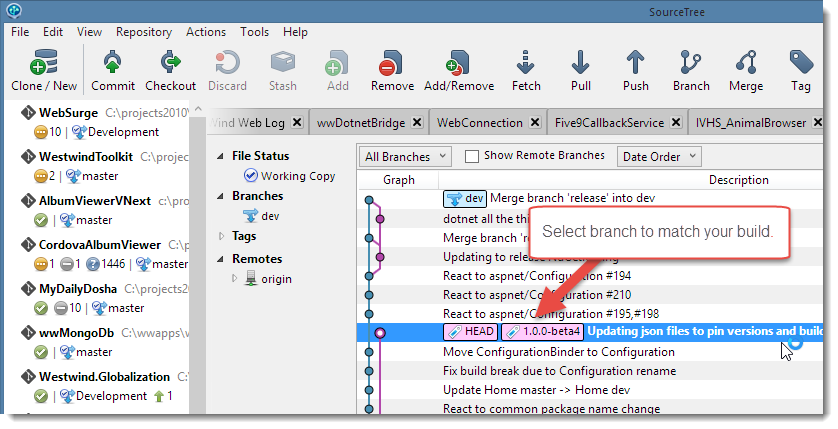
Because these libraries are actively worked on you'll want to switch to a version of the branch that matches the version you're running with in my case the Beta 4 tag. The ASP.NET team is tagging milestones so it's easy to jump to the correct place in the repository by jumping to that tag. In the future you may be able to more easily use newer branches but in this case there has been a complete overhaul of the options library and the newer code would not run.

So to switch to the right code base switch to the beta 4 tag:

Branches

Or from the Command Line:

git tag -l

to list all tags and find the Beta 4 tag:

git checkout tags/1.0.0-beta4

And I'm now on the active codebase that matches the version I'm running.

Linking the Source Code to your Project

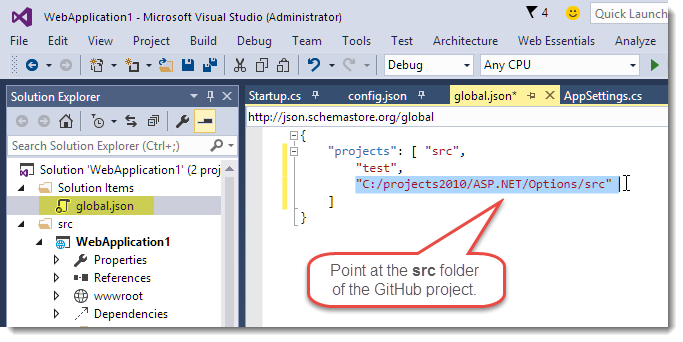
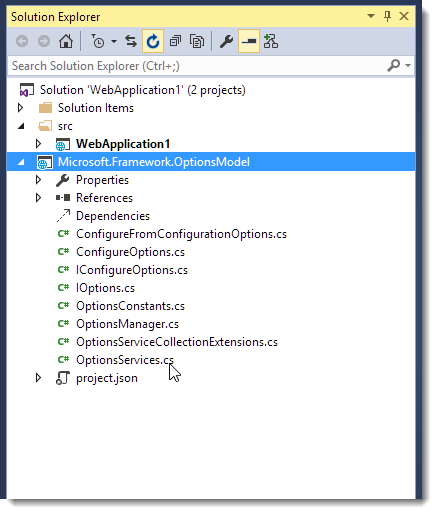
If you want to add the library into your project now you need to first establish a project link by pointing at the src  folder of the package. Note that the src folder can contain multiple projects (sub-folders with project.json files in them) and each of those become an available package that you can import into your project.

But first you have to let the compiler know where to look for packages – or source code based packages in this case. You need to let it know where to find this new 'package source' we want to link to our project.

The place to do this is the global.json file which lives at the solution root folder (the one that sits above the src folder) and which is global to the entire solution. In there you add the path to the src folder to the projects array:

SourceLink

The packages found at this folder take priority over NuGet packages loaded from the NuGet feeds, so effectively local packages and source code trumps NuGet packages coming from your feed. Keep this in mind because this can have some unintended consequences if you carry an older codebase that you've patched forward – it can affect not just the immediate code and project you changed but all those projects in the solution.

Adding Source Package References

The running application already has a reference to the Options library as it's a dependency of some other component. IOW, there's already a reference to it in my project – somewhere. I couldn't actually find what references it – there are too many freaking packages and no way to search the tree – this is something badly needed Microsoft (here's a User Voice). Anyway there's a reference *somewhere* already and because the package is referenced in the local package sources you don't have to do anything to get it to run from source code.

However, if you want to debug the code you'll need to explicitly add the Reference to your DNX project so the project gets pulled into your solution to debug. You do this by adding it to the dependencies node like any other package:

"dependencies": {"Microsoft.AspNet.Mvc": "6.0.0-beta4",
"Microsoft.Framework.OptionsModel": "1.0.0-beta4"},

Note that when you type inside of Visual Studio you'll get version completion. Visual Studio will peak into all of the project.json files in the src folder and provide Intellisense for each of the projects available. In this case there's a single package, but if you had multiple packages they would all show up for autocompletion. Source code packages are treated with the same level of integrity as binary packages and that's awesome!

Once you've added the project.json entry you now have a referenced project in your solution. Visual Studio will add the project to your existing project list and show the project as source project in the references section:

Library Project

As well as the project added into your solution:

AddedProject

You can now select the code you want to debug. In my case the code that's the problem is in OptionsServices.cs, so I set a break point in the code and go ahead and run it:

DebuggerCode

And sure enough I can now debug into the DNX runtime component. As you can see the debugger works and I can step through the Microsoft code like any other code, which in effect it is. It's simply an external project reference. What's new and nice about this is that the DNX treats this external package like it would like a binary package, but it is also immediately debuggable as source code.

Fixing the Bug

So the original problem I was trying to troubleshoot was that Enums values weren't parsing.  Based on the code above you can probably spot the problem: Convert.ChangeType() doesn't support Enum conversions. When you step through the code above with an Enum value, the exception handler kicks in and the value is not set leaving the default configuration value intact.

That's easy enough to fix with the following code:

try{object value;if (propertyType.IsEnum)
        value = Enum.Parse(propertyType, configValue);elsevalue = Convert.ChangeType(configValue, propertyType);

    prop.SetValue(obj, value);                    
}
catch{// Ignore errors}

I can make this change and re-run my application and – voila: the Enum value now properly parses. Yay!

Let's Review

I've just made a change in a Microsoft provided runtime library and integrated that change into my running application. If I now compile and package this application for deployment the change I made would be shipped up right into a deployed application.

Think about of how much of a pain that's been in the past, and it's now – pretty straightforward and easy. You can make temporary changes like this and integrate those changes into your own projects with what is essentially a private copy of the project. Since the code is in source control you can also keep checking Microsoft's repository by updating and seeing if they fixed the problem in their code base, or if you're willing to put in the effort and paperwork, you can just as easily submit a pull requests.

Now mind you, this particular bug has been addressed in post beta4 versions of the OptionsModel project. In fact the entire options model hierarchy has been re-shuffled so newer versions won't actually work in a beta 4 project unless you update all the dependencies.

But this exercise clearly demonstrates that you can easily fix a bug in the framework and run with that private bug fix in your own projects without a hassle. If Microsoft updates their code, and you want to keep running with your's instead – you can do that. If Microsoft fixes the bug without breaking anything else – you can remove your private patch and simply revert back to the NuGet packages. It's easy to move back and forth simply by adding and removing external package paths in global.json.

The fact that you can debug framework code in real source code, rather than source from symbol servers is pretty awesome. With source code you have the actual up to date source code and it's part of your project where you can browse and change it. That's huge and makes it actually realistic to debug and modify source code as well as making it much easier to contribute bug fixes back to Microsoft (or any other library provider) as Pull Requests.

Summary of Steps To Add an external Source Code Project

As a summary lets look at the steps you need to do this again:

  1. Find the Package Source that you need to work on
  2. Clone the Git Repository to your local Disk
  3. Add project's path to the local Package Sources in global.json
  4. Add any of the source package names to your project.json dependencies
  5. Go nuts with the source code

Out of those steps the most time consuming one for DNX components likely is finding the right GitHub project to clone. And this should be easier in the future when the DNX source code has settled a bit and hopefully gets a bit more consolidated. It should also be much easier for third party libraries which aren't likely to be as crazy fragmented as the DNX runtimes are currently.

Much More than a Nice-To-Demo Feature!

It's great to see that source code as a package solution has become a first class citizen. I was talking to Glenn Condron when I was researching into this subject based on his awesome DNX Deep Dive talk at Build (go watch it for lots of little useful tidbits) and both of us were remarking that although this comes off as nice-to-demo feature, it really has great practical potential in real life developer work flows. Where it was painful in the past to import external code into your running solutions, it now takes 3 simple steps to get external source code linked and ready to run.

I think this is a key feature for contributing to open source projects because it makes so much easier to work with source code that you don't own. Clone from Git, add a solution reference and add the project to your existing package references and you can start making changes to code in the realistic contexts of your own projects. The latter part is the key here – making it easy to use external project code in your actual projects. It's a big improvement over how things work with today's .NET projects.

Resources

© Rick Strahl, West Wind Technologies, 2005-2015
Posted in ASP.NET vNext  NuGet  

Turn off HTML Input Auto Fixups for Mobile Devices

$
0
0

You ever run into Web sites that mess with your user input when you don't want it to when using your mobile device? You know the kind: They capitalize the first letter when you're trying to enter a username, or email address, or auto-correct text while typing a part number. As a mobile Web developer it's easy to forget about these automatic behaviors that are often very helpful – until they are not, when they get in the way for other kinds of input.  As Web developers we need to provide the best user experience, and sometimes we need to be aggressive about turning functionality off.

Mobile Input Blues

Yup, I hate it when I run into this problem myself, but just last night I shipped off a prototype app to a customer and what's the first comment that came back? “Can you please turn off the auto-capitalization on the login form.” It was in an email but the “please” definitely had an emphasis in it!

Here's what they're talking about:

MobileEntry

Hrmph – egg on my face. Yes - it’s easy to forget this, because desktop browsers generally don’t implement these auto fix-up features because you have a keyboard. Mobile devices however are more difficult to type on and so they try to be helpful auto-correcting, enhancing and messaging your text as you type. Most of the time this is indeed what we want, but in a quite a lot of special cases this auto-fixup gets seriously in the way of a smooth user experience.

So, if you’re a Web developer who is building applications that also have to run on mobile devices – please do your users a favor and  check your HTML inputs that require case sensitive or generally non-processed input, and explicitly disable these auto fix-up  features when they get in the way, which is probably more often that you think.

Just turn it Off!

There are a number of official and unofficial attributes you can use to turn off auto fix ups on most mobile devices. Here’s a tag that disables all of the available features on a single control - all of the bolded attributes take values as either on or off, except for spellcheck which use true or false.

For input controls:

<input type="text" name="username" id="username"class="form-control" placeholder="Enter your user name" value="" autocapitalize="off" autocomplete="off"spellcheck="false" autocorrect="off"   />

For a textarea control:

<textarea type="text" name="control_codes" id="control_codes"class="form-control" placeholder="Enter device control codes"  autocapitalize="off"autocomplete="off"spellcheck="false"autocorrect="off"></textarea>

The default settings for these attributes on type="text" is that they are enabled on mobile devices, so it's up to you to turn them off when they don't make sense, which in a lot of business applications actually happens to be most of the time.

AutoCapitalize

Capitalization is probably the most annoying of the features when you’re using non-formatted inputs. The most common place where this is a problem if you’re entering non-formatted values like non-email user names, item or part numbers etc. It can be really annoying to start typing a username and have the first letter capitalized. You should be using this on any non-text entry field.

AutoCorrect

AutoCorrect tries to correct user input automatically as you type for common misspellings. Typing teh instead of the for example will be auto-corrected. Since this is limited to specialized words this is usually not quite as intrusive as some of the other auto fix ups.

AutoComplete

Automatically tries to guess what you're typing and fills in the text. Again this works well for plain text input but is very annoying if you're entering say and inventory number and it's trying to auto-complete a SKU for you to some known word.

SpellCheck

Spellcheck like autocomplete provides the red squiggles under text. Unlike the other behaviors this one also works on desktop browsers. This is a great feature for text input and the default behavior is great for that, but again if your input is not 'real' text it can be annoying. Turn it off unless spell checking the content actually make sense or otherwise user see confused messages.

Use other Input Types

One other thing to remember is that there are other input types that don’t automatically capitalize and reformat input. For example, if you’re entering Email addresses use the type="email", if you’re building a search box use  type="search" and if you want urls use  type="url". By default all the auto-fix ups on INPUT controls are only applied to the type="text" or <textarea> inputs and… what’s more is that most of these input types are optimized for the input they are supposed to provide. Email address input on a phone often includes the @ sign and the .com extension for example. Use the right input type

Summary

Do your users a favor and take the time to test your site with a mobile device and understand where auto fixups don’t make sense. Since auto-fixup is the default behavior for plain text and textarea inputs, it’s easy to forget that the behavior is different on mobile devices. Remove auto-fixups where they don’t make sense – your users will thank you for it. Or… more likely not bitch to you about a lousy data entry experience.

© Rick Strahl, West Wind Technologies, 2005-2015
Posted in HTML5  

Rebooting Database Localization for ASP.NET with West Wind Globalization 2.0

$
0
0

In the last few months I’ve been posting a lot of entries related to some of the work I’ve been doing on the Westwind Globalization 2.0 Library. It’s been a long while coming and I’m happy to announce that the new version is now officially released at version number 2.1.

Version 2.0 has many major improvements including support for multiple database backends (Sql Server, MySql, SqLite, SqlCE – and you can create your own), a much cleaner and more responsive  JavaScript based Resource Editor Interface, a new Strongly Typed Class Generator that outputs switchable resource backends that can easily switch between Resx and Database resources, an updated JavaScript Resource handler to serve server side resources (either Db or Resx) to client side JavaScript applications and much improved support for interactive resource editing. There have also been a ton of bug fixes thanks to many reports that have come in as a result of the recent blog posts which is awesome.

Because there’s so much new and different in version 2.0 I’ve created a new 25 minute Introduction to West Wind Globalization Video which is a combination of feature overview and getting started guide. I realize 25 minutes isn’t exactly short but it covers a lot of ground beyond just the basics, describing features, background info and how to. So take a look…

What follows is a more detailed info on most of the same topics covered in the video.

The NuGet Packages

To get started in a Web Project it's best to install the Starter package, which includes some sample resources you can import and a test page you can use to test resources with.

PM> Install-Package Westwind.Globalization.Web.Starter

Once you're up and running and have had a chance to play with your resources – you can remove the starter package leaving the base packages in place.

If you don't want sample resources and a test page, you can install:

PM> Install-Package Westwind.Globalization.Web

If you're not using a Web Project or you're using only MVC/Web API and don't need the Web Resource Editor you can just install the core package:

PM> Install-Package Westwind.Globalization

Please read or watch the video or read the the Installation Section of the Wiki or the Github Homepage all of which describe how to install the packages, configure your project , import existing resources (if any) and then start creating new ones quickly.

Here are a few more resources that you can jump to:

What is West Wind Globalization

Before I go over what’s new in this release, let me give a quick overview of what this library provides. Here are a few of the key features:

  • Database Resource Provider
  • Database Resource Manager
  • Sql Server, MySql, SqLite, SqlCe
  • Interactive Web Resource Editor
  • Keyboard optimized resource entry
  • Translate resources with Google and Bing
  • Use Markdown in text resources for basic CMS-like functionality
  • Support for interactive linking of content to resources
  • Import and export Resx resources
  • Generate strongly typed classes from Db resource (supports Db and Resx)
  • Serve .NET resources to JavaScript
  • Release and reload resources
  • Create your own DbProviders
  • Open source on GitHub - MIT licensed

Database ResourceManager and ResourceProviders

Traditional ASP.NET localization supports only Resx resources which store resource information in static XML files that are compiled into the binaries of your application. Because resources are static and compiled they tend to be fairly unwieldy to work with when it comes to localizing your application. You have to use the tools available in Visual Studio or whatever custom tooling you end up building for managing resource stored in XML files and any resource changes require a recompile of the application.

West Wind Globalization uses the same .NET resources models – ResourceManagers and ResourceProviders – and adds support for retrieving and updating resources using a database. Database resources are much easier to work when it comes to localizing an application and the library ships with a powerful Web based Resource Editor that lets you edit your application resources in real time as the application is running. You can force resources to be reloaded, so any changes become immediately visible.

Using Database resources doesn’t mean that every resource is loaded from a database each time the resource is accessed. Rather the database is used to retrieve a given ResourceSet and locale as a single ResourceSet at a time just like Resx resources.  Resources are then cached by the native .NET resource architecture (.NET ResourceManager or ASP.NET ResourceProvider) and stay in memory for the duration of the application – unless explicitly unloaded. Using database resources is no less efficient than using Resx resources except perhaps for the first load.

If you don’t want to use database resources in production you can also import Resx resources, run with a database provider during development and interactively edit the resources, then export the resources to Resx and compile the resources for your production environment. It’s easy to import and export resources as well as creating strongly typed resources that can work with either Resx or database resources using Westwind Globalization. Switching between Resx and Db providers is as easy as switching a flag value.

The goal of this library is to give you options to let you work the way you want to work with resources and to make it easier to add, update and generally manage resources. You can use the Web Resource editor or use the Code API, or the database directly to interact with your resources.  If you have an interactive resource environment in production you might also like the Markdown feature that is built into the library that allows you to flag resources as being Markdown content which is automatically turned into HTML when the resources are created into a resource set. Combined with the interactive resource linking features this allows you use Db Resources as a poor man’s CMS where you can interactively edit content using the Web Resource Editor interface.

The advantage of database resources for a typical Web application is that you can interactively edit and refresh resources so you can quickly see what the results of localizations look like in your applications as you are localizing.

Advertisement

Support for Multiple Database Providers

The previous version of Westwind.Globalization only supported MS SQL Server. A lot of feedback has come in over the years for support of other SQL backends. The new version adds  multiple database providers that can connect your resources to several different databases by default, with an extensible model that you can use to hook up additional providers. Out of the box MS SQL, MySql, SqLite and SqLite are supported. You can also create your own providers and hook up any other datasource. Hooking up another relational Sql backends using ADO.NET can be easily hooked up by overriding a few methods that don’t fit the stock SQL syntax by override the DbResourceManger class. Other providers (like a MongoDb provider for example) would require a bit more work as the DbDataResourceManager API is fairly big, but allows hooking any kind of data from a database or anything else. As long as you can read and write the data store you can serve it as resources.Switching providers is easy as adding and requires only specifying the appropriate ADO.NET data providers, setting the DbResourceManagerType and providing a connection string.

For more information on how to use other providers than SQL server see this wiki entry:

Non SQL Server Provider Configuration

Interactive Web Resource Editor

The Web Resource Editor has undergone a complete re-write in this version as a pure client side SPA application, to provide a much smoother and quicker editing experience. The interface is also lot more keyboard friendly with shortcuts for jumping quickly through your resources. Here’s what the new Resource Editor looks like:

Note that the localization form is also localized to German using West Wind Globalization – so if you switch your browser locale to German you can see the localization in action. This particular interface uses server side database resources and the JavaScript resource handler to push the localized resources into an AngularJs client side application. Here's what the German version looks like:

GermanResourceEditor 

It’s very quick to add new resources or even new resource sets for multiple languages through this single form:

resourceeditor

The main editor and resource editor both support RTL languages and the editors autofill new resources with default values for quick editing.

You can also translate resources once you've added them either by hand or by using a translation dialog – accessed by clicking on the flag in the main resource list - that lets you use Google or Bing Translation to help with translation of text:

Translation using these translators isn't always accurate but I've found them to be a good starting point for localization.

Import and Export Resx Resources

As mentioned earlier you can also import and export Resx resources to and from a database which makes it easy to use resources that you've already created. There are user interface form and code APIs that let you do this. The Web Resource Editor has an import and export form that makes it easy to get resources imported:

ImportExportResx

The Import (and Export) folder defaults to a project relative path. For an MVC project it assumes resources live in the ~/projects folder, for a WebForms  project path is ~/ and the ~/App_LocalResource and ~/App_GlobalResources folders will be scoured to pick up resources. However, you can also specify any path that is accessible to the server here and load/save resources to and from there. What this means it's possible to import resource for any project from arbitrary locations on a development machine, edit them then export them back out which is very powerful if you need to localize resource in say a class library.

Create Strongly Typed Classes

In order to work with ASP.NET MVC strongly typed classes are a big requirement. MVC uses strongly typed resources for resource binding as well as for localized model validation messages so it's crucial that you can create strongly typed resources from the database resources. Visual Studio includes functionality to automatically create strongly typed resources from Resx resources, but the mechanism unfortunately is very tightly coupled to Resx resources – there's no easy way to override the behavior to load resources from a different source.

So West Wind Globalization uses its own strongly typed resource generation mechanism, one that is a bit more flexible in what type of resources you can use with it. You can use Db Resources from raw projects (what you would use with MVC or a class library/non-Web project), from Web Forms (App_GlobalResources/App_LocalResources using the various ASP.NET Resource Provider functions), as well as Resx Resources.

You can export resources using the following dialog from the Resource Editor:

StronglyTypedResources

The dialog lets you choose a file name the classes are generated into (it's a single file) and a namespace that the resource classes use. Again the file specified here can be generated anywhere on the machine, but by default it goes into the project folder of an ASP.NET Web project.

Here's what the generated classes look like (there can be multiple resource classes in the single source file):

public class GeneratedResourceSettings{// You can change the ResourceAccess Mode globally in Application_Start        public static ResourceAccessMode ResourceAccessMode = ResourceAccessMode.DbResourceManager;
    }  [System.CodeDom.Compiler.GeneratedCodeAttribute("Westwind.Globalization.StronglyTypedResources", "2.0")]
    [System.Diagnostics.DebuggerNonUserCodeAttribute()]
    [System.Runtime.CompilerServices.CompilerGeneratedAttribute()]public class Resources{public static ResourceManager ResourceManager
        {get{if (object.ReferenceEquals(resourceMan, null))
                {var temp = new ResourceManager("Westwind.Globalization.Sample.Properties.Resources", typeof(Resources).Assembly);
                    resourceMan = temp;
                }return resourceMan;
            }
        }private static ResourceManager resourceMan = null;public static System.String Cancel
        {get{return GeneratedResourceHelper.GetResourceString("Resources","Cancel",ResourceManager,GeneratedResourceSettings.ResourceAccessMode);
            }
        }public static System.String Save
        {get{return GeneratedResourceHelper.GetResourceString("Resources","Save",ResourceManager,GeneratedResourceSettings.ResourceAccessMode);
            }
        }public static System.String HelloWorld
        {get{return GeneratedResourceHelper.GetResourceString("Resources","HelloWorld",ResourceManager,GeneratedResourceSettings.ResourceAccessMode);
            }
        }public static System.Drawing.Bitmap FlagPng
        {get{return (System.Drawing.Bitmap) GeneratedResourceHelper.GetResourceObject("Resources","FlagPng",ResourceManager,GeneratedResourceSettings.ResourceAccessMode);
            }
        }
    }

The class at the top is a static class that is used to allow you to specify where the resources are served from which is the DbResourceManager, AspNetResourceProvider or Resx. This static global value can be set at application startup to determine where resources are loaded from.

Each resource class then includes a reference to a  ResourceManager which is required for service Resx Resources. Both the ASP.NET provider and DbResourceManager use internal managers to retireve resources. The GeneratedResourceHelper.GetResourceString() method then determines which mode is active and returns the resources from the appropriate resource store – DbManager, AspNetProvider or Resx.

The helper function is actually pretty simple:

public static string GetResourceString(string resourceSet, string resourceId,ResourceManager manager,ResourceAccessMode resourceMode)
{if (resourceMode == ResourceAccessMode.AspNetResourceProvider)return GetAspNetResourceProviderValue(resourceSet, resourceId) as string;if (resourceMode == ResourceAccessMode.Resx)return manager.GetString(resourceId);return DbRes.T(resourceSet, "LocalizationForm");
}

but it's what makes support of the different providers from a single class possible which is nice.

What's cool about this approach and something that's sorely missing in .NET resource management is that you can very easily switch between the 3 different modes – assuming you have both database and Resx resources available. Given that you can easily import and export to and from Resx it's trivial to switch between Resx and Database resources for strongly typed resources.

ASP.NET MVC Support

Although the library has always worked with ASP.NET MVC, the original version was built before MVC was a thing and so catered to Web forms, which was reflected in the documentation. As a result a lot of people assumed the library did not work with MVC. It always did but it wasn’t obvious. The main feature that makes ASP.NET MVC work with West Wind Globalization is the strongly typed resource functionality and you can simply use those strongly typed resources the same way as Resx resources.

To embed a strongly typed resource:

@Resources.HelloWorld

To use strongly typed resources in Model Validation:

public class ViewModelWithLocalizedAttributes{
    [Required(ErrorMessageResourceName = "NameIsRequired", ErrorMessageResourceType = typeof(Resources))]public string Name { get; set; }

    [Required(ErrorMessageResourceName = "AddressIsRequired", ErrorMessageResourceType = typeof(Resources))]public string Address { get; set; }
}

No different than you would do with strongly typed Resx resources in your MVC applications as long as you generate the strongly typed resources into your project.

In addition you can also use the DbRes static class to directly access localized resources. Note that the strongly typed resources that are tied to DbResourceManager also use this DbRes class behind the scenes so resources come from the same ResourceManager instance behind the scenes so there's no resource duplication. Using DbRes you can string based access to resources:

@DbRes.T("HelloWorld", "Resources")

Note that this always works – unlike strongly typed resources you don't need to generate anything in order for resources to work so you can update Views without having to recompile anything first. You lose strong typing with this, but you gain the non-compile flexibility instead. DbRes also has DbRes.THtml() which generates a raw HtmlString instance in case you are returning raw Html.

For example if you wanted to display some automatically rendered Markdown text you can use:

@DbRes.THtml("MarkdownText","Resources")

to get the raw HTML into the page.

The new documentation on the Wiki has a lot more information and examples specific to ASP.NET MVC. This version has improved support for MVC with a new Strongly Typed Class Generator that works with either Resx or Database resources (ie. you can switch with a single flag value) as well a much more powerful resource importer and exporter that lets you use resources not just from Web projects but any project at all.

I posted a detailed blog post on the ASP.NET MVC specific features a while back:

ASP.NET MVC, Localization and Westwind.Globalization for Db Resources

MarkDown Support

As mentioned in the previous section one useful new feature is Markdown support for individual resources. You can mark an individual resource to be a Markdown style resource, which causes the resource to be rendered into HTML when it is loaded into a ResourceSet or when you retrieve a resource value from the API.

Resources have a ValueType field in the database that identify the type of resource that is being requested and if its Markdown it's automatically translated to HTML. For typical localization the value is rendered to HTML when the resource set is retrieved. To set a resource as Markdown you can do that in the resource editor:

Note that this is a database specific feature. Once you export resources with the markdown flag to Resx, the markdown flag is lost and the data is exported as the rendered HTML string into Resx instead. If you plan on going back and forth between Resx and Db resources just be aware of this fact.

For more info on the Markdown features you can check the Wiki documentation:

MarkDown For Resource Values

Interactive Resource Linking and Editing

This version also improves on the interactive resource editing functionality that allows you to create links to resources that can be directly embedded into your pages and can be activated when an authorized user wants to edit resources. Basically you can add a few markup tags to any element on the page that makes that element linked to a resource based on its resource id. This makes it possible to quickly jump to resources for editing. This is an especially powerful feature when you combine it with the Markdown features described above, as you can in effect build a mini CMS system based on this mechanism.

West Wind Globalization provides two features: A couple of HTML based tags that can be applied to any DOM element and mark it as editable, as well as a helper JavaScript component that can be used to make the resource links active. Here's what this looks like:

On this page each element that has a flag associated with it is marked up with one or two  mark-up tags.

For example:

<body data-resource-set="Resources">

<span data-resource-id="HelloWorld"><%= DbRes.T("HelloWorld","Resources") %></span>

</body>

The key is the data-resource-id attribute which points at a resource id. data-resource-set can be applied either on the same element, or any element up the hierarchy to be found. Here I'm putting it on the body tag which means any attribute in the page can search up and find the data set. These attributes are used by a small jQuery component to find the resourceId and resourceSet and then open up the Resource Editor with the requested resources activated. If the resource doesn't exist a new Resource Dialog is popped up that allows creating a new resource with the resource name and content preset.

Adding the Resource Linking button that enables the flag links on a page is as easy as adding a small script block (and a little CSS) to your page or script:

<script src="scripts/ww.resourceEditor.js"></script><script>    ww.resourceEditor.showEditButton(
        {
            adminUrl: "./",
            editorWindowOpenOptions: "height=600, width=900, left=30, top=30"}
    );</script>

For more info check out the in depth blog post that describes in detail how this functionality works and how it's implemented.

Interactive ASP.NET Resource Linking and Editing with Westwind.Globalization

Serving Server Side Resources to JavaScript

More and more Web applications are using fully client centric JavaScript to drive application logic, but you can still use your server side resources with these application by using the JavaScriptResourceHandler included in West Wind Globalization. The JavaScriptResourceHandler works both with database and resx resources and can be used either in ASP.NET client applications or static HTML pages.

It works by using a dynamic resource handler link that specifies which resources to request. The link specifies which Resourceset to load, which locale to use and what type of resource (Db or Resx) to return as well as a variable name to which to generate the resources. The handler responds by creating a JavaScript class map with the localized resources attached as properties for each resource.

Here's what the exported resources look like normalized for German:

JavaScriptresourceHandler

To get resources into the page you can either use a .NET code tag like this:

<script src="@JavaScriptResourceHandler.GetJavaScriptResourcesUrl("resources","Resources")"></script>

This creates the above value when accessing the page in the German locale. The first parameter is the name of the variable to create which can be anything you chose including a namespaced name (ie. globals.resources). The second parameter is the resource set to load. There are additional optional parameters that let you explicitly select a language id (ie. de-DE) as well as the resource provider type. The default is to auto-detect which checks to see if the Resource Provider is active. If it is resources are returned from the database, otherwise Resx resources are used (or attempted).

You can also use a raw HTML link instead of the tag above, which is a bit more verbose but has the same result (all one line):

<script src="/Westwind.Globalization.Sample/JavaScriptResourceHandler.axd?
ResourceSet=Resources&LocaleId=de-DE&VarName=resources&
ResourceType=auto"></
script>

Note that the JavaScriptResourceHandler works with Resx resources so you can use it without using anything else in Westwind.Globalization. IOW, you don't have to use any of the database localization features if all you want is the JavaScriptResourceHandler functionality.

If you want to see a working example that uses Server Side resources in JavaScript, the Web Resource Editor uses this very approach with AngularJs and binds resources into the page using one-way binding expressions in AngularJs:

<i class="fa fa-download"></i> {{::view.resources.ImportExportResx}}

where view.resources holds the server imported resources attached to the local Angular view model. 

If you want to see how to integrate server resources into a JavaScript application, the resource editor serves as a good example of how it's done. The source code is available in every project you add the Web package to, or in the base GitHub repository.

For more info on how the resource handler works check out this Wiki topic.

JavaScript Resource Handler Serve JavaScript Resources from the Server

Summary

As you can see there's lot of new stuff in Westwind.Globalization version 2.0 and I'm excited to finally release the full version out of beta. If you're doing localization and you've considered using database resources before in order to have a richer and more flexible resource editing experience, give this library a spin. If you run into any issues, please post issues on GitHub or if you fix up feel free to add a pull request. If you use the project or like it, please star the project on GitHub to show your support. Enjoy.

Resources

© Rick Strahl, West Wind Technologies, 2005-2015
Posted in ASP.NET  Localization  MVC  

External Links in Cordova for iOS

$
0
0

Hybrid app development with Cordova can be challenging at times. While it makes so much sense to build Web applications that can run as an app in a WebView container that can run on most device platforms, it's good to remember that these apps are not 'just' Web apps. There are all these little gotchas that you run into with seemingly simple things that work in a normal Web application but have wonky behavior or work very differently when running inside of a WebView container. Here's one of these fun ones: External links that should not open inside of the current application but in a full web browser instance. It sure is a lot harder than it should be.

What's the problem? External Links stay in the WebView

Cordova applications run in a WebView container in iOS and one of the gotchas that you are likely to run into if you have any external links is that external links will try to display in the current WebView of your application. So lets say in my AlbumViewer application I'm viewing an album loaded from the application which displays content from an internal HTML link (or a re-rendered view in this case from Angular).

Then there are a few links on the page that link to external content – in this case external links to buy an album on Amazon or play it on Spotify. Here's what this looks like in my sample app:

AlbumViewerButtons

On a Web page you might do something very simple to link these external URLs to Amazon or Spotify - in this case by simply having HREF links like this:

<a ng-href="{{view.album.AmazonUrl}}" class="btn btn-sm btn-default" target="_blank"><i class="fa fa-dollar" ></i> Buy</a>

and that works fine in the browser. Because of the target="blank" the window opens in a new tab and you can easily get back to the original tab. Even in the same window without the target="blank" you can always use the back button to get back.

However, in a Hybrid app running in a WebView you don't have tabs or a back button. There's no browser chrome and you can't use a backspace key or swipe right to go back since those gestures are not supported:

NoNavigation

You're stuck on this page.

This behavior is actually what you want most of the time. Since hybrid apps are supposed to be 'apps' and not just wrapped Web pages, apps should provide for their own navigation features. You shouldn't be able to arbitrarily jump around the application by moving back and forth unless you explicitly expose that functionality as part of your UI.

That's all well and good, but in the code above this obviously not the behavior we want – we want to navigate to external content and then somehow actually get back. Target links don't do it and neither does the following script code calling window.open():

vm.openAmazonUrl = function(album) {
    window.open(album.AmazonUrl,"_system");
}

Even the explicit window.open operation forces the window to open in the WebView rather than in a new browser window. Note that the behavior varies. Android for example, does the right thing with window.open() and opens a new window. iOS… not so much.

Low Level Fixes

iOS requires a low level workaround to this problem and the workaround for this problem is – you guessed it – a plug-in. It seems really sad that something so simple requires an actual plug-in to work. The solution on iOS lies with a very low level fix – which is o create a custom Objective-C handler for the Web View control that detects external link requests and then opens them externally? Are you serious? Here's an old Stackoverflow Question that goes over a few solutions that no longer work with the exception of the Objective-C hack. Crazy huh?

The InAppBrowser Plug-in

Luckily there's a cordova.inAppBrowser plug-in that encapsulates this hack in an easy to add plug-in. This is a much simpler solution that doesn't require hacking the generated cordova WebView wrapper code that can be overwritten by updates. The plug-in basically provides the ability for window.open() to open a new window in the external browser.

You can add this plug in with:

cordova plugin add https://git-wip-us.apache.org/repos/asf/cordova-plugin-inappbrowser.git

in your Cordova project or – if you're using Visual Studio's Cordova Tools by adding it from the Visual Studio add-in Configuration page.

The plugin basically replaces the window.open() function inside of the WebView control and so causes a new instance of the device browser to open – on iOS that'd be Safari. So rather than using a direct link in my Angular app I had to change the code a bit to either using an onclick handler or an Angular call to a controller method:

<a ng-click="vm.openAmazonUrl(view.album)" class="btn btn-sm btn-default"><i class="fa fa-dollar"></i> Buy</a>

and then adding this function to the controller:

vm.openAmazonUrl = function(album) {
    window.open(album.AmazonUrl);
}

And here's what you get:

safari

It's a full instance of Safari opened in a separate window. More importantly you see both this browser view and the original application in the task list so you can switch back and forth easily:

tasklist

Handling Target Links

With the plug-in installed you can also simplify the process a bit more with a little bit of script code to capture target links and then automatically opening them in the browser. You can use the following as part of the startup code in your Cordova app:

window.addEventListener('load', function () {$(document).on('click', 'a[target="_system"],a[target="_blank"]', function (e) {
            e.preventDefault();var url = this.href;
            window.open(url,"_system");                    
    });//}}, false);

This code basically looks for anything that has _blank or _system in the target tag and if it does, routes that to window.open() instead. This makes it a little easier to use the functionality so that you don't have to hook up code just to open a new window. So instead calling my Angular handler or using an onclick that calls window.open() I can use a simple link instead and essentially get the behavior I'd normally expect in the browser:

<a ng-href="{{view.album.AmazonUrl}}" target="_blank"  
class="btn btn-sm btn-default"><i class="fa fa-dollar"></i> Buy</a>

Much nicer and more importantly allows me to leave my existing links – assuming they go to the right target – intact without having to change code specifically for Cordova.

Summary

It's amazing how complicated some simple things like this can be, isn't it? It seems like this would be trivial to handle natively inside of the WebView control. A window.open() *should* go out to a new browser window just like it would in a browser. Some devices – notably recent versions of Android – do get this right and work without requiring a plug-in to make this happen. On those platforms that natively support browsing to a new browser the implementation is just passed through. Unfortunately other platforms like iOS do require this lousy workaround and so we're stuck with using a plug-in. It's easy enough once you know what needs to happen and what the problem is. It's just another one of those weird things you have to remember. Hopefully this blog post helps finding this info.

Resources

© Rick Strahl, West Wind Technologies, 2005-2015
Posted in Cordova  Mobile  

Windows 10 Upgrade and IIS 503 Errors

$
0
0

I just upgraded one of my machines to Windows 10 from Windows 8.1. This is a development machine and it has a ton of IIS Web sites and virtuals on it. The Windows upgrade (build 10162) went very smooth and everything seems to be working rather well – all except for IIS.

Accessing any link on the local machine I get this lovely error:

503 Server Unavailable

It looked like IIS was installed properly and the service is running. I can use IISReset to restart IIS and I can see the admin service running. Application Pools are also showing running, but any attempt to access any IIS page results in an immediate 503 error.

After some spelunking around in the Event Viewer I found that the problem is the IIS Rewrite Module:

EVENTLog

This is the IIS Rewrite Module that gets separately installed from the Web Platform Installer.

IIS Rewrite Module Problem

It turns out that there's a new version available that's more recent (but doesn't change the version number), and that needs to be installed in order to work. The version I found on the WebPI was dated a month ago (5/27/2015), and I suspect it's meant to address just the type of problem I've been running into with my upgrade.

To install the module:

  • Uninstall the Rewrite Module from Windows Features
  • Go to the Web Platform Installer
  • Pick Url Rewrite from Products | Server section and install
  • Restart IIS

And bingo – my IIS installation is up and running again.

Advertisement

Several people tweeted mentioning that they ran into these problems repeatedly with successive Windows 10 updates, so it's quite possible that the issue has to do with settings rather than an old version. Before going through the above steps you might want to just try to Repair the UrlRewrite installed feature.

RewriteModuleRepair

Watch for External Module Updates

In searching around I found a few other reports of people having issues with external module updates  in IIS. So if your server fails with errors:

  • Check the Event Log
  • See if errors relate to any external Modules not installed by the main IIS install
  • Do a Repair Install or Uninstall Reinstall the Module if there are newer versions

Windows 10 seems to have done a pretty good job updating most of my Windows components, including all native IIS components and Web sites. However, in this case the Rewrite module is externally installed from WebPI so it's not a standard Windows file and therefore wasn't updated. This can be a sleeper bug depending on the components you are dealing with. Essentially – double check anything that was installed through Web PI and make sure it all still works since those external components did not get updated in the Windows 10 migration.

© Rick Strahl, West Wind Technologies, 2005-2015
Posted in IIS  Windows  

Multiple Desktops in Windows

$
0
0

I spent the last month and a half using a Mac and OSx, running both OSx and Windows and while doing that one thing I really appreciated was the use of multiple desktops that OSx supports. It's been especially useful when running parallels which you can set up in such a way that it runs the Windows instance on a separate desktop which is convenient.

I've since switched back to Windows and I have to plead ignorance: I didn't know that Windows has had support for multiple desktops for some time. Multiple desktop support actually harks back all the way to Windows XP, but the operating system didn't officially expose this functionality. However there are a number of utilities out there that you can use to take advantage of multiple desktops – in a limited fashion today.

Windows 10 – Official Multiple Desktop Support

Even better though is that Windows 10 will native support for multiple desktops.  Windows 10 officially adds multiple desktops as a feature as part of a host of new desktop manager features that can be managed through the Windows UI as well as with convenient hotkeys. Hopefully they'll also add support for touch or mouse pad gestures so that you can swipe to new desktops as you can on OSx, but currently I don't see support for that (touch pad vendors would have to provide the gesture mapping support I suppose – then again given how crappy most Windows machine touch pads are maybe that's not such a good idea – my Dell XPS touch is the worst piece of crap I've ever used, amazing that manufacturers can't get such a simple device right).

Anyway, in Windows 10 you can use a number of shortcut keys to manipulate and manage multiple desktops:

Alt-Tab: Bring up the Task View which includes a new Add Desktop option this view also shows you all of your open desktops on the bottom.

desktops

Alt-Ctrl-Left/Right Arrow: Switch between desktops. You can use these key combos, or you can use Windows-Tab and then select the desktop of choice interactively as shown in the screenshot above.

Moving Windows between desktops: You can also move windows between desktops by simply dragging them from the task view on the active desktop onto another desktop on the bottom of the task list.

Advertisement

How useful is this?

I tend to run 2 or 3 monitors (depending on whether I'm on Maui or here in the 'remote office' in Oregon) and then set up 3 desktops:

  • Main Desktop
    This is my main desktop where I do most of my work and get stuff done – mostly development work, business stuff, writing, browsing for research etc.
  • Supplementary Desktop: Media, Email, Twitter, Social Browsing etc.
    I like to set up a separate desktop to keep all the things that I leave open for a long time and get them off my main desktop to make the main desktop less cluttered. If I run music using a music player I really don't want to see Pandora or the Amazon Music player on my desktop. Same goes for email. Gmail or Outlook is always open but I don't want it in my way while I'm working on stuff. For one thing it's a little less distracting – notifications that pop up, pop up on the secondary desktop. Likewise with my Twitter client. Having all that 'distracting' stuff on a second screen keeps the distractions to a minimum. I have to explicitly check over there to get distracted on purpose :-)
  • Web Debug Desktop
    During development I prefer to have all my Web related stuff running on a separate desktop. Typically this means running Chrome with a separate DevTools Window each taking up their own screen in a multi-monitor setup, which makes it very easy to see things happening. By having only the things I need running in this setup it's much easier to see what's going on. Other things I run in this desktop is any test agents and other tools I use to access requests like WebSurge for URL testing of APIs etc. The nice thing is that development and the running application are separated only by the switch desktop key and I can get a much cleaner clutter free view to play with this. It does take some getting used to pressing Windows-Ctrl-RightArrow instead of  Alt-Tabbing to the browser and the dev tools, but that'll happen with time.

Multiple Desktops on older Versions of Windows

Multiple desktops have actually been supported in Windows since Windows XP, but there's not been any official UI built into Windows to create or access those desktops. However there are third party tools you can use to create and manage desktops. The most popular is:

Desktops from Systernals

In typical Systernals tradition, it's a small self-contained utility that provides the core features you need. Desktops is a small tray icon application that allows you manage up to 4 desktops.

When you click on the taskbar icon you get four squares, each of which represents a potential desktop to create:

Desktops[4]

You can then switch desktops by using the pop up view above, or by using a set of hotkeys you can configure as part of the options. Desktops is pretty bare bones. It doesn't have support for closing desktops and you can't move things around, but its simplicity and small size make it a good choice for desktop management.

There are a host of other tools that let you create virtual desktops but most don't actually use this 'hidden' windows feature but rather create their own separate desktops to display and manage. The nice thing about this simple, but basic utility is that it's small and lightweight and works with what's in the Windows box.

Summary

I've only used the new desktop features in Windows 10 for a few days now but I've already found them to be pretty damn useful to keep clutter and distractions to a minimum, especially when coding. So if this is new to you in Windows, it might be worth checking it out. I'm glad to see that this feature has become an officially supported feature in Windows 10.

© Rick Strahl, West Wind Technologies, 2005-2015
Posted in Windows  

Multiple Desktops in Windows

$
0
0

I spent the last month and a half using a Mac and OSx, running both OSx and Windows and while doing that one thing I really appreciated was the use of multiple desktops that OSx supports. It's been especially useful when running parallels which you can set up in such a way that it runs the Windows instance on a separate desktop which is convenient.

I've since switched back to Windows and I have to plead ignorance: I didn't know that Windows has had support for multiple desktops for some time. Multiple desktop support actually harks back all the way to Windows XP, but the operating system didn't officially expose this functionality. However there are a number of utilities out there that you can use to take advantage of multiple desktops – in a limited fashion today.

Windows 10 – Official Multiple Desktop Support

Even better though is that Windows 10 will native support for multiple desktops.  Windows 10 officially adds multiple desktops as a feature as part of a host of new desktop manager features that can be managed through the Windows UI as well as with convenient hotkeys. Hopefully they'll also add support for touch or mouse pad gestures so that you can swipe to new desktops as you can on OSx, but currently I don't see support for that (touch pad vendors would have to provide the gesture mapping support I suppose – then again given how crappy most Windows machine touch pads are maybe that's not such a good idea – my Dell XPS touch is the worst piece of crap I've ever used, amazing that manufacturers can't get such a simple device right).

Anyway, in Windows 10 you can use a number of shortcut keys to manipulate and manage multiple desktops:

Alt-Tab: Bring up the Task View which includes a new Add Desktop option this view also shows you all of your open desktops on the bottom.

desktops

Alt-Ctrl-Left/Right Arrow: Rotate through the active desktops. You can use these key combos, or use Windows-Tab and then select the desktop of choice interactively as shown in the screenshot above.

Moving Windows between desktops: You can also move windows between desktops by simply dragging them from the task view on the active desktop onto another desktop on the bottom of the task list. There’s also a shortcut on the task view to move windows to another desktop. When you close a desktop with active windows the windows are moved to the desktop on the left.

Advertisement

How useful is this?

I tend to run 2 or 3 monitors (depending on whether I'm on Maui or here in the 'remote office' in Oregon) and then set up 3 desktops:

  • Main Desktop
    This is my main desktop where I do most of my work and get stuff done – mostly development work, business stuff, writing, browsing for research etc.
  • Supplementary Desktop: Media, Email, Twitter, Social Browsing etc.
    I like to set up a separate desktop to keep all the things that I leave open for a long time and get them off my main desktop to make the main desktop less cluttered. If I run music using a music player I really don't want to see Pandora or the Amazon Music player on my desktop. Same goes for email. Gmail or Outlook is always open but I don't want it in my way while I'm working on stuff. For one thing it's a little less distracting – notifications that pop up, pop up on the secondary desktop. Likewise with my Twitter client. Having all that 'distracting' stuff on a second screen keeps the distractions to a minimum. I have to explicitly check over there to get distracted on purpose :-)
  • Web Debug Desktop
    During development I prefer to have all my Web related stuff running on a separate desktop. Typically this means running Chrome with a separate DevTools Window each taking up their own screen in a multi-monitor setup, which makes it very easy to see things happening. By having only the things I need running in this setup it's much easier to see what's going on. Other things I run in this desktop is any test agents and other tools I use to access requests like WebSurge for URL testing of APIs etc. The nice thing is that development and the running application are separated only by the switch desktop key and I can get a much cleaner clutter free view to play with this. It does take some getting used to pressing Windows-Ctrl-RightArrow instead of  Alt-Tabbing to the browser and the dev tools, but that'll happen with time.

What’s missing

The obvious thing missing is that you can’t persist your desktops. You can open a new desktop and move things onto it, but there’s no way that I can see to actually persist anything on that desktop so next time you boot that set up comes back.

Still it’s nice to just be able to ‘spread out’ while the machine is running. With reboots becoming a rare thing, having desktops persist for the lifetime of your Windows session might be all you need anyway.

Third party solutions serve that particular need today and I expect there will be third party solutions crop up for Windows 10 that will also extend that functionality with more permanent desktops and configurations for each desktop such as backgrounds, icons displayed and so on.

Multiple Desktops on older Versions of Windows

Multiple desktops have actually been supported in Windows since Windows XP, but there's not been any official UI built into Windows to create or access those desktops. However there are third party tools you can use to create and manage desktops. The most popular is:

Desktops from Systernals

In typical Systernals tradition, it's a small self-contained utility that provides the core features you need. Desktops is a small tray icon application that allows you manage up to 4 desktops.

When you click on the taskbar icon you get four squares, each of which represents a potential desktop to create:

Desktops[4]

You can then switch desktops by using the pop up view above, or by using a set of hotkeys you can configure as part of the options. Desktops is pretty bare bones. It doesn't have support for closing desktops and you can't move things around, but its simplicity and small size make it a good choice for desktop management.

There are a host of other tools that let you create virtual desktops but most don't actually use this 'hidden' windows feature but rather create their own separate desktops to display and manage. The nice thing about this simple, but basic utility is that it's small and lightweight and works with what's in the Windows box.

Summary

I've only used the new desktop features in Windows 10 for a few days now but I've already found them to be pretty damn useful to keep clutter and distractions to a minimum, especially when coding. So if this is new to you in Windows, it might be worth checking it out. I'm glad to see that this feature has become an officially supported feature in Windows 10.

© Rick Strahl, West Wind Technologies, 2005-2015

Azure VM Blues: Fighting a losing Performance Battle

$
0
0
I've been struggling with performance when putting up an Azure virtual machine with the eventual intend to replace my physical server. In this post I describe some of the performance issues I've run into with Azure Virtual Machines in a simple scenario of migrating a single Web site to a full VM setup.

The Rise of JavaScript Frameworks - Part 1: Today

$
0
0


frameworkWhen it comes to Web development, JavaScript frameworks have moved front and center in the mainstream in the last year and a half or so. When looking at building modern Web applications, the bar has been raised significantly by what is possible in large part due to the more accessible mainstream frameworks that are available today to build rich client and mobile Web applications. Although full featured end to end front end JavaScript frameworks have been around for quite a bit longer than just the last couple of years, it seems in the last year and half they really established themselves in the Web developer mainstream with extremely wide ranging uptake that happened very quickly. Clearly these JavaScript frameworks have a hit a nerve with the developer mainstream, scratching an itch that developers have wanted to scratch for some time, but didn’t quite have the tools to do so easily. Frameworks have filled that niche and caused a lot of developers that previously avoided complex JavaScript development to jump in head first.

In this post I describe my thoughts on how we’ve arrived here and why I think that frameworks are the new baseline that we will work and build on top of in the future. This post talks in the context of the current crop of the various frameworks that I call the V1 round that are based on current crop of shipping technologies and EcmaScript 5. In Part 2 I’ll talk the V2 round that describes the new versions that framework providers are working on and that take advantage of the latest and greatest technologies built around EcmaScript 6, new and more complex build systems and a general refactoring of what we’ve learned from the V1 round. While it sounds exciting none of these frameworks are released yet, and in some ways they sound much more complex in terms of integration and getting started. I’ll tackle that touchy subject next month.

Fast Adoption of Frameworks

It's amazing to me quickly JavaScript frameworks like AngularJS and Ember and recently also ReactJs (which technically isn’t a framework) and even commercial frameworks like KendoUI and Wijmo have caught on and have permeated into to JavaScript developer mainstream. There are also a host of JavaScript based mobile frameworks like Ionic, Onsen Ui, Telerik’s Application Platform and NativeScript that are very mobile centric and based on complex frameworks as well.

Traditionally JavaScript components and libraries have had a fairly lengthy uptake curve when it comes to the mainstream developers. I’m not talking about the bleeding edge developers here – that top 10% or so that lives vicariously jumping from the latest JavaScript tools du jour to the next every month or less, but rather about the typical developer in the mainstream building business applications who typically picks tools and sticks with the technology for some time.

Advertisement

Framework uptake for the latter has been very quick and wide and that has been a big surprise. The last time that there was a huge spike like this was when jQuery started gaining serious momentum in the late 2000’s to the point that almost 90% of all Web sites were using jQuery. Frameworks haven’t quite reached that level yet and the spread is not as unipolar as jQuery, but at the rate framework adoption is going things are heading that way.

JavaScript frameworks have raised the bar so much that I think it’s safe to say, that a framework of some type has now become the new baseline for JavaScript development of rich client applications. In the not so distant future you may still use jquery type development for single pages or little page helpers, but as far as full client side application development goes, frameworks are going to become the norm if they haven’t already done so.

Some of the most popular frameworks in use today with the current crop of framework technology are:

For mobile frameworks there are

Several of the Mobile frameworks – namely Ionic, Onsen and KendoUI also work in combination with AngularJs or are built directly ontop of AngularJS. There’s a lot of choice out there at the moment with more choices. Currently AngularJs and derived frameworks are easily the most popular among developers.

The current crop of frameworks succeed because they:

  • provide a coherent framework model for development 
  • provide a module system that allows for code separation
  • provide for easy, declarative data binding
  • allow you to create components
  • provide for URL based routing
  • provide the support features nearly every application needs
    • form validation
    • HTTP services
    • animation
    • intra application messaging
    • event management

These may seem pretty obvious now, but if you think back a few years these were all very difficult problems to tackle individually and even more difficult to manage collectively in an application.

This is where Frameworks shine – they can integrate these features in a comprehensive way that is consistent and are more seamless than individual components would be. On the downside you have to buy into the frameworks development model and mindset, but overall the benefits of a coherent whole far outweigh the pieced together model.

Why now?

Full blown client frameworks have really hit a nerve, solving a problem that needed solving for a long time. For years we have built client side applications without a plan it seems.

Patterns

In the past there wasn’t much guidance on how to build large client side applications, which often resulted in mountains of jQuery spaghetti code. While many of us managed this process successfully it was also very ugly for most and involved continually learning and doing a lot of trial and error to find what worked – and what didn’t.  I speak from experience when I say that I really hate looking at 3-5 year old client application code I wrote and trying to decipher what the heck I did back then. The code definitely was not as clean as I would want it to be even though at the time of building it I thought of it as following some good ideas and best practices I’d arrived at.

It wasn’t for the lack of trying to make things maintainable either, but somehow the nature of applications that were built using jQuery and a host of support libraries, with manual databinding and event hookups just always ended up being very messy no matter how hard I tried to organize that code. Raise your hand if you were also in this boat – I expect to see a lot of hands. Those of you that had the foresight and skill to not end up there – congratulations your are the proud few…

Not only did code often end up getting tangled very easily but it was also daunting for many developers to jump in, because in the old way there wasn’t much in the way of structure or guidance. Getting started involved mostly starting with a blank screen and then letting you figure out everything from structure to library choice to code patterns to manage application logic. How do you set up your JavaScript properly? How do you manage large code files? How do you break up complex logic? How do you split large code pieces up into separate code files and load them effectively? These are all things that are very unique to JavaScript – in other languages compilers or official build system provide some structure in terms of pulling all the pieces together into a coherent whole. JavaScript doesn’t have such a thing natively.

Frameworks address these issues by providing guidance in the form somewhat rigid pattern implementations required to lay out an application. Most frameworks provide ways to modularize code and break complex code into smaller, more testable and more maintainable modules using a pre-described syntax. While there is some ceremony involved with this today, it does provide consistent structure to modules that make it easy to separate code and understand what you are looking at.

Data Binding and User Interface

Then there are also UI and application issues like how do you consistently manage assigning and reading data out of the DOM with manual databinding.  There are literally dozens of ways that you can do this and often you do end up using a few different ways of doing it in an application. The fact that there’s no built in UI framework in HTML/JavaScript applications is somewhat unique and we’ve had to struggle with this since the begging of the Web.

Most other languages have built in support for user interface and data binding abstractions. Think about a desktop framework like WinForms or WPF or Visual Basic for that matter – in those frameworks you don’t have to worry about how the various pages are strung together or how code is loaded or how data is bound to controls – the base framework handles all that for you. In JavaScript and HTML this is not the case so inherently there were always a million choices to make and lots of up front learning involved to pick the pattern du jour – which seems to be changing every month or so.

It’s not surprising that in those days many developers were turned off by complex JavaScript development and decided to just not go there – or at least not go the full client centric SPA application route. It is difficult to manage complex applications without some bedrock foundation. Although there were a few solutions out there at the time – Backbone came around in those early years – the solutions that were available tended to be very esoteric and also very low level with a whole new level of complexity added on top of the existing mess. To me the very early frameworks seemed to make things more difficult rather than ease the process of building complex client side logic which is why I built my own subset that made sense to and addressed the problems I had to solve.

In the years preceding the current framework round I had built my own mini framework that provided base services and features I use everywhere. Some of it wasn’t optimal and while it all worked, it took constant maintenance to keep it up to do date, tweak it and minor little incompatibilities amongst browsers and various other libraries. While it helped me tremendously in understanding how a lot of the underlying technologies worked, it really wasn’t anywhere near the best use of my time to screw around with this low level stuff. And I know I wasn’t the only one – nearly any JavaScript dev who was doing anything reasonably sophisticated was in a same boat building their own micro-libraries of utilities and helpers to perform many common tasks. Parallel development of the worst kind…

You might have mitigated some of this by using and combining multiple JavaScript libraries but that too had risks – integration issues and style differences and learning this or that library out of context and then dealing with the overhead of pulling in many large dependencies for a small subset of features you’d actually use. And after all that you then move to a different client and all of that learned stuff goes out the window because they’re using a difference set of customized tools.

For me and my tools it worked well enough, but it was a major pain to build and maintain that code. It’s not a process I want to repeat…

Frameworks Blitz

But all of that started to change with the advent of more capable and much more comprehensive frameworks that started arriving on the JavaScript scene a few years back.

My journey with frameworks started about 3  years ago and it took me a while to pick and choose something that worked for me. More so I was waiting out the initial pain of these then new’ish JavaScript frameworks getting over their 0. blues.

Early Days

Backbone was the earliest of these frameworks that attempted to provide a common development patter for building complex applications. When it arrived it made quite a stir by providing a relatively small blue print for how you can package application logic to build more complex applications. Personally I never got into Backbone because at the time it seemed quite complex and low level. At the time I didn’t quite get it yet because it seemed that in a lot of ways it took more code to write stuff that I was already writing which seemed a step back. But Backbone did provide the first step in providing a common and repeatable project structure that in retrospect makes a lot of sense, but didn’t really show its value until you got into building fairly complex applications.

Growing up

A couple of years later Angular and Ember started showing promise. I remember watching a demo of both frameworks on a conference video and although the frameworks looked very rough at the time, I immediately got excited because it was much closer to what I would expect of a full featured framework that provides enough functionality as to replace my own micro framework. The value over what I had cobbled together myself was immediately obvious to me, and right then and there I knew that my micro-framework development days were done. It was always meant to be a hold over until proper frameworks arrived to me, but it just took a lot longer before worthwhile contenders actually arrived on the scene.

I kept watching progress on the frameworks for a while before I tried out both frameworks and eventually started creating some internal applications with AngularJs. While both Angular and Ember have many things that are not exactly intuitive or obvious, both of these frameworks address most of the key features I mentioned earlier. The key is that they provide an end to end development solution that should be more familiar to developers coming from just about any other development stack.

Huge Productivity

Using Angular was able to build a few medium sized mobile apps in a ridiculously small amount of time compared to how long it took me to do the same thing with my old home grown toolkit. I ported over a couple of small apps from my old stack to the new and the amount of code reduced into less than a quarter of the original code. The amount of time to build the same app from scratch roughly took a third of the time which included learning the framework along the way. In terms of productivity the improvements were quite dramatic and the resulting application was much more functional to boot as new features were added. The real bonus though was letting the app sit for a few months and coming back to it and not feeling like I had to rediscover my own code all over again. Because of the modularization it was reasonably easy to jump right back in and add bug fixes and enhancements.

Modularity and Databinding are the Key

When it really comes down to it to me the two biggest reasons for productivity for me were the ability to easily modularize my code and for having a non-imperative way for data-binding. Being able to create small focused modules to back a display view or component, and the ability to describe your data as part of a model rather than manually assigning values to controls is a huge productivity win. Both of those were possible before of course (module systems abound today, and data-binding libraries like Knockout were around before frameworks started to rise), but the frameworks managed to consolidate these features plus a host of other support infrastructure into a coherent and consistent whole.

It’s not all Unicorns and Rainbows

unicornsandrainbowsIt’s still possible to shoot yourself in the foot when you do something stupid like binding too much data into a form or using inefficient binding expressions or filters, or creating inefficient watches.  I’ve run into funky databinding issues where updated model values fail to update the view or where model updates fire watch expressions in recursive loops. Stuff does go wrong and then requires some sleuthing into the framework.

Sometimes you have to fight the framework when you’re doing things slightly different than it wants you to do things. But in my experience that is rather rare, and when it does happen I can always fall back to low level JavaScript at that point and manipulate the DOM manually. The way I see it you’re not giving up very much – you still have all the low level control even if that is often frowned upon in the framework guidelines.

Frameworks have brought in a ton of new developers to JavaScript including a lot of them who know very little about the esoteric nature of how JavaScript works. Lets face it – JavaScript is one func’ed up language, but it is what we’re stuck with in the browser – I’ve given up fighting it and try to make the best of it by understanding as much of its esoteric nature as possible although my rational mind struggles with many of the illogical language ‘features’. For developers inexperienced with JavaScript it can be difficult to understand where the seam is between framework and underlying language and JavaScript’s funky behavior makes it easy to get into trouble when you don’t know the language quirks. The best advice I have to developers new to JavaScript is spent some time reading up on the core features of JavaScript. Still the best and most concise book to start with is still Douglas Crockford’s JavaScript: The Good Parts. And then spent a few hours coding through some of the scenarios mentioned in the book. Understanding closures and variable scoping, floating point number behaviors and the DOM event loop are probably the most relevant issues you have to understand when working with these frameworks.

Java frameworks bring to mind the old adage: With great power comes great Responsibility and when you give very powerful tooling to developers who may not understand the underlying principles or even core components of the JavaScript language, it’s easy to end up with complex applications that are badly engineered and look like steaming piles of spaghetti code.  Functional – yes. Maintainable – not so much. But compared to managing the complexity without a framework the level of spaghetti-ness is actually more manageable because at least there are isolated piles of spaghetti code in separate modules. Maybe that’s progress too…

Much of this is due to the fact that the current crop of frameworks – while very powerful are very much 1.0 versions. Their first implementations of a general vision and the developers of these frameworks initially focused on making things possible rather than making them easy or maintainable. The latter concepts have come much later and while improvements have been made to improve maintainability, performance  and usability in many cases a lot of the improvements have been bolted on. Version 2.0 of most of these frameworks which are under construction, are all from the ground up re-writes that aim to fix many of these early implementation issues. Whether that’s the case we’ll have to wait and see (and I’ll talk about this topic in Part 2).

What took us so long?

If I had to summarize why this wave of frameworks has been so successful I’d argue it’s because they’ve provided us with a base blueprint for how to structure an application as well as providing a powerful and easy way to handle data binding. That has been one of the huge missing pieces that has made JavaScript development of anything non-trivial in the past such a pain.

In retrospect it really seems crazy that it’s taken us this long to get to this point. Navigation, data binding, form validation, event management, http services, messaging – those are all things that any even moderately sophisticated application needs, so why the heck were we constantly reinventing the wheel over and over again each in our own individual ways?

It’s amazing that we’ve come this far in client side Web development and have made due without a base framework layer. Most other UI platforms provide you a base framework. Just think about tools like Visual Basic and  FoxPro in the old days, WinForms and WPF on Windows, Cocoa on the Mac – all of these provide base frameworks to build applications along with build systems that know how to bundle stuff so you can run things. You don’t worry about how to modularize your code, or handle databinding – it’s part of the system itself. JavaScript has never had any of that. Building complex multi-page applications with just raw JavaScript is not an easy endeavor. It requires a lot of foresight and understanding of how information flows across pages and code and linking that all together requires a consistent methodology.

The advent of more capable – and also bigger – JavaScript frameworks has brought a renewed interest in JavaScript development. Frameworks have caused a lot of developers that were previously deferent of JavaScript to jump in head first.

I’ve been surprised to see uptake of frameworks – especially AngularJS – in companies that previously were ferociously anti-JavaScript. I’ve also seen relatively inexperienced JavaScript developers able to build fairly complex and very functional applications with these frameworks. I work with quite a few developers who are very slow to adopt new technologies, but quite a few of those who have ignored a lot of other technology trends in the past, are all of a sudden very gung-ho and jumping in with both feet into JavaScript frameworks and producing good results.

It’s not hard to see why: Client side application development in the browser has been on everybody’s radar for a long time all the way back may from the early days when IE first brought the XHR object and DHTML forms (which all other browser vendors snubbed at until 10 years later). It’s something that most developers can clearly identify with but that has been a difficult goal to achieve in the past. But it’s something that’s been really difficult to do right for a long time.

JavaScript frameworks provide a much easier point of entry to build rich client Web and mobile applications and that is a good thing.

Open Source is a Key Feature

open-source ideasBut it’s also amazing that these frameworks abstract some of  hard-won experiences about what works and what doesn’t when it comes to DOM manipulation, JavaScript quirks and best practices regarding performant JavaScript.  Much of this information is hard won from the experience of thousands of users that use the code and often report as well as fix bugs. The fact that all of the big frameworks are open source and developed by a large number of developers have made it possible to take advantage of the group mind to build better solutions. So many more people can be involved in this process of reporting and also fixing issues that simply transcends what a single developer or even a private or corporate entity accomplish. These projects uniquely benefit from the open source development model – it’s a key component to the success of these frameworks.

Too much, too big?

There are those that decry JavaScript frameworks as bloated, do-too-much pieces of software and the truth is you can do all of these things yourself today either by writing your own or piecing together various components to provide similar functionality. It’s easier today than it was 5 years ago, as lots of new libraries have sprung up to provide support for key features that you see embedded in frameworks today.

It’s a viable option to build your own micro-framework, but the problem is that it takes a much higher level of JavaScript developer to work in this space and even then I’m not sure that you would build something that is as capable and certainly not as competitive. As developers we should strive for a sense of unity, not individualism so that code is more portable and more understandable across applications. This approach might still make sense to a small subset of developers, but for the mainstream I cannot point to any serious downsides of using a framework.

I also find the size argument dubious at best. Most sophisticated applications use a ton of functionality that these frameworks provide. And while their script footprint is not small, if you were to piece together even half of the feature set from other more specific libraries you’re just as likely to use the same or bigger script size footprint. Yes there’s a price of admission but at the same time it’s worth it. As of Angular 1.4 the size of the minified and compressed gzip file is 45k which is hardly a deal breaker in my book. Anybody who complains about that – especially after subtracting whatever size a custom set of libraries would take – is micro optimizing in the wrong place.

The argument that building your own tools and frameworks helps you learn more about the stack you work on certainly is a valid one. I’ve followed that approach for much my developer life, but I’m finding it’s getting too damn difficult to keep up with the changes in technology and especially in JavaScript where things are changing too fast to keep up with. The latest rounds of upheavals – leading to ES6 and all the new build system technologies are making my head spin. If you’re component or library developer you have to keep up with all of this in order to keep your code compatible.

The way forward is to be a part of something bigger and contribute rather than to reinvent the wheel in a different way yet again.

We’re not going back

There's clearly a lot of demand to build rich client side applications on the Web and all of these frameworks address the sweet spot of providing enough structure and support features to make it possible to build complex applications with relative ease.

onewayTo me it’s obvious that the days of low level JavaScript for front end applications for the average developer are numbered and baseline frameworks are going to be the future for the majority of Web developers that need to get stuff done. The productivity gain and the fact that the frameworks encapsulate hard-won knowledge and experience about quirks and performance in the DOM and JavaScript, make it impractical to ‘roll your own’ any longer and stay competitive in the process.

As time goes on these frameworks are only going to get more sophisticated and provide more functionality which will become the new baseline of what is expected for typical Web applications. As is often the case technology ends up sorting itself out and building on top of the previous generation to extend new functionality.  We’re building a tower of Babel here and we’re already seeing that happening with the next generation of several of these frameworks like AngularJS 2.0, Ember 2.0 and Aurelia all of which are seriously overturning the apple cart by moving into the latest technologies involving  EcmaScript 6 language and build system features. We’re in for a rough ride for this next iteration of frameworks.

But – we’ll leave that discussion for Part 2. In the next part I’ll address the complexities that I see with the next generation of these JavaScript frameworks that attempt to bridge a whole new slew of JavaScript standards and functionality along with new tooling and to help build us the next generation of sophisticated client side applications.

Stay tuned…

© Rick Strahl, West Wind Technologies, 2005-2015
Posted in Opinion  HTML5  Angular  JavaScript  

Windows 10 RTM Upgrade and Driver Update Issues

$
0
0

True to full Murphy form, my upgrade to Windows 10 on my MacBook Pro Bootcamp partition went anything but smoothly.

When I got my new machine a few weeks back I installed the Windows 10 Preview on it – specifically build 10162. The install through the Bootcamp manager went smoothly without any issues whatsoever and Windows 10 had been running nicely on it. The Mac makes for a pretty damn nice and fast Windows machine – it’s quite a bit speedier than a similarly configured Dell XPS 15 I’ve been using. The Mac is partitioned half and half for Windows and Mac and running the Bootcamp partition from the Mac via Parallels and it all works pretty well. I’ve been spending most of my time in the native Windows partition recently and using Windows 10.

I’ve been pleased with Windows 10 – it seems Microsoft has finally found some polish instead of the cartoonish interfaces they’ve been cultivating since Windows Vista through Windows 8. For the most part the OS seems very smooth in terms of operation and the overall feel of the shell. I really like the way the Windows Chrome looks – which actually makes even legacy apps look a bit more modern. There isn’t really anything new that will blow your mind. It’s more like incremental updates and fixing things that should have worked in the first place. The only really useful new things to me so far have been the ability to configure multiple displays individually, multiple desktops and some of the Console enhancements – cut and paste and command history in particular. Minor stuff, but that’s OK with me – it’s an OS and we don’t need new features;  we need usability and stability more than anything. There is still a bunch of  nastiness when it comes to all the mish-mashed configuration UIs that are a pain in the ass to use but hey what else is new in Windows, right? Configuration UI issues aside, overall I think Windows 10 is a big step up in overall look and feel and behavior from Windows 8. It just feels like a lot cleaner and smoother environment to work in.

So, I’ve been using Windows 10 for a few weeks now and it’s been working without any issues for me. Performance has been great – as good or better than Windows 8 (hard to say really since this is new hardware). Everything’s been cool and pretty painless.

Driver Update Problems

Everything except the Windows Update process that is.

As I mentioned I installed one of the last Insider Previews and for a while I’d been unable to install more recent previews and the final RTM release.

It all started with a bad video driver update – the AMD video driver wanted to upgrade but would fail:

Windows Update Fail

Maddeningly Windows 10 would also keep trying to install the same failed updates over and over again on the next Windows Update check, which is pretty lame. Worse yet there’s no easy way to disable this update from re-appearing – in previous Windows versions you could hide updates to keep them from recurring, but not so in Windows 10.

Upgrade Failures

It turns out that the failed driver update was also responsible for the inability to upgrade my version of Windows. But… since you can’t keep an upgrade from showing up I had no way of disabling that upgrade.

I tried upgrading a total of 5 times before I found a solution that worked. I tried a number of suggestions from uninstalling all drivers before an update, to uninstalling .NET 3.5 (which apparently has been causing some weird issues with the upgrade installers even in Windows 7->8 upgrades I recall) to running an install of the full Windows 10 ISO. Nothing worked on the first four installs.

I kept getting the same error each time at about 35% of the install process:

The installation failed with FIRST_BOOT with an error during SYSPREP operation

No fun! Especially since the time from start to failure is about 20 minutes.

For the final upgrade that actually worked I did 3 things one of which made the upgrade work. I suspect the final one which is disabling any failed updates is the real key, but here are all three that might help others with their update problems.

Clean out all Temporary Install Files

Based on a number of suggestions found in various forums I decided to clean out all old installer files and general temp file removal on the machine. Windows 10’s update process downloads files in the background incrementally, if there are problems with the installer it’s probably a good idea to clean out those files and start from scratch and make sure when the update downloads it downloads to a clean install folder.

To do this you can use the Windows Disk Cleanup tool and run it in Administrative Mode that lets you clean ‘system’ files.

CleanupDisk

CleanupDisk2

Using the Windows Resource Checker (sfc.exe)

Based on a suggestion on various forums I also ran sfc.exe to scan the system for potentially modified system files that might also be blocking the update. This utility basically runs through the files in the Windows installation and makes sure they are not corrupted or otherwise invalid. When I ran this I had one modified .inf file that was updated by the Parallels installer in order to get Windows 10 to run on Parallels attaching to a Bootcamp partition.

The command you need to run is:

sfc /scannow

from the Windows command prompt. Make sure you run this as an Admin and you run it in 64 bit mode (if you’re running 64 bit Windows). I happened to be using Console2 rather than the actual Windows Command prompt and because it’s a 32 bit application it was finding the 32 bit version of sfc rather than the 64 bit one. So make sure you use the actual Windows command prompt.

Apparently this utility may also reset various file flags, so even if nothing is found it might help with an install problem.

This command takes a while to run… so be patient.

Hiding Windows Updates

Although I described the items above I think the real reason I believe my final update worked was because I was able to hide my Windows Update of the AMD video driver which was failing. As I mentioned earlier I had problems with the AMD video driver Windows update failing repeatedly. When Windows starts the upgrade process the first thing it does is try to find all pending updates and tries to install those or at least download the drivers from those. However, since the updated driver was failing I suspect that that was the problem.

Unfortunately there’s no easy way to hide updates natively in Update dialog anymore due to Microsoft’s new policy that you have to install updates eventually. Ok, I get it that it’s a good idea to keep up to date, but there needs to be a way to opt out if something fails or worse if a driver update goes wrong and you roll back and don’t want to reinstall the driver.

I reached out on Twitter, and thanks to Robert McLaws who pointed me at this GizModo article :

hidewindowsupdates

The article points at a utility from Microsoft Support that you can download to essentially hide updates.

How to temporarily prevent a Windows or driver update from reinstalling in Windows 10

The download is a small utility - wushowhide.diagcab -  you can run to disable specific updates:

HideUpdates

And voila you’re good to go until the next set of updates for the same driver rolls around.

There’s also a way to do this using PowerShell and a custom module described in this post by Igal Tabachnik:

Preventing a certain Windows Update from installing on Windows 10

After running the UI utility and then updating to the RTM build of Windows 10 using Windows Update I was finally able to install the RTM build.

Windows 10 Needs a Hide Update Option

There’s no doubt that Windows 10 needs to have native functionality for hiding updates. There are going to be driver updates that simply won’t work as is the case for me. The fact that Microsoft has a separate download to make this happen is ridiculous. Drivers have been known to not work and stuff goes wrong. I realize Microsoft is trying to make updates automatic to insure machines are up to date and secure, but re-downloading failed updates over and over puts a bunch of strain on the network and causes the computer to wake up during every update cycle to install an update that’s just going to fail again. That’s not a solution. A better process is needed for this scenario.

Heck since Windows 10 itself ships as a Windows update I ended up downloading Windows 5 times as part of this update cycle. That’s over 20 gigs of wasted bandwidth and that’s just for me. Now multiply this by a few thousand people who are also having issues out of the millions that don’t. It’s mind-boggling if you think of the bandwidth wasted.

This is clearly an oversight that has to be addressed in some way in the future.

For now I’m just glad the update worked. At least I managed to get up to the RTM version – we’ll see what happens when the next major update rolls around that acts like a reinstall. And already I’m seeing the AMD driver show up again on this machine as an update and – once again it’s failing to install. It’s disabled now and an update check is not trying to install a new driver at the moment. Fingers crossed AMD and Microsoft will figure this out at some point.

Hopefully this might be useful to some of you who also are having problems updating to Windows 10 from Preview releases.

Resources

© Rick Strahl, West Wind Technologies, 2005-2015
Posted in Windows  

Upgrading ASP.NET 5 Projects between Beta Versions

$
0
0

I’ve been trying to keep up with ASP.NET 5 and the various beta releases that have come out over the last months. It looks like we’re in for at least a couple more more beta releases (there are 8 planned and we’re currently on Beta 6 in mid-August). Of all the things that have been frustrating about ASP.NET 5, updating between versions has been the most painful for me. Every update - even after updating packages and runtimes has resulted in over 1500 errors between updates which when you first see it can be daunting. To be fair most of those errors are fixed by a fixing a couple of package dependencies but still it's quite a shock to open a project that just worked before updating to a new version and seeing thousands of errors :-).

In this post I'll describe how I've been updating projects between betas. It's not been painless by any means, but following a few basic steps will make the experience a little easier.

My AlbumViewer Sample Project

For context, I've been experimenting with ASP.NET 5 using a small sample project that I've been working on. I've been using this same sample for a variety of different implementations and platforms for a few years now. Those of you who read this blog have probably seen my Cordova AlbumViewer sample, or my MVC AlbumViewer sample that's part of the West Wind Toolkit. Using the same sample for a number of platforms makes it easy to compare features, lift related code and also compare performance which has been very useful in many ways.

Here's what the VNext Client Side app looks like:

The app is also fairly mobile friendly and re-arranges itself a bit for phone and tablet operation.

If you want to check it out you can go to:

It’s a small API app with an Angular Client Side front end. It’s set up with multiple projects which has made the migration process more complex as I have to update 3 separate projects first to get them to run then to make them coordinate and run together.  But I explicitly decided to do this to see what the update process and dependency management for multiple projects looks like which is a little different than the many simple ASP.NET 5 samples you find out there.

Here's what the project structure looks like:

3Projects 

The 3 projects are:

  • Westwind.Utilitities
    A small subset of my utility library classes ported to .NET Core compatible operation.
  • AlbumViewerBusiness
    The business layer that contains the Entity Framework Models and Context as well as a Business object that wraps the classes. This project also contains the base business layer. Normally I would move that out into another separate utility project but given the troubles with updating projects I - for now - am keeping that code as part of the same business layer project.
  • AlbumViewerAspNet5
    The actual Web front end project. Contains the ASP.NET and DI configuration and controllers for both the main API backend for the Web applications as well as a very limited MVC controller to display a few pages as server rendered HTML.

These projects are pretty small but they represent what for me at least is a typical project layout. It would be a lot easier to maintain all of this in a single project, but my goal was to create support libraries and at least one toolset project (Westwind.Utilities) that simulates low level features that don't have high level dependencies that automatically pull in a raft of libraries. When you add something like EntityFramework or ASP.NET Hosting or MVC packages into your projects, you are automatically pulling in a ton of Nuget packages that satisfy most common dependencies (ironically in the same way that big libraries standard libraries in full .NET would do). But if you build a low level library that deals mostly with base component, you have to manually pull in all of your own low level .NET core dependencies that used to live in mscorlib.dll or system.dll.

You can see the differences in the references for full runtime and .NET core projects here:

LowLevelRefs

I seriously question that all of this micro-management of 'breaking out of packages' into tiny little dependencies will have any value in terms of footprint - especially since most applications will automatically reference a shitton of these things by way of their top level dependencies like ASP.NET or EntityFramework. Worse though I can see one bad apple pulling in lots of dependencies that aren't even used. All it takes is a lower level component referencing EntityFramework and you now pull in a hundred packages. I suppose this is the equivalent of referencign mscorlib, but it feels a lot worse when you look at a cluttered package folder of over a hundred NuGet packages. Curious to see how that works out in terms of actual memory/footprint savings in the end.

I've been sticking to the major Beta releases and the main NuGet feed that provides the package references. For the really bleeding edge you can switch to the dev feed, but I've found that to be too intense to keep package relationships intact. Unless you are working on the ASP.NET source code itself, stick to the major beta releases.

Beta Upgrade Steps

I’ve been roughly following these steps for each update:

  1. Update the Visual Studio Tooling (this link is for Beta 6 - it'll change for later versions)
  2. Update the DNX Runtime
  3. Check the ASP.NET Announcements Page for changes
  4. Update your References in your Projects
  5. Fix any changed types based on Compilation Errors
  6. When in trouble: Compare Web project startup to a new Project
  7. Run

Even using these steps the updates – for this small project – tend to take easily a couple of hours of hunt and peck debugging and troubleshooting. To be fair this troubleshooting in many ways has helped me understand how things work behind the scenes but it is disconcerting to see how much is changing between these ‘beta’ releases.

Update the the Visual Studio Tooling

The first step you need to do if you’re using Visual Studio when a new beta rolls around is update your Visual Studio tooling (thank to Damien Edwards for reminding me). The tooling is synced with the latest DNX changes and is required to make sure your projects use the proper command line options etc when compiling code. Since those tools are still changing that's one requirement. The other is that there are some dependencies on the core libraries in the tooling and since those core libraries are also still changing the updated tooling is required.

The tricky part about this is that it's easy to forget. I didn't do it on my Beta 6 update and had a number of weird compiler errors that didn't make sense (even after updating references in the next step). Installing the new tools fixed a number of bogus compiler errors.

Update the DNX Runtimes

This is pretty obvious - once a new beta becomes available you'll need to install the new runtimes and DNX tools. Go to the command line and do:

dnvm update-self

to update the actual dotnet version manager binaries.

Then update the runtimes to the latest versions:

dnvm upgrade
Here's what you should see from the Windows Command Line (using ConEmu in case you're wondering):

dnvm updates

Check the Announcements Page

The announcements page shows breaking changes and a few other useful things that you probably will have to address in your code. It's by no means complete and not easy to see how it relates to existing code sometimes but it's a good place to start. Check this first then update your references and make code changes accordingly.

Update your References

For me this has been the most troublesome part of the update process. When I opened my small AlbumViewer project after updating references and runtimes I end up with over 1900 errors in my projects! Yikes. For example here's what my compile output looked like.

When looking at the error list it's easy to see that most of the errors are related to base types that are not referenced properly which is most of the time caused by bad references. So the first step is to update all references to the latest versions.

If you're using multiple projects like I am, compile one project at a time. Start with the one that has the least dependencies and then work outwards from that. In my case I fixed Utilities first, then the Business project, and finally the Web project.

Rename Assemblies from Beta5 to Beta6

So for example in my Web project I have the following packages defined in project.json:

"dependencies": {"EntityFramework.Core": "7.0.0-beta6","Microsoft.AspNet.Diagnostics": "1.0.0-beta6","Microsoft.AspNet.Mvc": "6.0.0-beta6","Microsoft.AspNet.Mvc.TagHelpers": "6.0.0-beta6","Microsoft.AspNet.Server.IIS": "1.0.0-beta6","Microsoft.AspNet.Server.WebListener": "1.0.0-beta6","Microsoft.AspNet.StaticFiles": "1.0.0-beta6","Microsoft.AspNet.Tooling.Razor": "1.0.0-beta6","Microsoft.Framework.Configuration": "1.0.0-beta6","Microsoft.Framework.Configuration.Json": "1.0.0-beta6","Microsoft.Framework.Logging": "1.0.0-beta6","Microsoft.Framework.Logging.Console": "1.0.0-beta6","Microsoft.VisualStudio.Web.BrowserLink.Loader": "14.0.0-beta6","AlbumViewerBusiness": ""},

All of these have the Beta6 postfix so in order to update them I could simply rename them by doing a search and replace on beta5 to beta6. That part is pretty straight forward and as it turns out most of those assemblies are staying the same.

However, things are potentially a little more tricky for updating .NET Core references to core runtime files since these are not tied directly to the BetaX designations. For example, my Westwind.Utilities project.json looks like this:

"dependencies": {
  },"frameworks": {"dnx451": {
    },"dnxcore50": {"dependencies": {"System.Runtime": "4.0.20-beta","System.Runtime.Extensions": "4.0.10-beta","System.Collections": "4.0.10-beta","System.Linq": "4.0.0-beta","System.Threading": "4.0.10-beta","Microsoft.CSharp": "4.0.0-beta","System.IO": "4.0.10-beta","System.IO.FileSystem": "4.0.0-beta",        "System.Text.Encoding": "4.0.0-beta6","System.Text.RegularExpressions": "4.0.10-beta6","System.Reflection": "4.0.10-beta","System.Reflection.Extensions": "4.0.0-beta","System.Reflection.TypeExtensions": "4.0.0-beta","System.Threading.Thread": "4.0.0-beta","System.Globalization": "4.0.10-beta"}
    }
  }

Notice that all of these point at -beta, but not -beta5. But what really sucks about this I that the version numbers on some of them are .0, .10, .20 and they've been known to change. It's easy to get in trouble here and get the wrong package. In this round from Beta 5->6 the only change I had was System.Runtime.Extensions which went from .0 to .10, but it's a good idea to go through each of these references and use the editor Intellisense to find the latest version:

 PackageJsonIntellisense

and then drop of the actual build number. The 'safe' NuGet feed should have the latest version in there for the current Beta.

Entity Framework Changes

In Beta 6 there were a few updates again in Entity Framework that caused me issues:

EntityOptions and EntityOptionsBuilder to DbContextOptions and DbContextOptionsBuilder

If you're doing any custom configuration in the overridden OnConfiguring() you'll get a DbContextBuilder passed and that needs to be updated.

.Table() changed to .ToTable() in EntityBuilder

protected override void OnModelCreating(ModelBuilder builder)
{//builder.ForSqlServer().UseIdentity();

    // Pluralization and key discovery not working based on conventions
    builder.Entity<Album>(e =>
    {                
        e.Key(et=> et.Id);e.ToTable("Albums");    });
    builder.Entity<Artist>(e =>
    {
        e.Key(et => et.Id);e.ToTable("Artists");    });

    builder.Entity<Track>(e =>
    {
        e.Key(et => et.Id);        e.ToTable("Tracks");
    });base.OnModelCreating(builder);
}

Suprisingly there were no changes required for any other code in this beta 6 update for which I am thankful. Troubleshooting start up issues due to renamed or moved components can be a royal pain, especially if said components and dependency injected. The errors emanating from injected components tend to be less than conducive to finding the real problem.

When in Trouble: Compare to a working Project or ASP.NET MusicStore Sample

The Beta5 to Beta6 so far was probably the smoothest upgrade for me. I only had to make a few changes related to Entity Framework - no code changes to anything else. However, beta3-4 and 4-5 were drastic with lots of changes. The only way I could get things to work was by creating a new project and then comparing the start up code and basic config code to my own project. For startup code a new project probably works fine, for other things like Entity Framework Configuration and and Controller operations I recommend looking at the MVC MusicStore sample. For me this has been the best place to see working code for each beta cycle as there's good effort to keep these sample apps up to date. I've been using the SPA sample since that's the closest match to what I'm doing in my sample.

It's a lot of Trouble Still

Updating between versions is still a major pain, but - I guess this is to be expected when working with pre-release bits. However, these 'betas' continue to feel more like CTPs or prelease alphas as there is still so much churn. Hopefully the minimal change pace for the Beta 6 update signals a more stable update cycle coming up so we can actually start building stuff without constantly getting the rug pulled out from under us. I have a bunch of stuff that I'd like to port to vNext, but I'm not going to go down this road until I have some confidence that things won't massively change. In the meantime I'm sticking with my simple play example to see things working and experimenting around the fringes…

© Rick Strahl, West Wind Technologies, 2005-2015
Posted in ASP.NET vNext  

The Rise of JavaScript Frameworks – Part 2: Tomorrow

$
0
0


frameworkIn Part 1 of this series I talked about the current state of JavaScript frameworks and how in many ways JavaScript frameworks have become the new baseline for developing client centric Web applications or Single Page Applications. Due to the complexities involved in building complex client side applications using JavaScript and HTML, frameworks have just about become a necessity to effectively building any non-trivial application. Frameworks are a huge help with organizing code, providing easy ways to bind data from models rather than binding data to the DOM manually with imperative code, providing tons of helper functionality for operations most applications need like view and nested view routing, form validation, http request management and tons of other features that every application needs but isn’t immediately obvious as a bullet point feature.

Version 1 of the major frameworks came about later than I would have expected them to, as there was a lot of pent up need to address the missing pieces. When these frameworks finally did arrive on the scene and got to a reasonably stable point, public interest took off like wild fire and adoption rates have gone through the roof since then. It’s not surprising – for me personally using both Angular and React I’ve seen myself being able to build complex front ends in a fraction of the time that it took previously.

Trouble in V1 Paradise

As much as the first round of frameworks have improved life for JavaScript developers everywhere, there are lots of warts in the V1 frameworks. Most of these frameworks started out as very experimental projects that  morphed into frameworks only after public interest inspired exploration of more general purpose functionality. Angular in particular evolved from a template HTML generator, into a what is now a full featured Angular 1 framework. Angular  had its start in 2009 which seems like a lifetime ago now in terms of new Web capabilities and developer practices. With the exception of some of the newer frameworks like React, the story is similar with other frameworks that had an early start.

The result is that a number of frameworks have quite a bit of old code that wasn’t designed for the purposes we use them for today. Even beyond that when these frameworks were originally built, the complexity of applications we are actually building today wasn’t imagined in those early days. The end result is that frameworks have been refactored from the outside in, resulting in a number of inconsistencies, overly complex APIs and sometimes funky behavior that requires detailed inside knowledge of how the framework works to work around issues.

Since those early days, framework developers have done an admirable job of patching up the existing frameworks, keep them relatively easy to use as well as providing the features that we as developers need to get our job done. As I mentioned in Part 1, it’s amazing what these frameworks have provided us in terms of a leap over your typical jQuery based application we built before it, both in terms of functionality as well as productivity. For me personally the productivity gains in building front end applications has skyrocketed after starting to use a framework (Angular in particular) because it freed me from having to build my own system level components and try to figure out project structure. It's been a huge win for me.

But… looking over how frameworks are working there are many things that are suboptimal. Again speaking from my Angular particular view there are tons of rough edges. In Angular the built-in routing system is terrible even though UI-Router provides some relief for that it's still a very messy way to handle routing. Directives have to be near the top of the list for awkward APIs with its multi-overloaded structure and naming standards (if you can call it that).  There are lots of quirks where binding can go terribly wrong if you bind circular references or when you need to do manual binding at the wrong time in the Digest cycle and you end up in an endless digest loop that eventually pops the execution stack. While these are all known and relatively minor issues that have workarounds, it shows the architectural choices from a bygone time catching up with frameworks that are trying to do so much more than they were originally designed for.

Advertisement

Starting Over with V2 Frameworks

The inclination to reimagine is very high in software development, and in the JavaScript world where major version cycles are measured in weeks instead of years this is especially true. But in the case of the existing JavaScript frameworks and their explosive growth and rate of change, it’s actually become quite clear that starting over and building for the current use cases that we’ve discovered and mostly standardized on for JavaScript framework based development is a good idea. Clear the slate so to say, and start over with focus on the performance and features that we are tasking those frameworks with today.

Not only are we dealing with new framework re-designs, at the same time we're also dealing with a bunch of new-ish technologies that are disrupting the way things have been done in the past. Among them are:

  • Components not Applications
  • JavaScript Changes
  • Platform Changes
  • Mobile Optimizations

I've been watching and playing around with Angular 2, Aurelia and Ember 2 for version 2 frameworks. Out of these three only Ember is shipping a production V2 version today while the others are still in alpha and beta state respectively and not looking like they are going to release anytime soon. This post mostly relates to these three frameworks since that's what I've looked at, but much of the content can be applied more broadly to other frameworks as well.

Components over Applications

One theme that all the frameworks are starting to embrace is that applications should be built out of smaller and simpler building blocks. So rather than building large modules or pages/controllers,  the idea is to create self-contained smaller components that can be patched together like legos into a larger document. Components have their root in the fledging Web Components standard that seems to have stalled out due too many problems and inconsistencies, but the overall concept of self contained components is still something that each of these frameworks is paying lip service to.  All the framework vendors claim some Web Components functionality but in reality it looks like the concept more than the actual implementation is what counts.

In Angular 2 for example, rather than having controllers and directives there will only be components. A component can take over the functionality of what directives and controllers used to do under a single component type. At a high level both do many of the same things - they both have models  and binding code to deal with.  Likewise services and factories are simply classes in Angular 2. The goal of much of the new functionality is to simplify and strip functionality down to its most essential features to limit the API surface of frameworks which results in simplification on many levels. Certainly angular 1 had a lot of duplicated concepts and in Angular 2 the object model will be much smaller and more concise which makes it easier to work with.

Besides the object model simplification, a component approach can have a profound impact on how you build applications. Rather than building large and complex controllers, you can break out pages into their individual components where sections of a form, or say a list live in their own components. By isolating each of these components and assigning their own logic and data to them they become easier to develop (less dependencies and smaller code base) as well as more easily testable. Angular, Aurelia and Ember all embrace this component style with nested customer HTML tags that describe the individual components in a page.

But having played with components over controller approach I have to admit I have to really force myself to think this way - it's hard to draw the line and not over fragment applications into a million little shards. There's a fine line between not enough and too much componentization. But the beauty of the model is that it's your choice. You can make your components as atomic or as monolithic as you choose.

Improved Databinding Syntax for Angular and Aurelia

Angular 2.0 is making a big break from Angular 1 with drastic changes to its markup syntax for data binding. In Angular you can bind any attribute, event or property through the markup interface using a funky CSS inspired syntax (# for objects/properties, [] for attributes and () for events) for example. While the syntax definitely is 'different', it does provide for a well thought out approach for data and event binding that is much more flexible than the old model. This model reduces the need for custom directives just to handle special bindings for each type of control or control attribute. This feature alone should cut down drastically the amount of directives needed in Angular.

Aurelia also has a beautiful, explicit data binding syntax model that uses descriptive prefixes like bind. or delegate. to actively describe the operations to perform for binding. It's very clear and descriptive although a little verbose. Like Angular Aurelia can bind to anything on an element which makes for more flexibility than V1 frameworks had. I'm a big fan of Aurelias binding and validation model. It's very clean and easy to work with in code.

The changes in these frameworks are very welcome as they provide much more flexibility than what was available in V1 frameworks. It also looks like performance of data binding will be much improved as a result of these changes.

JavaScript: On the Cusp of Big Change

The other major change that's happening in the V2 frameworks is that they are all focused on EcmaScript 6  (ES 2015) and beyond.  With that change comes a whole slew of other technologies that are required in order to make it all work because even modern browsers cannot run ES6 natively today.

This means new technologies you have to learn and work with:

  • EcmaScript 6 (ES 2015)
  • Transpilers
  • ES6 Module System and Loaders
  • Build system technologies

ES6/ES 2015

Some of the highlight features of ES6 are:

The built-in module system is probably the most notable feature as it greatly simplifies the alphabet soup of module systems that are in use today. Having a standard module system defined at the language level should - in the future - provide for a more consistent experience across libraries instead of the messy multi-module support most libraries have to support today. ES6's module system doesn't support all the use cases of other module systems (there's no dynamic module loading support for example), so we may still need a supporting module system for that, but at least at the application level the interface will be more consistent.

Classes are the other big feature for ES6 although not everybody is a fan of classes in JavaScript, as it sidesteps some of the traditional functional nature that many love in JavaScript. Realistically classes just add to existing features so the purists can go on using their prototypes and functional classes, but I think classes add a necessary construct that is needed in a general purpose language like JavaScript. Dissenting purist voices aside, classes will end up being the most popular choice for creating a data structure  and looking at how the V2 frameworks handle operations that's certainly validating this point. Function() based classes and Maps likely will be relegated to special use cases once ES6 takes hold broadly.

I might be biased coming from Object Oriented environments but to me classes make a lot more sense than the haphazard choices we've had in JavaScript thus far with their individually different behaviors. As a bonus classes finally maintain the scope of the .this pointer in method code, which is one of the most vexing problems that new JavaScript developers coming from OO often run into.

Another great feature are template strings which can be used to merge string and data content inline. This is great for code based output generation, but also useful for things like components which often need to be fully self contained and not ship with external HTML content. In this new word of components inline HTML may not be uncommon and template strings greatly facilitate embedding data into string content for rendering.

Promises are now included in ES6 as part of the base language which again provides a consistent baseline on which libraries can build. The built-in implementation doesn't support all the features a library like Q provides, but it provides the core implementation. Libraries can build ontop and provide the additional functionality. It's been frustrating to see different promise implementation that handle callbacks and error handling using differing syntax and by having a standard in the language at least we're bound to see standardization of the core syntax. All the new major frameworks are using the base ES6 promises and building extensions on top of it.

Arrow functions are like C# lambdas and make for less verbose function syntax.  Not exactly a big feature but I have noticed that it does make for more readable code as it cuts down on verbosity for anonymous functions. Unlike standard anonymous functions, arrow functions also guarantee that the parent scope's .this pointer is captured, rather than the active context's which is important when executing inside of the context of a class.

Finally there are a bunch of new language features in ES6 - the let keyword allows truly local scope variables in addition to the sometimes tricky block scoping. There are tons of new features via method extensions on the base JavaScript objects. Arrays in particular gain a ton of new functionality. There's also support of yield syntax using Generators so you can build IEnumerable style functions, and an implementation of iterators using the new .keys() and .values() and .next() functions that allow iterating over the internal members and values of an array. .find() and .findIndex() make it easier to find elements.  Many of these features have been available as part of third party libraries like underscore or lodash, but it's nice to have these common features available natively without a lib. It's a good idea to poke around in the list of new features in ES6 to see what other things you can use and might allow you to ditch an external library for. ES7 promises even more common language enhancements like async and await, object.observe() and more array and object extension functions which are useful for everyday scenarios.

None of the features are necessarily new - most you've been able to accomplish with third party libraries or other code workarounds. But having this stuff as part of the native JavaScript platform can reduce the amount of external libraries required and generally make functionality more consistent.

ES6 and (no) Browser Support

We can all agree that ES6 is nice and has many, many worthwhile enhancements. But the reality is that ES6 is not natively supported by any browser shipping today. Some browsers support some of the features, but no browser supports ES6 fully today.  if you take a look at this chart, you'll see a lot of red and the highest feature coverage of any browser is FireFox with 71%. It's actually quite surprising that full support isn't here yet especially given that most browsers (with the exception of Internet Explorer) are now evergreen browsers that are automatically updated with new features and standards and the ES6 standard has been more or less finished for nearly a year (although fully ratified only a few months ago). Yet full native support for ES6 looks like it will be off by quite some time yet. My guess is we won't see a full native implementation until early next year and probably a few more months before even all evergreen browsers will be there.

But even when evergreen browsers become capable to run native ES6, there's still the issue of older browsers that won't go away. Internet Explorer versions before 11 and Edge will never get upgraded, and there are literally  a billion old smartphones that have old browsers that also won't upgrade. The shift to ES6 with native browser support will take a long time before you can ensure that native ES code runs the way we expect ES5 code to run today.

ES6 requires Transplilation

Because this is all so much fun we had to invent a new word for running ES6 on browsers today: Transpilation. Transpilation is the process of converting JavaScript from one version to another - specifically from ES6/7 to ES5. For now, if you want to use ES6 the unfortunate truth is that you have to a transform ES6 code into ES5 somehow so that it can run on just about any browser. Transpilers take ES6 (and ES7) code and convert the code to ES5 code that can run in any browser.  Tools like Babel and Traceur come both in build time and runtime libraries that convert ES6 code into ES5.  The most common use case is to use a transpiler as part of the build process and statically 'compile' ES6 code into ES5 code, which is then loaded in the browser using a command line build tool or build tool like Gulp or Grunt.

There are a number of transpilers available today:

  • Traceur
  • Babel
  • Typescript (still requires traceur or shim transpiler at the moment)

Traceur by  Google is optimized for machine read code which essentially means it creates very terse and unreadable code. Babel is probably the most popular of the transpilers at the moment and creates reasonably readable ES5 code from ES6 or 7. The advantage of Babel is that it provides good debugging functionality and source mapping as well as smart exception handling that actually provides usable errors. Typescript is Microsoft's JavaScript enhancement language that provides new language features ontop of JavaScript and a type system for JavaScript. Typescript's features are mostly compatible with ES6 and ES7 syntax and provides additional features like variable and member typing, interfaces etc. Typescript comes natively with a compiler to turn typescript into JavaScript and there are options on the compiler to create either ES5 or ES6 code. Typescript is a super set of JavaScript, so plain JavaScript just works in Typescript. TypeScripts is shooting for full ES6 support, but it's not quite there yet. While Typescript can compile down to ES5 making it a transpiler of sorts, it still requires some additional module loader code to handle ES6 module loading completely.

Say Goodbye to Simplicity

Say what you will about the complexity of the V1 set of frameworks, one thing that is nice about them is you don't need much to get started. You can simply add a script reference to a page and you're off and running. The V2 frameworks are not going to be so easy to get started with.
With the ES6 recommendation of these new frameworks (Angular 2, Aurelia, Ember 2) that simplicity is gone as you *have to*  use a build process in order to transpile your code before you can execute it. Theorhetically you don't have to use ES6 as the frameworks pay lip service to supporting ES5, but it's clear that this is not the optimal use case. The new frameworks are designed for ES6 and when you look at the examples you are also not likely to want to use ES5 as it's much more verbose to write code with the same functionality.

But the complexity goes beyond just the transpilation. To get the transpilers set up you need a bunch of additional tooling. Aurelia requires jspm which is quite nice and meshes really well ES6's module system by using the same naming convention as modules. Angular uses Typescripts pacakage manager and Ember uses its CLI based loader. Everywhere you look tooling is required to get things loaded compiled modified and rearranged. Welcome to the simple JavaScript lifestyle.

Going to the home page and reading the getting started guide for any of the frameworks reads like a tutorial for a whole product of earlier libraries with discussion of installing package managers, transpilers, and running build agents that compile your code as soon as it's changed. There are usually a page or two of command line tools you get to run before you ever get to write a single line of JavaScript or HTML code. The move to ES6 might provide cleaner code, but the downside is that there is a lot more complexity involved in actually starting and building an application.

To be fair once you understand the basic steps involved this process of setting up a simple build environment won't take very long, but if you are a new developer starting from scratch and staring at the first time tutorials I'm not sure that I would stick with it. My first impression would likely be: "Are you fucking serious? You call this easier?"

I think in the big picture it will be easier to use these new tools and as much as it seems painful at first, a build process for JavaScript is becoming a necessity even if you are using an older framework. The main thing is that the getting started for a complete newbie learning curve has gotten significantly more complex. And that is not a good thing.

Even for seasoned developers comfortable with V1 frameworks there will be a learning curve, at the very least picking up ES6 and new module loading syntax and the new fraemwork syntax, but also to work with a whole new set of tools to build your application.

Dedicated CLIs

To help alleviate some of this setup, build and configuration pain the new frameworks come with dedicated CLIs that help manage project creation, build process and running watchers. These tools are geared towards easing the repetitive and tedious tasks that you have to go through especially at project creation. This goes a long way to making the process appear simpler as long as it all works.

But when it doesn't, things can get ugly because at this point you have hundreds of files and packaged dependencies created and very little in the way of hints where things went wrong. I ran into this with both Aurelia and Ember starter projects and in both cases the problem ended up being out of date package references which took a bit of time and searching to correct.

Regardless, tooling is going to be a vital part of this lifestyle if there is any hope of getting the unwashed masses to use this stuff or even try it out for that matter. I think it's going to be an uphill battle to get people weaned off the simplicity of the V1 frameworks and get over the AYFS moment. :-)

There's lots of room to improve here. The V2 frameworks are either in Alpha, Beta or just Released so they'll improve and get more reliable with time. Let's also hope that the build tooling and dependency trees can be whittled down over time to reduce the complexity of what is required just to get an application off the ground.

Mobile Development

Another important aspect of V2 frameworks is additional focus on mobile development. This comes mostly in the form of optimizations to make sure that frameworks are optimized for mobile devices to use less power and perform adequately. Existing V1 frameworks are notoriously CPU hungry and a lot of focus is going into V2 versions to optimize performance.

All of the new frameworks are using new approaches to deal with view rendering and data binding performance by overhauling their view and binding engines. The React framework seems to have had a massive effect on other frameworks in spurring better performance for rendering large amounts of data, so much so that some frameworks like Ember are emulating some of the React engines features for their own rendering. React's main selling point is that its blistering fast in rendering data, so much so that it doesn't use traditional bindings but rather just redraws the UI as needed from memory rendered buffers.  React's approach is more traditional in that it works like a view engine rather than a data binder with the view engine simply re-rendering the entire view rather than trying to update the DOM's existing state.

Angular and Aurelia on the other use data binding to update existing DOM nodes when data changes. In V2 new approaches are used to detect changes. MutationObservers and support for Object.observe() make it easier to detect changes on DOM elements and classes in a highly performant way and this translates into better overall data binding performance.

Additional mobile development features are geared to the animation features built into the frameworks, that are optimized for mobile deveices as much as possible. I haven't really checked this out, but there's quite a bit of hoopla around this aspect.

There are also efforts in making various frameworks to support multiple view engines that can be swapped out and actually render native controls in native applications. Again React started this with React Native which maps their JSX language markup to native controls. Telerik is also heavily pushing their NativeScript framework which is a more traditional component library approach to building applications, but using JavaScript.

Native development is definitely an important aspect. For me personally, the last 4 applications I've built have had major mobile components to them and while I prefer building Web based applications that work well on the Web, 2 of those apps needed to be wrapped up in Cordova to provide the functionality we needed. Native frameworks address this need. To me though it's not so much the development of the applications that is at issue though - it's the infrastructure and deployment/testing process that's the big issue. Building applications that can go easily between a Cordova solution and a native Web application require a bit of tweaking, and the entire process of rigging up and testing Cordova applications still feels very cumbersome. Again I think tooling in this space is going to potentially make this better and as far as it goes Telerik seems to have the right idea with their integrated Web and Visual Studio environments.

Mobile is definitely an interesting space - so much is changing and no matter what you use it seems by the time you get rolling with it something new and better shows up…

Two Steps forward One Step Back

twoforwardonebackIt's easy to get wrapped up in the hype around the V2 frameworks as they are clearly bringing many improvements and cleaner object models to framework Web development. But we're getting hit with a large amount of change, not just from the frameworks themselves but also the underlying JavaScript and build system changes that are essentially forcing a complete reoboot on how you build front end applications with these new frameworks. We're gaining easier to use code and new framework features at the cost of additional infrastructure overhead.

It's ironic to see JavaScript move in this direction because simplicity was always one of the biggest selling points of JavaScript. In the past it's been "Just add a script tag to an HTML page and you're in business" - well that's no longer the case if you want to take advantage of all of these new features. And just as ironic is that JavaScript now needs what essentially amounts to a compilation system that can compile a bunch of modules into a concatenated and compacted executable file. This is starting to look a lot like a .NET or Java project - without all the nice IDE build tool features that don't exist for JavaScript today.

Regardless, it'll be interesting to see where JavaScript frameworks will end up once they are actually releasing. Currently the biggest pain is that it's hard to see when some of these frameworks will actually ship. I've been really enjoying playing around with Aurelia and some parts of it feel really solid while others are clearly still under construction and wobbly. Neither Aurelia nor Angular are ready for any sort production work yet, so it's hurry up and wait. I'm not about to jump in for real before the frameworks are ready for anything but just playing and getting familiar with some of the new concepts. Make no mistake there's a lot to learn and it will take time, so getting a headstart on ES6 especially is probably a good idea.

I'm taking my two steps forward cautiously. For production use I'm continuing on with Angular 1.x for the time being - after all the V1 frameworks work today. I'm checking out the new frameworks and building a few simple sample apps with them but that's as far as I'm willing to commit for right now. I get questions from customers regularly asking whether they should wait for V2 of this framework or that, and my advice always is - go with what is available today. Don't wait for the new and shiny. Even if it shipped tomorrow you'd need some time for learning, and it's probably a good idea to wait for the first few point releases and see what issues crop up.

The future starts tomorrow. In the meantime get stuff done today…

© Rick Strahl, West Wind Technologies, 2005-2015
Posted in Opinion  JavaScript  Angular  

Announcing West Wind Web Surge 1.0

$
0
0

About a year ago I introduced an easy to use URL and load testing tool called West Wind WebSurge. I created this tool out of a sense of frustration with existing stress testing tools that are either wickedly expensive, or a pain in the butt to use. I wanted an interactive tool that makes it easy to set up and test URLs either individually or under load. What started out as a requirement on a client project, quickly morphed into a custom load testing library and then eventually into a product that combines the load engine with an easy to use UI to make it easy to create the URLs and run the tests.

The end result of this was West Wind WebSurge which is a Windows based application that makes it very easy to enter and capture URLs and then play them back either individually for functionality testing of individual URLs or under heavy load for performing stress testing. WebSurge stores the test information in plain text files that can be shared easily in projects or source code repositories and can be easily generated by tools. The main goal of the front end piece is to make it super quick and easy to capture or create URLs for tests, store and save them so that you can easily create repeatable tests, that you will  actually run on a regular basis. Even starting from scratch you should be able to start running tests in a couple of minutes.

So, today I'm happy to announce that I've released version 1.0 of West Wind WebSurge after a lengthy beta period.

You can download and find out more about West Wind WebSurge from these links:

or take a peak at the functionality available in this YouTube walk-through video:

Installing

The easiest way to install West Wind WebSurge is through Chocolatey:

choco install westwindwebsurge

But you can also download the installer directly from the download link and then run the embedded installer exe.

WebSurge and Me

For me personally I've been using WebSurge in just about any Web project I've created in the last year and it's been especially useful in API projects. I use WebSurge for all my API testing to test individual URLs interactively. When building client centric Web applications almost everything becomes an API and since I prefer to design my APIs up front before there is any Application UI to test it, some sort of testing tool is required. WebSurge makes it easy to manually create the request trace and then test it against the server. Yes there are other tools for that like Postman, which is excellent and I've been using it for years. However, there are a number of things that make WebSurge more useful to me. I switch around servers quite a bit and Websurge makes it easy to transform test URLs to work against different domains/virtuals. So I can take a series of URLs created on an IIS Express test url and run it against a staging site just by changing the domain in an options setting. If necessary I can also run a quick search and replace on the actual HTTP trace text files used by WebSurge to modify URLs or headers or whatever else needs to be modified in a set of requests.

Once the URL tests exist the stress testing comes for free - I can just turn on the load testing parameters and I can fire a given number simultaneous connections to load those same URLs. For HTML based sites the capture tool lets me easily capture HTTP content including HTTPS requests and then use that for stress testing. Having the ability to easily create load tests I now routinely set up captured tests of server side applications right when I create them to check for performance issues early on. Because it's so easy to create and recall tests, I test for performance under load on a regular basis now as I build applications…

Anyway for me at least (I'm only slightly biased)WebSurge has become a very useful tool in the Web Development process.

How did I get here?

When I started out on this path, I wasn’t planning on building a tool like this myself – but I got frustrated enough looking at what’s out there to think that I can do better than what’s available for the most common simple load testing scenarios. My goal wasn't to build the end all load testing tool to replace super high end networked solutions. Rather I wanted to build a tool that can create and run local tests quickly and easily so that the job actually gets down. Having a user friendly UI that makes it easy to manage requests and run tests is key to that as well.

WebSurge can handle 10's of thousands of requests a second, but it's not meant to replace massive load generators that create a million requests a second. If you need that much performance, then you're probably a good candidate for those big bucks, high end tools that gave me sticker shock :-)  I've tested WebSurge on my i7 MacBook Pro under Bootcamp laptop capturing close to 50,000 reqs/sec against static content, just to give you an approximate measuring stick -so if you're testing apps that have higher request loads than that then WebSurge may not be for you. I suspect not many of you are working with apps that have 10's of thousands of requests a second, and if you are you are likely already using some other load testing solution anyway. For the rest of us who are happy to be dealing with thousands of requests a second, WebSurge works great.

Advertisement
#

West Wind Web Surge – Making Load Testing Quick and Easy

So I ended up creating West Wind WebSurge with the goal to make it drop dead simple to create load tests. It should only take a couple of minutes to fire up WebSurge, add a few URLs and test the URLs either individually or in bulk for a load test. Let's take a look and see what this looks like.

WebSurge works with Sessions of Urls. You create URLS either by manually entering them or by using the built in capture tool. While using WebSurge the most common view you'll see is the session view and here's what it looks like:

RequestPage 

A session is a collection of URLs that runs when you run a load test.

When you click on a request the request info is automatically shown in the detail pane on the left where you can see the request trace.

But you can also test URLs individually and just one request at at time while poking around the user interface. You can right click for a host of options on a single request:

UrlMenu

The Test button lets you run an individual request or Test All will run all requests that are active exactly once and show you the results pane with a list of each of the request. You can also make URLs inactive (Ctrl-i), so they are excluded from load tests and Test All, which is useful to hide certain requests from tests temporarily. For example, I occasionally have maintenance links I need to test individually, but not as part of a test run. I can just disable that request which excludes it from any test run, but lets me still test it individually. You can also make all but one request inactive if you want to load test a single request out of a session which is a common use case for me while I'm working on a particular request and trying to tune performance or find problem related to high load.

When running tests, WebSurge by default runs the URLs in the sequence shown in the session list. When loading up requests it runs each request in a session in serial, but runs many sessions simultaneously. This is useful in scenarios where you have dependencies on the order in which things happen for a given user and you can rearrange the order interactively.

WebSurge remembers the last Session that was open and automatically opens that session for you when you restart so you're typically ready to go. You can also load session that were previously saved to disk and restore sessions from there. Because these are simple text files these files are easy to save to disk and share and I typically store my WebSurge session files in application solution folders and check them in with source control so they are available to anybody working on the project. Sessions can also easily be shared on Dropbox or OneDrive. The text files files have a .websurge extension that is associated with WebSurge, so double clicking on the file opens the session in the WebSurge UI.

Creating Sessions of URLs

Before you can actually do any testing you need to capture the URLs and there are two ways to do this: Manually or using the Capture tool.

The most obvious way to create new requests is to use the request editor by pressing the New button in the Session window. Requests are simply a URL, an HTTP verb, headers and content and if you manually enter the content or edit it here's what it looks like:

Request Editor

If you add POST content, it's added as plain text and the request handler automatically adds the proper encoding. You can also capture and add binary data which is stored in base64 format and then converted back to binary when the data is sent out. Requests can also be named. If you are doing API testing you often end up with long very similar URLs, and being able to give descriptive names to requests can be easier to read. The POST editor pops up by double-clicking the window and the header and content panes are resizable.

Manual entering works great if you are working on an application and creating requests as you go. I personally tend to create my URL request here first, then create API endpoints to handle each request  in typical test first style.

Capturing Session Data

If you have an existing, running application you want to test, then using the capture tool makes life easier as you don't have to manually create the requests, can just capture them from the running application.

You can also capture output from Web Browsers, Windows Desktop applications or service applications. Basically any HTTP source that goes through the Windows HTTP stack (either Windows or .NET APIs) can be captured. In the following screen shot I'm simply capturing the API output from the running sample application on localhost:

CaptureWindow

With this tool you can capture any HTTP content including SSL requests and content from HTML pages, AJAX calls, JSON APIs, SOAP or REST services – again anything HTTP that uses Windows or .NET HTTP APIs. Requests are captured as raw text. You can edit the HTTP trace text in the editor here, or after you've saved it to file because the format is one and the same. WebSurge uses this format as input for its tests.

Notice that capture window also has a few options for filtering requests that are captured which is useful to avoid capturing a bunch of noise that you typically don't want to test. If you're using Chrome for driving a Web Application you might see a bunch of Chrome's navigation pre-fetching URLs. For HTML sites you might capture google analytics and social links that you are probably not interested in for a stress test. You can specify the domain that you want to capture URLs from which excludes content from all other domains. You can also filter out static file links for images, css and js files which also may not be of interest in your testing. Personally I like to set up tests to only hit the actual data links of an application, so this makes it easy to capture only the things that I'm interested in with minimal cleanup after the capture is complete.

Use it for single URL Testing

Although WebSurge's primary purpose was for Load testing, I've found it to be a great tool for individual URL testing. I use it for API testing when I create my APIs initially and to ensure my APIs are working the way they are intended. Because you can capture a single or many URLs and store them on disk, this also provides a nice HTTP playground where you can record URLs with their headers, and fire them one at a time or as a session and see results immediately. And because you can save the sessions you have created, you can restore them later for repeating the tests or for sharing the tests with others also working on your project. I like to store sessions in source control so the traces are easily shared and also serve as a simple way to demonstrate API behavior that can be easily tested by new users.

Overriding Cookies and Domains

Speaking of sharing Sessions – when running tests on multiple machines or different domains, you often run into issues with cookies, domains, authorization and query string values changing. Using the Session Options you can override these values for your specific environment.

For example, in order to change the domain of all test requests that were run on localhost to dev.west-wind.com I can simply add the ReplaceDomain value. Now when a URL is accessed the orignal domain is replaced with the new value. You can use a domain name or domain plus virtual. Likewise if you have an authorization cookie in your captured content, that cookie may have expired and is no longer valid. You can use your browser to log on to your application and capture a valid cookie (using your favorite dev tools) and then replace either the cookie or an authorization header (for oAuth bearer tokens perhaps). Several people also requested ways to inject a query string value into requests.

headeroverrides[6]

There are a number of options here that allow you customize each request sent or how the entire test is managed.

Running Load Tests

Once you’ve created a Session you can specify the length of the test in seconds, and specify the number of simultaneous threads to run each session on. Sessions run through each of the URLs in the session sequentially by default. One option in the options list above is that you can also randomize the URLs so each thread runs requests in a different order. This avoids bunching up URLs initially when tests start as all threads run the same requests simultaneously which can sometimes skew the results of the first few minutes of a test.

While sessions run some progress information is displayed:

LoadTest[5]_thumb[2]

By default there’s a live view of requests displayed in a Console-like window. On the bottom of the window there’s a running total summary that displays where you’re at in the test, how many requests have been processed and what the requests per second count is currently for all requests.

Note that for tests that run tens of thousands of requests a second it’s a good idea to turn off the console display as the overhead of updating the screen starts affecting the performance of the test. There's a NoProgressEvent option in the Session options or your can use the button next to the thread count on the toolbar to disable the console display. The summary display continues to run however.

The summary display gives a running total of the test, and once an error occurs turns red.

Test Results

When the test is done you get a simple results display that lets you see what's happened at a glance:

ResultDisplay_thumb[2]

On the right you get an overall summary as well as breakdown by each URL in the session. Both success and failures are highlighted so it’s easy to see what’s breaking in your load test. You can right click to open the the report in your default Web browser and save or print the HTML document from there.

The list on the left shows you a partial list of the URLs that were fired so you can look in detail at the request and response data. The list can be filtered by success and failure requests. Each item in the list can be clicked to see the full request and response data. Here's the view for a failed API request:

RequestView_thumb[2]

This particularly useful for errors so you can quickly see and copy what request data was used and in the case of a GET request you can also just click the link to quickly jump to the page. For non-GET requests you can find the URL in the Session list, and use the context menu to Test the URL as configured including any HTTP content data to send.

You get to see the full HTTP request and response as well as a link in the Request header to go visit the actual page which is useful for GET requests where you can see the error occurring in your browser. If the content data is in a format that WebSurge can syntax highlight (JSON, XML, HTML,CSS) the content will be displayed in highlighted format. In the sample above the result is JSON, and the formatted version is displayed. You can click on the Raw Format button to see the original raw response which doesn't include the pretty formatting.

You can also export the actual test result detail and the result summary to either XML, JSON or the WebSurge plain HTTP Trace format:

ExportResults_thumb[3]

The result summary is output as JSON and is a nice way to keep a historical record of your tests. The summary basically exports what you see on the summary screen with the test summary for the overall test, and a summary for each of the URLs in the test. These exports can get very large if you ran long or very high volume tests…

Finally you can also get a few charts. The most useful one is probably the Request per Second chart which can be accessed from the Charts menu or shortcut. Here’s what it looks like:

Chart 

Command Line Interface

WebSurge runs with a small core load engine and this engine is plugged into the front end application I’ve shown so far. There’s also a command line interface available to run WebSurge from the Windows command prompt. Using the command line you can run tests for either an individual URL or you can reference an existing session file.

Here's what the output from an indvidual url test looks like:

Console

By default when it runs WebSurgeCli shows progress every second showing total request count, failures and the requests per second for the entire test. A silent option can turn off this progress display and display only the results.

Here are all the command line options available:

West Wind WebSurge v1.0
------------------------
usage:   WebSurgeCli <SessionFile|Url> -sXX -tXX -dXX -r -yX

Parameters:
-----------
SessionFile     Filename to a WebSurge/Fiddler HTTP session file
Url             Single URL to to hit

Commands:
---------
-h | -?      This help display

Value Options:
--------------
-s          Number of seconds to run the test (10)
-t          Number of simultaneous threads to run (2)
-d          Delay in milliseconds after each request
               1-n  Milliseconds of delay between requests
               0   No delay, but give up cpu time slice
               -1   No delay, no time slice (very high cpu usage)
-y          Display mode for progress (1)
               0 - No progress, 1 - no request detail,
               2 - no progress summary, 3 - show all

Switches:
---------
-r          Randomize order of requests in Session file

Output:
-------
--json       Return results as JSON

Examples:
---------
WebSurgeCli http://localhost/testpage/  -s20 -t8
WebSurgeCli c:\temp\LoadTest.txt  -s20 -t8
WebSurgeCli c:\temp\LoadTest.txt  -s20 -t8 --json

The command line interface can be useful for build integrations  that allow checking for failures perhaps, or hitting a specific requests per second count etc.

Version 1.0

I announced WebSurge about a year ago, and it's been a fun journey since. There've been a few challenges in using the .NET HTTP client for this and in the future I might have to switch something a bit more high performance capable. There's also been a lot of great feedback and suggestions that have since been integrated into the tool. Source code is now available on GitHub and the licensing has been adjusted so the tool is free for personal or open source use. Only commercial use requires a reasonably priced paid-for license.

There's lots more that I'd like to add to WebSurge  in the future, but in the meantime I think it's time to push an actual non-beta release version out and since the product has been in stable mode for the last couple of months and a half now seems a good time to make that release push. If you haven't tried it, I hope you give it a try, and if you have used it previously give it another look as lots of new features and perf improvements have been added since the early betas.

Get Involved

I’m definitely interested in feedback. If you run into issues or have suggestions for features or want to get involved, you can use GitHub Issues for the WebSurge project. For more general discussions or specific use case questions you can also post a message on the West Wind Message Board in the WebSurge secton.

Microsoft MVPs and Insiders get a free License

If you’re a Microsoft MVP or a Microsoft Insider you can get a full NFR license for free. Send me a link to your current, official Microsoft profile and I’ll send you a not-for resale license. Send any messages to sales@west-wind.com.

Resources

For more info on WebSurge and to download it, use the following links.

© Rick Strahl, West Wind Technologies, 2005-2015
Posted in Testing  Testing  

Talking about ASP.NET 5 on .NET Rocks

$
0
0

Last week I got a chance to talk to Carl and Richard about my experiences with ASP.NET 5. The good, the bad and the obnoxious. Ok maybe none of the latter. We had a great discussion on why we need a reboot on ASP.NET and how the process of building ASP.NET has affected developers trying to keep up with the 'beta' releases.

ASP.NET 5 is a major reboot of ASP.NET and there are a ton of great features that drive the platform forward. Some of my favorite features are the unified model for MVC and API, the middle pipeline for extensibility, Tag Helpers, and the ability to actually run code and develop DNX on other platforms. But, as cool as ASP.NET 5's new features are there are also a lot of pain points at this point in the development cycle of the product. This is not a minor upgrade, but rather a shift in a way similar that the original ASP.NET was from classic ASP. There are many familiar concepts but a lot of the cheese has completely moved.  In this show we talked about the things that make ASP.NET 5 great and necessary but also some of the issues that have made working with it at this point an adventure in configuration tweaking.

As a side note Carl and Richard make these shows so easy to do. In fact when we got to the end all I could think was "Where did the time go?" Felt like we could have gone on for another hour (well I did anyway :-))

You can check it out here:

Developing using ASP.NET vNext with Rick Strahl

© Rick Strahl, West Wind Technologies, 2005-2015
Posted in ASPNET5  
Viewing all 670 articles
Browse latest View live