Quantcast
Channel: Rick Strahl's Web Log
Viewing all 670 articles
Browse latest View live

Mysteriously stubborn IIS 401.2 Errors

$
0
0

I just had one of those wonderful days where everything in Windows just falls apart. I set out yesterday morning to finally install ASP.NET 5 Beta 8. One of the installs along the way is the Visual Studio Web Tools Update for Beta 8. Ok, so I installed that and towards the end of that install the machine blue screens with a REGISTRY_ERROR.

Ok, so after the reboot I tried again - same bloody thing: Full Windows Blue screen. Aaargh.

So I figured I'll check in Visual Studio and sure enough it appears the install actually worked. I can see the Beta 8 tools installed in the VS About screen. Except - it really isn't all there. Visual Studio started throwing all sorts of package load errors. Hrrmph. I knew what was coming next - uninstalling and reinstalling Visual Studio.

Except - that Visual Studio would now not uninstall. It'd start uninstalling and then just hang half way through the uninstall would hang. Lovely. So then came a long string of Repair, Uninstall, Reinstall - all yielding slightly different and equally unsatisfactory results. I was eventually able to uninstall and reinstall Visual Studio, but still have major packages failing to install. I still don't have a stable Visual Studio 2015 install at this point.

But it gets worse.

IIS Configuration Corruption

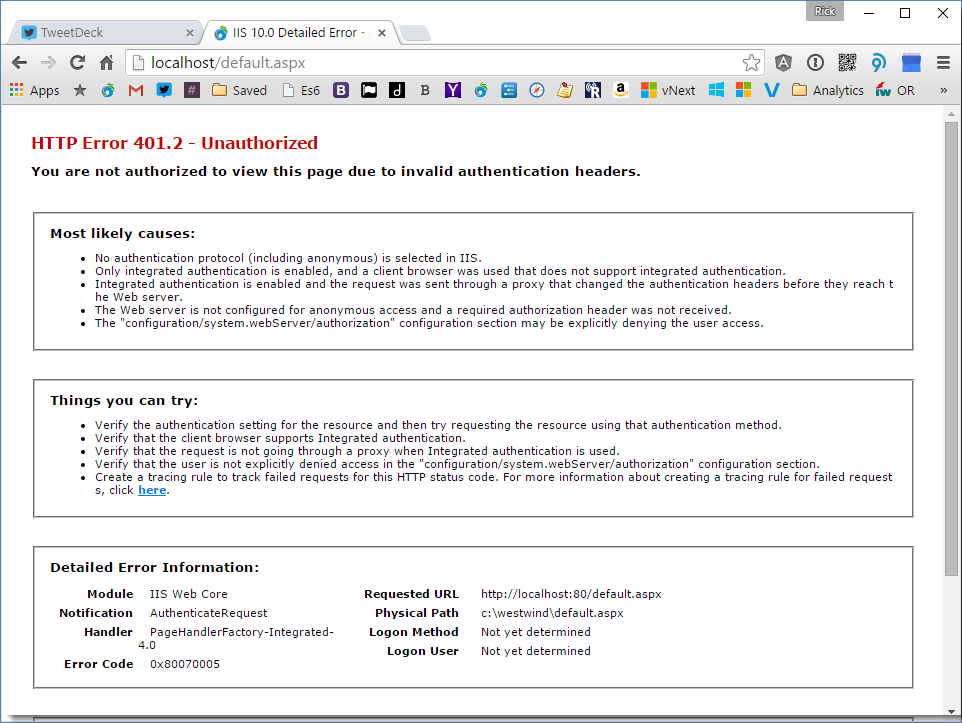
I also started having major issues with IIS. IIS now would run static content just fine but all ASP.NET content would either throw an auth dialog or show with a nice fat 401.2 error page when only Anonymous access was enabled:

Auth401_2

Aargh. Nothing I initially tried - checking disk permissions, using different anonymous accounts, disabling security entirely with mode=none - would work. 

Corrupted and/or Missing master web.config File

After a bit of sleuthing I found that the .NET master web.config file got completed corrupted - containing binary data. No wonder things were not working. I copied out a new web.config from web.config.default in the .NET framework folders and thought that would fix it. Except it didn't.

Even though I had copied in a new web.config, after going back and checking I could see that the web.config had disappeared again. And that missing web.config file was the culprit all along: After hours of poking around in the IIS settings (and I consider myself rather adept at knowing IIS settings like the back of my hand) I finally found when I looked at the .NET Trust levels at the Machine root,  the .NET Trust Levels were missing:

TrustLevels[6]

which was the dead givaway that something was very wrong. The fix in my case was to copy the web.config.default to web.config and voila everything snapped back to working.

These values are defined in the .NET master configuration web.config file which lives in:

C:\Windows\Microsoft.NET\Framework\v4.0.30319\Config\web.config

C:\Windows\Microsofyt.NET\Framework64\v4.0.30319\Config\web.config

Not surprisingly the 32 bit file was the one that had been corrupted previously and caused the initial havoc I had seen. Oddly the web.config in these folders simply were not there. Gone, missing and with it the base ASP.NET configuration which caused all sorts of problems. Once I replaced those with the default files, things started working the way they should.

A Reinstall Didn't Fix it!

But here's the real WTF: Prior to this discovery I had completely uninstalled IIS and renamed the windows\system32\INETSVR folder to force IIS to reinstall itself from scratch as it did. It created a new inetsvr folder but it did not install web.config files in the above config folders. Even after a full uninstall/reinstall I still saw the same failure of a continues login dialog or a 401.2 error. WTF???

I still had to manually copy the web.config.default to web.config in order for those settings to get picked up. For a sanity check I went over to my live Web Server and double checked and sure enough there's a web.config file in the Framework\Config folder. But on this machine even a complete reinstall didn't create one for me.

That's now solved my IIS problem. I still don't have a working copy of Visual Studio, but I'll leave that for another post once I figure out what the heck the problem is with that.

Advertisement
© Rick Strahl, West Wind Technologies, 2005-2015
Posted in IIS7   ASP.NET  

Serving URLs with File Extensions in an ASP.NET MVC Application

$
0
0

Today I was working on a blog plug-in for an existing application. The application is an ASP.NET MVC application so the application uses MVC’s routing to handle file access for the most part. One of the requirements for the blogging component is that it has to integrate with Windows Live Writer handling posting and updates to posts. One of the requirements for Live Writer to supported extended post properties when uploading new posts is a Live Writer Manifest file.

Serving the wlwmanifest.xml File from a Subfolder

The issue is that the manifest file has to live at a very specific location in the blog's root folder using an explicit filename.

If your site is running from a Web root, that's not a problem – it's easy to link to static files in the Web root, because MVC is not managing the root folder for routes (other than the default empty ("") route). So if you reference wlwmanifest.xml in the root of an MVC application by default that just works as IIS can serve the file directly as a static file.

Problems arise however if you need to serve a 'virtual file' from a path that MVC is managing with a route. In my case the blog is running in a subfolder that is a MVC managed routed path – /blog. Live writer now expects the wlwmanifest.xml file to exist in the /blog folder, which amounts to a URL like the following:

http://mysite.com/blog/wlwmanifest.xml

Sounds simple enough, but it turns out mapping this very specific and explicit file path in an MVC application can be tricky.

MVC works with Extensionless URLs only (by default)

ASP.NET MVC automatically handles routing to extensionless urls via the IIS ExtensionlessRouteHandler which is defined in applicationhost.config:

<system.webServer><handlers><add name="ExtensionlessUrlHandler-Integrated-4.0" path="*."
verb="GET,HEAD,POST,DEBUG"
type="System.Web.Handlers.TransferRequestHandler"
preCondition="integratedMode,runtimeVersionv4.0" responseBufferLimit="0" /></handlers>
</system.webServer>

Note the path="*." which effectively routes any extensionless URLs to the TransferRequestHandler which is MVC's entrypoint.

This handler routes any extensionless URLs to the MVC Routing engine which then picks up and uses the routing framework to route requests to your controller methods – either via default routes of controller/action or via custom routes defined with [Route()] attributes. This works great for MVC style extensionless routes that are typically used in MVC applications.

Static File Locations in Routed directories

However, things get tricky when you need to access static files in a directory that MVC routes to. For the Live Write scenario particularly I need to route to:

http://mysite.com/blog/wlwmanifest.xml

The problem is:

  • There’s no physical blog folder (wlwmanifest.xml resides in the root folder)
  • /blog/ is routed to by MVC
  • /blog/ is a valid and desirable MVC route
  • wlwmanifest.xml can’t be physically placed in this location

And that makes it rather difficult to handle the specific URL Live Writer expects in order to fine the manifest file.

There are a couple of workarounds.

Skip Routing use UrlRewrite

After futzing around with a bunch of different solutions inside of MVC and the routing setup, I instead decided to use the IIS UrlRewrite module to handle this. In retrospect this is the most efficient solution since IIS handles this routing at a very low level.

To make this work make sure you have the IIS Rewrite Module installed – it’s an optional component and has to be installed via the IIS Platform installer.

Then add the following to your web.config file:

<system.webServer><rewrite><rules><rule name="Live Writer Manifest"><match url="wlwmanifest.xml"/><action type="Rewrite" url="blog/manifest"/></rule></rules></rewrite></system.webServer>

This effectively routes any request to wlwmanifest.xml on any path to a custom MVC Controller Method I have set up for this. Here’s what the controller method looks like:

[AllowAnonymous]        
[Route("blog/manifest")]public ActionResult LiveWriterManifest()
{            return File(Server.MapPath("~/wlwmanifest.xml"), "text/xml");
}

This is an efficient and clean solution that is fixed essentially through configuration settings. You simply redirect the physical file URL into an extensionless URL that ASP.NET can route as usual and that code then simply returns the file as part of the Response. The only downside to this solution is that it explicitly relies on IIS and on an optionally installed component.

Custom Path to TransferRequestHandler

Another, perhaps slightly safer solution is to map your file(s) to the TransferRequestHandler Http handler, that is used to route requests into MVC. I already showed you that the default path for this handler is path="*." but you can add another handler instance into your web.config for the specific wildcard path your want to handle. Perhaps you want to handle all .xml files (path="*.xml") or in my case only a single file (path="wlwmanifest.xml").

Here's what the configuration looks like to make the single wlwmanifest.xml file work:

<system.webServer><handlers><add name="Windows Live Writer Xml File Handler"path="wlwmanifest.xml"verb="GET" type="System.Web.Handlers.TransferRequestHandler"preCondition="integratedMode,runtimeVersionv4.0" responseBufferLimit="0"  /></handlers>
</system.webServer>

Once you do this, you can now route to this file by using an Attribute Route:

[Route("blog/wlwmanifest.xml")]public ActionResult LiveWriterManifest()
{            return File(Server.MapPath("~/wlwmanifest.xml"), "text/xml");
}

or by configuring an explicit route in your route config.

Advertisement

Enable runAllManagedModulesForAllRequests

If you really want to route files with extensions using only MVC you can do that by forcing IIS to pass non-Extensionless Urls into your MVC application. You can do this by enabling the  runAllManagedModulesForAllRequests option on the <modules> section in the IIS configuration for your site/virtual:

<system.webServer><modules runAllManagedModulesForAllRequests="true" /></system.webServer> 

While this works to hit the custom route handler, it’s not really something I typically want to enable as it routes every type of document – including static files like images, css, javascript – through the MVC pipeline which adds overhead. Unless you’re already doing this to perform special manipulation of static files, I wouldn’t recommend enabling this option.

Other Attempts

As is often the case, all this looks straight forward in a blog post like this but it took a while to actually track down what was happening and realizing that IIS was short-circuiting the request processing for the .xml file.

Before I realized this though I went down the path of creating a custom Route handler in an attempt to capture the XML file:

public class CustomRoutesHandler : RouteBase{public override RouteData GetRouteData(HttpContextBase httpContext)
    {var url = httpContext.Request.Url.ToString();if (url.ToLower().Contains("wlwmanifest.xml"))
        {
            httpContext.Response.ContentType = "text/xml";
            httpContext.Response.TransmitFile("~/wlwmanifest.xml");
            httpContext.Response.End();
        }        return null;
    }public override VirtualPathData GetVirtualPath(RequestContext requestContext,RouteValueDictionary values)
    {return null;
    }
}

To hook up a custom route handler:

public static void RegisterRoutes(RouteCollection routes)
{
    routes.IgnoreRoute("{resource}.axd/{*pathInfo}");
    routes.IgnoreRoute("{resource}.ashx/{*pathInfo}");                routes.Add(new CustomRoutesHandler());

    routes.MapMvcAttributeRoutes();

    routes.MapRoute(
        name: "Default",
        url: "{controller}/{action}/{id}",
        defaults: new { controller = "Home", action = "Index", id = UrlParameter.Optional }
    );
}

The route handler explicitly checks each request coming in and then overrides the behavior to load the static file.

But alas,  this also doesn’t work by default because just like a route that tries to look at an XML file, the file is never actually passed to the MVC app because IIS handles it.

Nevertheless it's good to know t that MVC has the ability to allow you to look at every request it does handle and customize the route or processing along the way which allows for short circuiting of requests which can be useful for special use cases. Irrelevant to my initial problem, but useful and worthwhile to mention in this context :-)

Summary

File based URL access is one of those cases that should be super simple and obvious, but is not. It requires a relatively simple but non-obvious workaround to ensure that you can handle a Url with an extension by either using UrlRewrite or adding an explicit file mapping to the TransferRequestHandler.

Incidentally in ASP.NET 5 (MVC 6) – assumes you’re handling all requests anyway as you are expected to build up the entire request pipeline – including static file handling from scratch. So I suspect in future versions of MVC this sort of thing will be more natural, as long as the host Web server stays out of the way…

© Rick Strahl, West Wind Technologies, 2005-2015
Posted in ASP.NET  MVC  

Path Environment Editing Improvements in Windows 10

$
0
0

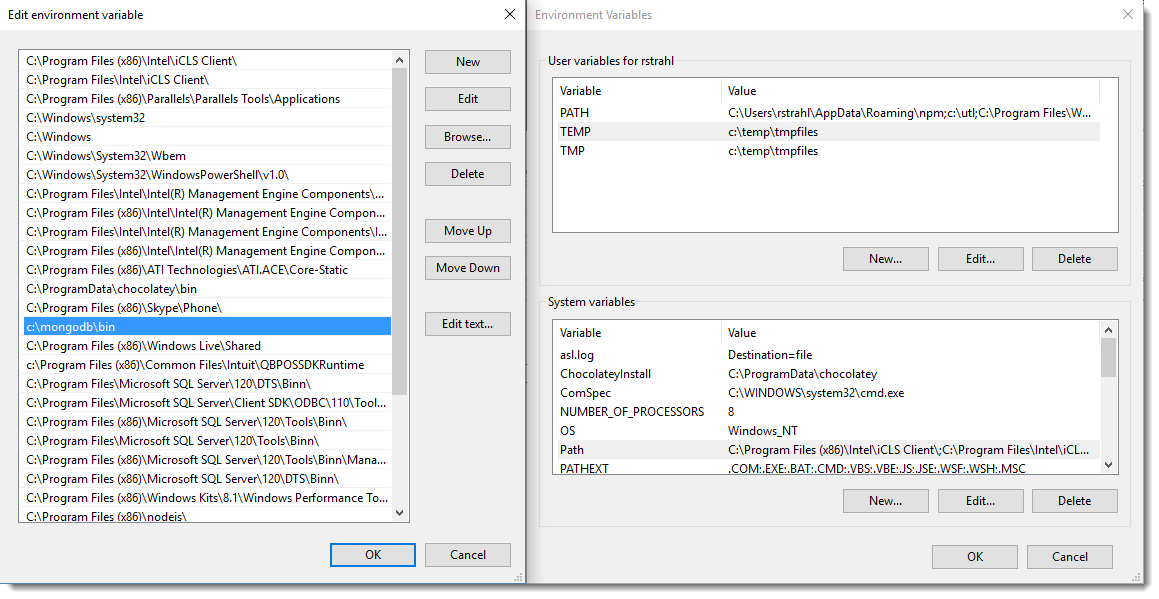
I was just poking around in my PATH environment variables as my machine is a relatively new install. To my surprise I found this new Path Environment Editor in Windows 10 Update 1:

Path Editing

A real editor for editing environment variables? And a way to manage the 50 or so paths I usually end up with in my SET PATH? Hell yeah… it only took 30 years for Windows to do such a simple thing.

It's sad, but this is exciting. How many times have you taken the path string out of the old editor and paste it into an editor just so you can read the freaking path, let alone edit it on a single line? Well, this is a welcome if long overdue change.

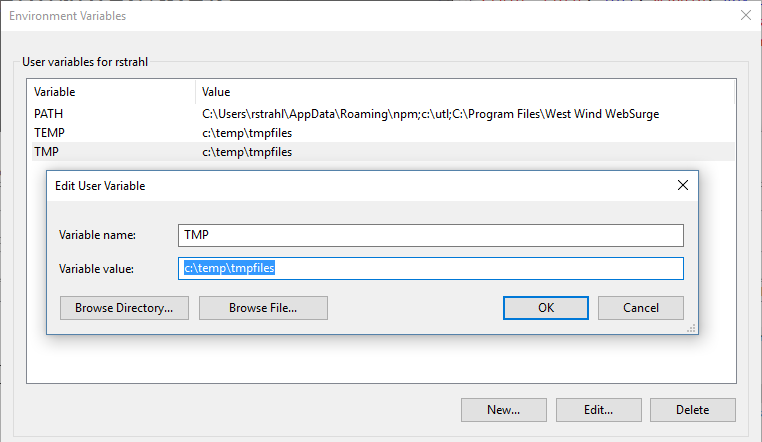
When you click on any environment variable you now also get a window that pops up that optionally lets you select a directory or file path:

EditEnvironmentVariable

Also notice that all of these windows are resizable which is another useful feature for seeing more of your system vars more easily.

More Please!

I hope we see more of this sort of thing in future Windows updates. Little things like this make life easier for many medial tasks and there are plenty of related things in the ancient Windows 3.x dated dialogs that can be improved in similar ways. Better late than never and I for one appreciate that!

© Rick Strahl, West Wind Technologies, 2005-2015
Posted in Windows  

Going Big: 40 Glorious inches of 4k with the Philips BDM4065UC

$
0
0

For software developers lots of screen real estate is important – it seems like there's never enough. Trying to see code, and multiple browser windows, debuggers and command windows all at once or at least in a way that you can find all these windows quickly is difficult if you don't have a ton of screen real estate lest you get into multi-finger acrobatics. Yeah, we've all done that. For the longest time I've fallen behind in my expansion of screen real estate – I've been stuck with a couple of  27" 1080p monitors (plus the laptop screen) for a looong time. I missed the WQHD/WQXGA era because it seemed like too little too late, when 4k was on the horizon. However it seems like it's taken a long time for 4k monitors to actually catch on and even longer for some decent sized 4k displays to become available.

A couple of weeks ago when I got back to Maui and my office (after 6 months on the mainland), I finally decided to jump in and buy a 4k monitor. But not just any monitor either but a freaking behemoth of a monitor that is the 40" Phillips BDM4065UC.

Why this Philips?

4k seems to me the logical next step for monitor resolutions, but a 4k monitor on anything smaller than a 30+ inch monitor is pointless, so I've been waiting for for larger models to show up. I discovered the Philips monitor before it was released in the US and was available only as an import and it looked tempting then. The thing that put me off initially was that it's relatively cheap compared to most other 4k monitors – it's in the same price ranger as mid to high end ~30" monitors which seems surprising given that this is one of the very few large 4k monitors out there. So, naturally I was skeptical and with lack of reviews at the time I decided to hold off.

In the last 6 months I've checked the reviews again and talked to a few people that bought these and said they were good – not great but good. Since I've never owned a super high end monitor I figured I can live with purist limitations and decided to get it.

After a week and half with this beast I can tell you one thing: There's no way I'm going back to a smaller monitor!

It's freaking Big and Big is AWESOME!

This monitor is very large compared to the 27" displays I've been using in my office. Just to give you and idea, here is the monitor with one of the old 27" monitors on the right and the 15" MacBook Pro on the left. Look how puny the 27" looks compared to the Philips.

MonitorSetup

Yes it's a behemoth. When the box showed up at the door it was a definite OMG moment! Sylvia said it must be some mistake on the delivery and now she's worried I might never emerge from my office again :-). Once set up the monitor barely fit underneath the mounted speakers…

When I sat down in front of the monitor for the first time I definitely thought: This is going to be too freaking large. I felt like being at a tennis match in the front row. You definitely have to turn your head to see each end of the monitors edges :-)

But surprisingly after a day or so of use the monitor no longer feels massive, but rather it feels – just right. It takes a little getting used to, in terms of figuring out how to place your windows for maximum efficiency to access them and to put the content you're working at the right eye level. The screen real estate is amazing. 4k is essentially four 1080p monitors and that is a lot of space. Making the most of all this space takes some experimenting – I like to layer my windows so that part of every window is always visible so it's easy to get to each open window and with 4k of space it's very easy to keep a lot of stuff open and accessible.

Living with 40 inches

40" is big enough so you can run the monitor in its native 100% resolution without any scaling required from Windows or the Mac. I run Windows at 100% and the Mac in smallest scaled size it can do and while it's a little bit on the small side it's totally doable.  I'd say it's probably equivalent of what you would get with a 24" display at 1080p.

To give you an idea of screen size consider this screen shot of using Visual Studio with 3 edit windows open simultaneously plus a document and test view, plus a full screen browser with the Dev Tools open:

VisualStudioAndDev

Everything you need on one screen!

The real kicker here is the vertical resolution – if you want to see a lot of lines of code in a single page, this is a pure joy to get over 2k vertical pixel height When you're heads down working this setup is pretty sweet with Code, HTML, CSS all open in a single view, plus a code search, active browser and browser dev tools. It's pretty damn productive when everything is right there without flipping between different windows or monitors.

Another really cool use for all that screen real estate for me has been running my music recording rig. I use LogicProX on the Mac and running a DAW at 4k is simply amazing.

Daw

I can see all my tracks, plus the full track mixer plus a number of bus views and plug ins I'm actively working on in a single view. When I'm actually recording I can see the whole track while it's running which provides some useful visual feedback.

In short having this much screen real estate is just awesome. But what's really scary is that now going back to the 1080p display to do anything feels like a an 800x600 display of old. It's going to be hard going back to smaller resolutions once you get used to this much screen real estate.

The Good Stuff

Given that this is a relative cheap monitor for this size, the monitor is pretty nice. Yes it's missing some amenities, but the things that really matter for developers are all there and working.

There's lots to like:

  • Size, Size, Size
  • Super sharp text at native resolution and scaling
  • Good brightness and contrast levels
  • 60hz support with DisplayPort 1.2 (has to be configured explicitly)
  • Price: Less than $800 from Amazon
  • PIP options to section the screen into halves or quarters driven by separate video inputs

Make sure you configure the Monitor for DisplayPort 1.2

Note that in order to get the monitor to run at 60hz, which is a requirement if you want to run it at native resolution so you don't get severe mouse lag, you have to configure the monitor explicitly via the on screen menus. Those menus are a bit tricky to work at first – it's a funky joy stick at the back. The DisplayPort configuration is in the Setup section of the onscreen menu on the bottom.

It's a mystery why they would ship this thing with DisplayPort 1.1 support enabled by default when you can't really get good enough screen performance to run it at native resolution. You definitely need DisplayPort 1.2 to use this monitor effectively so make sure you have a video card that supports this.

I'm using the current 15" MacBook Pro with the monitor and it works great. You'll need a mini DP to full DP cable which is not included in the box to hook up a laptop. There are a host of cables that come with the monitor including a full size DisplayPort cable, but no mini to full DP cable.

You will also need a video card that actually supports 4k video output. Most recent video cards on higher end laptops and most reasonably recent dedicated GPUs should support 4k and DisplayPort 1.2 but be sure to check first.

Driving this much screen requires a lot of horsepower and I have noticed that the GPU is working pretty hard and forcing the MacBook fan to run a lot more than it did before. I also noticed that while running in Parallels, the mouse is not quite as smooth as it used to be. However, in native Windows (Bootcamp) or native Mac there's no problem. You do want to bump the mouse pointer sensitivity nearly as high as it will go so you can get around all of this screen real estate. Any small hiccup in the mouse software or wireless connectivity is noticeable – I'm considering getting a wired mouse to avoid these disconnects.

It's not all Unicorns and Rainbows

As I mentioned early, when I did some research on this monitor the reviews were good but not exactly glowing. The bottom line is that this is a good monitor, but it's not a competitor in the top of the line camp for monitors. This is not an IPS monitor so while the screen is super sharp, the color gamut is average at best. Even playing around with the color settings on the monitor and in the OS gives decent but slightly washed out colors. I settled on the standard SRGB settings which are not customizable at the monitor level with some gamma tweaking in the video settings for the video card to make colors pop a little better. This isn't to say the colors are bad, but compared to high end displays this monitor is not a contender.

The other issue are viewing angles. Because the monitor is absolutely massive this actually matter a lot more than other monitors because you are actually affected by viewing angles sitting directly in front of the monitor. I've had issues with things on the very bottom of the screen – like Windows Taskbar highlights being difficult to see because they are so small. If you are really close to the monitor and looking down the bottom edge starts disappearing. The higher you sit the more noticeable this problem becomes. It's a minor thing that could be easily fixed if the monitor had veritcal adjustment so the image could be moved up a touch, but in certain color profiles you can't adjust the image position.

Because the monitor is so big, I also noticed that there are a few uneven spots in the display. This is not a problem if you sit right in front of it but from various angles you see these uneven spots as slightly shaded/discolored.

The monitor comes on a fixed stand – there's no adjustment for height or angle. On the plus side the stand is an open metal frame that leaves room underneath the monitor so you can store stuff underneath the monitor.

None of these are deal breakers, and given the price of the monitor this is what you would expect.

Going Big

To me this is the right size for a monitor because it's the size that is borderline too big, but can display an enormous amount of pixels at native resolution. I think this is as big of a monitor that you can comfortably use sitting right in front of, so I don't foresee much bigger monitors coming along in the future and getting much traction. Some would say that this is too big, but I think this is pretty close to the sweet spot for 4k displays. It's big, but it doesn't feel too big.  I also think that even higher resolutions aren't going to matter all that much for monitors because this monitor's resolution is already ultra sharp – anything higher and we're just going to start scaling the screen down which seems pointless. So personally I think 4k seems like a sweet spot with 30"+ size monitors.

I'm rather surprised that there are a so few bigger size monitors out there. To date there are only very few and most of the other ones are a lot more expensive. I think this will change eventually once more people use these behemoths and they become more common. If you're a developer, once you see one of these, or better yet you've had a chance to work on one for a few hours you'll probably realize very quickly how productive it is to have all this screen real estate.

The Philips is a decent monitor and great deal for the price. It's bare bones but it gets the most important job done effectively.

There's no going back for me.

Related Monitor Resources

© Rick Strahl, West Wind Technologies, 2005-2015
Posted in Hardware  

A small jQuery Resizable Plug-in

$
0
0

A few days ago I was working on one of my old applications and needed to add support for a resizable panel based layout in HTML. Specifically this is for HTML Help Builder which is an application that generates HTML based documentation from class libraries, databases and that also lets you create help topics manually for full documentation purposes. The generated output for documentation typically has a two panel layout and I needed to integrate resizing functionality from the old school frames interface that had been in use before.

Surprisingly there aren't a lot of resizing libraries out there and the ones that are available tend to be rather large as they are either part of larger libraries or are trying to manage the UI specifically for a scenario such as panel layout components. I couldn't find anything that was lean and can just rely on basic CSS layout to handle the UI part of resizing. So as is often the case, I ended up creating my own small jquery-resizable plug-in as this isn't the first time I've looked into this.

The jquery-resizable Plug-in

jquery-resizable is a small jquery plug-in that handles nothing but the actual resizing of a DOM element. It has no direct UI characteristics other than physically resizing the element. It supports mouse and touch events for resizing and otherwise relies on CSS and HTML to handle the visual aspects of the resizing operations. Despite being minimalistic, I find it really easy to hook up resize operations for things like resizable windows/panels or for things like split panels which is the use case I set out to solve.

If you're impatient and just want to get to it, you can jump straight to the code on GitHub or check out some of the basic examples:

Creating a jQuery-resizable Plug-in

jQuery-resizable is a small jQuery plug-in that – as the name implies – resizes DOM elements when you drag them in or out. The component handles only the actual resizing operation process and doesn't deal with any UI functionality such as managing containers or sizing grips – this is all left up to HTML and CSS, which as it turns out is pretty easy and very flexible. The plug-in itself simply manages the drag operation events for both mouse and touch operation and resizing the specified container(s) that is being resized. The end result is a pretty small component that's easily reusable.

You can use this component to make any DOM element resizable by using a jQuery selector to specify the resizable element as well as specifying a drag handle element. A drag handle is the element that has to be selected initially to start dragging which in a splitter panel would be the splitter bar, or in a resizable dialog would be the sizing handle on the lower left of a window.

The syntax for the component is very simple:

$(".box").resizable({
    handleSelector: "size-grip",
    resizeHeight: false,
    resizeWidth: true});

Note that you can and should select a handle selector which is a separate DOM element that is used to start the resize operation. Typically this is a sizing grip or splitter bar. If you don't provide a handleSelector the base element resizes on any drag operation, which generally is not desirable, but may work in some situations.

The options object also has a few event hooks – onDragStart, onDrag, onDragEnd - that let you intercept the actual drag events that occur such as when the element is resized. For full information on the parameters available you can check the documentation or the GitHub page.

A Basic Example: Resizing a Box

Here's a simple example on CodePen that demonstrates how to make a simple box or window resizable:

ResizeBox[8]

In order to resize the window you grab the size-grip and resize the window as you would expect.

The code to enable this functionality involves adding the jQuery and jquery-resizable scripts to the page and attaching the resizable plug-in to the DOM element to resize:

<script src="//ajax.googleapis.com/ajax/libs/jquery/1.11.3/jquery.min.js" type="text/javascript"></script><script src="scripts/jquery-resizable.js"></script><script>$(".box").resizable({ handleSelector: ".win-size-grip" });</script>

The key usage requirement is to select the DOM element(s), using a jQuery selector to specify the element(s) to resize. You can provide a number of options with the most important one being the .handleSelector which specifies the element that acts as the resizing initiator – when clicked the resizing operation starts and the as you move the mouse the base element is resized to that width/height.

As mentioned, jquery-resizable doesn't do any visual formatting or fix-up, but rather just handles the actual sizing operations. All the visual behavior is managed via plain HTML and CSS which allows for maximum flexibility and simplicity.

The HTML page above is based on this HTML markup:

<div class="box"><div class="boxheader">Header</div><div class="boxbody">Resize me</div><div class="win-size-grip"></div></div>

All of the UI based aspects – displaying the sizing handles (if any) and managing the min and max sizes etc. can be easily handled via CSS:

.box {margin: 80px;position: relative;width: 500px; height: 400px;
min-height: 100px;min-width: 200px;max-width: 999px;max-height: 800px; }.boxheader { background: #535353; color: white; padding: 5px; }.boxbody { font-size: 24pt;padding: 20px; }.win-size-grip {position: absolute;width: 16px;height: 16px;bottom: 0;right: 0;cursor: nwse-resize;background: url(images/wingrip.png) no-repeat; }

So to make the UI work – in this case the sizing grip in the bottom right corner – pure CSS is used.  The Box is set using position:relative and the grip is rendered to the bottom left corner with position:absolute which allows the grip to be attached to the lower right corner using a background image. You can also control sizing limitations using max/min/width/height in CSS.  to constrain the sizing to appropriate limits.

You can check out and play around with this simple example in CodePen or in the sample grabbed from GitHub.

Advertisement

A two panel Splitter with jquery-resizable

I mentioned that I was looking for a light-weight way to implement a two panel display that allows for resizing. There are a number of components available that provide this sort of container management. These are overkill for what I needed and it turns out that it's really easy to create a resizable two panel layout using jquery-resizable.

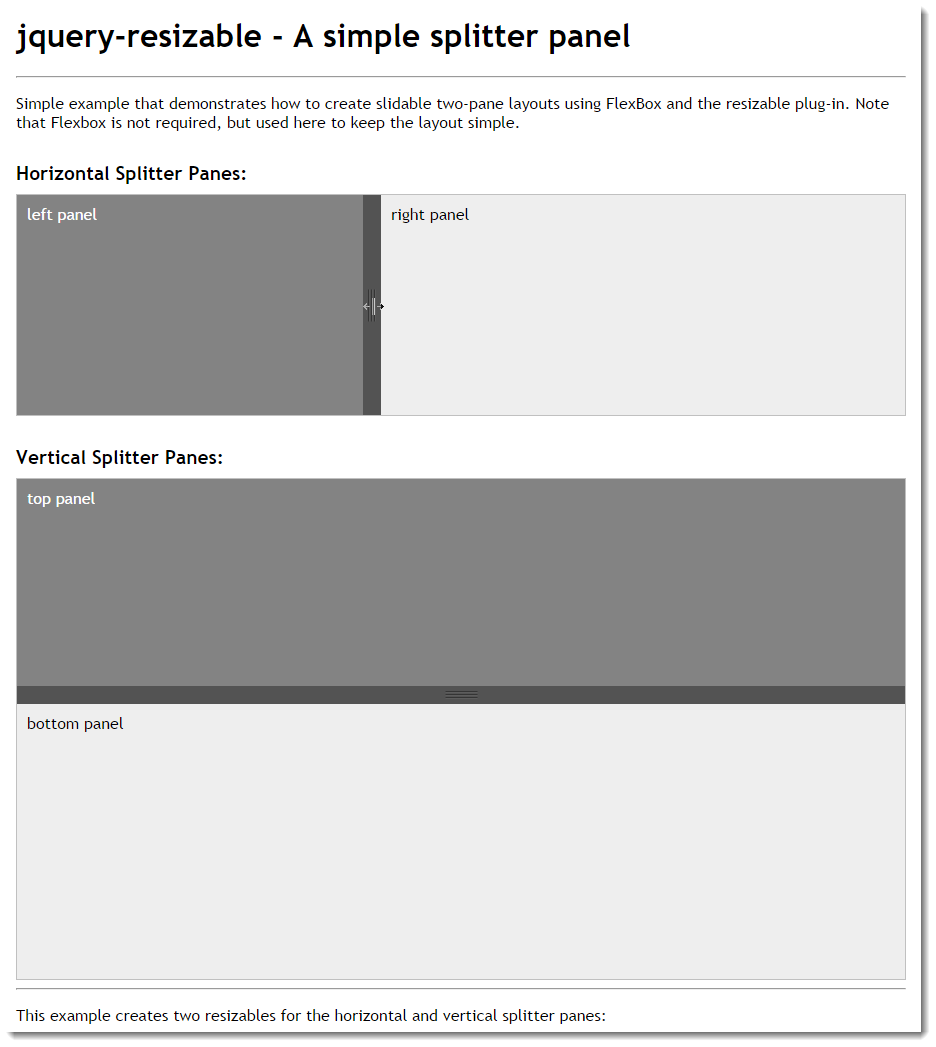
You can take a look at the Resizable Splitter Panels sample on CodePen to see how this works in a simple example.

SplitterPanelExample

Let's take a look and see how this works. Let's start with the top panel that horizontally splits the two panels. This example uses FlexBox to create two panes that span the whole width of the screen, with the left side being a fixed width element, while the right side is a variable width auto-stretching container.

Here's the HTML:

<div class="panel-container"><div class="panel-left">left panel</div><div class="splitter"></div><div class="panel-right">right panel</div></div>

Pretty simple – the three panels are contained in top level container that in this case provides the FlexBox container.  Here's the CSS:

/* horizontal panel*/.panel-container {display: flex;flex-direction: row;  border: 1px solid silver;         overflow: hidden;
}.panel-left {flex: 0 0 auto;  /* only manually resize */padding: 10px;width: 300px;min-height: 200px;min-width: 150px;white-space: nowrap;background: #838383;color: white;
}.splitter {flex: 0 0 auto;width: 18px;background: url(images/vsizegrip.png) center center no-repeat #535353;min-height: 200px;cursor: col-resize;
}.panel-right {flex: 1 1 auto; /* resizable */padding: 10px;width: 100%;min-height: 200px;min-width: 200px;background: #eee;
}

FlexBox makes this sort of horizontal layout really simple by providing relatively clean syntax to specify how the full width of the container should be filled. The top level container is marked as display:flex and flex-direction: row which sets up the horizontal flow. The panels then specify whether they are fixed in width with flex: 0 0 auto or stretching/shrinking using flex: 1 1 auto. What this means is that right panel is auto-flowing while the right panel and the splitter are fixed in size – they can only be changed by physically changing the width of the element.

And this is where jquery-resizable comes in: We specify that we want the left panel to be resizable and use the splitter in the middle as the sizing handle. To do this with jquery-resizable we can use this simple code:

$(".panel-left").resizable({
   handleSelector: ".splitter",
   resizeHeight: false});

And that's really all there's to it. You now have a resizable two panel layout. As the left panel is resized and the width is updated by the plug-in, the panel on the right automatically stretches to fill the remaining space which provides the appearance of the splitter resizing the list.

The vertical splitter works exactly the same except that the flex-direction is column. The layout for the verticals:

<div class="panel-container-vertical"><div class="panel-top">top panel</div><div class="splitter-horizontal"></div><div class="panel-bottom">bottom panel</div></div>

The HTML is identical to the horizontal except for the names. That's part of the beauty of flexbox layout which makes it easy to change the flow direction of content.

/* vertical panel */.panel-container-vertical {display: flex;flex-direction: column;height: 500px;border: 1px solid silver;         overflow: hidden;
}.panel-top {flex: 0 0 auto;  /* only manually resize */padding: 10px;height: 150px;width: 100%;                        background: #838383;color: white;
}.splitter-horizontal {flex: 0 0 auto;height: 18px;background: url(images/hsizegrip.png) center center no-repeat #535353;            cursor: row-resize;
}.panel-bottom {flex: 1 1 auto; /* resizable */padding: 10px;            min-height: 200px;            background: #eee;
}

and finally the JavaScript:

$(".panel-top").resizable({
    handleSelector: ".splitter-horizontal",
    resizeWidth: false});

It's pretty nice to see how little code is required to make this sort of layout. You can of course mix displays like this together to do both vertical and horizontal resizing which gets a little more complicated, but the logic remains the same – you just have to configure your containers properly.

The thing I like about this approach is that that JavaScript code is minimal and most of the logic actually resides in the HTML/CSS layout.

This is pretty close to the implementation I ended up with using for my Html Help Builder implementation of the final help layout, which ended up looking like this:

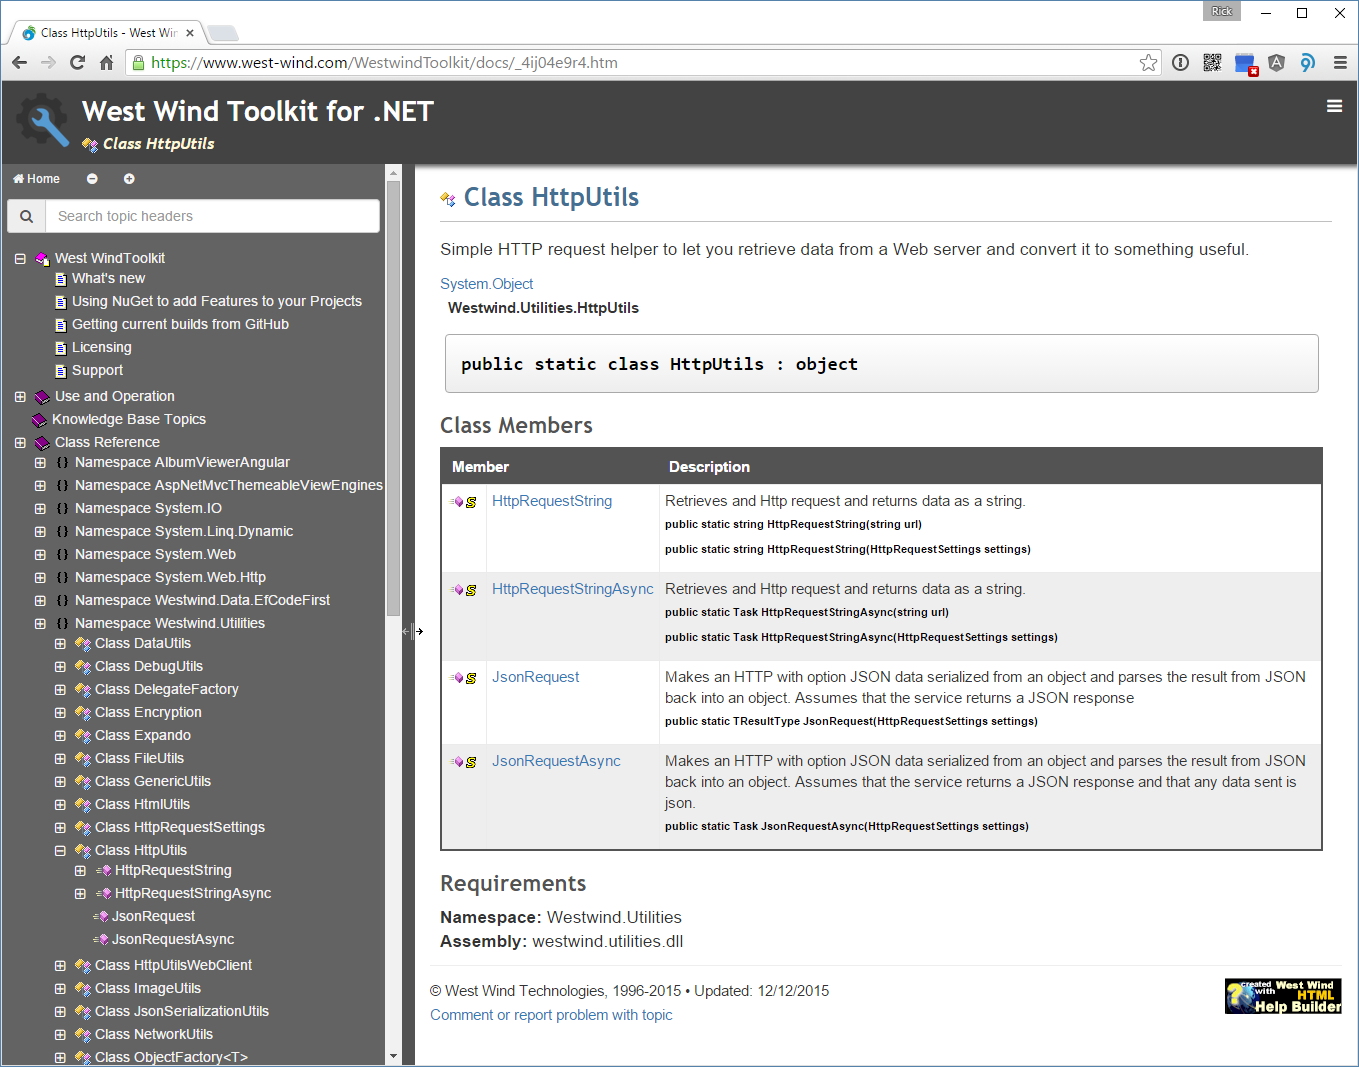
HelpBuilderSplitPanel

Sweet!

Implementation

The code for the jquery-resizable is pretty straight forward. The code essentially waits for mouseDown or touchStart events on the sizing handle which indicates the start of the resizing operation. When the resize starts additional mouse and touch events are hooked up for mouseMove and touchMove and mouseUp and touchEnd events. When the move events fire the code captures the current mouse position and resizes the selected element's width or height to that location. Note that the sizing handle itself is not explcitly moved – it should move on its own as part of the layout, so that when the container resizes the handle is moved with it automatically adjusting to the location.

For reference here's the relatively short code for the plug-in (or you can also check out the latest code on GitHub):

/// <reference path="jquery.js" />/*
jquery-watcher 
Version 0.13 - 12/22/2015
© 2015 Rick Strahl, West Wind Technologies 
www.west-wind.com
Licensed under MIT License
*/
(function($, undefined) {    if ($.fn.resizable)return;

    $.fn.resizable = function fnResizable(options) {var opt = {// selector for handle that starts dragginghandleSelector: null,// resize the widthresizeWidth: true,// resize the heightresizeHeight: true,// hook into start drag operation (event passed)onDragStart: null,// hook into stop drag operation (event passed)onDragEnd: null,// hook into each drag operation (event passed)onDrag: null,// disable touch-action on $handle
            // prevents browser level actions like forward back gesturestouchActionNone: true};if (typeof options == "object") opt = $.extend(opt, options);return this.each(function () {            var startPos, startTransition;var $el = $(this);var $handle = opt.handleSelector ? $(opt.handleSelector) : $el;if (opt.touchActionNone)
                $handle.css("touch-action", "none");

            $el.addClass("resizable");
            $handle.bind('mousedown.rsz touchstart.rsz', startDragging);function noop(e) {
                e.stopPropagation();
                e.preventDefault();
            };function startDragging(e) {
                startPos = getMousePos(e);
                startPos.width = parseInt($el.width(), 10);
                startPos.height = parseInt($el.height(), 10);

                startTransition = $el.css("transition");
                $el.css("transition", "none");if (opt.onDragStart) {if (opt.onDragStart(e, $el, opt) === false)return;
                }
                opt.dragFunc = doDrag;

                $(document).bind('mousemove.rsz', opt.dragFunc);
                $(document).bind('mouseup.rsz', stopDragging);if (window.Touch || navigator.maxTouchPoints) {
                    $(document).bind('touchmove.rsz', opt.dragFunc);
                    $(document).bind('touchend.rsz', stopDragging);                    
                }
                $(document).bind('selectstart.rsz', noop); // disable selection}function doDrag(e) {                var pos = getMousePos(e);if (opt.resizeWidth) {var newWidth = startPos.width + pos.x - startPos.x;                    
                    $el.width(newWidth);
                }if (opt.resizeHeight) {var newHeight = startPos.height + pos.y - startPos.y;                    
                    $el.height(newHeight);
                }if (opt.onDrag)
                    opt.onDrag(e, $el, opt);//console.log('dragging', e, pos, newWidth, newHeight);}function stopDragging(e) {                
                e.stopPropagation();
                e.preventDefault();                

                $(document).unbind('mousemove.rsz', opt.dragFunc);
                $(document).unbind('mouseup.rsz', stopDragging);if (window.Touch || navigator.maxTouchPoints) {
                    $(document).unbind('touchmove.rsz', opt.dragFunc);
                    $(document).unbind('touchend.rsz', stopDragging);
                }
                $(document).unbind('selectstart.rsz', noop);// reset changed values$el.css("transition", startTransition);if (opt.onDragEnd)
                    opt.onDragEnd(e, $el, opt);return false;
            }function getMousePos(e) {var pos = { x: 0, y: 0, width: 0, height: 0 };                if (typeof e.clientX === "number") {
                    pos.x = e.clientX;
                    pos.y = e.clientY;
                } else if (e.originalEvent.touches) {
                    pos.x = e.originalEvent.touches[0].clientX;
                    pos.y = e.originalEvent.touches[0].clientY;
                } else
                    return null;return pos;
            }            
        });
    };
})(jQuery,undefined);

There are a few small interesting things to point out in this code.

Turning off Transitions

The first is a small thing I ran into which was that I needed to turn off transitions for resizing. I had my left panel setup with a width transition so when the collapse/expand button triggers the panel opens with a nice eas-in animation. When resizing this becomes a problem, so the code explicitly disables animations on the resized component.

Hooking into Drag Events

If you run into other things that might interfere with resizing you can hook into the three drag event hooks – onDragStart, onDrag, onDragEnd – that are fired as you resize the container. For example the following code explicitly sets the drag cursor on the container that doesn't use an explicit drag handle when the resize is started and stopped:

$(".box").resizable({
    onDragStart: function (e, $el, opt) {
        $el.css("cursor", "nwse-resize");
    },
    onDragStop: function (e, $el, opt) {
        $el.css("cursor", "");
    }
});        

You can return false from onDragStart to indicate you don't want to start dragging.

Touch Support

The resizing implementation was surprisingly simple to implement, but getting the touch support to work took a bit of sleuthing. The tricky part is that touch events and mouse events overlap so it's important to separate where each is coming from. In the plug-in the important part is getting the mouse/finger position reliably which requires looking both at the default jQuery normalized mouse properties as well as at the underlying touch events on the base DOM event:

function getMousePos(e) {var pos = { x: 0, y: 0, width: 0, height: 0 };if (typeof e.clientX === "number") {
        pos.x = e.clientX;
        pos.y = e.clientY;
    } else if (e.originalEvent.touches) {
        pos.x = e.originalEvent.touches[0].clientX;
        pos.y = e.originalEvent.touches[0].clientY;
    } else
        return null;return pos;
}

It sure would be nice if jQuery could normalize this automatically so properties things like clientX/Y and pageX/Y on jQuery's wrapper event could return the right values or either touch or mouse properties, but for now we still have to normalize manually.

Checking for Mouse and or Touch Support

On the same note the code has to explicitly check for touch support and if available bind the various touch events like touchStart, touchMove and touchEnd which adds a bit of noise to the otherwise simple code. For example, here's the code that decides whether the touchmove and touchend events need to be hooked:

if (window.Touch || navigator.maxTouchPoints) {                    
    $(document).bind('touchmove.rsz', opt.dragFunc);
    $(document).bind('touchend.rsz', stopDragging);                    
}

There are a couple of spots like this in the code that make the code less than clean, but… the end result is nice and you can use either mouse or touch to resize the elements.

Arrrggggh! Internet Explorer and Touch

It wouldn't be any fun if there wasn't some freaking problem with IE or Edge, right?

Turns out IE and Edge on Windows weren't working with my original code. I didn't have a decent touch setup on Windows until I finally managed to get my external touch monitor to work in a 3 monitor setup. At least now I can test under this setup. Yay!

Anyway. There are two issues with IE – it doesn't have window.Touch object, and so checking for touch was simply failing to hook up the other touch events that the plug-in is listening for. Instead you have to look for an IE specific navigator.maxTouchPoints property. That was problem #1.

Problem #2 is that IE and Edge have browser level gestures that override element level touch events. Other browsers like Chrome ave those too but they are a bit more lenient in their interference with the document. By default I couldn't get the touchStart event to fire because the browser level events override the behavior.

The workaround for this is the touch-action: none property that basically disables the browser from monitoring for document swipes for previous. This CSS tag can be applied to the document, or any container or as I was happy to see the actual drag handle. Ideally applying it to the drag handle doesn't have any other side effects on the document and prohibit scrolling so the code now optionally forces touch-action: none onto the drag handle via a flagged operation:

if (opt.touchActionNone)
    $handle.css("touch-action", "none");

You can try it out here with Edge, IE, Chrome on a touch screen. I don't have a Windows Phone to try with – curious whether that would work.

http://codepen.io/rstrahl/pen/eJZQej

Remember: If you support Touch…

As always if you plan on supporting touch make very sure that you make your drag handles big enough to support my fat fingers. It's no fun to try and grab a 3 point wide drag handle 10 times before you actually get it…

Slide on out

All of this isn't rocket science obviously, but I thought I'd post it since I didn't find an immediate solution to a simple way to implement resizing and this fits the bill nicely. It's only been a week since I created this little plug-in and I've retrofitted a number of applications with sliders and resizable window options where it makes sense which is a big win for me. Hopefully some of you might find this useful as well.

Resources

© Rick Strahl, West Wind Technologies, 2005-2015
Posted in HTML5  jQuery  JavaScript   ASP.NET  

jQuery-resizable and Table Column Resizing

$
0
0

Last week I wrote about a small jQuery resizing plug-in that handles resizing of DOM elements and I showed a couple of common use cases for resizable windows and slider panels for multi-panel layouts which were a couple of use cases that I needed the plug-in for. You can check out the plug-in on GitHub and see a few CodePen samples that demonstrate this functionality:

Table Column Resizing

Well, that didn't take long! Almost immediately I got a number of questions regarding using the plug-in with HTML tables and resizing of columns which is a scenario I didn't think about initially. My first thought was "That's not going to work." However, after some experimenting, and as I show in this post with a little bit of extra code you can make table columns resizable as well.

Yeah, we all know tables suck when it comes to building HTML layouts that are responsive and need to be styled nicely, but… hey, they are heavily used anyway in many applications. And hate them or not, there use cases where tabular data is required and tables work for those grid style displays of true multi-column data. Resizing of columns is a nice feature and one that you don't see all that often in HTML forms so it'd be nice if this worked with the jquery-resizable plugin. It does, but it takes a little extra effort.

Check out the example here:

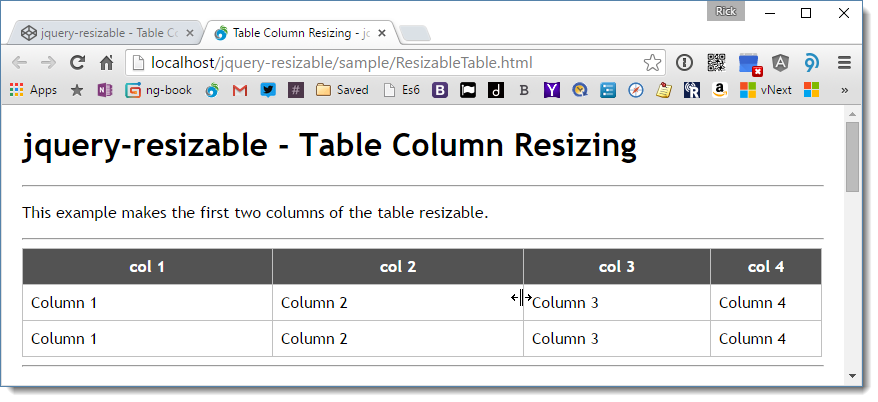
tableresizing

The jquery-resize plug-in was designed to be very minimal so it handles it resizing without any dependencies on CSS or the HTML layout as it relies entirely on the DOM element resizing for managing the resizing process. In other words as the element expands or shrinks in size the sizing handle moves with it. This is how this small plug-in is so small. Tables are a bit more complicated because when you resizing columns you generally don't have a sizing handle, so in order to make this work, we need to inject the resizing handles into the document and display them in the each column you want to resize.

Essentially what needs to happen is this:

  • Add a resizing handle to each column that is to be resized
  • Attach the handle dynamically to the resizer
  • Provide some CSS styling to ensure the resizing handle shows in the right location

To make a long story short here is the essential code to make this work using interactive code and styling:

<style>/*
        this is important!
        make sure you define this here
        or in jQuery code
    */.resizer {position: absolute;top: 0;right: -8px;bottom: 0;left: auto;width: 16px;    cursor: col-resize;       
    }</style><script src="//ajax.googleapis.com/ajax/libs/jquery/1.11.3/jquery.min.js" type="text/javascript"></script><script src="../src/jquery-resizable.js"></script><script src="../src/jquery-resizableTableColumns.js"></script><script>//$("td,th").resizableTableColumns();$("td:first-child,td:nth-child(2),td:nth-child(3)").resizableTableColumns();

$("td,th")//$("td:first-child,td:nth-child(2),td:nth-child(3)").css({ position: "relative" })
    .prepend("<div class='resizer'></div>")            
    .resizable({
        resizeHeight: false,// we use the column as handle and filter
        // by the contained .resizer elementhandleSelector: "",
        onDragStart: function (e, $el, opt) {// only drag resizerif (!$(e.target).hasClass("resizer"))return false;return true;
        }
    });</script>

The hardest part in all of this was to get the CSS to work for the dynamically added resizing handles. The trick to making this work is to make the table cells (and/or headers) position:relative so that we can insert the element and push it to the right of the column. The resizer basically overlaps the column separator with a negative margin and cursor: col-resize to show the resizing cursor so that the cursor shows up when hovering on the column border. If you play with the demo, try setting the background of the .resizer style to green so you can see how the overlay works.

The code also sets the handle selector to the actual column and then later checks the actual dragStart target to see if it's the resizer we're triggering. This is because initially the resizer doesn't exist, so the handle selection really occurs at runtime when you grab the handle.

This is all a bit of a hack, but it works suprisingly well. You may see some odd sizing behavior on the last column, but that's acceptable given that this is such a simple and light weight solution.

Making it into a jQuery Plug-in

The code above works but you can easily abstract this into another plug-in so it's a little more user friendly. Rolled into a plug-in the code looks like this:

/// <reference path="jquery.js" />
/// <reference path="jquery-resizable.js" />/*
jquery-resizable-table-columns
Version 0.14 - 1/4/2015
© 2015 Rick Strahl, West Wind Technologies 
www.west-wind.com
Licensed under MIT License
*/
(function($, undefined) {
    $.fn.resizableTableColumns = function(opt) {
        opt = $.extend({
            resizeHeight: false,// we use the column as handle and filter
            // by the contained .resizer elementhandleSelector: "",
            onDragStart: function(e, $el, opt) {// only drag resizerif (!$(e.target).hasClass("resizer"))return false;return true;
            }
        }, opt);return this.each(function() {
            $(this)
                .css({ position: "relative" })
                .prepend("<div class='resizer'></div>")
                .resizable(opt);
        });
    };
})(jQuery, undefined);

and you can now call this using code like this:

$("td,th").resizableTableColumns();

or as before:

$("td:first-child,td:nth-child(2),td:nth-child(3)").resizableTableColumns();

Note that you still have to add the .resizer {} CSS to the page:

<style>.resizer {position: absolute;top: 0;right: -8px;bottom: 0;left: auto;width: 16px;    cursor: col-resize;       
    }</style>

to ensure that the resizer renders properly in each column. One enhancement to this plugin might be to integrate the CSS logic into the code so that there are no extra dependencies by simply assigning the .css() attributes via jQuery. While this makes the code self-contained without dependencies, it also reduces the configurability so I prefer to have the CSS external as shown here.

Code on GitHub

I've updated the existing plug-in and added the jquery-resizableTableColumns plug-in and you can find the code, links to the samples, documentation there….

Resources

© Rick Strahl, West Wind Technologies, 2005-2016
Posted in jQuery  JavaScript  HTML5  

Resetting Entity Framework Migrations to a clean Slate

$
0
0

Not sure if this is a common occurrence, but I've had a number of occasions where Entity Framework migrations have left the state of migrations in an unusable state. Usually this happens after a large number of migrations have been applied and I get stuck to where I can't update a database with new migrations or roll back. It simply won't go.

There are a number of hacks you can try to fix bonked migrations, but to be honest more often than not those simply don't work. So what do you do?

I've found in most cases it's simply easier to blow away the migrations and start with a clean slate from the current schema. To be clear this works only if all of your databases are up to date in the first place or at least in some known consistent state. Usually this isn't a problem as databases tend to be vital in order for anything to work so they are very likely to be up date, but if not you'll have to find that consistent state so that your EF schema and the database are in sync. That might mean rolling back to the last known good migration.

As you might expect, resetting migrations is not as obvious as it could be – it's not use case that Entity Framework expects you to work with. There's no built-in way to do this, so you have to perform a number of manual steps and that's what this post is about.

A Word of Warning

If you go the route of resetting your migrations,  make sure you back up your code and make known good backups of your database, just in case the schema reversion doesn't do what you expect. While the EF code generator is pretty good at matching the EF schema and what's in your database, in some cases it doesn't work. And you don't want to be stuck in that place without a backup. This is especially true if you have custom code in your migrations that perform additional tasks to update the database. You may have to add these additional manual steps to the initial migration that gets created…

All that said I've had to do this sort of reset on a large project with a couple of hundred tables and it worked without a problem. But your mileage may vary, so whatever you do be safe about the data and code you already have and do the backup.

Removing and Resetting Migrations

The idea of this process is basically this: The database and the EF schema are up to date and just the way you want it, so we are going to remove the existing migrations and create a new initial migration.

In summary, the steps to do this are:

  • Remove the _MigrationHistory table from the Database
  • Remove the individual migration files in your project's Migrations folder
  • Enable-Migrations in Package Manager Console
  • Add-migration Initial in PMC
  • Comment out the code inside of the Up method in the Initial Migration
  • Update-database in PMC (does nothing but creates Migration Entry)
  • Remove comments in the Initial method

You've now essentially reset the schema to the latest version.

Again if you had custom code in your old migrations that added custom constraints or modified data alongside of the generated Migration code you may have to add this code back in the initial migration generated.

Advertisement

Simple Example

I recently ran into this problem with a simple example database that I use for various applications. The migrations got corrupted because the database is shared amongst multiple applications and the migration history was hopelessly bonked.

Removing the Migrations Table

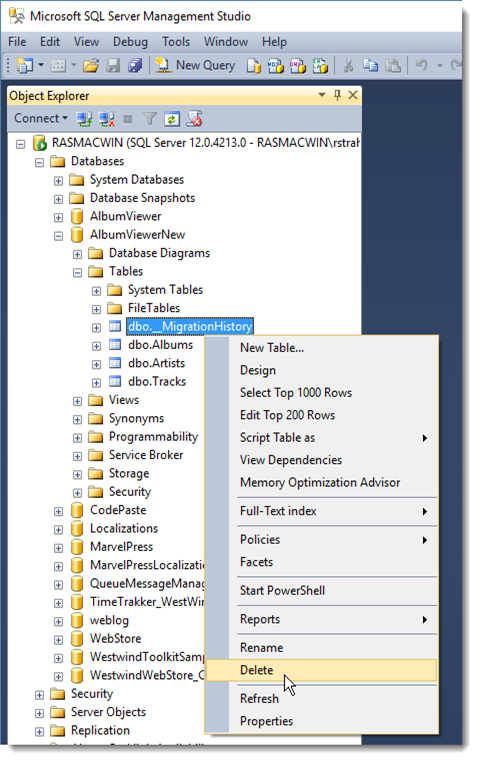
The first step is to remove the migrations table:

DeleteMigrationsHistory

Go ahead and delete the _MigrationHistory table which tells EF what migrations have been applied. If this table exists EF checks to see whether the latest migration has been applied and if it hasn't fails and throws an error to the effect that the database and EF schema are out of sync. Note however, that if you remove the table and run your application it will run, as EF simply won't check if the schema matches.

Delete your Migrations in your Project

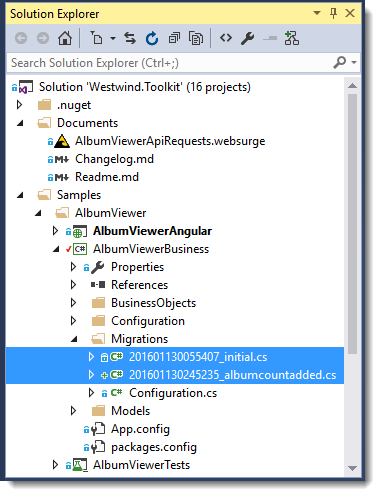
Your project that contains the DbContext for your EF application contains a Migrations folder. This folder contains code files for each schema modification that was made with Up() and Down() methods that add and remove a given migration.

MigrationCodeFiles

You can leave the Configuration.cs file, as it may contain initial data adding code. If you leave it you might have to check if you need to update any initial data loading code to reflect the potentially updated schema. If you don't care about the initial code you can delete the file or the entire Migrations folder.

If you now recompile and run your application again you're likely going to find that your application will run just fine. Because there's no migrations table in the database and there are no migrations in your project EF just pretends that everything is in sync and runs. If there are any schema errors you will encounter them at runtime…

Recreating the Migrations

The next steps involve using the Nuget Package Manager Console to re-enable migrations and create an initial migration.

Open the Package Manager Console in Visual Studio and select the project that contains your DbContext (!important) and type Enable-Migrations:

PackageManagerEnable[6]

Next create an initial migration by typing Add-Migration Initial.

This creates an initial migration source file with the Up() and Down() methods that define the schema for your database as EF sees it based on your DbContext class. If your database is large this may take a while and produce a massive source file.

For my minimal sample app I'm using to demonstrate this it looks like this:

namespace AlbumViewerBusiness.Migrations
{using System;using System.Data.Entity.Migrations;public partial class Initial : DbMigration{public override void Up()
        {
            CreateTable("dbo.Albums",
                c => new{
                        Id = c.Int(nullable: false, identity: true),
                        Title = c.String(),
                        Description = c.String(),
                        Year = c.Int(nullable: false),
                        ImageUrl = c.String(),
                        AmazonUrl = c.String(),
                        SpotifyUrl = c.String(),
                        ArtistId = c.Int(),
                    })
                .PrimaryKey(t => t.Id)
                .ForeignKey("dbo.Artists", t => t.ArtistId)
                .Index(t => t.ArtistId);
            CreateTable("dbo.Artists",
                c => new{
                        Id = c.Int(nullable: false, identity: true),
                        ArtistName = c.String(maxLength: 128),
                        Description = c.String(),
                        ImageUrl = c.String(maxLength: 256),
                        AmazonUrl = c.String(maxLength: 256),
                    })
                .PrimaryKey(t => t.Id);
            CreateTable("dbo.Tracks",
                c => new{
                        Id = c.Int(nullable: false, identity: true),
                        AlbumId = c.Int(),
                        SongName = c.String(maxLength: 128),
                        Length = c.String(maxLength: 10),
                        Bytes = c.Int(nullable: false),
                        UnitPrice = c.Decimal(nullable: false, precision: 18, scale: 2),
                    })
                .PrimaryKey(t => t.Id)
                .ForeignKey("dbo.Albums", t => t.AlbumId)
                .Index(t => t.AlbumId);
        }public override void Down()
        {
            DropForeignKey("dbo.Tracks", "AlbumId", "dbo.Albums");
            DropForeignKey("dbo.Albums", "ArtistId", "dbo.Artists");
            DropIndex("dbo.Tracks", new[] { "AlbumId" });
            DropIndex("dbo.Albums", new[] { "ArtistId" });
            DropTable("dbo.Tracks");
            DropTable("dbo.Artists");
            DropTable("dbo.Albums");
        }
    }
}

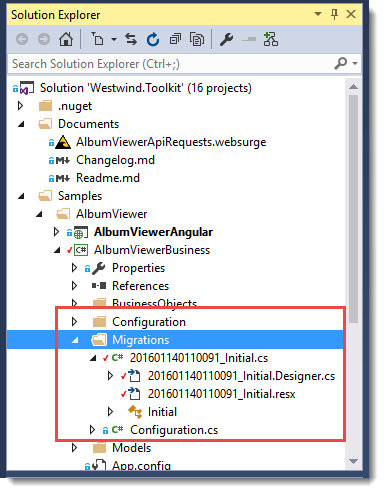
There are the expected create table commands and foreign key associations and any special restraints required based on your dbContext and Model classes. EF walks the dbContext, finds each of the model classes, figures out the relationships and foreign keys and applies any of the attribute settings defined in the model and expresses them as code. After you're done you now see this in the Solution Explorer:

InitialMigration

Updating the Database

Finally we need to update the database with the updated Migration information, data by using the Update-Database command. But there's a twist – we want to write the migration record, but we actually don't want to update the database because it's already in the desired state. If you try to run the migration as is, it fails because the tables already exist.

To work around this we can fake out the Migration by commenting out the code in the Up() method. I like to just put a return at the top of the code like this:

public override void Up()
{return;        

    CreateTable(
        "dbo.Albums",
        c => new{
                Id = c.Int(nullable: false, identity: true),
                Title = c.String(),
                Description = c.String(),
                Year = c.Int(nullable: false),
                ImageUrl = c.String(),
                AmazonUrl = c.String(),
                SpotifyUrl = c.String(),
                ArtistId = c.Int(),
            })
        .PrimaryKey(t => t.Id)
        .ForeignKey("dbo.Artists", t => t.ArtistId)
        .Index(t => t.ArtistId);
… more code omitted for brevity
}

Now you can run Update-Database and the Up() operation does nothing, yet still writes the migration record into the database.

When you're done, remove the return;  statement from the Up() method and – voila! – your code is now back in sync.

Update-Database with Scripts

The last step is arguably pretty clunky and you have to proceed with this same procedure for each database local and remote that you're updating. You have to remember to comment the code, and uncomment when your done which is a pain.

So perhaps the better approach is to generate the database scripts, edit the script and remove all the actual model update code and leave in just the database creation code. You can share that script with other developers or check that into source control for others to use to get their development databases into sync.

If you run Update-DataBase –script you can capture the full database update operations as a SQL script that you can edit. The script is the same that runs when you do the interactive update, but you can choose to run it yourself. You can also edit the script.

So maybe you can save both the full script to create the database completely as well as just the update script

You can grab the final INSERT statement from this script to write the Migration entry without the rest of the schema creation :

INSERT [dbo].[__MigrationHistory]([MigrationId], [ContextKey], [Model], [ProductVersion])VALUES (N'201601140110091_Initial', 
N'AlbumViewerBusiness.Migrations.Configuration',
0x1F8B0800000000000400ED5ACD6EE33610BE17E83B083AB545D6B2B368B ,
N'6.1.3-40302')

which is arguably a little bit easier to work with and can be more easily shared with others that might have to update their database as well. You'll still want to delete the __MigrationHistory table first.

Personally, I prefer to update the database with scripts like this because you can more easily see what operations are perforned and – if something goes wrong – you are likely to get better error information from Sql Server Management studio or command line execution than from the package manager update.

Sync up all Databases

It's important that when you wipe the slate clean as described above, all databases in use should get updated to a known consistent state before you perform these steps. Once the updates are applied your migration starting points are either no database at all, or the database in the fully updated base state. If you have databases that were a few iterations behind in migrations before you started the clean slate operations, there will be no easy way to get those in sync.

If you find that's happened, you may have to use the SQL Server Schema Comparison tools in Visual Studio or a tool like Red Gate's awesome Sql Compare.

Summary

Clearly this process is more difficult than it should be, but I also suspect that this is not something that the EF team would recommend. Yet, I've seen a number of occasions in my own apps and many more in client applicatinos where migrations have simply gone too far out of whack to fix, and this is the only solution I've found to get back a stable environment. In some cases when I have massive amounts of migration scripts I also find it more sensible to 'clean up' and consolidate the schema changes into an initial startup script and these steps fit the bill.

It would be nice if there was a command that could basically 'reset' migrations to a starting point with a single command. These steps here are repetitive and I find that when I go through this process I typically have to do it more than once because I forgot something along the way. Still to me it beats wasting hours or days on trying to troubleshoot migrations that have gone off the rails. Your mileage may vary…

I'd be curious to hear whether you dear reader have also run into EF migration problems and if you have whether you've used the same approach or something else. Chime in, in the comments.

Resources

© Rick Strahl, West Wind Technologies, 2005-2016
Posted in Entity Framework  ADO.NET  Sql Server  

Styling all Text Elements with the CSS :not Filter

$
0
0

Here's a short post that's more of a CSS tip that I've found useful when styling an application. If you're working with CSS in an application that has more than a handful of forms you're likely dealing with a number of different input types. Plain text data, Dates, numbers, email addresses, ip addresses and who knows what else. HTML 5 now provides a boatload of different input types that all display in what essentially is a textbox, but provides special input handling. For example, on a mobile device if you use:

<input id="email" name="email " type="email"/>

you get special input characters on the keyboard: The @, – and . (or even a .com button) show up to make it easier to enter an email address. Likewise when you use a date input field you get a date picker.

For desktop browsers the behavior generally is not as pronounced, but you still want to use the newer input types to give mobile devices an easier data entry experience. The end result is as a developer, if you need to generically style textbox input you need to address all of the supported input types.

Input Type Proliferation

HTML5 has brought a whole big proliferation of input element types that are now available. All of the following are essentially represented by a textbox:

  • text
  • password
  • date
  • datetime-local
  • time
  • number
  • email
  • tel
  • search
  • url
  • ipaddress

And typically if you'll want all of these input types to be formatted consistently.

If you have a sizable application that uses a number of these input types, you've probably found yourself using input styling like the following in your CSS:

input[type=text], input[type=password], input[type=date], input[type=time], input[type=datetime-local],input[type=email], input[type=number],input[type=range],input[type=search], input[type=color], input[type=ipaddress], select, textarea {font-size: 1.1em !important;font-weight: 600 !important;font-family: Trebuchet, 'Trebuchet MS', 'Lucidia Sans', Helvetica, Arial, Verdana, sans-serif;
}

While that's not too bad if you have one place where you need to style input elements, it gets ugly if you have sub-styling or a number of different media queries where you end up continuously adding this long list of input types.

You might be tempted to just assign all input elements to a style like this:

input,textarea {font-size: 1.1em !important;font-weight: 600 !important;font-family: Trebuchet, 'Trebuchet MS', 'Lucidia Sans', Helvetica, Arial, Verdana, sans-serif;
}

But that doesn't really work because it also includes submit, button and file stylings. Thus are the inefficiencies of HTML5 semantic tags that lump these disparate elements into one input tag which is one thing that would be nice to get addressed in HTML (I guess you can use <button> submit buttons, but that still leaves the file upload button which is a pain anyway).

Using the :not Selector for a CSS Blacklist

One solution that I find more user friendly given the proliferation of input types, is to use the CSS :not selector to exclude just the few types that shouldn't be styled as an input box. :not is a CSS filter which effectively lets you exclude a selection of elements.

So, I like to use the following CSS:

input:not([type=submit]):not([type=button]):not(type=checkbox):not(type=radio):not([type=file]), select, textarea {font-size: 1.1em !important;font-weight: 600 !important;font-family: Trebuchet, 'Trebuchet MS', 'Lucidia Sans', Helvetica, Arial, Verdana, sans-serif;
}

To me it's easier to remember what I don't want to styled as an input box, than trying to remember the full list of input types and their inconsistent names in a long list.

FWIW, the :not() selector comes in handy for many things whenever you're dealing with a group of elements and you need to build some sort of exception list. It's a handy selector to filter element lists down.

CSS Filter Selector Support

The one caveat with this functionality is that it requires support for CSS3 filter selectors and the :not() selector in particular. It's supported in all CSS3 compatible browsers so support is nearly universal – the big exception is IE 8 and down and I can live with that. With the recent discontinuation of support for all IE versions except for IE 11, I think we're finally on the last leg of even having to think about supporting these ancient, non-standard browsers.

Summary

This is not a great relevation of course, but I constantly see these long input style lists in CSS, and using :not() is an alternative to tame this list down a bit. Maybe some of you find this useful and find new uses for the :not() selector.

Resources

© Rick Strahl, West Wind Technologies, 2005-2016
Posted in HTML5  CSS  

Microsoft renames ASP.NET 5 to ASP.NET Core 1.0

$
0
0

Yesterday Microsoft announced that what has so far been ASP.NET 5.0 has been renamed to ASP.NET Core 1.0. I'm really glad that Microsoft went this route and made it very clear that this version of ASP.NET is a totally new platform to build applications from and not just a small upgrade as prior upgrades from say ASP.NET 3 to 4 have been. ASP.NET Core is a brand new platform that has been rebuilt from the ground up – all the way to the core .NET platform libraries – to provide a leaner and cross platform implementation on what was ASP.NET. While there is a lot of feature compatibility with older versions, it does not have what you would call code compatibility meaning that you can't just run your old ASP.NET code in ASP.NET Core without a fair bit of change.

What's in a Name?

I really welcome the change of name and the renaming of packages and assemblies to match the new framework. It's a good change because we finally have a clear differentiator that makes it clear that this is a brand new version of ASP.NET (and .NET) that is very different from ASP.NET 4. The version number is also rewound to 1.0 for ASP.NET Core which is also nice touch as it indicates a fresh start, rather than the confusing naming that has plagued .NET versions upwards of .NET 3. Hopefully we'll see Semver versioning for ASP.NET Core and .NET Core going forward instead of the crazy version schemes that like .NET 3.5 running on framework 2 or version 4.5.x that in-place replaces version 4. According to Microsoft folks ASP.NET Core will also be search engine friendly and provide a differentiator from previous ASP.NET versions when searching for support content.

A bit late in the Game

So the new naming is great, but man, it is really late in the game to make such a major change that is affecting all the libraries in the framework. The name isn't just on the outside for product branding, but it's also affecting NuGet package names and the internal namespacing for libraries which affects just about all aspects of the framework. For existing applications this means you have to remove then add new packages and update each and every namespace to the framework libraries at a minimum. On top of that are numerous substantial core API changes. Updating any existing code pre-RC2 code will take a bit of effort to say the least.

Currently ASP.NET 5 (as the official pre-release version is still called) is on Release Candidate 1. RC1? Yes you read that right – Microsoft is completely changing the world of existing ASP.NET 5 applications by completely renaming the entire ecosystem. In addition all the command line tooling is also updated to use a whole new set of tools (from dnx tools to dotnet tools). The improved tooling is much easier to use – because it's a single command line utility – but wow what took so long given that this has been in discussion for a long time?

These types of major all encompassing changes are something that usually happens in the alpha or maybe the beta stage of a sane product development cycle. Alpha, Beta and RC have level of quality expectations and Microsoft simply did not apply the labels properly in the release cycle. To do a major refactoring 2 months before an announced ship date this seems kinda crazy and certainly doesn't warrant an RC2 moniker.

But then Microsoft has really bungled the entire release messaging that surrounds ASP.NET Core by setting expectations way too high for each of the stable Alpha, Beta and RC releases they have put out so far. By normal standards, none of these pre-release versions where anything close to what the name would have suggested. Given the current major change we are now seeing with this major rename, any other sane product would call the state of the product an Alpha (ie. break your world completely)!

Advertisement

Technical Kudos

To be fair, when it comes to the technical aspects of the ASP.NET Core architecture I continue to be very impressed how much the ASP.NET and Core CLR teams have been able to accomplish in the last year. The creation of .NET Core and ASP.NET Core are huge frameworks and they amount to a tremendous code footprint. It's very clear that ASP.NET Core is going to bring many major improvements to the ASP.NET Web stack, both in terms of the development process as well as the many new features that provide easier extensibility and easier over all development practices. In terms of implementation and even of the actual process of development of these frameworks I can't really find fault in the overall process that the ASP.NET and Core CLR teams have followed. With the frameworks being completely open source for all to see, it's easy to see what a monumental task these projects have been and what has been accomplished so far.

The actual development process and even the recent drastic changes are not out of line, were it not for the horrible messaging that has surrounded ASP.NET vNext from the very beginning. And it seems now that messaging is catching up with us.

What Message?

It's really been about mismanaged expectations!

What has been absolutely devastating is the messaging for the timetable that Microsoft has set for release of these products. From the very beginning it felt like the description was way off. When the first alphas and even the first betas shipped they were very volatile and you practically couldn't use them unless you used the daily feeds – which would promptly break something else. Back then even the betas felt like what Microsoft used to call an SDR preview release.

The later betas improved somewhat, but upgrading between betas was still an incredible pain as just about all the configuration and many apis changed for each release. Matching up NuGet packages in an upgrade was (and still is) a major task. Upgrading existing applications took hours and in a couple of cases nearly a full day even for a relatively small project. This is excaberated by the sheer number of packages that are now required by .NET Core many of which are so fine grained it's hard to reason what dependencies you might actually need to include.

Then came the first 'milestone' decision that wasn't communicated very well. When Visual Studio 2015 shipped last year, it wasn't clear until a scant two months before the release that ASP.NET 5 would not actually RTM at the same time. Anybody following the ASP.NET 5 development could probably tell that it wasn't going release at that time, but there was never really any announcement to the contrary and an almost implied air that all of the technology would ship all at once.  It wasn't until a community standup less than 2 months before RTM of that release, when it was mentioned in passing that 'Oh BTW we're only shipping Beta 5 with the release of VS 2015'. For months after the VS 2015 release a number of my customers were asking why we weren't starting to use (and upgrade to) ASP.NET 5 since it had been released.

When the Release Candidate rolled around you would expect some stability, but as soon as RC1 was released Microsoft announced that RC2 would break all the tooling and there would be some grand renaming that we are seeing now. This sort of thing does not go with an RC moniker – it's an alpha when you make that level of breaking changes. Think of the poor folks who were lulled in by Microsoft's 'Go Live' license that now have to go fix their applications for these name changes. Why in the world did Microsoft even allow a Go Live license, knowing full well these changes were coming down the pike? This is sending the wrong message and almost seems like it's meant to antagonize developers.

Now it's been made very clear that there will be RC2 (which is scheduled soon) and then RTM at the end of March (end of Q1) both with dates that aren't negotiable. I suspect RTM has to be done for the Build conference and who knows for what other commitments but apparently that date is set in stone.

I would much prefer that Microsoft gets version 1.0 right with an open release date of "it's done when it's done right",  rather than sticking to some arbitrary release date. While we can't rule out that the various teams get everything that needs to go into a 1.0 release finalized without rushing and cutting corners, I find that a pretty difficult task to accomplish given the current timeline. We can only hope that RTM hits all the high notes, because once RTM is done we are all going to have to live with whatever compromises had to be made for a long time.

RTM also has a certain level of expectations attached to it. People who will be trying out ASP.NET Core for the first time are going to have high expectations given all the hoopla that has been heaped on this new ASP.NET. If the product is buggy, or if it's difficult to get started with for the average developer, or if it's missing a major feature (data choices anybody?) that type of bad publicity can really end up hurting this new product in the long run. I think that it's very important that Microsoft hits a homerun with ASP.NET Core in order to keep developers on the .NET Platform and hopefully can attract some new blood into the .NET developer environment.

Mixed Messages

So for all the paying of lip service to OSS development, Microsoft is going to stick to a fixed release schedule come hell or high water. Scott Hanselman posted an announcement blog post for all of the new naming along with a description of these changes and reading between the lines you can tell that Microsoft is positioning ASP.NET Core 1.0 as a work in process and that the RTM release won't necessarily be a 'finished' product.

The message for some time has been that the 1.0 release won't be a final product. Development will continue post 1.0 RTM with many major features coming later, which makes sense. SignalR is one example of some significant tech that won't be in RTM but will ship later. That's not a bad thing since SignalR isn't a core feature but something that is bundled on top and so can be integrated independently. It IS however vitally important that the CORE framework and the CORE features of ASP.NET Core are solidly in place and the APIs are designed properly without cutting corners. While there may be later development for expansion, once RTM arrives the core APIs – just like the original .NET framework code from .NET 1.0 in 2001/2 – will stay with us for as long as the product exists.

You just don't want to screw up a V1 release of a core platform, because you end up having to live with it for as long as the platform lives. 

It's clear that development won't stop with RTM. But regardless I think it's absolutely critical to get RTM (or whatever Microsoft deems as the point of release) to be all that it's supposed to be. It's fine for high level features to be missing that can later be added (a la SignalR). But it's absolutely critical that the core framework features in .NET Core and the ASP.NET Core low level eco-system are rock solid and provide all of the API features you expect from a base platform on which to build on top of, right from the start. Once a core API exists it's very difficult or impossible to change it. So I really hope that Microsoft will think long and hard whether their RTM scheduling qualifies the code base to be truly ready to ship as an RTM release. A good feedback mechanism from those who'll end up using it is important for that, and that's what an RC is supposed to provide: feedback. And given the current schedule there's going to be preciously little time to provide that feedback.

As it stands with a fixed date RTM one big question is whether there will be enough time to get feedback and whether there will be enough people who'll actually try it in time. Especially given how hard it's been to keep up with these pre-releases. I'm not looking forward to upgrading even my simple sample application to RC2. I bet there are many others who have been burned by previous update cycles as well and are just holding off until Microsoft gives an official green light to a stable RTM release.

What ASP.NET vNext has meant for me

ASP.NET vNext has been a mixed bag for me. I was very excited when ASP.NET vNext was originally announced. The release promised to address many of the things that have started to become problematic with ASP.NET. And for the most part it looks like the ASP.NET team is actually delivering on those promises. The new framework is going to be much more lightweight, more pluggable, provide a host of useful new features, is cross-platform and more in line with modern developer practices.

I jumped in very early and played with the late Alphas and early betas. I experimented, and struggled with updates and  trying to understand the new architecture. I eventually got things to work and once I got the magic combinations together, the experience was indeed very nice. Coding was easy, the new features a delight to use and all was good. Until the next update rolled around. 

Getting things going was really painful in the beginning because there was very little documentation and lots of stuff was completely moved around or difficult to even discover. Fair enough, it was Alpha and that's to be expected. What I didn't expect was when Beta rolled around and things didn't get any easier. Each update brought major name and api changes and package conflicts because new versions had been renamed.

By this  time  I was hoping to write some articles about this new version. And I did in the Beta 3 timeframe for Code Magazine (and here). It's funny looking back at the articles and associated code. Almost nothing that I wrote in the getting started article applies anymore. It's like I was talking about a different product! That gives you an idea how much things have changed. Yet that was what was called Beta 3!

As part of the article I also built a sample application that I've been carrying forward through my vNext experiments. It's a small SPA application using using ASP.NET Core as an API backend. But it's insane how much effort went into trying to carry this simple application forward between the various upgrades. At some point during the last betas I gave up trying to keep up – the churn was just too much. But surely by the time the RC came out things must have mellowed out –  but no, same story. The upgrade from the last beta to RC was another big change. I suppose this can be forgiven as this is pre-release stuff and most people will not see that once RTM comes around, but I do wonder whether this will be any better once you update your RTM application to the next update release. We shall see.

As I mentioned before much of what I describe here is about the mismanaged expectations that were set by naming thing things Beta or RC. When you call something a beta or an RC I would expect a certain level of stability that ASP.NET 5/Core so far has never delivered.

In the meantime I've been holding off on a number of internal projects I've been wanting to get started. I wanted to use ASP.NET Core because it's internal stuff so it's a perfect place to experiment. I seriously regret that decision given that Microsoft has strung us along basically for 2 years with unstable betas which again was not what I would have expected. I'm still waiting for a jump off point where there's a stable place where the rug isn't continually pulled out from under me.

A lot of Unknowns

So to me ASP.NET Core is a mixed bag. On the one hand I'm excited to see all the new features and light weight framework with the potential for improved performance and lower footprint. There are many things that will make development easier. For MVC development TagHelpers and ViewComponents are awesome. For all apps the merged API and MVC engine is a big improvement. But at the same time I have huge trepidation about what the future of this OSS developed framework that is in constant flux will look like. I'm not sure that I trust Microsoft at this time to deliver RTM and keep the framework stable even after RTM so the pain points I've described above don't overwhelm in every version upgrade. So far the track record has not been good and that's a scary prospect having to deal with that with production applications in the future.

There are a lot of unknowns when it comes to ASP.NET Core and .NET Core. Because I haven't been able to really dig in and start building any substantial applications or even start porting over some of my common libraries it's hard to get a good feel for what the edge cases are with the new framework. There is lots to learn and lots to design differently.

Exactly what works and what doesn't isn't very easy to gauge up front. If you plan on using the .NET Core runtime, you'll be using a stripped down version of .NET that has the lowest common denominator needed to run on multiple platforms. That means a lot of stuff that was in full framework just won't be there. What that is exactly is not always so obvious. All platform specific Windows features are obviously not there, but there will be plenty of other stuff too. Many APIs have been truncated – many common overloads are missing from even very basic things, and features from individual APIs have gone missing. It's hard to get a good feel for this until you actually start working with  .NET Core and start pushing towards the edges of the framework which has been difficult for me so far.

We've all gotten very used to using a lot of third party NuGet packages/libraries – in .NET Core that probably won't be the case at least initially. Very few libraries have been ported to support .NET Core to date. That will change, but initially the number might be small. I know almost every application I build has a few specialty libraries. It might be a library to access a credit card processor, or a data access library for a NoSql engine, an HTML or Markdown parser etc. and chances are that code won't run on .NET core yet. Can you work around that? Maybe you can, maybe not…

For some time to come these are some issues that we'll have to deal with until the eco-system starts catching up. And yet that depends on how well ASP.NET Core/.NET Core are received in the first place. Which brings us back to the point I made earlier that it's crucial that V1 RTM is a solid release that hits all the high notes.

Clearly ASP.NET Core and .NET Core are a journey not a destination and we're at the very beginning of it. The beginning is rough as it usually is, until it finds its stride. I hope ASP.NET Core will find its stride soon and that the RTM release will be something to be proud of. We shall see…

© Rick Strahl, West Wind Technologies, 2005-2016
Posted in ASP.NET  ASPNET5  

FontAwesome Fonts and Mime Types in IIS and other Web Servers

$
0
0

When running FontAwesome and loading resources from IIS locally and checking out a page loaded in browser dev tools you might find that you get a 404 Not found on your page like this:

404woff

If you open the link you're going to find that the server returned a 404 Not Found response.

FontAwesome includes and references fonts in a number of different ways and basically loads the font file that it both understands and can load from the server.

@font-face {font-family: 'FontAwesome';src: url('../fonts/fontawesome-webfont.eot?v=4.5.0');src: url('../fonts/fontawesome-webfont.eot?#iefix&v=4.5.0') format('embedded-opentype'), url('../fonts/fontawesome-webfont.woff2?v=4.5.0') format('woff2'), url('../fonts/fontawesome-webfont.woff?v=4.5.0') format('woff'), url('../fonts/fontawesome-webfont.ttf?v=4.5.0') format('truetype'), url('../fonts/fontawesome-webfont.svg?v=4.5.0#fontawesomeregular') format('svg');font-weight: normal;font-style: normal;
}

As you can see FontAwesome tries to load a number of different font types. This works by letting the browser find the type that it supports and then trying to load the file. If the file is not found the browser continues down the list.

So in the case of Chrome, it supports WOFF2 font type – it tries to load it and it fails because the server is not ready to serve the file. It then goes on and loads the .WOFF files (v1) and that's what's ends up getting used.

The .WOFF2 format is something that's rather new which is why it doesn't show up in many a Web server's default Mime map. From the looks of it WOFF2 uses better compression than .WOFF, so one benefit is that the Fontawesome .WOFF2 file is 20% smaller than the .WOFF file.

Advertisement

Why does IIS not serve the .WOFF2 File?

Depending on which version of IIS you use you'll find that it will not serve the .WOFF2 and in older versions (2008 R2 and older) even the .WOFF file. The reason is that these formats do not exist in the Mime type list for IIS. Any static file type served by IIS that not either dynamically mapped handler (ISAPI Handler or .NET HttpHandler), or has an entry in the IIS Mime map, will end up being served as a 404 Not Found HTTP error.

IIS 10 has both .WOFF and .WOFF2 mapped so it just works. On IIS 8 .WOFF is registered and on older version none are registered.

Set the Mime Types

In IIS you can set the mime types in a number of ways both local to your application and global at the IIS or Application level. Personally I think Mime Maps ought to be set globally at the top level so lets start with that. You can set the global settings in the IIS Service manager:

IISMimeMap

IISMimeMap2

You can also use the IIS command line tool appcmd like this:

c:\windows\system32\inetsrv\appcmd set config /section:staticContent /+"[fileExtension='.woff2',mimeType='application/font-woff2']"

Applying Mime Types Locally to your Application

If you need to apply these settings locally, or when you have no control over the Web server globally you can also add this at the Application level in your web.config file:

<system.webServer><staticContent><remove fileExtension=".woff" /><mimeMap fileExtension=".woff" mimeType="application/font-woff" /><remove fileExtension=".woff2" /><mimeMap fileExtension=".woff2" mimeType="application/font-woff2" /></staticContent></system.webServer>

FWIW, this isn't just an IIS issue - the same thing come

s up with other Web servers that might not have the most recent Mime mappings set. As mentioned  .WOFF2 is relatively new, so it's not unusual to find it missing in many Web server configurations. Follow instructions for your particular Web server to configure a mime type entry.

Why Bother?

Now you might ask, why does this matter? Even with the missing .WOFF2 entry, Chrome will eventually find a font that it knows about and can find on the server. So why should you care? After all it works without all the fuss.

A 404 request is still a server request and there's latency and some bandwidth (headers and response) involved with every 404 request. Additionally, 404's on a server are nasty because they don't cache. So unlike a successful resource request which eventually ends up in the cache and won't get requested again by a browser,  a 404 will always be re-requested adding extra overhead to any request that has to load your font so you take that extra server round trip on every page load that loads this 404 resource even if it was previously requested.

So, it's always a good idea to hunt down 404 errors in applications especially for things that get fired on every page (especially things like favicon.ico - See Hanselman's story on this topic).

Additionally FontAwesome's .WOFF2 file is 20% smaller than the .WOFF file, so there's some good bandwidth savings as well.

Another good options for something like FontAwesome or Bootstrap is to use a CDN to offload the font/css/script loading from your server altogether. CDNs will make sure that the  files in a distribution can be served so you can completely side-step these typed of missing MIME map problems entirely.

Resources

© Rick Strahl, West Wind Technologies, 2005-2016
Posted in CSS  HTML5  

Flexbox Containers, PRE tags and managing Overflow

$
0
0
I ran into nasty problem with PRE tag overflow behavior, which caused content of PRE tags to not respect the boundaries of the container even when overflow rules were set. It turns out the problem was due to Flexbox and the min-width setting that is set differently than standard DOM Block mode rendering.

Using Let's Encrypt with IIS on Windows

$
0
0
Let's Encrypt is a new, open source certificate authority for creating free SSL certificates. In this post I show you how you can use some of the API clients on Windows to create Let's Encrypt certificates for use in IIS.

Registering and Unregistering a VSIX Extension from the Command Line

$
0
0
If you use VSIX extensions and you need to install them as part of an installation script, you can use the VSIX Installer executable that ships with Visual Studio to control the install and uninstall process.

Code Magazine Article: Flexing your HTML Layout Muscles with Flexbox

$
0
0

I'm happy to announce that my CoDe Magazine article Flexing your HTML Layout Muscles with Flexboxis now out in the March and April issue:

FlexBox – why now?

I've been on Flexbox kick in the last half a year. I've been a reluctantant – or perhaps lazy – adopter of Flexbox. I've looked at Flexbox a few times in the past but was always put off by the lack of browser support, the quirky behavior between different browsers and the nomenclature that you have to learn and understand. But all that has changed in the last year or so, with all major browsers now supporting the latest Flexbox standard and behavior across browsers being fairly consistent. Flexbox syntax is definitely different and requires thinking about some new containership concepts that are not very well expressed in the Flexbox lingo (IMHO). But, while there are endless combinations for containership rendering with Flexbox, the actual vocabulary of CSS tags is relatively small. In fact, at the end of the article I have a table with the 12 tags that are available. Once I figured out the basic Flexbox concepts, it wasn't too difficult to remember the relevant tags that you typically deal with. As is usually the case, all it took is making a commitment to using the technology and the rest came easy. Now I can't imagine working without it anymore.

Flexbox has really changed my HTML design drastically. I'm no designer (said every developer ever) but with Flexbox I can at least manage my containership much easier. Building your typical 3 or 5 panel layouts becomes easy. Flexbox has especially been useful for complex SPA applications that display lots of data. Data entry forms are much easier to flow properly, even with responsive or mobile first design in mind.

Anyways – if you haven't looked at Flexbox before or you're still using tables to layout horizontal flow of pages then this article is to you. If you're already using FlexBox there's probably not a lot of news for you there, but you might enjoy the CodePen examples linked in the article that demonstrate a few common use cases where FlexBox really makes life easier.

Resources

© Rick Strahl, West Wind Technologies, 2005-2016
Posted in HTML5  CSS  

Reversing Sort Order on DOM Elements using jQuery

$
0
0

This post is going back to some basics, but it's a useful trick for many applications that's easy to implement and can make a big difference in usability. Quite frequently in an application you might have a server generated list of items to display that can be displayed in a reversible or other sortable order. While you can build the logic into a server side application to let you switch the sort order by re-reading content from the server, it's actually quite easy to make the server generated list client side sortable. Client side sorting is nearly instant and doesn't require server round trips and it's pretty easy to implement.

An Example: Messages in a Thread

For example, I've recently re-written the Message Board application I use for support on my Web site, and in it I show a list of message in a thread. One of the first requests that came up was: Can I see the list in reverse order with the last messages posted showing first.

Yup I can relate: I use my message board to support customers, and I frequently deal with long threads and it is useful to be able to see the last messages without having to scroll past a million messages that I have previously read and replied to. Not unexpected at all.

The UI I ended up with is a sort button on the top of the thread header with the message list below:

MessageList

The server side code in this application simply returns the HTML of the sorted list in ascending/default order, which is what is the most common scenario. Most people prefer to read messages chronologically. The only people who usually want to only read the last messages are moderators or support people like myself who need to sift  through lots of posts and reply to answer messages.

Advertisement

Making the List Client Side Reversible

It's actually quite easy to make any list client side sortable or reversible, by adding an initial sort order indicator to the sortable elements in the page. So for example in my app I generate my list items like this using ASP.NET MVC and Razor on the server:

<div id="ThreadMessageList">@{int counter = 0;foreach (var msg in Model.Messages)
        {counter++;<div class="message-list-item" data-id="@msg.MsgId" data-sort="@counter">... message content item here</div>}}</div>

The key here is the data-sort="@counter" attribute which effectively defines an initial sort order for the messages in this thread which generates:

<div id="ThreadMessageList"><article class="message-list-item" data-id="4I3212L1" data-sort="1">...</article><article class="message-list-item" data-id="4I10J4WL9" data-sort="2">...</article></div>

At this point you have an ascending sorted list of messages.

Toggling the List to make it Reversible

The data-sort key is important even though it's not used in the ascending order, but it gives a basic comparer value to each DOM element that you can then use to sort the DOM elements. And how do we sort DOM elements you might ask?

jQuery actually makes this pretty damn simple because you can simply select all of your list elements and then run JavaScript's sort() function over the resulting element array. The steps for this are:

  1. Keep a static variable that holds the sort state (asc/desc)
  2. Select all the child elements with jQuery
  3. Run sort() over the result jQuery result set
  4. Detach and re-attach the elements to the parent node

Here's what this looks like:

wwthreads.sortAscending = true; // initialize globally for page

// handle sorting of thread messages$(".main-content").on("click","#ReverseMessageOrder",function () { wwthreads.sortAscending = !wwthreads.sortAscending; var $msgList = $(".message-list-item"); $msgList.sort(function (a, b) {var sort = a.getAttribute('data-sort') * 1;var sort2 = b.getAttribute('data-sort') * 1;var mult = 1;if (!wwthreads.sortAscending) mult = -1if (sort > sort2)return 1 * mult;if (sort < sort2)return -1 * mult;return 0; }); $msgList.detach().appendTo("#ThreadMessageList");
});

How it Works

The code starts by declaring a static variable where it's globally accessible. I use wwthreads.sortAscending  which represents the toggle state of the sort option. To toggle the order all I do is not the value which effectively reverses the flag. As a side note I also load topics via AJAX requests, and whenever a topic is loaded the sortAscending flag is reset to true to make sure the initial message is displayed in the right order before it can be toggled.

The sort operation is initiated by the click on the #ReverseMessageOrder icon button which is also generated as part of the server side message. The first thing that happens is that I toggle the ascending order flag, so whatever the order currently is we're going to reverse it.

Next I capture all the message elements into a jQuery selected set. The nice thing about jQuery selectors is that they produce an array (actually and array-like list) that you can treat like an array using array functions. Which means we can use the JavaScript Array.sort() method on the result set. Sort iterates over the DOM elements and uses a Comparer function to receive two parameters for DOM elements to compare. Sort is internal and it shuffles elements asking your code to provide the logic to compare the two elements and return 1, –1, 0 to determine if the value is greater than, smaller than or equal.

So in our case, I look at the data-sort attribute's value for both elements passed, turn that value into a number (by multiplying by 1), and then decide depending on the sort order which value is 'larger'. Depending on whether we're doing ascending or descending order we then add a multiplier of 1 or –1 respectively. For ascending (natural) order we multiple by 1 which leaves the original order intact. For descending/reverse order we multiply by –1 which effectively reverses the sort logic. And that's it for the Comparer function.

When the .sort() completes the list has been resorted, but this doesn't affect the DOM as the list is only pointing at the existing DOM elements – although we sorted the list the DOM elements haven't changed. In order to update the DOM we have to actually detach the existing list, and reattach it to the parent element using this simple line:

$msgList.detach().appendTo("#ThreadMessageList")

And voila – the list is instantly updated.

This code is very simple and fairly generic to plug into any application easily, and it's a great client side enhancement feature you can easily add to server side application as an easy value add.

Bonus: Generating the Client Side data-sort Order

In the example above I used server side rendering to generate the initial sortorder and data-sort attribute, but that's not actually necessary (but easier if you can do it!). If you can't control the server side generated code for your sortable list you can generate the data-sort attributes yourself when the page loads (or when it refreshes as in my AJAX reloads). Assuming the initial list is in a specific order you can simply add the data-id using a little jQuery code:

// create initial data-sort elements$(".message-list-item").each(function (index, el) {
    $(el).attr("data-sort", index );
});    

This will work the same as server generated code but you have to be careful if you reload content via AJAX as to make sure the list is updated each time the data is loaded. But, this is a good way to handle the list sort entirely on the client side – the server doesn't need to contribute anything to the behavior.

Summary

This is certainly not a new trick, but it's something that I do quite frequently in my applications, and I'm often surprised that this functionality is not provided in popular Web sites or customer implementations when this functionality is so easy to implement and add to any kind of application. Choice is good and your users will thank you for the option to quickly view things in a different order.

© Rick Strahl, West Wind Technologies, 2005-2016
Posted in JavaScript  jQuery   ASP.NET  

Custom Message Formatting in WCF to add all Namespaces to the SOAP Envelope

$
0
0

I've been working on a WCF client implementation that is calling into a rather peculiar service that is unable to handle messages sent from a WCF SOAP client. In particular the service I needed to call does not allow inline namespaces in the SOAP message and requires that all namespaces are declared with prefixes and declared on the SOAP:Envelope element. WCF by default doesn't work that way.

It felt like I entered into the real bizarro world of a service that was refusing valid XML messages because the messages were formatted a certain way. Specifically the service refuses to read inline namespace declaration and expects all the namespaces to be declared up front on the SOAP envelope. Yeah, you heard that right – send valid XML with validating namespace definitions, but which happen to be defined inline of the body rather than at the top of the envelope and the service fails with a hard exception on the backend.

Hmmm alrighty then… After a lot of back and forth with the provider it comes out that, yes "that's a known issue" and it will be fixed – sometime in the future to which I mentally added "presumably in the next 10 years". Not bloody likely that they are going to help me on the server side.

So since I wasn't going to get any help from the provider, I did what any good developer would do – search StackOverflow and the Web for a solution. Apparently this is not the most bizarre thing ever, as I assumed. A lot of Java/IBM based service apparently have this problem, but even so WCF solutions for this seem to be scarce. I even posted my own StackOverflow question, which I eventually answered myself with what I'm describing here in more detail.

Defining the Problem

To demonstrate what I'm talking about,here's a simple request that WCF natively creates when calling the service:

<s:Envelope xmlns:s="http://schemas.xmlsoap.org/soap/envelope/"><s:Header><h:Security>...</h:Security></s:Header><s:Body xmlns:xsi="http://www.w3.org/2001/XMLSchema-instance" xmlns:xsd="http://www.w3.org/2001/XMLSchema"><cancelShipmentRequest xmlns="http://www.royalmailgroup.com/api/ship/V2"><integrationHeader><dateTime xmlns="http://www.royalmailgroup.com/integration/core/V1">2016-04-02T01:39:06.1735839Z</dateTime><version xmlns="http://www.royalmailgroup.com/integration/core/V1">2</version><identification xmlns="http://www.royalmailgroup.com/integration/core/V1"><applicationId>RMG-API-G-01</applicationId><transactionId>vw7nj5jcmtkc</transactionId></identification></integrationHeader><cancelShipments><shipmentNumber>TTT001908905GB</shipmentNumber></cancelShipments></cancelShipmentRequest></s:Body></s:Envelope>

This is pretty typical of WCF messages which include a bunch of inline and duplicated namespace declarations. Some of them inherit down (like on cancelShipmentRequest) and others are defined on the actual nodes and repeated (all of the v1 namespaces basically). I'm not quite sure why WCF creates such verbosity in its messages rather than defining namespaces at the top since it is a lot cleaner, but regardless, what's generated matches the schema requirements of the WSDL and in theory the XML sent should work just fine.

But - as pointed out, the provider does not accept inline namespace declarations in the body, so no matter what I tried the requests were getting kicked back with 500 errors from the server. As you might expect, it a look a lot of trial and error and head beating to figure out that the namespaces were the problem. After confirming with the provider this is indeed the problem, a known problem with no workaround, on the server side and it became clear that the only way to get the service to work is to fix it on the client in the WCF Proxy.

Advertisement

Customizing the XML Message using a MessageFormatter

After a lot of digging (and a comment on my StackOverflow question that referenced this blog post) the solution was to implement a custom MessageFormatter in WCF. MessageFormatters sit inside of the WCF pipeline and get fired after a document has been created but before the message has been processed. This gives a chance to hook into various creation events and modify the message as its being created. Essentially I need to hook into the Envelope element creation and then add the namespaces and when creating a subclassed message object there is a way to hook into the Envelope generation event and at that time it's possible to inject the namespaces. And it turns out that this approach works – the namespaces get generated at the Envelope level in the SOAP document.

Creating a custom Message Object with WCF

The key element that has to be modified to handle the Envelope XML creation is the Message object which includes a OnWriteStartElement() method that can be overridden and where the namespaces can be added. But as usually is the case with WCF to get your custom class hooked you have to create several additional classes to get the pipeline to fire your custom handlers.

Leave it to WCF to make this process an exercise in composition hell.  In order to customize the message, three classes are needed:

  • Message Class
  • ClientMessageFormatter Class
  • FormatMessageAttribute Class

You then attach the attribute to each of the Operations in the Service contract interface to get the formatting applied. Most of the code in these classes is just default implementations with a couple of small places where you actually override the default behavior. For the most part this is implement and interface and change the one method that you're interested in.

So here we go – I'll start with the lowest level class that has the implementation and work my way up the stack.

Message Class

First  is the message class implementation which has the actual code that adds the namespaces needed.

public class RoyalMailCustomMessage : Message{private readonly Message message;public RoyalMailCustomMessage(Message message)
        {this.message = message;
        }public override MessageHeaders Headers
        {get { return this.message.Headers; }
        }public override MessageProperties Properties
        {get { return this.message.Properties; }
        }public override MessageVersion Version
        {get { return this.message.Version; }
        }protected override void OnWriteStartBody(XmlDictionaryWriter writer)
        {
            writer.WriteStartElement("Body", "http://schemas.xmlsoap.org/soap/envelope/");
        }protected override void OnWriteBodyContents(XmlDictionaryWriter writer)
        {this.message.WriteBodyContents(writer);
        }protected override void OnWriteStartEnvelope(XmlDictionaryWriter writer)
        {
            writer.WriteStartElement("soapenv", "Envelope", "http://schemas.xmlsoap.org/soap/envelope/");
            writer.WriteAttributeString("xmlns", "oas", null, "http://docs.oasis-open.org/wss/2004/01/oasis-200401-wss-wssecurity-secext-1.0.xsd");
            writer.WriteAttributeString("xmlns", "v2", null, "http://www.royalmailgroup.com/api/ship/V2");
            writer.WriteAttributeString("xmlns", "v1", null, "http://www.royalmailgroup.com/integration/core/V1");
            writer.WriteAttributeString("xmlns", "xsi", null, "http://www.w3.org/2001/XMLSchema-instance");
            writer.WriteAttributeString("xmlns", "xsd", null, "http://www.w3.org/2001/XMLSchema");            
        }
    }

The key method is OnWriteStartEnvelope() which receives an XmlWriter that you can use to explicitly create the header element. As you can see I add all the namespaces I need in the header here.

Note that you may have to have multiple message classes if various methods use different namespaces. Lucky for me the service I'm dealing with has only a couple of namespaces that are used for all the service methods so a single overload was all we needed for the methods we called on the service.

ClientMessageFormatter

WCF has two kinds of MessageFormatters: ClientMessageFormatter used for client proxy requests and DispatchMessageFormatter which is used for generating server side messages. So if you need to create custom messages for services use a DispatchMessageFormatter which has slightly different overloads than the ones shown here.

Here's the implementation of the ClientMessageFormatter I used:This code basically overrides the SerializeRequest() method and serializes the new message object we created that includes the overridden namespace inclusions.

public class RoyalMailMessageFormatter : IClientMessageFormatter{private readonly IClientMessageFormatter formatter;public RoyalMailMessageFormatter(IClientMessageFormatter formatter)
    {this.formatter = formatter;
    }public Message SerializeRequest(MessageVersion messageVersion, object[] parameters)
    {var message = this.formatter.SerializeRequest(messageVersion, parameters);return new RoyalMailCustomMessage(message);
    }public object DeserializeReply(Message message, object[] parameters)
    {return this.formatter.DeserializeReply(message, parameters);
    }
}

FormatMessageAttribute

Finally we also need an attribute to hook up the new formatter to the actual service, which is done by attaching an attribute to the Service Operation on the contract. First you implement the attribute to attach the Formatter.

[AttributeUsage(AttributeTargets.Method)]public class RoyalMailFormatMessageAttribute : Attribute, IOperationBehavior{public void AddBindingParameters(OperationDescription operationDescription,BindingParameterCollection bindingParameters)
    { }public void ApplyClientBehavior(OperationDescription operationDescription, ClientOperation clientOperation)
    {var serializerBehavior = operationDescription.Behaviors.Find<XmlSerializerOperationBehavior>();if (clientOperation.Formatter == null)
            ((IOperationBehavior)serializerBehavior).ApplyClientBehavior(operationDescription, clientOperation);IClientMessageFormatter innerClientFormatter = clientOperation.Formatter;
        clientOperation.Formatter = new RoyalMailMessageFormatter(innerClientFormatter);
    }public void ApplyDispatchBehavior(OperationDescription operationDescription, DispatchOperation dispatchOperation)
    { }public void Validate(OperationDescription operationDescription) { }
}

Here I hook up the custom formatter to the operation.

Note that this service uses XmlSerializer messages and because of that I look for the XmlSerializerOperationBehavior to find the behavior. In other cases you may have to use DataContractSerializerBehavior so be sure to step through the code to see which serializer is registered for the service/operation. 

That's a lot of freaking ceremony for essentially 10 lines of code that actually do what we need it to do – but at the same time it's pretty amazing that you get that level of control to hook into the process at such a low level. WCF never fails to shock and awe at the same time :-)

Hooking up the Attribute to Service Operations

When all of the ceremony is done the last thing left to do is to attach the behaviors to the operation contracts. In my case I'm using a WCF generated proxy so I do this in the generated Reference.cs file in the ServiceReferences folder (with show all files enabled):

[System.ServiceModel.OperationContractAttribute(Action="cancelShipment", ReplyAction="*")]
[System.ServiceModel.FaultContractAttribute(typeof(MarvelPress.Workflow.Business.RoyalShippingApi.exceptionDetails), 
Action=
"cancelShipment", Name="exceptionDetails")] [System.ServiceModel.XmlSerializerFormatAttribute(SupportFaults=true)] [System.ServiceModel.ServiceKnownTypeAttribute(typeof(contactMechanism))] [System.ServiceModel.ServiceKnownTypeAttribute(typeof(baseRequest))] [RoyalMailFormatMessage]cancelShipmentResponse1 cancelShipment(MarvelPress.Workflow.Business.RoyalShippingApi.cancelShipmentRequest1 request);

And that's it – I'm now able to run my cancelShipment call against the service and make the request go through.

The new output generated includes all the namespaces at the top of the document (except for the SoapHeader which is generated separately and apparently *can* contain embedded namespaces):

<soapenv:Envelope xmlns:soapenv="http://schemas.xmlsoap.org/soap/envelope/" xmlns:v1="http://www.royalmailgroup.com/integration/core/V1"xmlns:v2="http://www.royalmailgroup.com/api/ship/V2" xmlns:xsi="http://www.w3.org/2001/XMLSchema-instance" xmlns:xsd="http://www.w3.org/2001/XMLSchema"><s:Header xmlns:s="http://schemas.xmlsoap.org/soap/envelope/"><h:Security></h:Security></s:Header><soapenv:Body><v2:cancelShipmentRequest><v2:integrationHeader><v1:dateTime>2016-04-02T07:54:34.9402872Z</v1:dateTime><v1:version>2</v1:version><v1:identification><v1:applicationId>RMG-API-G-01</v1:applicationId><v1:transactionId>he3q6qmer3tv</v1:transactionId></v1:identification></v2:integrationHeader><v2:cancelShipments><v2:shipmentNumber>TTT001908905GB</v2:shipmentNumber></v2:cancelShipments></v2:cancelShipmentRequest></soapenv:Body></soapenv:Envelope>

And that puts me back in business. Yay!

A generic [EnvelopeNamespaces] Operation Attribute

The implementation above is specific to the service I was connecting to, but I figured it would be nice to make this actually a bit more generic, by letting you configure the namespaces you want to provide for each method. This will make it easier to work with service that might have different namespace requirements for different messages. So rather than having hard coded namespaces in the Message implementation, it would be nice to actually pass an array of namespace strings.

To do this I created a new set of classes that generically allow an array of strings to be attached.

The result is the [EnvelopeNamespaces] Attribute which you can use by explicitly adding namespaces like this using delimited strings in an array:

// CODEGEN: Generating message contract since the operation cancelShipment is neither RPC nor document wrapped.[System.ServiceModel.OperationContractAttribute(Action="cancelShipment", ReplyAction="*")]
[System.ServiceModel.FaultContractAttribute(typeof(MarvelPress.Workflow.Business.RoyalShippingApi.exceptionDetails), Action="cancelShipment", Name="exceptionDetails")]
[System.ServiceModel.XmlSerializerFormatAttribute(SupportFaults=true)]
[System.ServiceModel.ServiceKnownTypeAttribute(typeof(contactMechanism))]
[System.ServiceModel.ServiceKnownTypeAttribute(typeof(baseRequest))][EnvelopeNamespaces(EnvelopeNamespaces = new string[] {"v1:http://www.royalmailgroup.com/integration/core/V1","v2:http://www.royalmailgroup.com/api/ship/V2","xsi:http://www.w3.org/2001/XMLSchema-instance","xsd:http://www.w3.org/2001/XMLSchema"} )]cancelShipmentResponse1 cancelShipment(MarvelPress.Workflow.Business.RoyalShippingApi.cancelShipmentRequest1 request);        

Here's the more generic implementation:

public class EnvelopeNamespaceMessage : Message{private readonly Message message;public string[] EnvelopeNamespaces { get; set; }public EnvelopeNamespaceMessage(Message message)
    {this.message = message;
    }public override MessageHeaders Headers
    {get { return this.message.Headers; }
    }public override MessageProperties Properties
    {get { return this.message.Properties; }
    }public override MessageVersion Version
    {get { return this.message.Version; }
    }protected override void OnWriteStartBody(XmlDictionaryWriter writer)
    {
        writer.WriteStartElement("Body", "http://schemas.xmlsoap.org/soap/envelope/");
    }protected override void OnWriteBodyContents(XmlDictionaryWriter writer)
    {this.message.WriteBodyContents(writer);
    }protected override void OnWriteStartEnvelope(XmlDictionaryWriter writer)
    {
        writer.WriteStartElement("soapenv", "Envelope", "http://schemas.xmlsoap.org/soap/envelope/");if (EnvelopeNamespaces != null)
        {foreach (string ns in EnvelopeNamespaces)
            {var tokens = ns.Split(new char[] {':'}, 2);
                writer.WriteAttributeString("xmlns", tokens[0], null, tokens[1]);
            }
        }
    }
}public class EnvelopeNamespaceMessageFormatter : IClientMessageFormatter{private readonly IClientMessageFormatter formatter;public string[] EnvelopeNamespaces { get; set; }public EnvelopeNamespaceMessageFormatter(IClientMessageFormatter formatter)
    {this.formatter = formatter;
    }public Message SerializeRequest(MessageVersion messageVersion, object[] parameters)
    {var message = this.formatter.SerializeRequest(messageVersion, parameters);return new EnvelopeNamespaceMessage(message) {EnvelopeNamespaces = EnvelopeNamespaces};
    }public object DeserializeReply(Message message, object[] parameters)
    {return this.formatter.DeserializeReply(message, parameters);
    }
}


[AttributeUsage(AttributeTargets.Method)]public class EnvelopeNamespacesAttribute : Attribute, IOperationBehavior{public string[] EnvelopeNamespaces { get; set; }public void AddBindingParameters(OperationDescription operationDescription,BindingParameterCollection bindingParameters)
    {
    }public void ApplyClientBehavior(OperationDescription operationDescription, ClientOperation clientOperation)
    {//var serializerBehavior = operationDescription.Behaviors.Find<DataContractSerializerOperationBehavior>();IOperationBehavior serializerBehavior = operationDescription.Behaviors.Find<XmlSerializerOperationBehavior>();if (serializerBehavior == null)
                serializerBehavior = operationDescription.Behaviors.Find<DataContractSerializerOperationBehavior>() ;if (clientOperation.Formatter == null)
                serializerBehavior.ApplyClientBehavior(operationDescription, clientOperation);IClientMessageFormatter innerClientFormatter = clientOperation.Formatter;
        clientOperation.Formatter = new EnvelopeNamespaceMessageFormatter(innerClientFormatter)
        {
            EnvelopeNamespaces = EnvelopeNamespaces
        };
    }public void ApplyDispatchBehavior(OperationDescription operationDescription, DispatchOperation dispatchOperation)
    {
    }public void Validate(OperationDescription operationDescription)
    {
    }
}

Summary

Ah, WCF == (love && hate).

You gotta love that you can hook into the pipeline and fix a problem like this and that the designers thought of millions of intricate ways to manage the process of manipulating messages. But man is this stuff difficult to discover this stuff or even to hook it up. I was lucky I found a reference to MessageFormatter in an obscure post referenced in a comment.

While the code to actually do the work is really simple there is a boat load of ceremony around all of this code to get it to actually fire. Plus an attribute has to be added to each and every Operation method and it also means I have to manually edit the generated WCF proxy Client interface. All of which is as far from 'transparent' as you can get.

But hey, at least I managed to get it to work and now we can get on with our lives actually talking to the service. I shudder to think what other lovely oddities we might run into with this service, but I leave that for another day.

I hope this information is useful to some of you, although I hope even more that you won't need it, because you know, you shouldn't have to do it this way! But as is often the case, we can't always choose what crappy services we have to  interact with on the server and workarounds are what we have to work with.

So I hope this has been useful… I know my previous posts on WCF formatting issues are among the most popular on this blog. Heck, I have a feeling I'll be revisiting this post myself in the not so distant future since problem SOAP services are a never-ending plague these days…

Related Resources

© Rick Strahl, West Wind Technologies, 2005-2016
Posted in WCF  Web Services  

Configuring ASP.NET and IIS Request Length for POST Data

$
0
0

One of the most infuriating things about IIS configuration in general is how the Request length is configured in the IIS and ASP.NET. There are several places that control how much content you can send to the server and over the years this setting has changed in a number of ways. The places where it's configured is not super obvious and they can be fluid because some of these features are optionally installed IIS features.

So here are the two main places where the request length is set in IIS and ASP.NET:

  • IIS Request Filtering
  • HttpRuntime maxRequestLength

IIS RequestFiltering requestLimits

Let's start with the IIS level setting, which is also a relatively new setting. It's based around the Request Filtering module in IIS which is an optional IIS component, but that is a required component if you have ASP.NET installed on your server (at least in the latest versions). If you have ASP.NET enabled in IIS the Request Filtering module is also enabled and the following settings apply.

If you don't use ASP.NET you can still install Request Filtering, but it's an optional component. So if you only use ISAPI or CGI scripts and no ASP.NET content Request Filtering may not be enabled in which case the following settings cannot be set and aren't required. Since most people do run ASP.NET at least for some sites, for all intents and purposes we can assume that the Request Filtering module is installed on IIS.

So to configure the posted content size you can use the following web.config based configuration settings:

<?xml version="1.0" encoding="UTF-8"?><configuration><system.webServer><security><requestFiltering><requestLimits maxAllowedContentLength="500000000"  /></requestFiltering></security></system.webServer></configuration>

The maxAllowedContentLength determines the size of the POST buffer allowed in bytes. Above I've set the value to 500megs.

Or you can do the same thing in the IIS Management console using Request Filtering option in the IIS options:

IISRequestFiltering

As is usually the case you can apply the filtering at all levels of the IIS hierarchy – Machine, Site and Virtual/Application. Using web.config as shown above sets the settings at the Application level.

Because these are IIS settings, the value controls the IIS upload settings so they are applied against any and all requests that are fired against IIS, including ASP.NET, ASP, ISAPI extensions, CGI/FASTCGI executables, IISNodeJs requests and so on.

ASP.NET <httpRuntime maxRequestLength>

ASP.NET traditionally has had its own httpRuntime element in the <system.web> section that control ASP.NET runtime settings one of which is the maxRequestLength. This setting controls the ASP.NET pipeline's acceptance of file uploads and it needs to be configured in addition to the Request Filtering settings described above.

<?xml version="1.0" encoding="UTF-8"?><configuration><system.web><httpRuntime maxRequestLength="500000000"executionTimeout="120" /></system.web></configuration>

You can also use the IIS Management Console and the Configuration Manager option, to view all of the options on the httpRuntime element:

HttpRuntimeSettings

What's interesting is that the settings you see here widely mirror the settings in the Request Filtering section, and they are not inherited. It's your responsibility to make sure the settings are set correctly in both places. I recommend that you take a minute and go through the values you care about and set them correctly in both places.

Summary

It's a pity that IIS and ASP.NET cannot integrate a bit better and that you effectively have to make these setting changes in two places. I know I hear this from customers all the time: "But I set the values in the httpRuntime element, but my posts still end up getting cut off at 2 megs…". The settings have to be made in both places and the lowest setting wins in either case. It's not a big deal to make these changes once you know, but it can be frustrating if you're searching for the setting find one and then find that you're still not getting the behavior you'd expect because it needs to be set in two places.

© Rick Strahl, West Wind Technologies, 2005-2016
Posted in ASP.NET   IIS7  

Google AdSense for AJAX Content

$
0
0

I recently updated my old Support Message Board Web site that previously was purely server rendered to a site that mixes server rendered content with dynamically loaded AJAX content. The app is a message board application, that uses a panel browsing layout. Any directly accessed URLs use server rendering to get content into the page, but any subsequent requests to update messages pulls down just a the actual message content as HTML and then injects that into the document. The result is a much smoother browsing experience.

In the site below the full page renders with server rendered output initially. Any clicks on messages then refreshes the right panel with content downloaded via AJAX and refreshing just the messaging area:

MessageBoardWithAds

The result is a much faster and smoother navigation experience than refreshing the entire page.

AdSense and AJAX

Ok old hat, that's nothing new or exciting really.

But the issue is that Google Adsense ads display just fine when the page is initially server rendered, but are not rendering at all when the right hand panel is updated with AJAX loaded messages. The AJAX loaded content includes the ad markup including script code, but because the markup is loaded dynamically via AJAX it's not properly activated and so no ads actually render with the AJAX content by default.

AdSense by default doesn't officially support AJAX content and some quick searching around seems to confirm that fact. But it looks like there are workarounds one of which I'll discuss here.

The Adsense default script that Google provides for displaying ads looks like this:

<!-- MessageBoard Thread Responsive Ad --><script src="//pagead2.googlesyndication.com/pagead/js/adsbygoogle.js" async ></script><ins class="adsbygoogle"style="display:block"data-ad-client="ca-pub-XXXXXXX"data-ad-slot="63623XXXXX"data-ad-format="auto"></ins>           <script>(adsbygoogle = window.adsbygoogle || []).push({});</script>

And this works fine for server rendered ads. You can embed this script into the page and an ad displays. However, when loading this script content via AJAX the script code isn't explicitly fired. While the ad placeholder gets embedded into the page, the script tag doesn't get fired.

Breaking up the Script

But luckily there's a relatively easy way to make this work by breaking up the google script code into its component pieces:

  • Put the script link into the header (so it only loads once – a good idea even for server rendered pages)
  • Put the <ins> tag placeholder whereever it needs to display (also in AJAX content)
  • Call the trigger code on AJAX reloads explicitly

So we'll start by putting the script tag into the header or the bottom of the page. Where doesn't really matter but it needs to be handled as part of the initially rendered page.

<script src="//pagead2.googlesyndication.com/pagead/js/adsbygoogle.js" async ></script>

Then embed the <ins> tag in the location(s) of the document where it shows. In my case that's in the rendered Message partial where ads are rendered after particular messages (1,3,6):

@{ int msgCount = 0; foreach(var msg in Messages) { msgCount++;<article><div class="message-body">...</div>@if (msgCount == 1 || msgCount == 3 || msgCount == 6) {<!-- script in layout and on bottom and ajax refresh in loadTopicAjax()<!-- MessageBoard Thread Responsive Ad --><ins class="adsbygoogle"style="display: block"data-ad-client="ca-pub-4571123155768157"data-ad-slot="6111111111111"data-ad-format="auto"></ins>}</article>
<script>
(adsbygoogle = window.adsbygoogle || []).push({});
</script>
}

Now, the script at the bottom fires on server rendered content and everything works as expected – I get a max 3 ads rendered into my content.

The Google script appears to have some awareness about where it lives in the page, as it renderes 3 ads in the right place in the page. If you move the script to the bottom of the page as I initially tried however, only the first script is rendered. So the script figures out which tag to render based on the location in the page. When run out of context (ie. on the bottom of the page) it appears the script fires only the first embedded ad it can find.

Advertisement

AJAX Loaded Message Content

When messages are reloaded via AJAX when a user clicks a message after the initial page load, the application makes an XHR call to retrieve a partial HTML fragment that contains just the message content without all the 'frame' chrome and extracts just the the content. The downloaded AJAX content is essentially identical to the message body we rendered before minus the message list. The HTML in this payload includes the threaded message along with the embedded Google Adsense ads.

The problem is that when the AJAX HTML is embedded into the page, the script code associated with the Ad markup is not automatically fired.

The work around to make this work is explicitly fire the script code that updates the ad on the page by adding the activation script code to the AJAX callback that merges the content into the page.

Here's the (truncated) client code that reloads messages into the page via the AJAX request:

function loadTopicAjax(href) {            $.get(href, function(html) {var $html = $(html);var title = html.extract("<title>", "</title>");
        window.document.title = title;var $content = $html.find(".main-content");if ($content.length > 0) {
            html = $content.html();
            $(".main-content").html(html);// update the navigation history/url in addressbarif (window.history.pushState && !hrefPassed)
                window.history.pushState({ title: '', URL: href }, "", href);

// fire google ads (adsbygoogle = window.adsbygoogle || []).push({}); } else return; });return false; // don't allow click };

The key item in regards of the AdSense is to trigger the ad display code as part of the AJAX result, so after the message has been loaded and updated we can trigger the Google ad code again and the ad will then be displayed properly.

The key item is:

(adsbygoogle = window.adsbygoogle || []).push({});

which activates the ad.

Good news, bad news

Notice that I said the ad – singular.

While the above code works to trigger an ad via AJAX, it unfortunately only triggers the first ad on the page, not any of the subsequent ones. The issue here is that script code has some internal awareness of where it's running in the page and finding the adjacent <ins> tag to render the ad. If called generically as I'm doing here (either on the bottom of the page in server render, or as above in the AJAX callback code) only the first ad actually renders.

So I'm only able to render a single ad on the AJAX calls, but all three render one server side rendering.

I haven't found a way around this – if anybody knows of a way to make this happen, please leave a comment. I suspect it might be possible with options as part of the push command but I couldn't find any documentation on this.

Careful!

All of this is actually unsupported. Officially Google doesn't support ads in AJAX based content and what I describe here is somewhat unorthodox and based on a hack. It works, but it can easily break if Google decides to change how the script code works.

In my Message Board application I'm not doing anything unorthodox with the ad-units as I'm simply trying to get new ad units to display when AJAX navigation has taken place – ie. new content is loaded. This is really no different than loading a new page and displaying new ads. But Google's policies and terms explicitly forbid tinkering with the ad code and not displaying more than 3 ad units per page. Technically, the code I'm using is violating that – since I have a single page effectively replaces the same page's content with new content. But logically, this is doing what traditionally a full page reload would do, so I'll take my chances in fair use under those terms.

But, it's easy to see how this approach could be used to hijack ads and trigger a lot of ad refreshes on a single page which is where you can easily run into problems with Google's policy. So use this with caution, and be aware that you're skirting the outer realms of Google's Terms of service and you can potentially get cut off for violating their terms. Use at your own risk. Be weary and err on the side of caution. If in doubt, contact Google and ask.

© Rick Strahl, West Wind Technologies, 2005-2016
Posted in SEO  HTML   ASP.NET  

Windows 10 Bash Shell Network Connectivity not working?

$
0
0

I started playing around with the Windows 10 Anniversary edition Bash shell in build 14316, and one of the first problems I ran into was that network connectivity wasn't working. Any network command – curl, apt-get etc. just hangs.

IPv6 DNS Addresses not Working

When you install the Ubuntu subsystem (from Windows Features), the system settings from Windows are copied into the resolve.conf file, so it inherits the current Windows settings, which should be fine since that clearly works in Windows. But alas, in the Ubuntu Bash shell  I get no connectivity.

It appears the problem is that the Ubuntu subsystem doesn't deal properly with IPv6 IP Addresses that are listed by default in the network resolution file. The IPv6 addresses are first in the list and apparently that doesn't work. The simple fix, is to swap the the IPv4 and IPv6 addresses and – voila, network access works.

This is likely a temporary problem but definitely an issue in the current 15316 build of Windows 10 IP that I'm running.

Advertisement

Edit your resolv.config

To fix you can bring up an editor like this:

nano /etc/resolv.conf

My original file looked like this:
ResolveConfigOrigBash

Notice the IPv6 address at the top of the nameservers list.

Moving the IPv6 servers below (Ctrl-K to copy Ctrl-U to paste single line):

ResolveConfigOrigBash2

Save with Ctrl-O, and you're off to the races – Internet Connectivity is back. curl and apt-get, which is what I needed to use earlier, now works.

Other Network Problems

There are a still some things that don't work.

I still can't run ifconfig which gives me:

root@localhost:~# ifconfig
Warning: cannot open /proc/net/dev (No such file or directory). Limited output.

Not sure what's causing this and searching around for this doesn't bring up anything useful other than installation errors for a distro (not specific to this Windows shell).

Likewise some commands continue to not work. ping also fails:

root@localhost:~# ping west-wind.com
ping: icmp open socket: Socket type not supported

There's a long thread on a GitHub issue around all of these problems with no resolution yet with the exception of the main connectivity issue. But I suspect these are just early version blues – this stuff will get sorted out. For the moment, I have enough connectivity to get stuff done.

© Rick Strahl, West Wind Technologies, 2005-2016
Posted in Windows  Linux  

Getting 'motivated' to move to SSL and HTTPS

$
0
0

It's no secret that if you're running a commercial site that it's a requirement to use SSL and HTTPS throughout your site. If you have any sort of login or any secure data on your site, SSL is not an option, but a requirement. However, if you're running a simple personal or hobby site, it's all too easy to dismiss SSL as a requirement because it's just enough of a hassle and in the past at least has a cost associated with it. But all that is changing.

There's no doubt: The pressure is on and HTTPS is pushed front and center more and more, as we see the browser vendors and API tools providers making SSL encryption for many Web scenarios no longer optional.

My moment: Google Maps API

Case in point - a few weeks back I found out the hard way when Google turned off their GeoLocation API in Chrome to no longer work on non-secured sites. I have a hobby site I built many years ago called GeoCrumbs.net, which is something that I mostly use personally to track locations I frequently use on my phone and easily pull them up in my maps app.

GeoCrumbs.net Web Site

Anyway a couple of weeks ago Google pulled the plug on providing GeoLocation over plain HTTP connection and the whole application just died in Chrome. Chrome now no longer supports GeoLocation to work from non-SSL urls. Because the site is a sort of a hobby site on my part, I didn't even notice the issue until a bit later when I tried to use my app on my test Android phone and the mapping features didn't work (the rest of it still runs). So, it was definitely time to get SSL hooked up to the site.

This post describes the process and a few thoughts on the process of moving this simple site over to HTTPS.

Advertisement

HTTPS for Everything?

A lot of people have been clamoring for secure-everything for some time. The Web has become a cesspool of malicious content and drive-by attacks and while HTTPS isn't a panacea it can help reduce the risks of malicious injection into Web traffic significantly.

There are a lots of good arguments for using HTTPS for everything. Rather than rehash all of that here I'll point you at a good article that summarizes many of the benefits of HTTPS:

Some of the more salient points are:

  • Prevent Malicious Content Injection
  • Search Engines starting to favor HTTPS
  • APIs not supporting HTTP any longer (my problem exactly)
  • Mobile devices can only access HTTPS
  • HTTP/2 coming only runs over SSL
  • Browsers are moving to mark non-SSL content as 'suspect'
  • Much harder to eavesdrop on HTTPS traffic by authorities

In short it's clear that browser vendors are on the warpath to push Web developers to use HTTPS as the de-facto goto protocol.

But doesn't it cost Money?

So my GeoCrumbs site is a perfect example of a site that was too small to justify actually paying for an SSL certificate. The site does logins, but since I intended this site to be mostly a personal site and it never went beyond that I decided it wouldn't have been worth the $15 or so for a certificate, plus the hassle to change the certificate every year.

There's cost, but there's also the hassle to deal with getting a new certificate from a provider, installing it into IIS, and more importantly then down the line have to deal with renewing the certificate and rebinding the sites because IIS's renewal process is so messed up.

Now I no longer have a choice since Google forced me into SSL, but... luckily today there are now free solutions to address that the SSL certificate issue both for the cost and administration factor.

LetsEncrypt changed Everything

This year things changed drastically when LetsEncrypt entered the SSL market as a purely open source certificate authority to offer free SSL certificates for all. Not only does this mean that cost is no longer an issue, but because LetsEncrypt is developed as an open source project with an accompanying open API, you can find a number of automation tools that automate the process of creating and installing LetsEncrypt certificates onto your servers. The tools can even help with auto-renewing certificates.

Let's Encrypt is still in late beta but already there are tons of tools that have been quickly ported into a variety of SDKs for various OS and development platforms. Creating a new certificate is as easy as firing up a small application or command line script and specifying a domain, contact info and depending on the tooling which Web site to install it to. It's not quite automatic, but after one time setup the process is pretty painless, even if you need to manage a few certificates.

I wrote about using Let's Encrypt with IIS on Windows and using some of the tooling described there (which has gotten better since I wrote the piece) it's trivial to set up new SSL certificates for free.

Certify

It's now become much easier to build an automated process that can create and renew certificates in an automated fashion. Since I run IIS on Windows I used Certify which is a Windows client for LetsEncrypt that makes it pretty straight forward to create certificates interactively and get them installed and renewed into an IIS installation in a matter of a few minutes.

Certify Application

Let's Encrypt needs to be run from the server where the certificate will be installed. With Certify I use Remote Desktop and fire up the app, enter an email contact (me) which receives notifications from Lets Encrypt when certificates are about to expire. I can then add a new certificate by picking a Web site to create the certificate for:

Certify Application

Certify then does all the work of creating the certificate and installing it on the Web site in question. After a few seconds of churning you should have your certificate installed and you're ready to use your HTTPS site.

AcmeSharp

As mentioned in my previous post, there are a number of tools available that are all based around the same ACMESharp .NET toolkit and it's entirely possible to build your own automation solutions. The ACMESharp toolkit includes .NET bits, as well as Powershell scripts that let you automate the entire process and even integrate it into your own applications.

That said using the low level API isn't exactly trivial - there's a lot to understand that the high level tools are hiding, so unless you're familiar with the security terminology and concepts I recommend to stick with the higher level tools at least for now.

It's all very early for tools like Certify and LetsEncryptWin - this stuff will get better and with any luck IIS (and most other Web servers) will include native support for certificate management with LetsEncrypt natively in the future.

LetsEncrypt has also announced that there will be an official Windows client, which presumably matches some of the features of the Linux versions and extend that functionality to IIS. That tooling is slated for RTM when LetsEncrypt is officially released (vs the current beta status).

The good news is this: Updating a site to use SSL is no longer expensive nor a big hassle. If you have small sites that ordinarily might not warrant SSL, using LetsEncrypt makes it much more plausible to just opt for SSL by default going forward.

That said, LetsEncrypt provides only support for Domain Verified (DV) certificates at the moment, not the full Extended Verification (EV) certificates that give you the full green browser bar. LetsEncrypt also doesn't support wildcard domains, which is a bummer as wildcard domains are just easier to manage when you have a ton of subdomains. So for these scenarios you still need to stick with paid for certificates at least for now.

Let's Encrypt's entry into the SSL space is fairly disruptive and a number of SSL providers have indicated they will start offering free certificates as well. It'll be interesting to see where this leads - I can't imagine that basic Domain Validated certificates can continue to be charged for item going forward.

One more thing... Redirecting to Secure Traffic with IIS

Ok, so I got my certificate, but I still need to make sure that all traffic is redirected to the secure site. This app is primarily meant to run on a phone and other devices so there are a shortcut links everywhere that point at the old http:// URL. So, it would be nice to forward all the old http:// links to https://.

To fix this it's easy to set up an IIS Rewrite Rule, in web.config:

<configuration><system.webServer><rewrite><rules><rule name="Redirect to HTTPS" 
              stopProcessing="true"><match url="(.*)" /><conditions><add input="{HTTPS}" pattern="^OFF$" /></conditions><action type="Redirect" 
                  url="https://{HTTP_HOST}/{R:1}" 
                  redirectType="Permanent" /></rule></rules></rewrite></system.webServer></configuration>  

Note that IIS Rewrite is an IIS add-in that you can install from the Web Platform installer.

With this simple change any request to access an http:// link automatically redirects an https:// link.

Summary

It's all fine and neat to hear about the changes coming with browsers to force HTTPS, but it's quite another when that process actually bites you in the butt as it did me. Granted it wasn't a critical issue, but nothing like getting thrown into the fire.

Using LetsEncrypt has made it much easier to deploy new certificates and get them renewed on a regular basis, which is great. In fact, since I started playing with LetsEncrypt I went and moved all of my smaller public facing sites to support SSL.

Certificate based security will never be easy, but the open nature of the tooling makes it that much easier to hide that complexity behind reusable tools.

The time to look at moving your non-secure sites is now, before it's a do or die scenario like mine was. The all SSL based Web is coming without a doubt and it's time to start getting ready for it now.

© Rick Strahl, West Wind Technologies, 2005-2016
Posted in Security  IIS  
Viewing all 670 articles
Browse latest View live