Quantcast
Channel: Rick Strahl's Web Log
Viewing all 664 articles
Browse latest View live

Returning an XML Encoded String in .NET

$
0
0

XML is not as popular as it once was, but there's still a lot of XML based configuration and data floating around today. Just today I was working with a conversion routine that needs to generate XML formatted templates, and one thing that I needed is an easy way to generate a properly encoded XML string.

Stupid Pet Tricks

I'll preface this by saying that your need for generating XML as standalone strings should be a rare occurrance. The recommendation for generating any sort of XML is to create a proper XML document XmlWriter or Linq to XML structure and create your XML that way which provides built-in type to XML conversion.

In most cases you'll want to use a proper XML processor whether it's an XML Document, XmlWriter or LINQ to XML to generate your XML. When you use those features the data conversion from string (and most other types) is built in and mostly automatic.

However, in this case I have a huge block of mostly static XML text and creating the entire document using structured XML documents seems like overkill when really i just need to inject a few simple values.

So in this case I'm looking for a way to format values as XML for which the XmlConvert static class works well.

Should be easy right? Well...

The XMLConvert class works well - except for string conversions which it doesn't support. XmlConvert.ToString() works with just about any of the common base types except for string to convert properly XML formatted content.

Now what?

Reading an encoded XML Value

There are a number of different ways that you can generate XML output and all of them basically involve creating some sort of XML structure and reading the value out of the 'rendered' document.

The most concise way I've found (on StackOverflow from John Skeet) is the following:

public static string XmlString(string text)
{
    return new XElement("t", text).LastNode.ToString();
}

which you can call with:

void Main()
{
    XmlString("Brackets & stuff <> and \"quotes\" and more 'quotes'.").Dump();
}

and which produces:

Brackets &amp; stuff &lt;&gt; and "quotes" and more 'quotes'.

If you don't want to use LINQ to XML you can use an XML Document instead.

private static XmlDoc _xmlDoc;

public string XmlString(string text)
{
	_xmlDoc = _xmlDoc ?? new XmlDocument();
	var el = _xmlDoc.CreateElement("t");
	el.InnerText = text;
	return el.InnerXml;
}

Note that using XmlDocument is considerably slower than XElement even with the document caching used above.

System.Security.SecurityElement.Escape()?

The SecurityElement.Escape() is a built-in CLR function that performs XML encoding. It's a single function so it's easy to call, but it will always encode all quotes without options. This is OK, but can result in extra characters if you're encoding for XML elements. Only attributes need quotes encoded. The function is also considerably slower than the other mechanisms mentioned here.

Just Code

If you don't want to deal with adding a reference to LINQ to XML or even System.Xml you can also create a simple code routine. XML strings really just escape 5 characters (3 if you're encoding for elements), plus it throws for illegal characters < CHR(32) with the exception of tabs, returns and line feeds.

The simple code to do this looks like this:

///  <summary>
///  Turns a string into a properly XML Encoded string.
///  Uses simple string replacement.
/// 
///  Also see XmlUtils.XmlString() which uses XElement
///  to handle additional extended characters.
///  </summary>
///  <param name="text">Plain text to convert to XML Encoded string</param>
/// <param name="encodeQuotes">
/// If true encodes single and double quotes.
/// When embedding element values quotes don't need to be encoded.
/// When embedding attributes quotes need to be encoded.
/// </param>
/// <returns>XML encoded string</returns>
///  <exception cref="InvalidOperationException">Invalid character in XML string</exception>
public static string XmlString(string text, bool encodeQuotes = false)
{
    var sb = new StringBuilder(text.Length);

    foreach (var chr in text)
    {
        if (chr == '<')
            sb.Append("&lt;");
        else if (chr == '>')
            sb.Append("&gt;");
        else if (chr == '&')
            sb.Append("&amp;");
        // special handling for quotes
        else if (encodeQuotes && chr == '\"')
            sb.Append("&quot;");
        else if (encodeQuotes && chr == '\'')
            sb.Append("&apos;");
        // Legal sub-chr32 characters
        else if (chr == '\n')
            sb.Append("\n");
        else if (chr == '\r')
            sb.Append("\r");
        else if (chr == '\t')
            sb.Append("\t");
        else
        {
            if (chr < 32)
                throw new InvalidOperationException("Invalid character in Xml String. Chr " +
                                                    Convert.ToInt16(chr) + " is illegal.");
            sb.Append(chr);
        }
    }

    return sb.ToString();
}

Attributes vs. Elements

Notice that the function above optionally supports quote encoding. By default quotes are not encoded.

That's because elements are not required to have quotes encoded because there are no string delimiters to worry about in an XML element. This is legal XML

<doc>This a "quoted" string. So is 'this'!</doc>

However, if you are generating an XML string for an attribute you do need to encode quotes because the quotes are the delimiter for the attribute. Makes sense right?

<doc note="This a &quot;quoted&quot; string. So is &apos;this&apos;!"

Actually, the &apos; is not required in this example because the attribute delimiter is ". So this is actually more correct:

<doc note="This a &quot;quoted&quot; string. So is 'this'!"

However, both are valid XML. The string function above will encode single and double quotes when the encodeQuotes parameter is set to true to handle setting attribute values.

The following LINQPad code demonstrates:

void Main()
{
	var doc = new XmlDocument();
	doc.LoadXml("<d><t>This is &amp; a \"test\" and a 'tested' test</t></d>");	
	doc.OuterXml.Dump();
	var node = doc.CreateElement("d2");
	node.InnerText = "this & that <doc> and \"test\" and 'tested'";
	doc.DocumentElement.AppendChild(node);
	var attr = doc.CreateAttribute("note","this & that <doc> and \"test\" and 'tested'");
	node.Attributes.Append(attr);
	doc.OuterXml.Dump();
}

The document looks like this:

<d><t>This is &amp; a "test" and a 'tested' test</t><d2 note="this &amp; that &lt;doc&gt; and &quot;test&quot; and 'tested'">
    	this &amp; that &lt;doc&gt; and "test" and 'tested'</d2></d>

Bottom line: Elements don't require quotes to be encoded, but attributes do.

Performance

This falls into the pre-mature optimization bucket, but I was curious how well each of these mechanisms would perform relative to each other. It would seem that XElement and especially XmlDocument would be very slow as they process the element as an XML document/fragment that has to be loaded and parsed.

I was very surprised to find that the fastest and most consistent solution in various sizes of text was XElement which was faster than my string implementation. For small amounts of text (under a few hundred characters) the string and XElement implementations were roughly the same, but as strings get larger XElement started to become considerably faster.

As an aside, the custom string version also runs considerably faster in Release Mode (in LINQPad run with Optimizations On) with optimizations enabled rather than debug mode. In debug mode performance was about 3-4x slower. Yikes.

Not surprisingly XmlDocument - even the cached version - was the slower solution. With small strings roughly 50% slower, with larger strings many times slower and incrementally getting slower as the string size gets larger.

Surprisingly slowest of them all was SecurityElement.Escape() which was nearly twice as slow as the XmlDocument approach.

Whatever XElement is doing to parse the element, it's very efficient and it's built into the framework and maintained by Microsoft, so I would recommend that solution, unless you want to avoid the XML assembly references in which case the custom solution string works as well with smaller strings and reasonably close with large strings.

Take all of these numbers with a grain of salt - all of them are pretty fast for one off parsing and unless you're using manual XML encoding strings in loops or large batches, the perf difference is not of concern here.

If you want to play around with the different approaches, here's a Gist that you can load into LINQPad that you can just run:

Summary

XML string encoding is something you hopefully won't have to do much of, but it's one thing I've tripped over enough times to take the time to write up here. Again, in most cases my recommendation would be to write strings using some sort of official XML parser (XmlDocument or XDocument/XElement), but in the few cases where you just need to jam a couple of values into a large document, nothing beats simple string replacement in the document for simplicity and easy maintenance and that's the one edge, use-case where a function like XmlString() makes sense.

Resources

© Rick Strahl, West Wind Technologies, 2005-2018
Posted in .NET  C#  XML  

Updating Westwind.AspnetCore.Markdown with Markdown from Files and URLs

$
0
0

It's been a while since I've been working on my Markdown tools, but last week I was back in content update mode on my Web site updating a bunch of ancient sites to something a little more modern. And as is often the case - a whole lot of rewriting of content is taking place.

I've previously described that I ended up creating a couple of Markdown controls for both classic ASP.NET WebForms and MVC as well as ASP.NET Core. Both provide roughly the same features to either style of ASP.NET from Markdown parsing to an embeddable Markdown control or TagHelper, which provide a number of useful Markdown features for ASP.NET.

My original goal for these tools was to allow me to integrate Markdown text into existing HTML based pages using either an ASP.NET Core TagHelper or a WebForms server control. The end result were a couple of generic Markdown helper libraries that ended up with a few additional tools:

For ASP.NET Core:

install-package westwind.aspnetcore.markdown

For System.Web based ASP.NET:

install-package westwind.web.markdown

For the original base features you can either look at the links above or check out these previous posts which go into more detail and talk about the implementations.

Adding additional Functionality

Recently I added a number of new features as part of a recent spade of updates:

  • Support for loading and parsing Markdown from Files
  • Support for loading and parsing Markdown from Urls
  • Making it easier to use a different Markdown Parser with this library
  • Better title sniffing for self-contained Markdown pages

and in this post I'll discuss these for the ASP.NET Core features. Note the System.Web based version has most of the same features but I won't discuss them in this post - you can look at the documentation on the Github page.

Feature Recap

Here's a quick review of the features of both of the Markdown libraries:

  • Raw Markdown Parsing
    • Markdown.Parse()
    • Markdown.ParseFromFile()
    • Markdown.ParseFromUrl()
    • HtmlString and async versions of the above
  • Markdown Islands
    • Markdown TagHelper on ASP.NET Core MVC
    • Markdown WebForm Server Control for WebForms
  • Markdown Page Handler
    • Serve Markdown files from the file system as HTML
    • Simply drop Markdown files into a folder
    • Uses a template wrapper for Markdown content
  • Support Features
    • Basic Html Sanitation
    • Base Url Fixups and common repository URL fixups

What's new

So the recent updates include a number of new features for the ASP.NET Core library:

  • Loading Markdown directly from File and URL for Parser and TagHelper
  • Replacable Markdown Parser (via IMarkdownParserFactory)
  • Simplified configuration for the MarkDig implementation

Markdown From Files on Disk

One very useful new feature is the ability to specify Markdown content from a file rather than statically embedding Markdown as text into a page. For content creation it's not uncommon to have a nicely designed page, with a large section of text that is mostly simple formatted text. Again back to things like contact pages, marketing pages, terms of conduct etc. which all need to render within the context of your site with nice layout, but still need a lot of text.

The base TagHelper allows abstracting the content into Markdown text which makes it easier to edit the text. However, if the block is large that gets unwieldy too, mainly because most HTML editors have no notion of Markdown formatting and will try to be extra helpful with their HTML expansions. For small blocks of Markdown this is fine, but for a lot of text, it's nice to be able to externalize that Markdown into a separate file that can be edited in a proper Markdown aware editor.

You can now do this either with the ASP.NET Core TagHelper or the Markdown.ParseFromFile() helper function.

For the ASP.NET Core TagHelper this looks like this:

<div class="mainbody"><img id="BannerImage" src="images/MarkdownMonsterLogo.png" />      <h3>A better Markdown Editor and Weblog Publisher for Windows</h3>
	... other marketing layout drivel<!-- Feature list is very simple ---><div class="mainbody-container"><markdown Filename="~/MarkdownMonsterFeatures.md"></markdown></div><footer>
    	... footer stuff</footer></div>

The TagHelper loads the Markdown from disk and renders it into HTML and you can now edit the markdown file separately from the HTML document.

Alternately you can also use the Markdown helper using one of the following methods:

  • Markdown.ParseFromFile()
  • Markdown.ParseHtmlStringFromFile()
  • Markdown.ParseFromFileAsync()
  • Markdown.ParseHtmlStringFromFileAsync()

You can do this in code:

var html = Markdown.ParseHtmlFromFile("~/MarkdownPartialPage.md")

or directly inside of a Razor page:

<div class="sample-block">
    @await Markdown.ParseHtmlStringFromFileAsync("~/MarkdownPartialPage.md")</div>

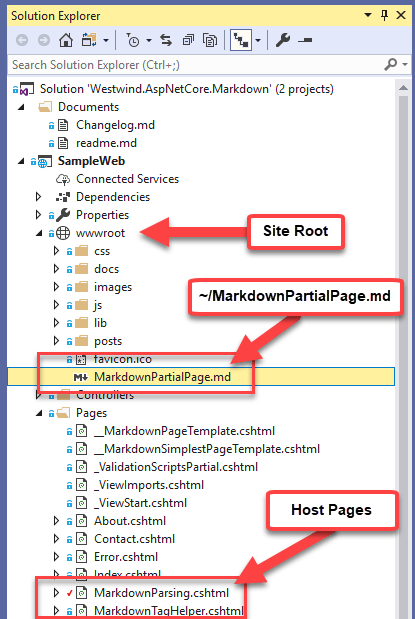
Page paths can be either relative to the Host Page or use Virtual Path Syntax (using ~/ for the root). Note these paths are site relative so they refer to the wwwroot folder of the ASP.NET core site.

Figure 1 - Images loaded from Markdown pages are host page relative rather than Markdown page relative

File Rendering loads Resources as Host Page Relative

Any relative links and resources - images, relative links - relative to the host page rather than to the Markdown document. Make sure you take into account paths for any related resources and either ensure they are relative to the host page or use absolute URLs.

Loading from URL

Very similar in behavior to loading Markdown files from disk, you can also load Markdown from a URL. Simply point the url= property of the TagHelper or use Markdown.ParseFromUrl() at a Markdown URL and that content will be loaded and then parsed into HTML.

There are 4 versions:

  • Markdown.ParseFromUrl()
  • Markdown.ParseHtmlStringFromUrl()
  • Markdown.ParseFromUrlAsync()
  • Markdown.ParseHtmlStringFromUrlAsync()

Here's what this looks like with the TagHelper:

<div class="mainbody"><img id="BannerImage" src="images/MarkdownMonsterLogo.png" />      <h3>A better Markdown Editor and Weblog Publisher for Windows</h3>
	... other marketing layout drivel<div class="mainbody-container"><!-- Embed external content here --->	<markdown
	        url="https://github.com/RickStrahl/Westwind.AspNetCore.Markdown/raw/master/readme.md"
	        url-fixup-baseurl="true"></markdown></div><footer>
    	... footer stuff</footer></div>

If you want to use code:

var html = Markdown.ParseFromUrl(                
                https://github.com/RickStrahl/Westwind.AspNetCore.Markdown/raw/master/readme.md",
                fixupBaseUrl: true);

Or inside of a Razor page:

<div class="sample-block">  
        @(await Markdown.ParseHtmlStringFromUrlAsync("https://github.com/RickStrahl/Westwind.AspNetCore.Markdown/raw/master/readme.md"))</div>

Notice that there are both sync and async versions and plain string and HtmlString (for Razor usage) versions available.

Also notice the fixupBaseUrl parameter that can be specified both on the helper methods as well as on the tag helper - this option fixes up relative Markdown images and links so that they can render from the appropriate online resources. This switch is turned on by default as in most cases you don't want to end up with broken images or links.

The following code handles this task by using the MarkDig parser to walk the Markdown document:

/// <summary>
/// Fixes up relative paths in the generated Markdown based on a base URL
/// passed in. Typically pass in the URL to the host document to fix up any
/// relative links in relation to the base Url.
/// </summary>
/// <param name="markdown"></param>
/// <param name="basePath"></param>
/// <returns></returns>
public static string FixupMarkdownRelativePaths(string markdown, string basePath)
{
    var doc = Markdig.Markdown.Parse(markdown);

    var uri = new Uri(basePath, UriKind.Absolute);

    foreach (var item in doc)
    {
        if (item is ParagraphBlock paragraph)
        {
            foreach (var inline in paragraph.Inline)
            {
                if (!(inline is LinkInline))
                    continue;

                var link = inline as LinkInline;
                if (link.Url.Contains("://"))
                    continue;

                // Fix up the relative Url into an absolute Url
                var newUrl = new Uri(uri, link.Url).ToString();
                
                markdown = markdown.Replace("](" + link.Url + ")", "](" + newUrl + ")");
            }
        }
    }
    return markdown;            
}

This function walks the downloaded Markdown document looking for any image and reference links that are not absolute and turns them into absolute urls based on the location of the page you are loading. You can opt out of this by setting the value to false explicitly.

Note that this only fixes up Markdown links and Urls - it won't catch embedded HTML links or images.

Url Loading - Is this Useful?

Link loading may not sound very exciting, but it can be a great solution for certain scenarios - specifically for CMS and documentation needs. Using this feature you can easily store content on a public site or - more likely a source code repository like GitHub - and serve Markdown content directly from there. By doing so you can update the documentation separately from your application and simply link in topics remotely.

The content is always up to date when you or other contributors update the documents by simply committing changes. No publishing or other changes required other than getting the links in place.

It's a great way to pull in Markdown content that is shared and updated frequently.

Replacing the Markdown Parser

A number of people have asked how to swap out the Markdown parser in this library and use a different parser. Markdig is pretty awesome as a generic Markdown parser, but there are a few specialized Markdown parsers around and heck it would even be possible to completely replace the parsing to something different like AsciiDoc for example.

This was previously possible but pretty hacky. The default implementation of this library and middleware uses the MarkDig Markdown Parser for processing of Markdown content. However, you can implement your own parser by implementing:

  • IMarkdownParserFactory
  • IMarkdownParser

These two simple single-method interfaces have a IMarkdownParserFactory.GetParser() and IMarkdownParser.Parse() methods respectively that you can implement to retrieve an instance of your own custom parser that can then handle the parsing tasks.

To configure a custom parser apply it to the Configuration.MarkdownParserFactory property in the Startup.ConfigureServices() method:

 services.AddMarkdown(config =>
{
	// Create your own IMarkdownParserFactory and IMarkdownParser implementation
	config.MarkdownParserFactory = new CustomMarkdownParserFactory();
	...
}	

The custom parser is then used for all further Markdown processing.

Growing up

This library has grown a lot more than I originally intended. I started with the TagHelper initially because I needed to embed text, then needed to serve entire pages and added the Markdown middle ware pipeline. Then I ran into large blocks of statically embedded Markdown in existing pages and found that external files are much easier to edit then inline Markdown. And finally in a recent document management application found that the easiest way to manage a large set of Markdown documents was via external files that are being pulled in remotely from Github via URL loading.

I'm sure there will be more uses cases and scenarios in the future but I'm happy to see this library now solves a lot of Markdown related usage scenarios out of the box and I'm finding I'm adding this to most of my applications these days for content centric by product features of most Web sites. Hopefully some of you also find it useful...

I also want to leave you with a shoutout to the excellent Markdig Markdown Parser that this library relies on by default - it's really the core piece that makes all of this possible. I know a lot of other libraries also depend on Markdig, so if you're using it show some love to that core component by starring the repository on GitHub or maybe even leaving a donation. I just did in my year end round of donations for projects I use - show some love for the 'free' stuff you use...

Aloha

Resources

Access the Code

Previous Posts

this post created and published with Markdown Monster
© Rick Strahl, West Wind Technologies, 2005-2018
Posted in ASP.NET Core  Markdown  

Don't let ASP.NET Core Console Logging Slow your App down

$
0
0

Earlier today I put my foot in my mouth on Twitter by running a quick and dirty perf test application to check out a question from a customer, without properly setting up configuration.

Specifically I ran my application directly out of the Release folder without first publishing and while that works to run the application, it doesn't copy over the configuration files. Since there was no configuration, ASP.NET Core started the console app without any explicit logging overrides and I got the default Console logging configuration which produced a crap-ton of Console log messages which in turn slowed the application under load to a crawl.

How slow? Take a look - here in WebSurge:

Figure 1 - Load testing with Information Console: 940 req/sec

Figure 2 - Load testing with Warning Console: 37,000+ req/sec

  • With Logging (Information): <1k req/sec
  • Without Logging (Warning): 37k+ req/sec

Yup, that's nearly a 40x difference in these admittedly small do-nothing requests. Even with the async logging improvements in .NET Core 2.x Console logging is very, very slow when it is set to Information or worse Debug. The default ASP.NET Core default if there's no configuration at all is Information. Not cool!

Luckily the default templates handle setting the Log level to Warning in production, but the raw default is still a headscratcher.

Moral of the story: Make sure you know what your Console logger is doing in your application and make sure it's turned down to at least Warning or off in production apps.

Operator Error: Missing Configuration

My error was that I tried to be quick about my test, simply compiling my tiny project and running it out of the Release folder. That works, but it's generally not recommended for an ASP.NET Core application.

ASP.NET Core applications should be published with dotnet publish which creates a self contained folder structure that includes all the dependencies and support files and folders that are needed for the application to run. In Web applications that tends to be the wwwroot folder, the runtime dependency graph and configuration files.

In this case specifically dotnet publish copies the appsettings.json configuration file(s) which is what I was missing to get the default Console Information logging behavior.

The default dotnet new template for Production (appsettings.json) sets the default logging level to Warning:

{"Logging": {"LogLevel": {"Default": "Warning"
    }
  }
}

which is appropriate for Production at runtime. And this works fine producing only console output on warnings and errors which should be relatively rare.

Here's the bummer though:

ASP.NET Core's default logging level is Information

By default if you don't apply explicit configuration (configuration file, environment vars, manual etc.), it will log a Information level messages which equals a ton of crap that you are unlikely to care about in the console or any other logging source in production.

Overriding Logging Behavior in ASP.NET Core

Logging is an important part of any application and ASP.NET Core introduces very nice logging infrastructure that is useful out of the box and allows for powerful extensibility via clearly defined and relatively easy to implement interfaces.

The Console Logger

One of the provided logging providers is the Console Logger which outputs logging information to the terminal. This is very useful during development as you can see exception information and log your own status information to the console for easy tracing and debugging.

It can also be useful in production. Even if you normally run your application behind a proxy normally it's possible to spin up the application from a terminal and potential check for terminal output directly. This can be especially useful for debugging startup errors. I've had to do that on a few occasions with IIS hosted applications because IIS failed to connect due the app not spinning up properly on the host.

Otherwise, realistically a Console logger is not the most useful thing in Production. The default configuration creates a Console logger regardless of configuration and there's no easy way to just remove a single logger. Rather you have to rebuild the entire logging configuration yourself (which is not that difficult but not all that obvious).

Console Logging is Very Slow

The problem with Console logging is that logging to the console is dreadfully slow at least on Windows as I showed above. In the past the biggest issue was that the Console (using System.Console.WriteLine()) is a sequential blocking call and under load that blocking is enough to seriously slow down request processing.

In .NET Core 2.0 and later improvements were made to provide a queue in front of the console and asynchronously log in a background thread writing out to the actual Console. Although that improved performance some the queue itself is also blocking so there's overhead there as well and performance still is quite slow potentially throttling request throughput.

Default Logging Configuration

The good news is if you create new ASP.NET Core 2.x project the default configuration for production does the right thing by setting the logging level to Warning in applicationsettings.json:

{"Logging": {"LogLevel": {"Default": "Warning"
    }
  }
}

The development version in applicationsettings.Development.json is more liberal and writes a lot more logging output:

{"Logging": {"LogLevel": {"Default": "Debug","System": "Information","Microsoft": "Information"
    }
  }
}

Logging levels are incremental so Trace logs everything, Warning logs Warning, Error and Critical, and None logs... well none.

  • Trace
  • Debug
  • Information
  • Warning
  • Error
  • Critical
  • None

So far so good.

What if you have no applicationsettings.json and no other configuration overrides? In this case the default is Information meaning a lot of logging happens to Console and this is how I ended up with this post.

Turning Off Console Logging

You can turn off console logging in a number of ways:

  • appsettings.json
  • custom logging configuration
  • removing the console log provider

Using Configuration

The easiest way to get control over your Console logging is to simply turn down your Logging volume by setting the logging level to Warning or Error. Any lower than that - Information or Debug - should really just be used during development or in special cases when you need to track down a hard to find bug. In Production there should rarely be a need to do information/debug level logging.

Any changes you make to the configuration settings either in appsettings.json or any other configuration providers like environment variables, affects all Logging providers that are configured. By default ASP.NET Core configures DebugLogger, ConsoleLogger and EventSourceLogger. Any logging level settings affect all of these providers by default.

Using the configuration settings in appsetting.json and setting to Warning was enough to get my scrappy test application to run at full throttle closer to the 37k request/sec.

Where does Default Logging Configuration come from

The default logging configuration originates in the ASP.NET Core's default configuration which is part of the WebHost.CreateDefaultBuilder() configuration during the host startup in program.cs:

public static IWebHostBuilder CreateWebHostBuilder(string[] args) =>
                WebHost.CreateDefaultBuilder(args)
                .UseStartup<Startup>();

You can take a look at what the default builder does by source stepping (or decompiling) WebHost.CreateDefaultBuilder(). The relevant logging configuration code in the default WebHost looks like this:

.ConfigureLogging((Action<WebHostBuilderContext, ILoggingBuilder>) ((hostingContext, logging) =>
      {
        logging.AddConfiguration((IConfiguration) hostingContext.Configuration.GetSection("Logging"));
        logging.AddConsole();
        logging.AddDebug();
        logging.AddEventSourceLogger();
      }))

Overriding the Default Logging Configuration

If that default setup doesn't suit you you can clear everything out and configure your own logging stack from scratch by doing something like the following in your Startup.ConfigureServices() method:

public void ConfigureServices(IServiceCollection services)
{
    services.AddLogging(config =>
    {
        // clear out default configuration
        config.ClearProviders();

        config.AddConfiguration(Configuration.GetSection("Logging"));
        config.AddDebug();
        config.AddEventSourceLogger();
        if(Environment.GetEnvironmentVariable("ASPNETCORE_ENVIRONMENT") == EnvironmentName.Development) 
        {
        	config.AddConsole();
        }
    });

    ... 
}

There are no config.RemoveProviderXXX() functions - once created the logging configuration has to be cleared and effectively rebuilt completely, and since the default config sets this up, any changes pretty much require this type of code.

You can control the logging levels via configuration, but you can't add or remove providers that way, so if you need custom providers or want to remove provider like say the Console provider in production you have to do it in code.

Summary

What I've covered here is probably an odd edge case that you may never see, but it's one that can bite you when you're not paying attention. It's a good reminder that Console logging can have a big performance hit for little benefit. There are more efficient ways to log and other than for on site debugging there's not much use for console logging in the first place at least running in production.

Ah, the little consolations in life... they always come back to bite 'ya!

© Rick Strahl, West Wind Technologies, 2005-2018
Posted in ASP.NET Core  

A Visual Studio to Visual Studio Code Snippet Converter

$
0
0

Visual Studio has very nice Code Snippet facility built into it and over the years I've been using it to create a ton of useful expansion snippets that make my day to day development easier. I have quite a few C# code snippets, but even more I use the HTML snippets for things like my Bootstrap customized snippets, snippets for complex HTML controls and the like. There are few others for JavaScript, XAML and even some Powershell ones.

Over the last couple of years I have been more and more using other tools in combination with Visual Studio. Two tools in particular: Visual Studio Code and JetBrains Rider.

Over the many years of using Visual Studio, I've accumulated nearly hundred 130+ code snippets and when I'm working in other environments I really miss them, especially the HTML ones for long blocks that are painful to look up on doc sites and then customize. With snippets this stuff auto-fills and with a few keystrokes customizes my specific use case which saves me tons of time every day.

In fact, I missed this stuff so much that sometimes I'd just fire up Visual Studio with an HTML editor open, just to expand HTML snippets I need, and then paste them back into VS Code or Rider. Tedious, but still faster than manually copying code from a Doc site and then manually customizing these longer blocks of text with the appropriate insertions added. It sure would be a lot nicer to do this directly in each respective environment.

So over the last couple of weekends I threw together a small utility that allows me to move my Visual Studio snippets to Visual Studio Code snippets and - with limited features - to JetBrains Rider.

If you just want to jump in, you can find the code on GitHub:

A word of warning - this is a hacky project, and there's no guarantee that it'll work with all types of snippets that are supported. However, for my snippets all 137 of them ported over nicely to VS Code and as far as I can tell they all work. I can also re-run the export multiple times and easily create new snippet files for the exports to compare/update as needed.

For Rider the story is more complicated as Rider has a crazy mechanism for storing templates in an internal, single configuration file. It also uses a couple of completely different storage engines for the .NET related snippets (C#,VB,F#, Razor, ASPNET) and the Web based ones (html,css,js etc.). This tool currently only supports the .NET related snippets and a one-time export since the crazy GUID based key system in Rider doesn't allow for finding existing snippets without the GUID. More on that later.

The Snippet Converter

You can download and run it as .NET Global SDK Tool (.NET SDK 2.1 or later) which is installable via Nuget:

dotnet tool install --global dotnet-snippetconverter

If you don't want to install and just run the tool you can clone or download the Github repo and then:

cd .\SnippetConverter\
# assumes .NET SDK 2.1+ is installed
dotnet run

Once installed this tool can convert Visual Studio Snippets to VS Code snippets, either individually or in batch by pointing a folder or individual snippet.

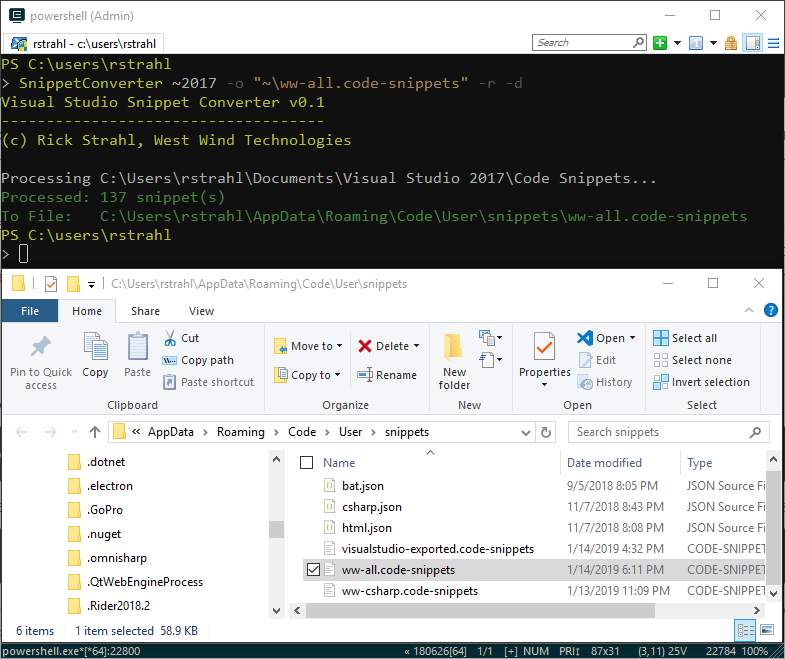
snippetconverter ~2017 -r -d

will convert all Visual Studio 2017 snippets to VS Code into a single visualstudio-exported.code-snippets snippets file.

There are a few options available to convert individual snippets and folders, add a prefix, recurse folders, display the generated file and more:

Syntax:
-------
SnippetConverter <sourceFileOrDirectory> -o <outputFile> 
                 --mode --prefix --recurse --display

Commands:
---------
HELP || /?          This help display           

Options:
--------
sourceFileOrDirectory  Either an individual snippet file, or a source folder
                       Optional special start syntax using `~` to point at User Code Snippets folder:
                       ~      -  Visual Studio User Code Snippets folder (latest version installed)
                       ~2017  -  Visual Studio User Code Snippets folder (specific VS version 2019-2012)                       

-o <outputFile>        Output file where VS Code snippets are generated into (ignored by Rider)   
                       Optional special start syntax using `~` to point at User Code Snippets folder:
                       %APPDATA%\Code\User\snippets\ww-my-codesnippets.code-snippets
                       ~\ww-my-codesnippets.code-snippets
                       if omitted generates `~\exported-visualstudio.code-snippets`
-m,--mode              vs-vscode  (default)
                       vs-rider   experimental - (C#,VB.NET,html only)
-d                     display the target file in Explorer
-r                     if specifying a source folder recurses into child folders
-p,--prefix            snippet prefix generate for all snippets exported
                       Example: `ww-` on a snippet called `ifempty` produces `ww-ifempty`

Examples:
---------
# vs-vscode: Individual Visual Studio Snippet
SnippetConverter "~2017\Visual C#\My Code Snippets\proIPC.snippet" 
                 -o "~\ww-csharp.code-snippets" -d

# vs-vscode: All snippets in a folder user VS Snippets and in recursive child folers
SnippetConverter "~2017\Visual C#\My Code Snippets" -o "~\ww-csharp.code-snippets" -r -d

# vs-vscode: All the user VS Snippets and in recursive child folders
SnippetConverter ~2017\ -o "~\ww-all.code-snippets" -r -d

# vs-vscode: All defaults: Latest version of VS, all snippets export to  ~\visualstudio-export.code-snippets
SnippetConverter ~ -r -d --prefix ww-

# vs-rider: Individual VS Snippet
SnippetConverter "~2017\proIPC.snippet" -m vs-rider -d

# vs-rider: All VS Snippets in a folder
SnippetConverter "~2017\Visual C#\My Code Snippets" -m vs-rider -d

This should give you an idea of what you can do. For more info read on...

But first a little background.

Visual Studio Code Snippets?

If you're not familiar or not using Code Snippets, you're not alone. They're pretty much a hidden feature in Visual Studio, which is a shame because they are a very useful productivity tool. Unfortunately Visual Studio doesn't have any useful, built-in UI to create these snippets, and so this feature is largely under-utilized by most developers. There's only the crappy Tool -> Code Snippet Manager, which isn't a manager of anything but a viewer that lets you see what snippets are active and available. There's no built-in way to create or edit snippets or even jump to and open a snippet. You're on your own.

However, Code Snippets are just simple XML files in a known folder location in your Documents folder. They are very easy to create and update and all things considered editing the raw XML file in syntax colored editor like VS Code might just be the easiest UI to create them anyway. There are a few low quality Visual Studio addins that provide UI but they tend to be more cumbersome than the raw snippet files.

The best way to create a new Code Snippet is to copy an existing snippet and modify it to fit your needs.

Snippets are located in:

<Documents>\Visual Studio 2017\Code Snippets

Each language/technology has its own subfolder for grouping, but that's really just for organization - snippets determine what language they apply to via a Language attribute in the XML.

Visual Studio ships with a number of code snippets in this location that you can use and learn from as a template for new snippets.

Snippets look something like this:

<?xml version="1.0" encoding="utf-8"?><CodeSnippets xmlns="http://schemas.microsoft.com/VisualStudio/2005/CodeSnippet"><CodeSnippet Format="1.0.0"><Header><Title>Property with INotifyPropertyChange raised</Title><Description>Control Property with Attributes</Description><SnippetTypes><SnippetType>Expansion</SnippetType></SnippetTypes><Shortcut>proIPC</Shortcut></Header><Snippet><References /><Imports /><Declarations><Literal Editable="true"><ID>name</ID><Type></Type><ToolTip>Property Name</ToolTip><Default>MyProperty</Default><Function></Function></Literal>        <Literal Editable="true"><ID>type</ID><Type></Type><ToolTip>Property Type</ToolTip><Default>string</Default><Function></Function></Literal></Declarations><Code Language="csharp" Kind="method decl" Delimiter="$"><![CDATA[public $type$ $name$
{
    get { return _$name$; }
    set
    {
        if (value == _$name$) return;
        _$name$ = value;
        OnPropertyChanged(nameof($name$));
    }
}        
private $type$ _$name$;
]]></Code></Snippet></CodeSnippet></CodeSnippets>

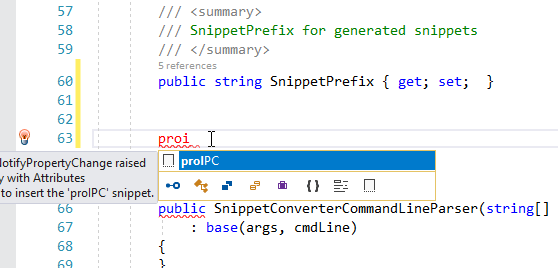
Once the file exists or is updated on disk, Visual Studio will immediately find it use it. No need to restart. In the relevant (C#) editor I now see the snippet in the IntelliSense list:

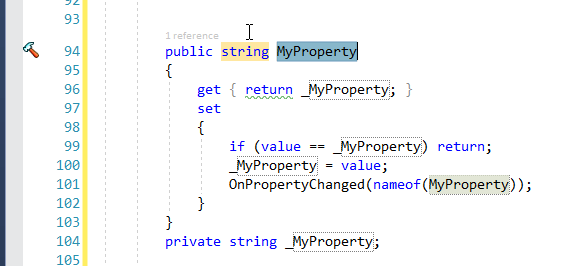
which inserts the template and lets you edit the declared place holders which are delimited with $expr$ in the template:

This happens to be a C# snippet but most common VS languages are supported. You can see that the key is the <Code> block that defines the template text, plus the <Shortcut> key that defines the editor expansion that triggers the snippet. You can embed $txt$ expressions in the template that are matched to the 'variable' <Declaration> elements above. Multiple place holder locations are changed in sync.

The most useful and larger snippets I use are mostly for HTML insertions, especially around custom Bootstrap structures or custom controls that have syntax that I can never remember. I like to look that stuff up once on a Documentation site, then create a snippet that lets me just insert it into my HTML. After you've done this a few times it's very easy, and the time it saves can be immense. A few minutes spent setting up a template can pay back big in time savings of text not typed into an editor and time not wasted looking up the same 50 lines of Bootstrap code every time 😃

Prefixes and Snippet Packs

There are also a number of snippet packs available in the Visual Studio Marketplace that you can install that provide a whole block of usually pre-fixed snippets that you can use. For example the Bootstrap Snippet pack adds a bunch of bs- snippets.

Using a prefix is a good idea as it makes it easy to find your own snippets in a see of Intellisense suggestions. I use ww- for most of my snippets. Unfortunately when I created many of my snippets originally I didn't follow this advice. But now when I export them I can explicitly specify a prefix when exporting if it doesn't exist already on the snippet name.

Building a Converter

So over the last couple of weekends I threw together a small utility that allows me to move my Visual Studio snippets to Visual Studio Code snippets and - with limited features - to JetBrains Rider.

I figure there might be a few others out there that would find this useful so I published this as a .NET Global Tool console application that you can quickly install:

dotnet tool install dotnet-snippetconverter

You'll need the .NET 2.1 SDK or later to run this.

The following commands all export from Visual Studio to VS Code I'll talk about Rider separately later

Once installed you can quickly convert all your Visual Studio snippets to VS Code with the following command.

snippetconverter ~ -r -d

This will convert all snippets from the latest installed Visual Studio version (2017,2019 etc.) and create a single VS Code visualstudio-exported.code-snippets in your VS Code User Snippets folder. You can also specify a specific VS version:

snippetconverter ~2017 -r -d

Or a specific folder:

snippetconverter "~2017\Visual C#\My Code Snippets" -r -d
                 -o "~\ww-csharp.code-snippets"

This specifies a specific output file for the snippet file. The ~ both in the input and output folder options are optional, but they reference base locations for snippets in Visual Studio (%Documents%\Visual Studio <year>) and VS Code (%appdata%\Code\User\Snippets\) to not have to provide full path names. But if you prefer you can also use fully qualified paths.

Finally you can also move a single file:

snippetconverter "~2017\Visual C#\My Code Snippets\proIPC.snippet" -d
                 -o "~\ww-csharp.code-snippets"

The tool will update snippets if they already exist in VS Code so you can re-run it to update your VS Code snippets from time to time.

Syncing Snippets

Moving snippets is one way from Visual Studio and to VS Code (for now). This means if you want to keep snippets in sync for both Visual Studio and VS Code it's best to create snippets in Visual Studio and then move them to VS Code via this tool.

VS Code Snippet Format

I talked about the snippet format for Visual Studio Snippets earlier, so let's look at what VS Code Snippets look like and where they live.

VS Code Snippets

  • Live in %AppData\Code\User\snippets
  • Are in JSON format
  • Have a lang.json format
  • Or have a <name>.code-snippet format
  • Can contain one or many Code Snippets

The SnippetConverter exports to .code-snippet files because there's too much of a chance of naming conflicts using the lang.json format. The default VS Code output file is visualstudio-export.code-snippets if not specified via -o switch.

VS Code snippet files are JSON and they look like this:

{"proipc": {"prefix": "proipc","scope": "csharp","body": ["public ${2:string} ${1:MyProperty}","{","    get { return _${1:MyProperty}; }","    set","    {","        if (value == _${1:MyProperty}) return;","        _${1:MyProperty} = value;","        OnPropertyChanged(nameof(${1:MyProperty}));","    }","}        ","private ${2:string} _${1:MyProperty};",""
    ],"description": "Control Property with Attributes"
  },"commandbase-object-declaration": {"prefix": "commandbase","scope": "csharp","body": ["        public CommandBase ${1:CommandName}Command { get; set;  }","","        void Command_${1:CommandName}()","        {","            ${1:CommandName}Command = new CommandBase((parameter, command) =>","            {","              $0","            }, (p, c) => true);","        }",""
    ],"description": "Create a CommandBase implementation and declaration"
  }	
}

The VS Code templates are conceptually simpler with a template, prefix and scope, and a simple embedded template that uses familiar string interpolation and convention to figure out how to display place holder values. There are additional fields that can be filled, but most of the values are optional and for conversion from Visual Studio at least - irrelevant.

You can find the Visual Studio Code Snippet Template docs here:

But for actually manually creating a template, the JSON body property is a pain to create because the string is expected to be an array of strings (yuk) which is a bear to type. The good news is it's easy to generate a template when exporting from a Visual Studio snippet...

Rider Formatting - Ugh

The SnippetConverter also works with Rider to some degree, but the functionality is much more limited. This is due to the fact that Rider uses a crazy format for storing its templates - or really all of its configuration using a GUID key/value based XML file.

%USERPROFILE%\.Rider2018.2\config\resharper-host\GlobalSettingsStorage.DotSettings

Take a look at a couple of relevant exported Live Templates:

<root><s:Boolean x:Key="/Default/PatternsAndTemplates/LiveTemplates/Template/=720E28E0ECFD4CA0B80F10DC82149BD4/Reformat/@EntryValue">True</s:Boolean><s:String x:Key="/Default/PatternsAndTemplates/LiveTemplates/Template/=720E28E0ECFD4CA0B80F10DC82149BD4/Shortcut/@EntryValue">proipc</s:String><s:Boolean x:Key="/Default/PatternsAndTemplates/LiveTemplates/Template/=720E28E0ECFD4CA0B80F10DC82149BD4/ShortenQualifiedReferences/@EntryValue">True</s:Boolean><s:Boolean x:Key="/Default/PatternsAndTemplates/LiveTemplates/Template/=720E28E0ECFD4CA0B80F10DC82149BD4/Scope/=C3001E7C0DA78E4487072B7E050D86C5/@KeyIndexDefined">True</s:Boolean><s:String x:Key="/Default/PatternsAndTemplates/LiveTemplates/Template/=720E28E0ECFD4CA0B80F10DC82149BD4/Scope/=C3001E7C0DA78E4487072B7E050D86C5/Type/@EntryValue">InCSharpFile</s:String><s:String x:Key="/Default/PatternsAndTemplates/LiveTemplates/Template/=720E28E0ECFD4CA0B80F10DC82149BD4/Text/@EntryValue">public $type$ $name$
{
    get { return _$name$; }
    set
    {
        if (value == _$name$) return;
        _$name$ = value;
        OnPropertyChanged(nameof($name$));
    }
}        
private $type$ _$name$;</s:String><s:Boolean x:Key="/Default/PatternsAndTemplates/LiveTemplates/Template/=720E28E0ECFD4CA0B80F10DC82149BD4/Field/=name/@KeyIndexDefined">True</s:Boolean><s:String x:Key="/Default/PatternsAndTemplates/LiveTemplates/Template/=720E28E0ECFD4CA0B80F10DC82149BD4/Field/=name/Expression/@EntryValue">complete()</s:String><s:Int64 x:Key="/Default/PatternsAndTemplates/LiveTemplates/Template/=720E28E0ECFD4CA0B80F10DC82149BD4/Field/=name/Order/@EntryValue">0</s:Int64><s:Boolean x:Key="/Default/PatternsAndTemplates/LiveTemplates/Template/=720E28E0ECFD4CA0B80F10DC82149BD4/Field/=type/@KeyIndexDefined">True</s:Boolean><s:String x:Key="/Default/PatternsAndTemplates/LiveTemplates/Template/=720E28E0ECFD4CA0B80F10DC82149BD4/Field/=type/Expression/@EntryValue">complete()</s:String><s:Int64 x:Key="/Default/PatternsAndTemplates/LiveTemplates/Template/=720E28E0ECFD4CA0B80F10DC82149BD4/Field/=type/Order/@EntryValue">1</s:Int64><s:Boolean x:Key="/Default/PatternsAndTemplates/LiveTemplates/Template/=E88A906D39C741C0A3B8095C5063DADE/@KeyIndexDefined">True</s:Boolean><s:Boolean x:Key="/Default/PatternsAndTemplates/LiveTemplates/Template/=E88A906D39C741C0A3B8095C5063DADE/Applicability/=Live/@EntryIndexedValue">True</s:Boolean><s:Boolean x:Key="/Default/PatternsAndTemplates/LiveTemplates/Template/=E88A906D39C741C0A3B8095C5063DADE/Reformat/@EntryValue">True</s:Boolean><s:String x:Key="/Default/PatternsAndTemplates/LiveTemplates/Template/=E88A906D39C741C0A3B8095C5063DADE/Shortcut/@EntryValue">seterror</s:String><s:Boolean x:Key="/Default/PatternsAndTemplates/LiveTemplates/Template/=E88A906D39C741C0A3B8095C5063DADE/ShortenQualifiedReferences/@EntryValue">True</s:Boolean><s:Boolean x:Key="/Default/PatternsAndTemplates/LiveTemplates/Template/=E88A906D39C741C0A3B8095C5063DADE/Scope/=C3001E7C0DA78E4487072B7E050D86C5/@KeyIndexDefined">True</s:Boolean><s:String x:Key="/Default/PatternsAndTemplates/LiveTemplates/Template/=E88A906D39C741C0A3B8095C5063DADE/Scope/=C3001E7C0DA78E4487072B7E050D86C5/Type/@EntryValue">InCSharpFile</s:String><s:String x:Key="/Default/PatternsAndTemplates/LiveTemplates/Template/=E88A906D39C741C0A3B8095C5063DADE/Text/@EntryValue">		
		public string ErrorMessage {get; set; }

        protected void SetError()
        {
            this.SetError("CLEAR");
        }

        protected void SetError(string message)
        {
            if (message == null || message=="CLEAR")
            {
                this.ErrorMessage = string.Empty;
                return;
            }
            this.ErrorMessage += message;
        }

        protected void SetError(Exception ex, bool checkInner = false)
        {
            if (ex == null)
                this.ErrorMessage = string.Empty;

            Exception e = ex;
            if (checkInner)
                e = e.GetBaseException();

            ErrorMessage = e.Message;
        }
    </s:String><s:Boolean x:Key="/Default/PatternsAndTemplates/LiveTemplates/Template/=E88A906D39C741C0A3B8095C5063DADE/Field/=busObject/@KeyIndexDefined">True</s:Boolean><s:String x:Key="/Default/PatternsAndTemplates/LiveTemplates/Template/=E88A906D39C741C0A3B8095C5063DADE/Field/=busObject/Expression/@EntryValue">complete()</s:String><s:Int64 x:Key="/Default/PatternsAndTemplates/LiveTemplates/Template/=E88A906D39C741C0A3B8095C5063DADE/Field/=busObject/Order/@EntryValue">0</s:Int64><s:Boolean x:Key="/Default/PatternsAndTemplates/LiveTemplates/Template/=E88A906D39C741C0A3B8095C5063DADE/Field/=NewLiteral/@KeyIndexDefined">True</s:Boolean><s:String x:Key="/Default/PatternsAndTemplates/LiveTemplates/Template/=E88A906D39C741C0A3B8095C5063DADE/Field/=NewLiteral/Expression/@EntryValue">complete()</s:String><s:Int64 x:Key="/Default/PatternsAndTemplates/LiveTemplates/Template/=E88A906D39C741C0A3B8095C5063DADE/Field/=NewLiteral/Order/@EntryValue">1</s:Int64></root>       

Ugh...

Using this crazy format you can't even tell where one set of settings starts or ends. Each key has a multi-value, plus GUID key which makes it next to impossible to try to match up an existing snippet to see if it exists already.

As far as I can tell there is no documentation on this format or any of the keys, nor how things are supposed to be stored. It's quite possible there are other options for storage, but it looks like Rider isn't set up to allow anything but manipulation through Rider for snippets. If you know of better developer docs on this please leave a comment.

For this reason Rider imports are one-time - they will double up if you export the same snippets twice.

For testing I've added a marker key into the file which Rider preserves. Then after I've imported and need to clear the imported snippets I remove the added snippets. Ugly but it works for testing. Probably not practical if other settings get changed in between.

This format is only supported for Rider's native .NET Specific code types: .NET Languages, Razor and WebForms which includes HTML templates. The other formats (JavaScript/HTML/CSS) use completely separate format and I don't have the energy to make that work at this point. For Rider my main concern are C# and HTML templates and those work just fine using this exporter.

Just be sure to export only specific folders like the C# folder or HTML snippets:

SnippetConverter "~2017\Visual C#\My Code Snippets" -m vs-rider -d
SnippetConverter "~2017\Code Snippets\Visual Web Developer\My HTML Snippets" -m vs-rider -d

Rather than doing the entire snippet folder in batch.

Summary

As I mentioned earlier all of this is pretty hacky, but for Visual Studio Code exports all of my snippets actually export and work without issues. For Rider, my C# and HTML snippets export and that works as well, but other types (like JavaScript, CSS) will cause errors. I'm aware but I can live with that for a personal tool. If there's enough interest I can get those bits moved as well but it basically requires another completely separate converter.

I haven't tested all the supported Visual Studio document types and those might cause problems even in VS Code. If you want to be safe, don't do a wholesale export of all snippets, but export each type of snippet separately.

I also highly recommend using prefixes as it makes it much easier to find your snippets and keep them out of the way when you're just heads down writing code.

For now this is good enough for me, but I'm curious to see if I'm one of the few people who cares enough about Code Snippets to go through this excercise 😃

Resources

this post created and published with Markdown Monster
© Rick Strahl, West Wind Technologies, 2005-2019
Posted in Visual Studio  VS Code  

COM Object Access and dynamic in .NET Core 2.x

$
0
0

I've been playing around with some old legacy code that uses an ASP.NET front end to some really old FoxPro COM servers. It's part of an old framework that works well on full .NET.

Recently I've been toying with the idea moving this to .NET Core to make the local development experience a lot smoother. With easy Kestrel self-hosting the need to use IIS or local IIS Express goes away and even for this old monolith that would be a huge win.

The old framework is implemented in .NET HttpModule/Handler and moving this to .NET Core wouldn't be a big effort which is even more of an incentive. The upside would be that it still works in IIS especially now in .NET Core 2.2 with the new and improved InProcess .NET Core hosting capability.

COM in .NET Core

COM of course is old tech and totally Windows specific, which is fine in this case. But in my case it's the only way to interop with the old legacy FoxPro server/applications.

Surprisingly .NET Core - when running on Windows at least - supports COM access, which means you can instantiate and call COM objects from .NET Core in the same way as full framework. Well almost...

Although .NET Core is cross-platform, COM Interop is a purely Windows specific feature. Incidentally even .NET Standard includes support for the COM related Reflection and Interop functions with the same Windows specific caveat.

Not so Dynamic

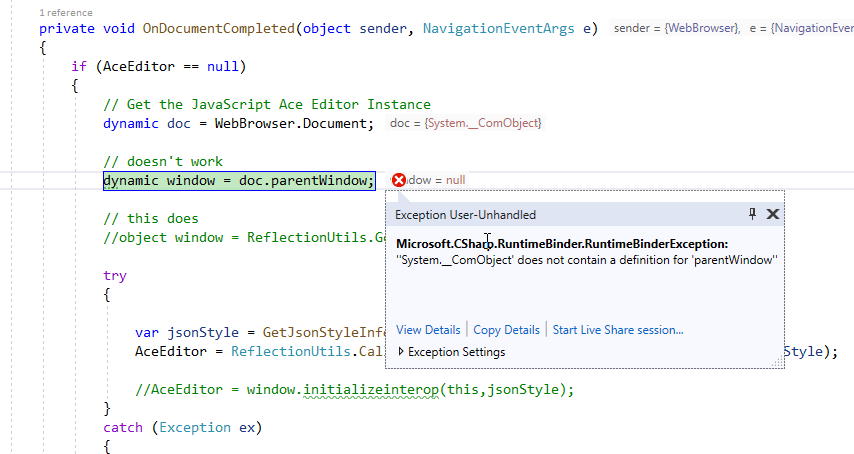
The good news is that COM Interop works in .NET Core. The bad news is that COM Interop using the C# dynamic keyword and the Dynamic Language Runtime in .NET does not.

Here's a silly example that's easy to try out using InternetExplorer.Application to automate that crazy Web Browser. Not very useful but an easy to play with COM Server that's generically available on Windows.

The following code uses raw Reflection in .NET Core to access a COM object and this works just fine in both full .NET 4.5+ or .NET Core 2.x:

[TestMethod]
public void ComAccessReflectionCoreAnd45Test()
{
    // this works with both .NET 4.5+ and .NET Core 2.0+

    string progId = "InternetExplorer.Application";
    Type type = Type.GetTypeFromProgID(progId);
    object inst = Activator.CreateInstance(type);


    inst.GetType().InvokeMember("Visible", ReflectionUtils.MemberAccess | BindingFlags.SetProperty, null, inst,
        new object[1]
        {
            true
        });

    inst.GetType().InvokeMember("Navigate", ReflectionUtils.MemberAccess | BindingFlags.InvokeMethod, null,
        inst, new object[]
        {"https://markdownmonster.west-wind.com",
        });

    //result = ReflectionUtils.GetPropertyCom(inst, "cAppStartPath");
    bool result = (bool)inst.GetType().InvokeMember("Visible",
        ReflectionUtils.MemberAccess | BindingFlags.GetProperty, null, inst, null);
    Console.WriteLine(result); // path             
}

I used this in a multi-targeted project targeting net46 and netcore2.1. The above code works against either target.

Using the much simpler dynamic code however, works only in .NET 4.5 but not in .NET Core 2.x:

[TestMethod]
public void ComAccessDynamicCoreAnd45Test()
{
    // this does not work with .NET Core 2.0

    string progId = "InternetExplorer.Application";
    Type type = Type.GetTypeFromProgID(progId);
    dynamic inst = Activator.CreateInstance(type);

    // dynamic inst is set, but all prop/metho access on dynamic fails
    inst.Visible = true;
    inst.Navigate("https://markdownmonster.west-wind.com");

    bool result = inst.Visible;
    Assert.IsTrue(result);
}

This is a bummer, but it looks like this will get fixed in .NET Core 3.0. I was just about to post an issue on the CoreFx Github repo, when I saw this:

and it looks it's been added to be fixed for .NET Core 3.0.

I'm glad to see that COM at least works. In this particlar case, I'm only dealing with a handful of Interop calls so I don't mind too much using my ReflectionUtils in Westwind.Utilties to do it.

But for more complex use cases it sure is a lot easier to use dynamic to handle the automatically handle the type casting and more natural member syntax. Hopefully this will get addressed before 3.0 ships later this year - chances are good seeing that a lot of focus in 3.0 is around making old Windows related frameworks like WinForms and WPF work in .NET Core. COM is just one more step removed back from that 😂.

this post created and published with Markdown Monster
© Rick Strahl, West Wind Technologies, 2005-2019
Posted in .NET Core  .NET  COM  

Back to Basics: Non-Navigating Links for JavaScript Handling

$
0
0

When you're creating <a href> links that are non-navigating and handled via script code or through some JavaScript framework, how exactly do you create that link on the page?

I'm talking about plain vanilla HTML/JavaScript here, not about what happens when you use any JS frameworks which usually add special handling for links.

The problem here is that if you create a link without an href attribute the link won't show typical link behavior. So this:

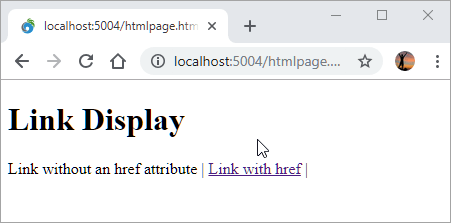
<h1>Link Display</h1><a>Link without an href attribute</a> | <a href="#0">Link with href</a> |

renders to the following with the default browser styling:

Notice that the 'link-less' link renders without link styling. So when using dynamic navigation via event handlers or jQuery etc. you need to make sure that you explicitly specifiy some sort of link in the href attribute.

If you're using a UI framework like BootStrap it will still style missing href links properly. But the default HTML styles render anchors without href with link styling that doesn't trigger the text-decoration styling.

If you're using a JavaScript framework like Angular, Vue, React etc. those frameworks will automatically fix up links and provide the empty navigation handling as well, so the discussion here centers on vanilla JS and HTML.

The Short Answer: href="#0"

I've been using various approaches over the years, but probably the cleanest and least visually offensive solution is to use a hash to a non-existing name reference in a page.

So this is what I've settled on:

<a href="#0">Fly, fly, fly away</a>

I like this because:

  • It doesn't navigate
  • It makes it obvious that this it's a do-nothing navigation
  • Link looks reasonable on the status bar

I actually found out that this works only recently and previously I had been using a slew of other approaches, which is what prompted me to write this up.

For a little more background lets take a look.

Ok, so what options are there? There quite a few actually, some better than others. I would argue some of these aren't an option, but I'll list them anyway:

  1. <a href="">
  2. <a href="#">
  3. <a href="#" onclick="return false;" />
  4. <a href="javascript:void(0)">
  5. <a href="javascript:{}">
  6. <a href="#0">

Until recently I've been using #5, but just recently discovered that #6 is actually possible and which to me is preferrable.

Here's a little HTML you can experiment with (CodePen):

<h1>Link Display</h1><ul><li><a href="https://weblog.west-wind.com">Normal Web link</a></li><li><a>Link without an href attribute</a></li><li><a href="">Link with empty href attribute</a></li><li><a href="#0">Link with href and `#0`</a></li><li><a href="javascript:void(0)">Link with JavaScript: tag</a></li></ul>

Don't use an empty HREF

Empty HREF links might be tempting but they are problematic as they basically mean re-navigate the current page. It's like a Refresh operation which resubmits to the server.

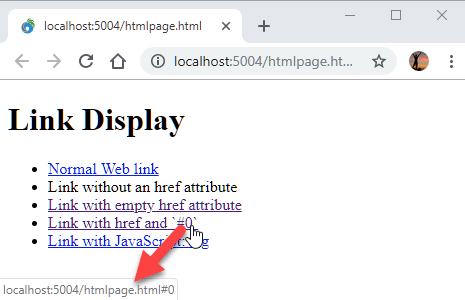
Notice that an empty HREF renders as a link with a target URL pointing back to the current page:

This can be deceiving on small pages as you may not actually notice the page is navigating.

Empty HREF links are useful for a few things, just not for dynamic navigation scenarios. It's a good choice for Refresh this Page style links, or for <form href="" method="POST"> form submissions which posts back to the same URL.

Don't use # by itself

As it turns out the second choice is the most commonly used in examples and demonstrations, but this is usually not a good choice because this syntax:

<a href="#">Link Text</a>

actually is not a do-nothing navigation. It causes navigation to the the top of the page. Unless your page is small enough to fit into a single Viewport screen, or every handled link actually explicitly aborts navigation (more on that below), you don't want to use this option.

Handling onclick and Returning false

One way you can prevent navigation is to implement an click/onclick JavaScript event handler and return false from it. Alternately you can use event.preventDefault() inside the click event's event object passed into the handler too.

While that works, it's easy to forget (unless you use a JavaScript framework that likely handles this for you). If you are already using handler this is Ok, but otherwise one of the other options is a better choice.

javascript: Tags

Another way to do this is to provide essentially a null JavaScript link. There are a number of variations for this:

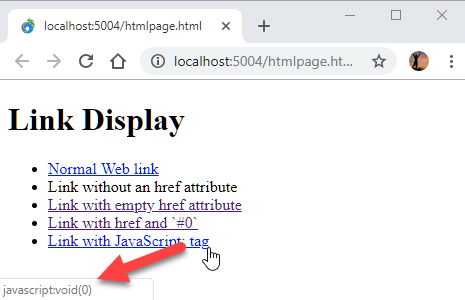
<a href="javascript:void(0)"><a href="javascript:{}">`<a href="javascript:null">`

These all function just fine, but they show some nasty looking links in the status bar as the javascript: text is displayed.

The links and text are harmless as they literally do nothing, but it's ugly, and to the average non-Web savvy person probably a bit scary.

And the Winner is: #0

The best solution to me is href="#0". Mainly because it does nothing, uses simple text and shows no scary looking link in the status bar unlike the javascript: links above.

This approach works by using a non existing hash link. Unless you have a named link or an ID named 0 - which is unlikely - the navigation fails, which effectively does nothing. No navigation and no scrolling.

If for some strange reason you have an ID or named link called 0 use a different non-existing value for the hash: #foo123 works too 😃

Most Frameworks handle this automatically

The cleanest and often automatic solution is using a framework that explicitly handles link navigation for you so you don't have to think about it. All major frameworks like Angular, Vue, React, Ember etc. handle links automatically by short circuiting link navigation in the attached wrapped JavaScript event handlers.

So if you're using these frameworks you usually don't set the href attribute at all and let the framework handle that for you, both in terms of styling and the navigation.

Summary

This is pretty basic stuff, but it's easy to forget which choices work and which sort of work or provide ugly results. I know I've gone back and forth on this many times in the past before I recently settled on:

<a href="#0">Dynamic Navigation</a>

which seems the cleanest solution.

© Rick Strahl, West Wind Technologies, 2005-2019
Posted in HTML  Javascript  

Finding the ProgramFiles64 Folder in a 32 Bit App

$
0
0

You probably know that on Windows using .NET you can use System.Environment.GetFolderPath() to pick out a host of special Windows folders. You can find Local App Data, Programs, My Documents, Pictures and so on using the Environment.SpecialFolder enum .

This function is needed because these special folders often are localized and using this function ensures that the paths are properly adjusted for various localized versions of Windows. You don't ever want to be building special paths by hand as they are likely to break if you run on a differently localized version of Windows. For example here's a link that shows what Program Files in Windows looks like in different languages:

http://www.samlogic.net/articles/program-files-folder-different-languages.htm

Bottom line is if you need to access Windows special folders always use the GetFolderPath() function and then build your path from there with Path.Combine().

While the function works well there are a number of common paths missing, and some others are a little quirky.

Using ProgramFiles and ProgramFiles32

One of those quirks is the Program Files folder. There are two Program Files folders in Windows the 64 bit versions of Windows most of us are running today:

  • Program Files
  • Program Files (x86)

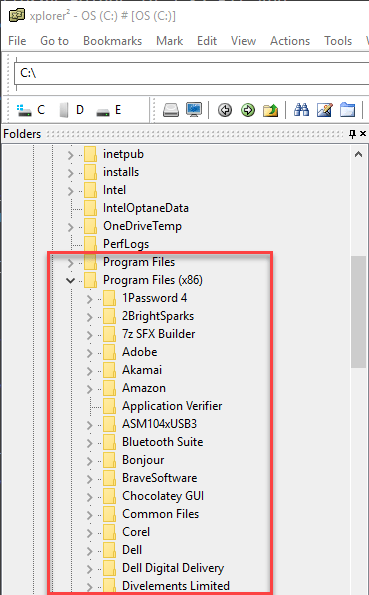
Here's what this looks like on disk off the C:\ root:

Program Files is for 64 bit apps, and Program Files (x86) is for 32 bit apps on 64 bit systems. On 32 Bit systems there's only Program Files which holds 32 bit applications and there's no support for 64 bit applications at all.

On 64 bit machines, the Program Files location where applications install changes the behaviors of Windows launchers. For example if you compile a .NET Desktop application with Any CPU and you launch from Program Files (x86) you'll launch as a 32 bit app. Launch from Program Files and you'll launch as a 64 bit application. Windows provides a launching process some hints that suggest whether the app should run 32 or 64 bit modes.

Special Folders

So the System.Environment.SpecialFolder enum has values that seem pretty obvious choices for finding those two folders:

  • ProgramFiles
  • ProgramFilesX86

But it's never that simple...

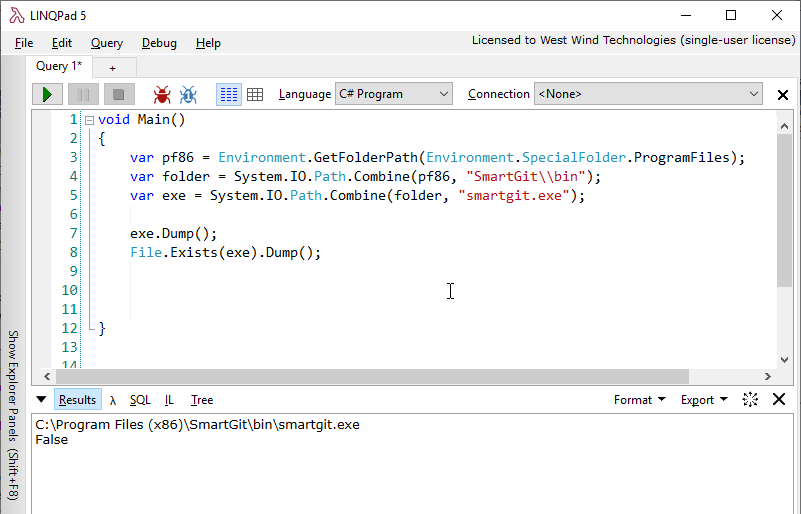
Quick, what does the following return when you run your application as a 32 bit application (on 64 bit Windows):

var pf86 = Environment.GetFolderPath(Environment.SpecialFolder.ProgramFiles);	
var folder = System.IO.Path.Combine(pf86, "SmartGit\\bin");
var exe = System.IO.Path.Combine(folder, "smartgit.exe");

exe.Dump();	
File.Exists(exe).Dump();

Here's a hint: Not what you'd expect.

In fact in a 32 bit application you'll find this to be true:

var pf86 = Environment.GetFolderPath(Environment.SpecialFolder.ProgramFilesX86);	
var pf = Environment.GetFolderPath(Environment.SpecialFolder.ProgramFiles);	
Assert.AreEqual(pf,pf86);    // true!

Now repeat this with a 64 bit application:

var pf86 = Environment.GetFolderPath(Environment.SpecialFolder.ProgramFilesX86);	
var pf = Environment.GetFolderPath(Environment.SpecialFolder.ProgramFiles);	
Assert.AreEqual(pf,pf86);    // false

Got that? It's confusing, but in its own twisted way this makes sense. A 32 bit application assumes it's running on a 32 bit system and should look for program files in the Program Files (x86) folder so it returns that folder for ProgramFiles because that's all it knows - 1 folder where 32 bit applications live.

Using 32 bit mode and the SpecialFolder enum there's no way to actually discover the true 64 bit Program Files folder. Ouch!

The Workaround - Using Environment Var

These days you'd be hard pressed to find a 32 bit version of Windows. Most people run 64 bit versions. So if you run a 32 bit application on a 64 bit version of Windows you can use the following code to get the 'real' Program Files folder:

var pf86 = Environment.GetEnvironmentVariable("ProgramW6432");
if (string.IsNullOrEmpty(pf86))
    pf86 = Environment.GetFolder(Environment.SpecialFolder.ProgramFiles)

This gives you the 64 bit Program Files path in a 32 bit application. If the environment variable doesn't exist because you're running an old or 32 bit version of Windows, the code falls back to SpecialFolder.ProgramFiles so it should still work in those environments as well.

Practicalities - Why is this a Problem

If you're running a 64 bit application there really is no problem. In 64 bit mode ProgramFiles returns the Program Files folder and ProgramFilesX86 returns the Program Files (x86) folder. Problem solved right? Yeah - for 64 bit.

But... if you have a a 32 bit application as I do with Markdown Monster you need to use the environment variable to retrieve the right Program Files path.

You might say - just use 64 bit, but in the case of Markdown Monster I run in 32 bit in order to get better performance and stability out of the Web Browser control that is heavily used in this application. 64 bit IE was always a train wreck and the Web Browser control reflects that.

So the app runs in 32 bit mode, but I'm also shelling out and launching a number of other applications: I open command lines (Powershell or Command) for the user, run Git commands, open a GUI git client, various viewers like Image Viewers, explicitly launch browsers and so forth. The apps that are being launched are a mix of 32 and 64 bit applications.

In the example above I open SmartGit which is my GUI Git Client of choice and it's a 64 bit app, hence I need to build a path for it.

Using the code above lets me do that.

Summary

I'm writing this down because I've run into this more than a few times and each and every time I go hunting for the solution because I forgot exactly I did to get around it. Now I can just search for this post - maybe it'll help you remember too 😃

this post created and published with Markdown Monster
© Rick Strahl, West Wind Technologies, 2005-2019
Posted in .NET  

Ad Blockers, Brave Browser and BrainTree Credit Card Processing SDKs

$
0
0

I just ran into an interesting issue with my Web Store. On my site I use a custom Web Store and the payment integration is going through BrainTree's CC Processing APIs. Braintree has both server side and client side SDKs and the site uses the JavaScript SDK to remotely render the payment form into the order form.

These days it's a pretty common scenario to use a JavaScript SDK that essentially removes the payment detail handling on the server so that the server never actually touches the credit card data. The SDK and the remote hosted form keeps the credit card data on BrainTree's server which reduces the risk of credit cards getting hacked during the payment process. Or, if something does go wrong the responsibility lies with the processor since they are the ones handling the Credit Card transaction data.

Good News, Bad News

The good news is works very well. Order processing is very quick through this remote interface and with BrainTree at least as a bonus you can process PayPal requests in the very same way without having to set up a separate PayPal order flow. Nice.

But - and there's always a but - today I noticed a fairly major problem: For the last few months I've been using the Brave Browser for most of my Web browsing. Brave is a Chromium based browser that provides most of the features of Chrome without Google tracking you each step of your browsing adventures. Brave also provides built-in ad-blocking by default so overall the browsing experience out of box is much better than you get in stock Google Chrome, because a lot of the crap ad content that makes up a good part of the Web these days is not being loaded.

When visiting one of the payment pages in my store with Brave, I noticed that the payment page wasn't working. Basically the remote payment form wasn't showing up.

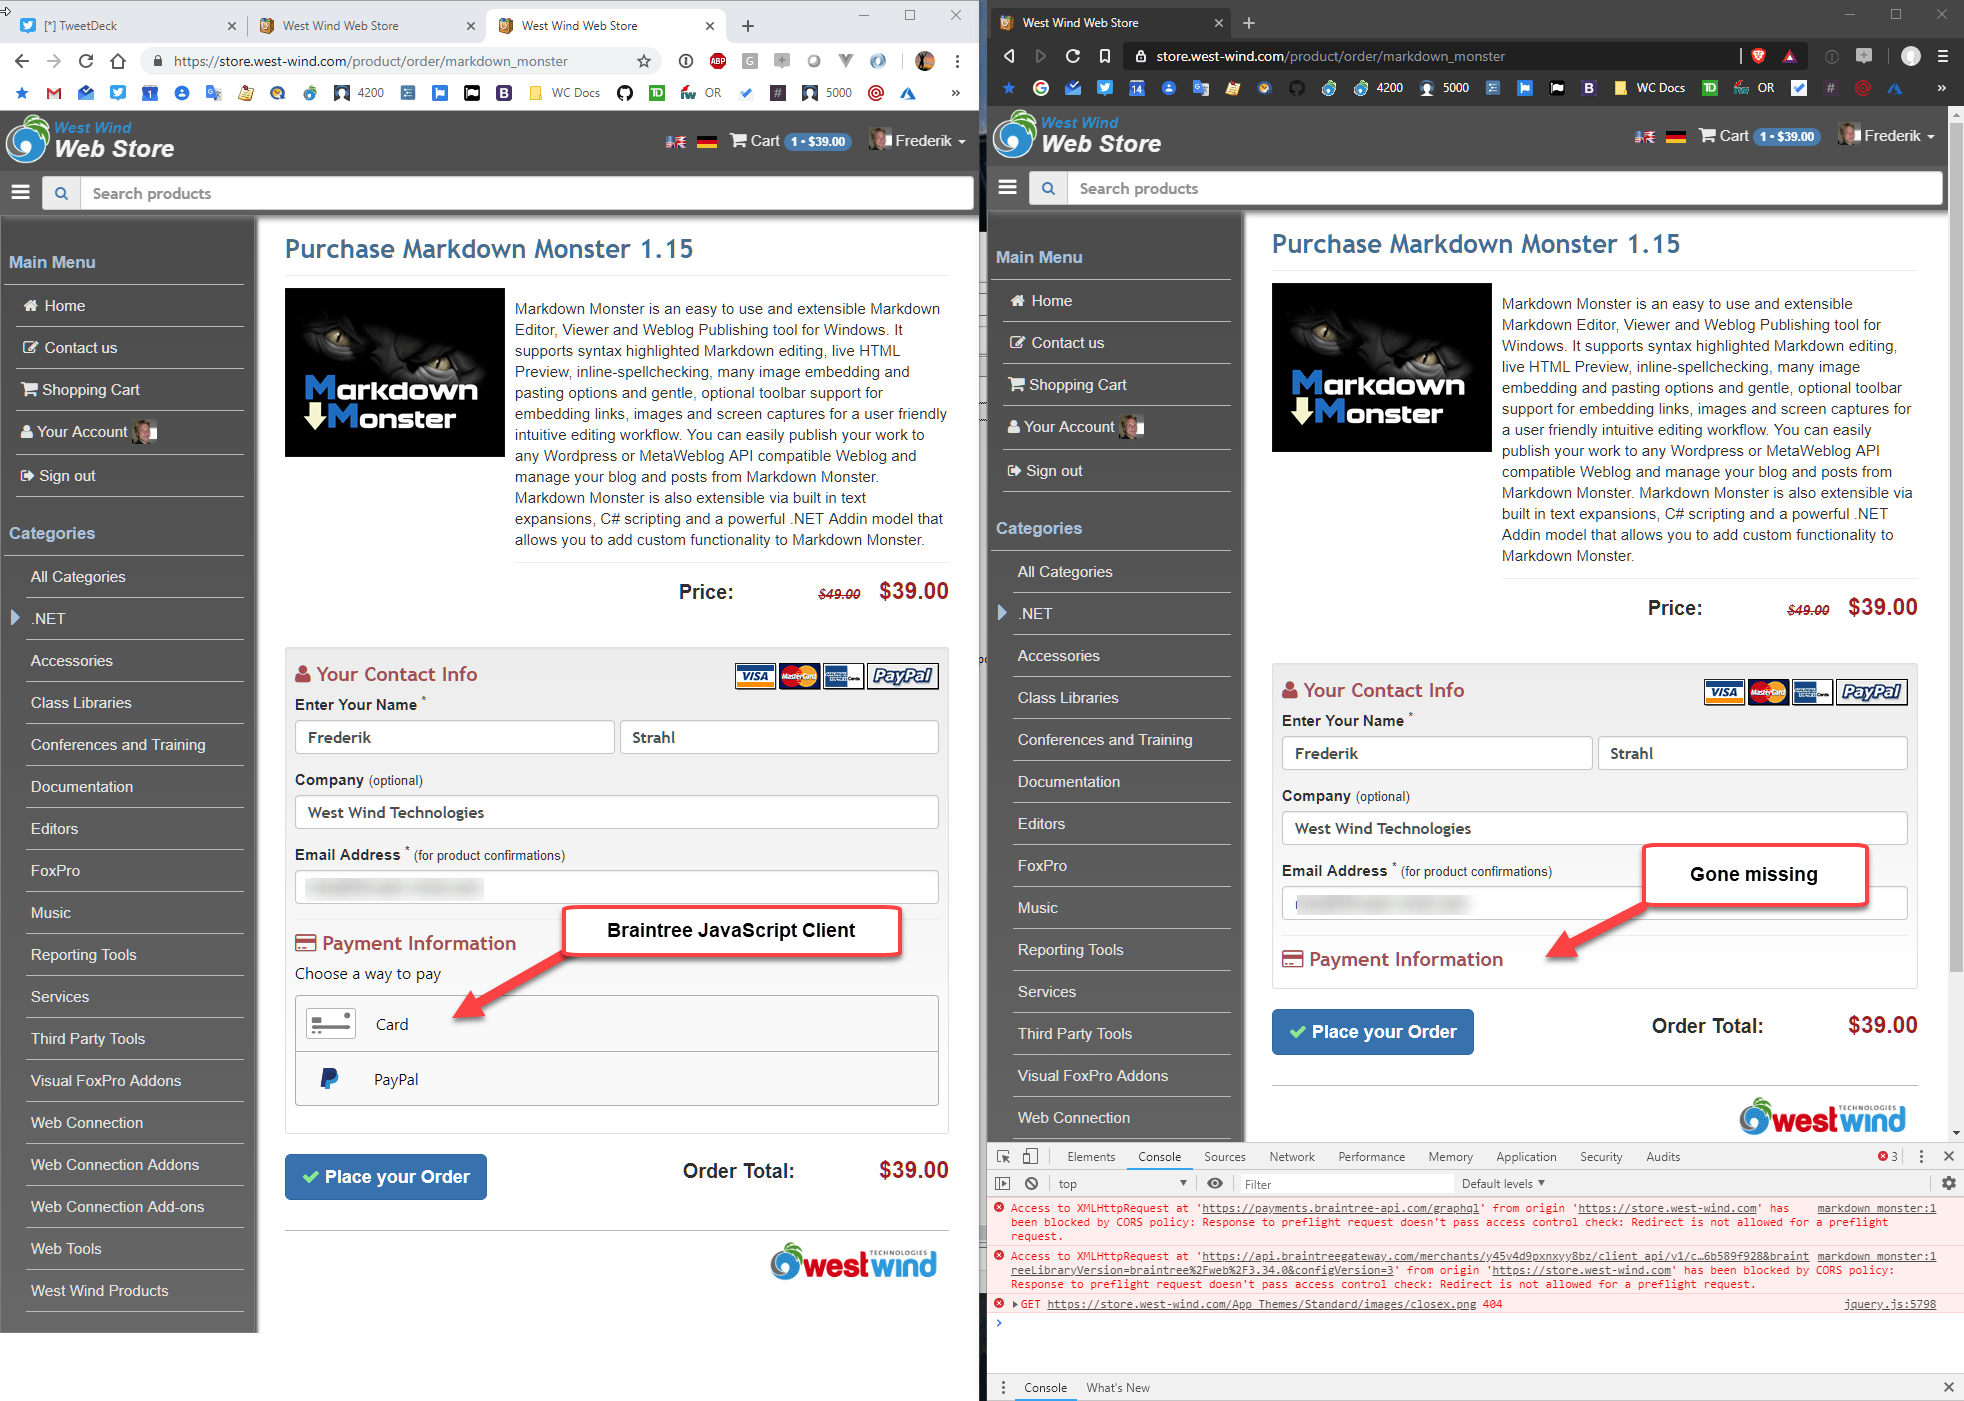
Here is a side by side figure of Chrome and Brave of the same order form page: (Chrome on the left, Brave on the right):

Notice that Brave doesn't render the payment form and if I open the DevTools I can see that it's failing because of CORS policy.

My first thought is that something was wrong with BrainTree's CORS policy that they are pushing down to my site, because typically CORS errors are related to missing sites in the content policy and CORS headers that are returned from the target SDK server.

Content Blocking in Brave

But alas it turns out that the problem isn't really the CORS headers but rather the fact that Brave is blocking third party cookies.

Now, I can now go in and manually disable that option and then get the page to work properly:

I had to enable All Cookies Allowed to enable third party cookies, which BrainTree is using to handle the internal order flow it uses between the JavaScript client component and its servers.

This is likely to be a problem with not just Brave Browser, but any content/ad blocker since third party cookies are a primary source of identity tracking. Unfortunately in this case the third party cookie is required for operation of the order form and not for tracking purposes.

Now What?

So while there's a workaround to the non-loading page, it's not really something that a user can readily figure out which is a pretty big problem for an order form, especially if the user was ready to pay. The last thing we want to do at that point is make the user go - "wait what" or worse "WTF?"...

So, how to address this problem?

Server Side Processing

I'm not sure if there's a real technical solution unless you want to fall back to server side processing which for security reasons is not a good idea.

In my custom store I can actually process either server side or using the client form. But because of the PCI requirements and liabilities, falling back to the server side processing is simply not an option for me. However, this might be for a larger company that has gone through their own PCI certification.

Documentation

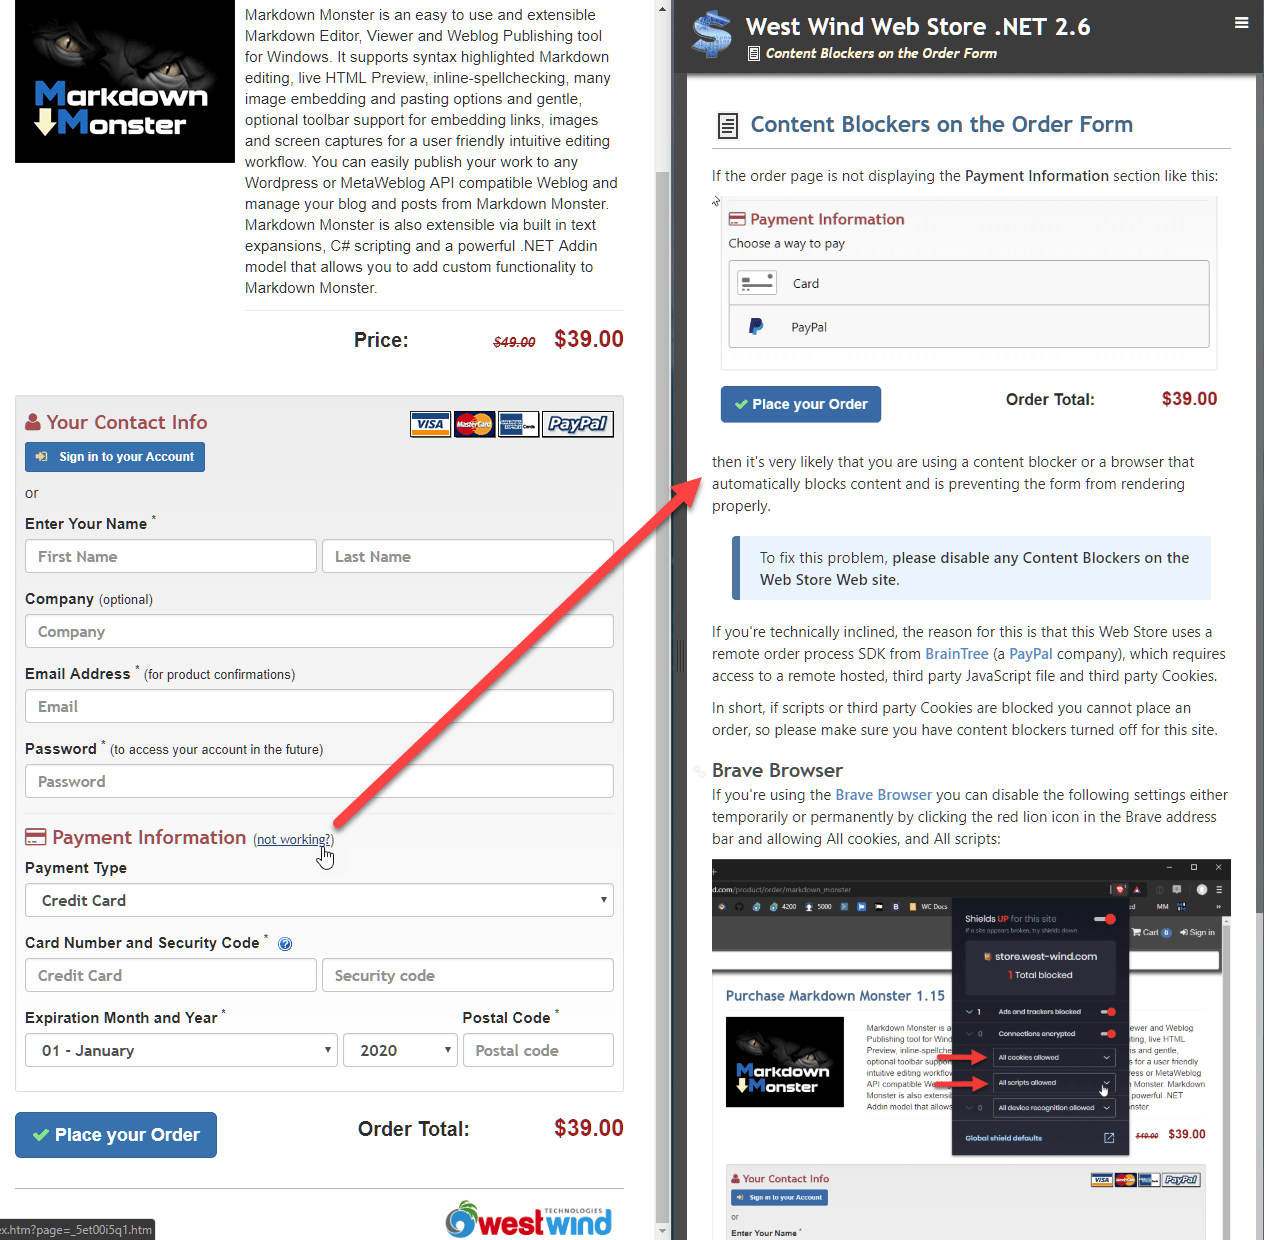
The only other solution I see is to provide some help to the user should they find themselves in this situation. I've added a link to the form that takes the user to a documentation page that describes what they should see and with some explanation on turning off content blockers.

This is not very satisfying but hopefully it might help keep people who hit this problem on the site and get them to disable their content blockers.

Summary

Ah - progress. By offloading payment processing to a remote service I've solved one thorny problem (PCI) and now I've potentially brought in another problem that might keep some customers from being able to place an order. It seems that no matter how you turn things with security, there is always some sort of trade off.

If you're using a browser like Brave you are probably fairly technically savy. It's also very likely that you will eventually run into problems like this with other sites. These days there is so much integration between applications using APIs that require remote scripts and third party cookie integrations and content blockers likely will become a more common problem for users in that more and more legitimate content will end up getting blocked. This whitelisting takes a little work, but it's usually still better than the alternative of getting flooded with ads and trackers.

The hard part is realizing that it's happening. In using Brave I often simply forget that it's blocking stuff and when stuff fails my first reaction is that Brave is not doing the right thing, when really it's the content blocker. For less savvy users this is especially the case since they have no idea why a page doesn't work right and thinking of turning the content blocking off won't come natural. Heck it didn't come as the first thought to me - I googled CORS issues with BrainTree initially, before trying a different browser 😃.

Carry on...

this post created and published with Markdown Monster
© Rick Strahl, West Wind Technologies, 2005-2019
Posted in Web  Credit Card Processing  

WPF Hanging in Infinite Rendering Loop

$
0
0

I ran into a nasty WPF issue recently with Markdown Monster. Markdown Monster has been for the longest time targeted at .NET 4.6.2, but a while back I started integrating with some libraries that have moved over completely to use .NET Standard. I was hoping by moving to .NET 4.7.1 and more built-in library support for .NET Standard would alleviate the DLL proliferation/duplication that using .NET Standard in full framework seems to entail. Alas it turned out to be a dead end.

But since I moved I figured what the heck, I'll stay on 4.7.1 - over 97% of users of MM are on 4.7.1+ or later and there are a number of improvements in the framework that make this probably worthwhile. I shipped the last minor version update 1.15 with 4.7.1 baseline target.

Lockups with the 4.7.x Target

A few days later a few oddball bug reports came in on Github Issues. Several existing users were complaining that the new version they just upgraded to was locking up on startup.

I tried to duplicate, and was unable to. I tried running MM on 4 different machines I have here locally and a few virtual machines that I have access to. Nothing failed.

It took a lot of back and forth messages to pin this one down and I finally was able to duplicate the error after I switched my display to scale 150%. 4 machines, none of them failed because they all ran 100% until I switched to 150% when I managed to make two of them fail. It turns out the scaling wasn't the actual issue, but it's something that brought out the problem.

Notice how the main window partially loads, but isn't quite complete and stuck half way in the process.

This is an insidious bug because of course I didn't think about a system bug, but rather "Shit, what did I break?" Off I go on a rabbit hunt, only to come up blank rolling back code until prior to the last version update which preceeds the move to 4.7.1. Even then I did not make the connection right away. It wasn't until I started searching for similar reports which was tricky given the vague behavior.

Looking at the call stack wasn't much help either. The call stack was stuck on App.Run() and then off deep into WPF. As you can see there's no user code in the stack, it's basically an infinite loop that keeps re-iterating inside of the WPF internals.

I got some help from an obscure Github Issue that references a StarDefinitionsCanExceedAvailableSpace setting that was introduced in WPF in 4.7.x. It disables a new behavior introduced in 4.7.x that more efficiently crashes - uh, I mean manages WPF Grid sizing. This funky app.config runtime configuration setting basically can roll back the new behavior to the old behavior.

Ugh! The quick solution after I found out was to roll back to targeting .NET 4.6.2 and voila this fixed the problem for all those that reported the problem. Problem solved - sort of.

Fixing 4.7.x

I fixed this the easy way which was to roll back to 4.6.2. This was actually a good thing for me in general as the move to 4.7.1 didn't really bring me any of the .NET Standard improvements I was hoping for (same library dependency footprint even though some of them are not actually required anymore).

If you're interested you can follow the whole Markdown Monster paper trail issue here in this GitHub issue:

HiDPI Display w/Scaling Can Cause App Freeze on Launch

Here's some more info on the resolution.

WPF Grid Sizing Bug

Long story short, I managed to duplicate the bug by having a high scale mode and all users that reported the issue also were using high scale modes.

But, it turns out the scale mode wasn't the actual cause of the failure, but rather a symptom which was exacerbated by scaling the display. The problem is a bug that is specific to applications that are targeted at .NET 4.7.x and hit a specific sizing issues. It's a Grid sizing bug caused by infinite loop entered due to a very minute rounding error.

The final outcome and summary of the problem is best summarized by Sam Bent from Microsoft in a separate Github issue:

The gist of that summary is that when an app is compiled for 4.7.x there's a possibility that grid sizing can cause the application end up in an infinite loop that can lock up an application hard.

Workarounds and Solutions

So to work around this problem there are two ways:

Rolling Back

Rolling back was the solution I used, because I didn't find out about the availability of the switch and because frankly I didn't see much benefit by staying on 4.7.1. It was important to get this resolved before I found out about the override flag and that's where it sits today for me.

Using the StarDefinitionsCanExceedAvailableSpace Override

This setting overrides the new GridRendering behavior and basically lets you run .NET 4.7.x, but keep the old behavior that was used in previous versions.

This is a configuration setting that can be set in app.config for your application:

<configuration><runtime><AppContextSwitchOverrides value="Switch.System.Windows.Controls.Grid.StarDefinitionsCanExceedAvailableSpace=true" /></runtime></configuration>

I can verify that using that switch lets me run 4.7.1 and not see the lock up in any scaling mode. It effectively makes the application behave just like the 4.6.1 version in regards to the grid behavior.

This is the right solution if you need to run 4.7.x but you run into this issue.

I suspect this issue is not wildly common as there was not very much info to be found about it. I think Markdown Monster makes this issue come up because it uses MahApps which uses animations, multiple window frames in addition to Markdown Monster's offscreen rendering DPI fixing etc. which ends up potentially resizing quite frequently during the startup sequence. I have other apps that are also 4.7.x targeted and that don't have a problem.

So I doubt that every application needs to worry about this, but if you have a 4.7.x WPF app it might be a good idea to try it out at various resolutions and scale levels just to see how it fares.

.NET 4.8 Fixes this Bug

I haven't tried this as I don't have 4.8 installed yet, but according to Sam and Vatsan from Microsoft it appears this WPF bug has been fixed in .NET 4.8. Yay!

But not so yay, because it'll take a while before we can target 4.8 apps and expect a decent user base.

It sure would be nice if this bug could be patched in 4.7. 4.7 has the vast .NET runtime user base and it'll probably will be that way for a long while before 4.8 starts catching up. In the meantime this insidious bug can catch a lot of developers off guard with a really hard to track down bug. Hopefully this post might help pointing people in the right direction.

Summary

It's always a bummer to see bugs like this creep up. It sure seems like a major bug, but again searching turned up almost no hits which makes me think that not a lot of people are hitting this issue. Maybe most people target lower versions of .NET as I do - it seems I'm always targeting one point version behind the current latest version and that might account for the relatively low hit rate.

Still it's disconcerting to hit a bug like this that's so random and yet sounds like it could potentially hit just about any app. After who's not using WPF Grids everywhere in an application, it would seem difficult not to hit this at some point if it's random calculation error. I'd be interested to hear about others that have run into this issue and under what circumstances. If you have leave a comment with your story.

I hope writing this down will make it easier for people to find this info in the future - I sure would have appreciated this instead of a week of lots of harried customer bug reports and no answers for them (and actually being a bit high and mighty with my Works on my Machine attitude).

this post created and published with Markdown Monster
© Rick Strahl, West Wind Technologies, 2005-2019
Posted in WPF  

Using .NET Standard with Full Framework .NET

$
0
0

.NET Standard has been around long enough now that most people are reasonably familiar with this somewhat 'unnatural' concept. The idea of targeting or consuming a library that is not really a library but a specification which in turn affects the build process and runtime binding takes a bit getting used to.

Things have gotten a little clearer recently with better documentation from Microsoft and clearer designations on what versions of the various .NET runtimes support what version of .NET Standard. With more implementations out in the wild now too, it's easier to see and realize the benefits of .NET Standard whereas in the early much of .NET Standard seemed sort of academic.

But there's still a lot of confusion for people who are not keeping up with all the latest .NET tech. It's not a concept that comes naturally unless you've been following the evolution of .NET and it's torturous versioning paths. Rather, seeing it in action is the best way to make sense of it - at least that's how it worked for me.

I've talked about .NET Standard in previous posts (and here) so I won't rehash it here. This post is about a more specific scenario which is using .NET Standard libraries in full .NET Framework, which has its own set of peculiarities.

But first a short explanation of .NET Standard.

What is .NET Standard?

Here's my 1 liner of what .NET Standard is:

.NET Standard is a Specification not an Implementation

.NET Standard is a specification that describes specific feature implementations that a .NET Runtime like .NET Core, .NET Framework, Mono, Xamarin or Unity has to implement - at minimum - to support that version of the Standard.

The current most widely applied version of .NET Standard is .NET Standard 2.0 but there are 1.0, 1.1, 1.6 and the latest 2.0. Each version includes progressively more features.

.NET Standard is a specification that serves as a base feature blue print for .NET runtime implementations. Runtime implementations are specific versions of a .NET Runtime such as .NET 4.6.1 or 4.7.2, .NET Core 2.2, Xamarin.IOs 10, Mono 5.18 etc.

Any one of those runtimes that want to support .NET Standard have to implement a specific set of .NET features that are defined by .NET Standard. .NET Standard describes the base CoreFx library - what we used to think of as the Base Class Libraries (BCL/FCL) in full framework that make up the core features of the platform.

It's up to the specific runtime to implement the features set forth in the Standard. The logistics of this involve some runtime magic where each runtime provides a set of .NET Standard forwarding assemblies that map the .NET Standard APIs to the actual underlying APIs on the specific Runtime. To the consumer it feels like you're using the same .NET APIs as always, but underneath the covers those APIs re-route to the appropriate native APIs.

The big win with .NET Standard is that it provides a common interface to runtime implementers, who have to make sure that their runtimes support the Standard's features and for component implementers that know what features they can use reliably across the platforms supported by the .NET Standard version they are using.

There are different versions of .NET Standard that are supported by different versions of various runtimes. The following matrix is from the .NET Standard documentation page:

In concrete terms this means that when you build a library you can target .NET Standard and expect the compiled assembly/package to work on any of the platforms that support that version of .NET Standard.

If you're building libraries, you'll want to target the lowest version of .NET Standard that your library can work with. But for most intents and purposes I think that .NET Standard 2.0 is the new baseline for anything useful going forward.

.NET Standard and Full Framework .NET

One of the supported Runtimes for .NET Standard 2.0 is the full .NET Framework.

For full framework the .NET Standard story unfortunately is a bit confusing because although all versions of .NET 4.6.1 and later are .NET Standard 2.0 compliant, some versions are more compatible than others.

.NET 4.6.1, 4.6.2, .NET 4.7 and 4.7.1 all have partial .NET Standard support in the natively shipped runtimes, but they still are .NET Standard compliant by adding additional runtime dependencies into your output folder to provide the missing functionality. NuGet along with the runtime targeting handles automatically adding those dependencies to your projects to provide the needed runtime support for those extra features. A lot of those assemblies override behavior from the base framework and .NET uses runtime redirects to route api calls to the appropriate assemblies rather than than mscorlib.dll or other system assemblies.

.NET 4.7.2 is the first version of the full .NET Framework that is fully .NET Standard compliant without any additional dependencies.

First Version to support .NET Standard 2.0 is 4.6.1

The first version of .NET Framework that is .NET Standard 2.0 compliant is .NET 4.6.1. 4.6.1 through 4.7.1 are all partially compliant with the shipped Runtime, but can work with additional dependencies added to the project when a .NET Standard 2.0 component is added.

When you add a .NET Standard 2.0 targeted package to say a .NET 4.6.2 project, a number of additional assembly dependencies and assembly redirects to provide updated runtime components are installed to provide the missing runtime features. This adds a bunch of assemblies to your application's bin folder that have to be distributed with your application and a bunch of assembly redirects to your app.config file.

This is pretty messy and clutters up your output folder and app.config, but it does work and lets you use .NET Standard 2.0 components from these older runtime versions.

The first version that fully .NET Standard 2.0 Compliant is 4.7.2

Each successive version of full framework .NET has slightly better support for .NET Standard 2.0 up to 4.7.2 which now has full support for it and is the first version that can use .NET Standard 2.0 packages without bringing in extra dependencies.

So, for best .NET Standard support in full framework .NET, ideally you should target 4.7.2 (or 4.8+ once that comes out). Unfortunately that's probably not realistic for public distribution applications as there are still plenty of people on older versions of .NET.

For Markdown Monster which even though it's pretty tech focused, about 25% of users are not on .NET 4.7.2 and a good chunk of that is still on .NET 4.6.2/1. It'll be a while before I can target 4.7.2 and not turn away a significant chunk of users without them having to update their .NET Runtime.

Concise Example: Using LibGit2Sharp in Markdown Monster

So what does all that mean for an application? Let me give you a practical example. In Markdown Monster which is a WPF desktop application which targets .NET 4.6.2, I'm using LibGit2Sharp to provide a host of Git integration features in the file and folder browser as well as the ability to commit current and pending documents in the document's repository.

A little while back LibGit2Sharp switched their library over to support only .NET Standard and they dropped support for other .NET Framework versions for a brief moment of time - of course the moment I decide to jump in and bite the bullet to think about upgrading. Since then a new version was released that added back full framework support which actually belabors a point I'll make later on 😃

At the time when I went through this excercise, the choices I had was stick to an older version of LibGit2Sharp or keep moving forward with .NET Standard version.

In version 0.25 you'd see this:

Only .NET Standard was supported.

Stuck in 4.6.2

Markdown Monster has been running with a target framework of 4.6.2 in order to support older runtime installs on Windows. Supporting 4.6.x still brings in quite a few people who haven't updated to Windows 10 mostly, and even for my developer centric audience that's a not-insignificant number of users.

At the time I decided to give updating LibGit2Sharp with the .NET Standard based 0.25.4 version a try in my 4.6.2 project and I got the following assembly hell:

By adding a reference to a .NET Standard 2.0 package a huge number of support assemblies - a subset of the CoreFx libraries effectively - are being pulled into the project, which is ugly to say the least.

This was such a crazy mess that nearly doubled my distribution size, so I decided to not roll forward to the 0.25 version of LibGit2Sharp.

The issue here is that .NET 4.6.2 is .NET Standard compliant but in order to work, it needs a ton of newer features that were not present when that version of the framework shipped. In a way .NET Standard was bolted onto .NET 4.6.1, 4.6.2, 4.7, 4.7.1 resulting in all those extra assemblies and assembly redirects in app.config.

If you really need to use a component that doesn't have a .NET Framework version this might be an option, but frankly the distribution overhead made that a non-starter for me.

Thanks, but no thanks!

What a difference a Runtime Makes

There's a way to make this pain go away by targeting .NET 4.7.2 which as I mentioned earlier is fully .NET Standard Compliant. This means that all those APIs in the .NET Standard DLLs that were pulled in for 4.6.2 to provide missing functionality are available in the shipped .NET 4.7.2 base runtime.

The end result is: No extra dependencies. Here's the same bin\Release output folder in the 4.7.2 project with the same dependency added to Markdown Monster targeting 4.7.2:

As you can see there no extra System. dependencies except the ones I added explicitly to the project.

Much Better!

LibGit2Sharp has added back a 4.6 Target

An even cleaner solution is the route that LibGit2Sharp took eventually by bringing back a .NET 4.6 target in the library: In version 0.26 - conveniently after I went through all of the experimentation described above - you now have both .NET Standard and .NET 4.6+ target support:

This multi-targeted package when added to a full .NET Framework project will use the NET46 assemblies and not clutter up your project with all those extra dependencies even on my original .NET 4.6.2.

We have a Winner!

I think that was a smart move on LibGit2Sharp's part. It's in vogue to .NET Standard All the Things, but practicality and more than likely the sheer numbers of user base often speak louder than the latest fad. I was not planning on upgrading LibGit2Sharp to the .NET Standard only version, because of the DLL dependencies - that's enough of a blocker for me. Although I tried out running on .NET 4.7.2 which didn't add the extra assembly load, that doesn't really help me because 4.7.2 still excludes too many people from my user base without a forced .NET Framework upgrade which otherwise offers minimal benefits especially to end users.

If you are a library author, multi-targeting in using the SDK Style project format is fairly easy to set up and assuming your library doesn't depend on some of the newest features that are in .NET Standard that didn't exist previously, there are usually no code changes required to compile both for .NET Standard or Full Framework.

For the time being I think any popular 3rd party library that is expected to work on full .NET Framework, should continue to ship a full framework target in addition to .NET Standard.

Regardless I suspect we're likely to see more and more libraries that end up targeting only .NET Standard. Hopefully the runtime version counts will keep creeping up to meet the versions that support .NET Standard completely. Maybe when .NET 4.8 ships the 1 step back will be 4.7.2 at that time.

Summary

.NET Standard with full framework is still confusing because it's not all that obvious what dependencies will be pulled in when bound to a specific version of the full .NET Framework. I hope this post clarifies some of that.

To summarize here are the key points

  • .NET 4.6.1-.NET 4.7.1: Not nyet!
    4.6.1 through 4.7.1 add a boatload of additional runtime assemblies and assembly redirects to your project to work with .NET Standard 2.0. Avoid, unless you really need to use a .NET Standard component. Look for older versions that do support full framework. Pester third parties to still provide .NET Framework targets which is not a difficult to do with SDK style projects.

  • .NET 4.7.2: Works as advertised
    .NET 4.7.2 is the first version of .NET Framework that fully supports .NET Standard 2.0 and there are no additional assemblies dumped into your output folder. This is what you would expect to happen.

  • Multi-Targeting for libraries is still recommended
    Because of the limited 'full .NET Standard support' in older version of the .NET Framework, it's still recommended for third party providers to ship .NET Framework targets with their NuGet packages in addition to .NET Standard.

Multi-targeting with the new SDK projects is easy and once configured doesn't require any additional work in most cases. Using this approach full framework target can avoid the DLL deployment nightmare on 4.6.1-4.7.1.

  • If possible use .NET 4.7.2 or later
    If you want full .NET Standard support, consider using .NET 4.7.2 or later. Not always an option, but if you can, this is the cleanest way to .NET Standard 2.0 o full framework today. We just need to wait until 4.7.2 or more likely 4.8 gets into the Windows update pipeline to flush out the old versions.
this post created and published with Markdown Monster
© Rick Strahl, West Wind Technologies, 2005-2019
Posted in .NET  .NET Standard  

ASP.NET Core InProcess Hosting on IIS with ASP.NET Core 2.2

$
0
0

ASP.NET Core 2.2 has been out for a while now and with it come some significant improvements to the hosting model if you plan on hosting in IIS. In previous versions you were required to host ASP.NET Core applications by proxying requests from IIS into the ASP.NET Core Kestrel server with IIS effectively as a Reverse Proxy. I wrote about this in a detailed blog post a while back.

In version 2.2 ASP.NET Core adds support for direct in-process hosting which improves throughput considerably using an easy mechanism that allows switching between in-process and out-of-process hosting.

In this post I'll focus on the new In Process hosting model since that's what's changed and is improved, but I'll review the basics of both models here so this post can stand on its own. I'll start with what's changed and then dig a little deeper into how the models work and how they differ.

ASP.NET Core 2.2 adds InProcess Hosting on IIS

The original versions of ASP.NET Core required you to host on IIS using an Out of Process model that proxies through IIS. Requests hit IIS and are forwarded to your ASP.NET Core app running the Kestrel Web Server.

Out of Process Hosting (pre v2.2 model)

IIS Out of Process Hosting

Figure 1 - Out of Process Hosting uses IIS as proxy to forward requests to your dotnet.exe hosted Console application.

With ASP.NET Core 2.2 there's now an In Process hosting model on IIS which hosts ASP.NET Core directly inside of an IIS Application pool without proxying to an external dotnet.exe instance running the .NET Core native Kestrel Web Server.

In Process Hosting (v2.2 and later)

IIS In Process Hosting

Figure 2 - With In Process hosting your application runs nside of the IIS application pool and uses IIS's intrinsic processing pipeline.

The In Process model does not use Kestrel and instead uses a new Web Server implementation (IISHttpServer) that is hosted directly inside of the IIS Application Pool that is some ways similar to the way classic ASP.NET was plumbed into IIS.

This implementation accesses native IIS objects to build up the request data required for creating an HttpContext which is passed on to the ASP.NET Core middleware pipeline. As with the old version, the the Application Pool that hosts the ASP.NET Core Module does not have to be running .NET since the module hooks into the native code IIS pipeline.

Although this sounds like a fairly drastic change, from an application compatibility aspect I've not run into into any issues that have had any effect on my applications other than faster request throughput.

This feature improves throughput for ASP.NET Core requests on IIS significantly. In my off the cuff testing I see more than twice the throughput for small, do-nothing requests using IIS InProcess hosting. More on this later.

Microsoft has done a great job of introducing this hosting model with minimal impact on existing configuration: It's easy to switch between the old OutOfProcess and InProcess models via a simple project configuration switch that is propagated into the deployed web.config file.

OutOfProcess or InProcess? Use InProcess

For new applications that are deployed to IIS you almost certainly will want to use InProcess hosting because it provides better performance and is generally less resource intensive as it avoids the extra network hop between IIS and Kestrel and maintaining an additional process on the machine that needs to be monitored.

There are a few cases when OutOfProcess hosting might be desirable, such as for trouble shooting and debugging a failing server (you can run with console logging enabled for example) or if you want to be 100% compatible between different deployments of the same application, whether it's on Windows or Linux, since Kestrel is the primary mechanism used to handle HTTP requests on all platforms. With the InProcess model you're not using Kestrel, but rather a custom IISHttpServer implementation that directly interfaces with IIS's request pipeline.

But for most intents and purposes I think running InProcess on IIS is the way to go, unless you have a very specific need to require Kestrel and OutOfProcess hosting.

New ASP.NET Core projects automatically configure projects for InProcess hosting, but if you're coming from an older project you may have to update your project settings explicitly.

Settings Affected

Switching between hosting modes is very easy and requires only a configuration switch either inside of your .csproj file or in web.config.

Project Change - <AspnetCoreHostingModel>

The first change is in the project file where you can specify the hosting model by using the <AspNetCoreHostingModel> key.

To use InProcess hosting add the following to your Web project's .csproj file:

<PropertyGroup><TargetFramework>netcoreapp2.2</TargetFramework><AspNetCoreHostingModel>InProcess</AspNetCoreHostingModel></PropertyGroup>

The relevant project setting is the AspNetCoreHostingModel which can be InProcess or OutOfProcess. When missing it defaults to the old OutOfProcess mode that uses an external Kestrel server with IIS acting as a proxy.

This affects how dotnet publish creates your configuration when you publish your project and what it generates into the web.config file when the project is published.

web.config Change

The <AspnetCoreHostingModel> project setting affects the generated build output by writing configuration data into the web.config file for the project. Specifically it sets the the hostingModel attribute on the <aspNetCore> element that is generated:

<?xml version="1.0" encoding="utf-8"?><configuration><location path="." inheritInChildApplications="false"><system.webServer><handlers><add name="aspNetCore" path="*" verb="*" modules="AspNetCoreModuleV2" /></handlers><!-- hostingModel is the new property here --><aspNetCore processPath="dotnet" arguments=".\WebApplication1.dll"	
			      stdoutLogEnabled="false" stdoutLogFile=".\logs\stdout"
			      hostingModel="InProcess" /></system.webServer></location></configuration>

If the <AspNetCoreHostingModel> key in the project is set to OutOfProcess or is missing, the hostingModel attribute is not generated and the application defaults to OutOfProcess.

Refresh web.config on Publish

I found that unlike the rest of the files in the publish output folder the web.config file was not updated on a new publish unless I deleted the file (or the entire publish folder). If you make changes that affect the IIS configuration I recommend to nuke the publish folder and doing a clean publish.

Note that you can easily switch between modes after publishing by simply changing the value between InProcess and OutOfProcess in the web.config in the Publish folder. This can be useful for debugging if you want to log output on a failing application with verbose log settings enabled for example.

Just remember that if you change publish output it will be overwritten next time you publish again.

Cool - this single setting is all you need to change to take advantage of InProcess hosting and you'll gain a bit of extra speed connecting to your application.

More Detail: Reviewing IIS Hosting

To understand how InProcess hosting for IIS is a nice improvement, lets review how ASP.NET Core applications are hosted on Windows with IIS.

What is an ASP.NET Core Application?

When you create an ASP.NET Core application you typically create a standalone Console application that is launched with dotnet .\MyApplication.dll. When you run the Console application, ASP.NET Core hosts its own internal Kestrel Web Server inside of the application. Kestrel handles the incoming HTTP traffic and a Kestrel connector hands of an HttpContext to the ASP.NET Core request middleware pipeline for processing.

When you build an ASP.NET Web application you essentially create a fully self contained Web Server that runs ASP.NET Core on top of it.

Why do I need a Web Server for my Web Server?

For live applications hosted on Windows you typically use IIS as the front end server for your ASP.NET Core application rather than letting your ASP.NET Core running the .NET Kestrel Web Server be accessed directly.

In a nutshell, the built in Kestrel Web server in ASP.NET core is not meant to be an Internet facing Web server, but rather act as an application server or Edge Server that handles very specific data processing tasks. Kestrel is optimized for application scenarios, but it's not optimized for other things like static file serving or managing the server's lifetime

For this reason you generally do not want to run Kestrel directly in a Web application. This is true on Windows with IIS and also on Linux where you tend to use a Web server nginx or ha-proxy to handle non-application concerns. I wrote about how to set up IIS rewrite rules to route common static files rather than letting Kestrel handle them. This is not only about speed but it lets your Web application focus on doing the dynamic things that it's designed to do, letting IIS do the work it was designed for.

Here are a few of many arguments on why you want to use a full Web Server rather than running your application directly connected to the Web:

  • Port Sharing
    Kestrel currently can't do port sharing in the same way that IIS and http.sys can do on Windows. Currently that functionality is supported only through IIS on Windows. (AFAIK you can't even using the HttpSys Server to do this). Additionally although it's possible to use host header routing in ASP.NET Core, it's not exactly easy or maintainable to set this up currently.

  • Lifetime Management
    If you run your app without any support infrastructure any crash or failure will shut down the application and take your site offline. No matter what, you need some sort of host monitor to ensure your app continues to run if it fails and IIS provides that out of the box. ASP.NET Core with the ASP.NET Core Module benefits directly by being able to restart application pools that can relaunch your application on failures.

  • Static File Serving
    Kestrel is not very good with static file handling currently and compared to IIS's optimized static file caching and compression infrastructure, Kestrel is comparitively slow. IIS takes full advantage of Kernel mode caching, and built in compression infrastructure that is much more efficient than today's ASP.NET StaticFile handler (".UseStaticFiles()").

There are additional reasons: Security and server hardening, administration features, managing SSL certificates, full logging and Http Request tracing facilities and the list goes on. All good reasons to sit behind a dedicated Web server platform rather than running and managing a self-hosted server instance.

Out of Process Hosting

Prior to ASP.NET Core 2.2 the only way to host ASP.NET Core on IIS was through out of process, proxy mode hosting. In this model IIS is acting like a Web Server Frontend/Proxy that passes requests through to a separately executing instance of the .NET Core Console application that runs Kestrel and your ASP.NET Core application. Each request first hits IIS and the AspNetCoreModule packages up all the request headers and data and essentially forwards it from port 80/443 (or whatever your port is) to the dedicated port(s) that Kestrel is listening on.

Figure 3 - Out of Process ASP.NET Core IIS Hosting

As you can see the out of process model makes an additional http call to the self-contained running dotnet core application. As you can imagine there's some overhead involved in this extra HTTP call and the packaging of the data along the way. It's pretty quick, because it all happens over a loopback connection, but it's still a lot of overhead compared to directly accessing request data from IIS.

Once on the ASP.NET Core side the request is picked up by Kestrel, which then passes on processing to the ASP.NET Core pipeline.

*Figure 4 - Once requests are forwarded via HTTP, they are picked up by the Kestrel Web Server

In Process Hosting

In ASP.NET Core 2.2 and later, an in process processing model has been added that provides a more direct connection between IIS and your application. Like the out of process model the AspNetCoreModule intercepts requests and routes them directly into the ASP.NET Core application:

Figure 4 - IIS In Process Hosting routes requests directly into the application pipeline via the IISHttpServer implementation.

In-process hosting does not use the Kestrel Web Server and instead uses an IISHttpServer implementation. This implementation receives incoming requests from the standard IIS http.sys driver and the built-in IIS native pipeline. Requests are routed to the Web site's port and host name through IIS and the request is then routed to IISHttpServer into ASP.NET Core.

Figure 5 - In Process hosting uses the IISHttpServer component to handle the Web Server interface

IISHttpServer then packages up request data for passing on to the ASP.NET Core pipeline to provide the HttpContext required to process the current request through the ASP.NET Core pipeline. Input is retrieved through native interfaces that talk to the IIS intrinisic objects and output is routed into the IIS output stream.

In Process Differences

Keep in mind that In Process Hosting does not use Kestrel and because you are using a different Web Server there might be some subtle differences in some settings that are picked up from the Web Server to create the HttpContext. One advantage of running Out of Process with Kestrel you get the same Web Server on all platforms regardless of whether you run standalone, on IIS, on Linux or even in Docker.

That said I haven't run into any issues with any of my (small to medium sized) applications where I've noticed anything that affected my application, but it's a possibility to watch out for.

One ASP.NET Core Application per Application Pool

The ASP.NET Core module V2 running in InProcess mode has to run in its own dedicated Application Pool. According to the documentation you cannot run multiple sites or virtual directories (Web Applications) using the the ASP.NET Core Module in a single Application Pool. Make sure each ASP.NET Core app on IIS gets its own Application Pool.

Checking for InProcess or OutOfProcess Hosting

Once an application is in production you might want to ensure that you're using the appropriate hosting mechanism. You can check in a couple of ways.

Check for the dotnet process

You can check for a dotnet process that runs your application's dll. If you're running out of process you should have a dotnet process that's running your application's dll as shown in Figure 5:

Figure 6 - OutOfProcess uses dotnet.exe to run your application in proxy forwarding mode when using IIS and you can see that separate process in the Process list.

If the dotnet.exe process is running with your application's specific command line, you know your app is running Out Of Process.

Check the Response Server Header

You can also check the HTTP response for the server and check for either Kestrel or Microsoft IIS as the Web Server for OutOfProcess and Inprocess modes respectively :

OutOfProcess

Figure 7 - Out of Process IIS Hosting forwards requests to an externally hosted ASP.Core application running Kestrel.

InProcess

Figure 8 - In Process IIS Hosting implements the Web server host inside of the Asp.Net Core Module using IIS infrastructure. The Server reads Microsoft-IIS/10.0.

Performance

So the obvious reason to use the new In Process model is that it's faster and uses less resources as it's running directly in process of the IIS Application Pool. There is no internal HTTP traffic and overhead and requests are processed immediately.

Before I show a few simplistic requests here, keep in mind that these tests are not representative of typical application traffic. Running simple do-nothing requests only demonstrates that potential throughput is drastically improved, but for longer running request the request overhead is far overshadowed by application level processing in comparison to the request access times.

Still it's always a good idea to eek out extra performance and the improved throughput means less latency in requests, slightly faster response times and less overhead on the server potential more load that can be processed.

How I set up the Test

For this test I used a standard .NET Core API project and then created a small custom class that has a few basically do nothing HelloWorld style methods in it:

public class TestController : Controller
{

    [Route("api/helloworld")]
    public string HelloWorld()
    {
        return "Hello World. Time is: " + DateTime.Now.ToString();
    }
    [Route("api/helloworldjson")]
    public object HelloWorldJson()
    {
        return new
        {
            Message = "Hello World. Time is: " + DateTime.Now.ToString(),
            Time = DateTime.Now
        };
    }
    [HttpPost]        
    [Route("api/helloworldpost")]
    public object HelloWorldPost(string name)
    {
        return $"Hello {name}. Time is: " + DateTime.Now.ToString();
    }
    ... informational requests removed
}

How Much of a Difference?

OutOfProcess

The out of process test result looks something like this:

Figure 9 - IIS Out of Process processing results with Proxying

This is on my local i7 - 12 core laptop. As you can see I get ~8.2k requests a second using out of process hosting.

InProcess Running that same test with InProcess hosting - ie. only adding the hostingModel="InProcess" to web.config (or via the AspNetCoreHosting project setting) I get this:

Figure 10 - IIS In Process processing results

This produces 19k+ requests a second. That's more than twice as many requests!

This is not exactly surprising given that you are removing an extra HTTP request and all the parsing that goes along the for ride in that process. But still it's quite a significant difference.

But again keep this in perspective. This doesn't mean that your app will now run twice as fast, but simply that you get slightly faster connect and response times for each request that runs through IIS which is a welcome addition, especially given that you have to do nothing to take advantage of this improvement except upgrade and set a configuration switch in your project.

Just for reference, if I hit an IIS static Web site using tiny plain static pages I can generate about ~50k requests/second on this same setup.

Raw Kestrel

Just for argument's sake I also wanted to test that same process using just raw Kestrel (on Windows) without IIS in the middle.

Figure 11 - Out of Process processing results with direct Kestrel access

Direct Kestrel access lands somewhere in the middle between In and Out of Process hosting.

I was a bit surprised by this - I would have expected raw Kestrel to perform on par or better than IIS for dynamic requests. Given all the performance stats we've heard how well ASP.NET Core performance on various benchmarks and many of the fastest benchmarks use raw Kestrel access.

I would expect IIS to have a big edge for static files (with Kernel caching), but for dynamic requests I expected Kestrel to beat IIS. But apparently that's not the case at least not on Windows. Even for dynamic requests the IIS Inprocess throughput is better than Kestrel's.

Summary

While IIS is getting marginalized in favor of hosting on Linux and Docker, remember that IIS is still Azure's default ASP.NET Core deployment model if you publish to an AppService and don't explicit specify platform. This means IIS is still in use in more scenarios than just self-hosted IIS applications, so it's not going away anytime soon. And Microsoft just backed that up with the new in processing hosting features that provide much better performance.

You now have two options for hosting on IIS using either the now classic Out of Processing that proxies requests through IIS and uses a completely self-contained ASP.NET Core console application using the .NET Based Kestrel Web Server, or you can use the In Process Hosting model which is more similar to the way classic ASP.NET used to interface with IIS through its own native APIs.

The new In Process model is considerably faster in terms of request throughput so in almost all cases when hosting on IIS you'll want to choose the InProcess model.

The key setting to remember is to set:

<AspNetCoreHostingModel>InProcess</AspNetCoreHostingModel>

in your project and remove it or set it to OutOfProcess to use the old mode. The setting will generate the required hostingModel attribute in web.config which can also be explictly set in this file to make runtime changes to the host behavior.

This is a great improvement that gets you a decent performance bump for literally setting a switch.

Switch it on and go burn some rubber...

Resources

this post created and published with Markdown Monster
© Rick Strahl, West Wind Technologies, 2005-2019
Posted in ASP.NET Core  IIS  

Creating a custom HttpInterceptor to handle 'withCredentials'

$
0
0

Been back at doing some Angular stuff after a long hiatus and I'm writing up a few issues that I ran into while updating some older projects over the last couple of days, and writing down the resolutions for my own future reference in a few short posts.

For this post, I needed to create and hook up a custom HttpInterceptor in Angular 6. There's lots of information from previous versions of Angular, but with the new HTTP subsystem in Angular 6, things changed once again so things work a little bit differently.

Use Case

In my use case I have a simple SPA application that relies on server side Cookie authentication. Basically the application calls a server side login screen which authenticates the user and sets a standard HTTP cookie. That cookie is passed down to the client and should be pushed back up to the server with each request.

WithCredentials - No Cookies for You!

This used to just work, but with added security functionality in newer browsers plus various frameworks clamping down on their security settings, XHR requests in Angular by default do not pass cookie information with each request. What this means is by default Angular doesn't pass Cookies captured on previous requests back to the server.

In order for that to work the HttpClient has to set the withCredentials option.

return this.httpClient.get<Album[]>(this.config.urls.url("albums"),{ withCredentials: true })
                    .pipe(
                        map(albumList => this.albumList = albumList),
                        catchError( new ErrorInfo().parseObservableResponseError)
                    );

It's simple enough to do, but... it's a bit messy and more importantly, it's easy to forget to add the header explicitly. And once you forget it in one place the cookie isn't passed, and subsequent requests then don't get it back. In most application that use authentication this way - or even when using bearer tokens - you need to essentially pass the cookie or token on every request and adding it to each and every HTTP request is not very maintainable.

CORS - Allow-Origin-With-Credentials

In addition to the client side withCredentials header, if you are going cross domain also make sure that the Allow-Origin-With-Credentials header is set on the server. If this header is not set the client side withCredentials also has no effect on cross-domain calls causing cookies and auth headers to not be sent.

HttpInterceptor to intercept every Requests

To help with this problem, Angular has the concept of an HttpInterceptor that you can register and that can then intercept every request and inject custom headers or tokens and other request information.

There are two things that need to be done:

  • Create the HttpInterceptor class
  • Hook it up in the AppModule as a Provider configuration

Creating an HttpInterceptor

Creating the Interceptor involves subclassing the HttpInterceptor class so I create a custom class HttpRequestInterceptor.ts:

import { Injectable } from '@angular/core';
import {
  HttpEvent, HttpInterceptor, HttpHandler, HttpRequest
} from '@angular/common/http';

import { Observable } from 'rxjs';

/** Inject With Credentials into the request */
@Injectable()
export class HttpRequestInterceptor implements HttpInterceptor {

  intercept(req: HttpRequest<any>, next: HttpHandler):
    Observable<HttpEvent<any>> {
      // console.log("interceptor: " + req.url);
      req = req.clone({
        withCredentials: true
      });
      return next.handle(req);
  }
}

This is some nasty code if you had to remember it from scratch, but luckily most of this boilerplate code comes from the Angular docs. What we want here is to the set the request's withCredentials property, but that property happens to be read-only so you can't change it directly. Instead you have to explicitly clone the request object and explicitly apply the withCredentials property in the clone operation.

Nasty - all of that, but it works.

Hooking up the Interceptor

To hook up the interceptor open up app.module.ts and assign the interceptor to the providers section.

Make sure to import the HTTP_INTERCEPTORS at the top:

import {HttpClientModule, HTTP_INTERCEPTORS} from '@angular/common/http';   // use this

and then add the interceptor(s) to the providers section:

providers: [            
    // Http Interceptor(s) -  adds with Client Credentials
    [
        { provide: HTTP_INTERCEPTORS, useClass: HttpRequestInterceptor, multi: true }
    ],
],

Summary

Customizing every HTTP request is almost a requirement for every client side application, especially if it deals with any kind of authentication. Nobody wants to send the same headers or config info on every request, and if later on it turns out there are additional items that need to be sent you get to scour your app and try to find each place the HttpClient is used.

Creating one or more interceptors is useful for handling creating standardized requests.

In the end this is relatively easy to hook up, but man is this some ugly, ugly code and good luck trying to remember the class salad - or even finding it. That's why I'm writing this up if for nothing else than my own sanity so i can find it next time. Maybe it's useful to some of you as well.

this post created and published with Markdown Monster
© Rick Strahl, West Wind Technologies, 2005-2019
Posted in Angular  

Using the ng-BootStrap TypeAhead Control with Dynamic Data

$
0
0

Ok I admit it - it took me way too long to figure out how to hook up and use the ng-Bootstrap's Typeahead control to work with dynamic lookup data that comes from the server. The documentation conveniently omits that little detail and as is often the case assumes you have a total grasp of the Observable and all the nuanced combinations of operators to figure out how to make dynamic calls on your own. In this post I'll show an example of how to use the TypeAhead control with data retrieved from the server using the Observable switchMap operator, which was the bit that was eluding me.

ng-Bootstrap is a collection of Angular components that wrap the native Bootstrap components like the Modal Dialog, Lists, Buttons etc. so that they can be dropped into the page as Angular components rather than using the default jQuery handling. It also adds a few additional controls like nice date and time pickers and the Typeahead/Auto-Complete control I'm going to discuss here. Using these components makes much easier to integrate programmatic control over bootstrap's components and it works fairly well. I'm not convinced that a lot of these wrappers, that only wrap the HTML for databinding add that much value, but for more interactive controls like the Modal and definitely for the missing DatePicker and Typeahead controls ng-bootstrap is very useful.

The ng-Bootstrap Typeahead control

I'm using my AlbumViewer sample app to demonstrate this functionality and here's what the ng-bootrap TypeAhead control looks like in action:

Bascially as I enter or edit albums, I can look up the name of an existing band and assign it to the band name of the album. Alternately I can also type a new band name. There are options that control the behavior of whether the control allows only selections from the list - by default it doesn't.

Let's take a look. The control is fairly straightforward to use at least for static content to display.

HTML Markup

Here's what the markup for the TypeAhead looks like in the HTML template:

<div class="form-group"><label for="ArtistName">Band Name:</label><input id="ArtistName" type="text"
         name="ArtistName"
         class="form-control"                     
         [(ngModel)]="album.Artist.ArtistName"
         [ngbTypeahead]="search"                     
         [resultFormatter]="resultFormatBandListValue"
         [inputFormatter]="inputFormatBandListValue"
         #instance="ngbTypeahead"                     
    /></div>

The control is data bound to the Artist in the model (the [(ngModel) attribute) and when the type ahead control expects to search it fires the search method in my component based on the [ngbTypeahead] attribute.

Component Code

In the component code I then need to add some dependencies. Specifically ng-bootstrap relies on various Observable behaviors which mostly come from the samples, but I added switchMap and catchError which are necessary for the async retrieval.

import { Observable } from 'rxjs';
import { debounceTime, distinctUntilChanged, switchMap, catchError  } from 'rxjs/operators';

The actual component code to handle searching was a bit tricky to get right. ng-bootstrap has good docs for local data, but completely fails to mention how to handle doing remote lookups of the data, which is a pretty common use case. In my case I have an API call on the server that returns a key value pair of { name: "bandName", id: "bandId" } to return the matching bands for what was typed.

Sync

ng-Bootstrap uses a search event exposed as an Observable stream of search terms that are fired on the search method I've specified. Try as I might I find Observables unintuitive to work with, but regardless this makes sense in the way Angular things about events.

So, a sync implementation is easy enough (from the documentation):

search = (text$: Observable<string>) =>
text$.pipe(
  debounceTime(200),
  distinctUntilChanged(),
  map(term => term.length < 2 
    ? []
    : states.filter(v => v.toLowerCase().indexOf(term.toLowerCase()) > -1).slice(0, 10))
)

The sample uses a static array of states and filters the list locally based on the search terms. The code debounces the input by 200ms so it doesn't fire immediately on key downs to avoid excessive thrashing, waits for a distinct value change (ie ignores navigation keys), and then maps the static result data into a result array. That all makes perfect sense.

To start with my data, I modified the sample data to match a few records of the Band data that my server is returning [ { name: "band", id: "bandId" } ] and I got that working easily enough and hooked in so the UI works properly.

Async and switchMap

But then question became how do I hook this up to result data retrieved from my API service?

My service call logic uses HttpClient in a service that returns an Observable<any>, so for model data I would typically use something like this:

this.albumService.artistLookup(searchText)
   .subscribe( lookups =>  this.lookups );

So how do I hook this into the Observable that ng-bootstrap's Typeahead expects as a result? The map() example for the static data expects to materialize instance of an array which is easy with the static data - you can filter that or pass back the entire array and that just works for .map().

But for the dynamic data the data returned is an Observable which is not available as an instance until the Observable resolves. Basically I need to return an Observable rather than a concrete array of lookup items.

So perhaps to others it would be quite obvious on how to continue the Observable chain after re-mapping the result value. It wasn't to me and I went on a bunny chase trying to track down and find the right operator to return an observable.

Turns out the simple answer is the switchMap operator instead of map.

The switchMap Operator

switchMap is similar to map as a transformation function that takes an input value and transforms it into a new value and returns an Observable of that value. Unlike map the value returned is not the instance value, but an Observable.More info

So using switchMap here's what the code now looks like with my remote service call hooked in:

search = (text$: Observable<string>) => {
      return text$.pipe(      
          debounceTime(200), 
          distinctUntilChanged(),
          // switchMap allows returning an observable rather than maps array
          switchMap( (searchText) =>  this.albumService.artistLookup(searchText) ),
          catchError(new ErrorInfo().parseObservableResponseError)              
      );                 
    }

Quite simple actually, once you know which operator to use!.

The key here is:

switchMap( (searchText) =>  this.albumService.artistLookup(searchText) ),

The call to this.albumService.artistLookup(searchText) returns Observable<any> which is simply returned and continues on into the Observable chain. If an error occurs my custom error handler captures the error and displays a message in a toast notification.

So easy, right? Well, it wasn't easy to find for me, but in 50/50 hindsight; yes easy.

Binding Values to the TypeAhead

To finish out the TypeAhead logic and point out another issue that took me a while to figure out, is that both the input binding and result bindings need to be adjusted with the inputFormatter and resultFormatter. These formatters are used to format the inbound text for the input binding so that the display in the control displays correctly, and for the result that is going back into the model.

In this example the value is a simple string in both cases but since the data from the server actually is a key/value pair the data needs to be fixed both for input and result values using these two formatters.

Here they are:

/**
 * Used to format the result data from the lookup into the
 * display and list values. Maps `{name: "band", id:"id" }` into a string
*/
resultFormatBandListValue(value: any) {            
  return value.name;
} 
/**
  * Initially binds the string value and then after selecting
  * an item by checking either for string or key/value object.
*/
inputFormatBandListValue(value: any)   {
  if(value.name)
    return value.name
  return value;
}

these values are bound in the HTML template with:

[resultFormatter]="resultFormatBandListValue"
[inputFormatter]="inputFormatBandListValue"

Note that the input formatter needs to differentiate between two different binding modes: The initial ng-model binding when the form first loads and the assignment when the model value is updated from the TypeAhead control.

I have to say this seems pretty convoluted when I think about list binding. Coming from other environments I expect an items source with a display binding expression and a selected item that are separate. Instead ng-bootstrap opts to use the list and transform the values explicitly or it uses the text typed into the input box which are two very distinct value types.

These formatters are necessary to work around this type mismatch and they act as transformation handlers which seems more unexpected work for such a common use case scenario.

But I'm glad the control provides the core features smoothly and it works and once you've worked through this once, you can copy and paste the base logic easily enough. But getting started and implementing this thing certainly took me a while - way longer than I would like to admit 😒.

Getting Ahead

Many of you have heard me rave about the DatePicker and TypeAhead abyss in HTML/JavaScript frameworks where every few months we need to hunt for a new one as we switch frameworks or tools and this is my bi-yearly attempt at that.

All things considered using ng-bootstrap was one of the easier integrations I've done recently and really the focus and pain point is more about the separate issue of Observables than ng-bootstrap.

It's my own inability to fully grok all the Observables operators and nuances. I can read and use them once and it all makes sense, but then... they have the same effect as RegEx on me - I can get them working, but then when I step away and come back it's like starting over. Unintuitive and non-discoverable APIs are big detriment to keep things in my head. Observables just feels horribly unnatural to me.

Summary

This post really boils down to using the correct Observable operator. What eluded me was switchMap even though I had a good idea what feature I needed I just couldn't quickly pin down the right operator.

In summary, switchMap is similar to map as a transformation function that takes an input value and transforms it and then returns an Observable of the transformed value. Unlike map the value returned is not a value but an Observable.

It was a very circuitous path that led me to find it eventually and that's primarily why I'm writing this down for my own future reference. Maybe it'll prove useful to a few of you as well.

Resources

this post created and published with Markdown Monster
© Rick Strahl, West Wind Technologies, 2005-2019
Posted in Angular  

Adventures in .NET Core SDK Installation: Missing SDKs and 32 bit vs 64 bit

$
0
0

Yesterday I ran into yet another .NET Core versioning problem, this time related around the .NET Core SDK installation. A couple of days ago the .NET Core 3.0 Preview 4 SDK was released and I installed it as I was doing some experiments around Blazor and Razor Components again. I installed the SDK and did my 3.0 things and forgot about it.

Today I went back to one of my .NET Core 2.2 applications and found that when trying to run from the command line I was getting strange errors saying that the required 2.2 SDK wasn't installed.

To my surprise doing a:

dotnet --info

showed this:

All the 2.x SDKs were missing. Yet notice that the 2.x SDKs are actually installed on the machine, as you can clearly see in the Programs and Features display.

I tried a few things to try and get this to work without success:

  • Repair Installed the 2.2 SDKs
    Just to be sure I went and repaired two of the SDK installs to see if that would bring them back in the dotnet --info list - but no joy.

  • Added explicit global.json
    I created a global.json with a very specific SDK version that I know was installed. Building the project now tells me that the specific version of the SDK is not installed. Hrrrmph - no joy.

I've been having a bunch of version mishaps lately with .NET Core, so in my frustration I yelled loudly on Twitter 😇

I'll come to regret that later... but only a little 😃

Success #1: Uninstall the .NET Core 3.0 SDK

So the first and obvious solution after all the above failed was to uninstall the .NET Core 3.0 SDK and sure enough removing the SDK fixed the problem, and the 2.2 SDKs SDK list back was back!

Yay.

But why all the pain with the 3.0 SDK?

32 Bit vs 64 Bit

Thanks to my Twitter outburst it only took a few minutes for Kevin Jones (@vcsjones) and Ben Adams (@ben_a_adams) to spot my myopia:

The 3.0 SDK installed is the 32 bit version and due to the way the SDK pathing worked out due to install order, the 32 bit SDK is found first.

So what happened here is that I had accidentally installed the 32 bit version of the .NET Core 3.0 SDK. If you look at the screen shot above more closely you can see that the installed version is installed Program Files (x86) which is the giveaway for the 32 bit version:

The problem here is that if you have both 32 bit and 64 bit versions of the SDK installed, the first one found wins. And only one version of the SDK (32 bit or 64 bit) can be active at any one time.

Success #2: Fix the Problem

So to fix this problem I can now do :

  • Uninstall the .NET Core 3.0 32 Bit SDK
  • Reinstall the 64 bit Version

which nets me the install I want to have from the get-go:

or if you really need to have both SDKs installed fix the path so that the one you need in your current session is first in the path sequence.

  • Fix 64 bit SDK locations to be first in Windows Path

Do you need 32 Bit SDKs?

There should be very little need for 32 bit versions of the SDK on Windows. Most moderns Windows machines are running 64 bit so if you are building a new application it would make sense to build your apps using 64 bit.

One place where this will perhaps matter with .NET 3.0 is for desktop applications. A lot of older desktop applications are still 32 bit for a variety of reasons (interop with older 32 bit COM components for example), compatibility issues with older UI components.

For example, I'm planning at some point to move Markdown Monster to .NET Core 3.0 but currently it runs as a 32 bit application due to better performance and stability of the Web Browser control in 32 bit mode. As long as I continue to use that control (which may not be much longer if the new Chromium Edge WebView can work reliably) I will continue to keep the application running as a 32 bit app.

So there are still some edge cases for 32 bit development and that's what those SDK exist for I suspect.

But... even if you are building 32 bit apps, according to Rich Lander again, the 64 bit SDK can build for 32 bit runtimes so even if you are building a 32 bit application you probably don't need a 32 bit SDK.

All 64 bit, all day!

Make it harder to install 32 bit

So my fat fingered error was caused by being sloppy when picking the installer on the Web Page:

It's probably a good idea to make the 64 bit download more prominent to avoid an accidental click or even for a new .NET person to think that x86 might just fine.

Even better maybe the 32 bit download on a 64 bit system should prompt and ask Are you sure you want to install the 32 bit SDK?

Visual Studio doesn't Care

Incidentally I found that while I was struggling on the command line with the dotnet command line tooling, Visual Studio was just fine compiling my 2.2 projects and running it. The problem I had was specifically with the command line version from my 'normal' Windows environment.

It works for Visual Studio because VS sets up a custom environment with a custom path that includes the right SDK locations based on the runtime target you specify in your application, so compilation inside Visual Studio works.

So in theory I could have gone and published my project to a folder to get the output to work. But then running it locally I still would have to adjust my path (unless I run through Visual Studio).

Moral of the Story

At the end of the day this was a user error on my part. The bottom line is make sure you install the right version of the .NET Core SDK and runtimes.

In almost all cases the right version of the SDK to download and is the 64 bit version unless you are running on 32 bit Windows version (hopefully not).

this post created and published with Markdown Monster
© Rick Strahl, West Wind Technologies, 2005-2019
Posted in .NET Core  

First Steps in porting Markdown Monster WPF App to .NET Core 3.0

$
0
0

Today I took the day to explore what it would take to port Markdown Monster to .NET Core. Most of the examples I've seen so far for ports or running applications on .NET Core are pretty trivial - you can see how the process works, but just looking at those examples I had a million questions of how certain things will be handled. So I decided to take a look.

For example:

  • How to handle non-.NET Standard NuGet Packages
  • How do external assembly loads (for addins in MM) work
  • Porting - How do I get my project ported
  • How to Xaml files get built
  • How do resources (Assets) get embedded into the project

I'll look at all of these things. Heads up: This is a long rambling post as I just wrote down a bunch of stuff as I was going through it. I edited out some extraneous stuff, but it's mostly just off the cuff, but if you're thinking about porting an application I think most of the things I describe here are things you are likely to run into yourself even if this application is a bit more esoteric as it includes some interop features.

Examples are based .NET Core 3.0 Preview 4 which is the latest Preview at the time of writing.

Porting

So the first thing I did is convert the project file to the new .NET SDK Project Format file by switching the old .NET project to a .NET SDK project. If you recall, .NET SDK projects are much simpler than the old .NET projects because you generally don't have to list every file that the project needs to build. Instead the project knows about common file types and automatically builds what it knows how to build. You only explicit add files that require special instructions like static files or folders to copy, or files to exclude from building or copying.

What's nice about that is that you can easily create a new project by basically deleting the old one and adding just a few simple things into the file.

To start I simply created a mostly empty project file from my old project:

<Project Sdk="Microsoft.NET.Sdk.WindowsDesktop"><PropertyGroup><OutputType>WinExe</OutputType><TargetFramework>netcoreapp3.0</TargetFramework><AssemblyName>MarkdownMonster</AssemblyName><UseWPF>true</UseWPF></PropertyGroup></Project>

At this point I can actually open the project in Visual Studio as a new SDK style project.

Most likely you'll get errors that complain about duplicate Assembly directives. SDK projects include assembly directive information in the project file itself, so you can either delete the old AssemblyInfo.cs file, or add <GenerateAssemblyInfo>false</GenerateAssemblyInfo> into the property group above and leave the old file as is.

Note that you no longer have to add Xaml files explictly - the <UseWpf> tag automatically compiles all Xaml files in your project so the file can stay clean.

NuGet Packages

If I compile at that point I'll get hundreds of errors - that's because all of my dependencies are still missing. So the next step then is to move over all the package references into the new project as an item group.

<ItemGroup><PackageReference Include="Dragablz" Version="0.0.3.203" /><PackageReference Include="FontAwesome.WPF" Version="4.7.0.9" /><PackageReference Include="HtmlAgilityPack" Version="1.11.3" /><PackageReference Include="LibGit2Sharp" Version="0.26.0" /><PackageReference Include="LumenWorksCsvReader" Version="4.0.0" /><PackageReference Include="MahApps.Metro" Version="1.6.5" /><PackageReference Include="Markdig" Version="0.16.0" /><PackageReference Include="Microsoft.ApplicationInsights" Version="2.9.1" /><PackageReference Include="Microsoft.Windows.Compatibility" Version="2.0.1" /><PackageReference Include="NHunspell" Version="1.2.5554.16953" /><PackageReference Include="Westwind.Utilities" Version="3.0.25" /></ItemGroup>

The easiest way to do this is open your old packages config file and copy the packages into the item group. Replace package with PackageReference and id with include for quickly getting your references in. Note that you can remove any secondary package references that your project doesn't directly reference. For example Westwind.Utilities references Newtonsoft.Json - the old packages.config included Newtonsoft.Json but since it's a secondary dependency you can remove it. It'll still get pulled, but doesn't need to be explicitly referenced.

Also note this package:

<PackageReference Include="Microsoft.Windows.Compatibility" Version="2.0.1" />

which is required in order to provide all the required Windows API that are not part of .NET Core. This basically contains most of the functionality of the BCL/FCL that is Windows specific and is not part of .NET Core. It's what makes it possible for .NET Core to actually run WinForms and WPF applications with fairly good compatibility. If you want to see how much Windows specific code you have in your project get to a stable point where your code compiles, then remove that package 😃

What's interesting is that some of the references in question are not .NET Standard (or .NET Core) compliant - mainly the Windows specific ones like this older version of MahApps, Dragablz and FontAwesomeWPF. Most of the other assemblies actually have .NET Standard 2.0 versions that are automatically ugpraded to be used instead of the full framework ones.

It appears that it's not necessary that packages or assemblies added to the project are .NET Standard compliant which is a big relief given that most legacy projects are likely to have at least a few dependencies that are not on the new .NET train.

The full framework assemblies link in just fine, but we'll see what happens at runtime. Adding the dependencies has whittled down my error count to about 80.

Hunting down Errors

Next comes the task of whack-a-mole to try to track down a bunch of dependency errors. Making sure the right namespaces are in place and all the NuGet packages are loaded properly in the project. Not really sure why some of these are happening since there weren't any code or dependency changes but lots of namespaces required explicit reassignments in my case.

Windows vs. .NET Standard and Non-Windows

I also ran into a few errors with my own libraries due to some - what now turns out to be bad - assumptions.

In westwind.utilities which is my general purpose library for helpers there are a few Windows specific classes that long preceded the advent of .NET Core/Standard. I left them in the library, but when I built the .NET Standard version I explicitly bracketed them out with #if #endif compiler directives, so they wouldn't actually compile nor run on other platforms or in .NET Standard.

Here's what this looks like in Visual Studio when the active target is .NET Standard 2.0:

Basically I have a compiler flag when I build for full framework called NETFULL that allows me to bring in some code that doesn't show up in the .NET Standard assembly. It works well and is easy enough to manage.

Well now with .NET Core 3.0 supporting Windows (via additional assemblies those extra classes are missing).

In this case the solution is easy enough - the code is open source and I can just directly add the missing classes or components into the Markdown Monster (or a support) project. There were several items like this with various libraries (image conversion using GDI were a few others).

For future reference I'll have to rethink how this is done. Most likely anything that is Windows specific will have to be pulled out of the library and moved into a Windows specific version and then the .NET Standard version has to have a dependency on the Windows support libraries to provide the needed Windows features. There are very few features in Westwind.Utilities, mainly System level functions (WindowsUtilities) and the Shell utilities to open files folders and other applications on the desktop.

So there's a lot of small cleanup tasks for various files and types that are mostly internal. Basically cleaning up some references and removing some support libraries (mainly the CommonDialogs functions for the folder browser dialog which is now fixed in 3.0 to use the new style file browser).

This is to be expected with any sort of version update and while there were about 30 or so instances of errors or relocated references this only took 15 minutes to clean up.

Managing Resources and Copied Files

So at this point I was able to compile my project (with a number of warnings for packages that aren't 3.0 'compatible'):

Cool! That wasn't too bad...

But running the application still doesn't work at that point:

Ah - yes missing resources. Looks like each of the individual icons and image assets have to be added to the project individually as well:

<ItemGroup><Resource Include="Assets/MarkdownMonster.png" /><Resource Include="Assets/MarkdownMonster_Icon_256.png" /><Resource Include="Assets/vsizegrip.png" /><Resource Include="Assets/folder.png" /><Resource Include="Assets/git.png" /><Resource Include="Assets/default_file.png" /></ItemGroup>

That gets me a little further but I'm still missing some additional resources:

In this case I'm missing some support files that Markdown Monster copies into the output folder. Specifically it's the Web Content files used to render the editor and preview HTML.

To add those I need to explicitly add those folders to be copied:

<ItemGroup><None Update="Editor\**\*.*"><CopyToOutputDirectory>PreserveNewest</CopyToOutputDirectory></None></ItemGroup><ItemGroup><None Update="PreviewThemes\**\*.*"><CopyToOutputDirectory>PreserveNewest</CopyToOutputDirectory></None></ItemGroup>

And that works.

At this point Markdown Monster is actually launching! Yay:

COM Interop and Dynamic Doesn't Work!

But... there are problems. As you can see the most important UI component - the freaking Editor - is missing and it's due to errors that are occurring when the editor is loading.

The problem is when accessing the Web Browser Control's internal components which are COM based, the application fails. It turns out the specific problem is accessing dynamic COM instances and then calling methods or accessing members on them. This just fails outright.

Any attempt to use dynamic just fails! I remember I talked about this in a previous post and at the time the word was that this would be fixed in 3.0.

Well apparently this is not the case at least not in Preview 4.

So Markdown Monster has a ton of interop that it does with the Markdown Editor which is an HTML component inside of a WebBrowser control. The WPF application calls into the custom behaviors that I've set up in JavaScript to interact with the editor. Any directives through the UI are routed through a central editor class and all of those interop calls use dynamic. These are lightweight method calls - calling JavaScript functions from C# code.

This has been working great in full framework but all of that's broken now in .NET Core 3.0.

The workaround is to use Reflection. To retrieve my Window I can do this instead of using dynamic using ReflectionUtils in Westwind.Utilities:

object window = ReflectionUtils.GetPropertyCom(doc, "parentWindow");

To get the editor and set the Markdown in the document I can do this:

if (AceEditor != null)
{

    // Doesn't work in Core 3.0
    //AceEditor.setvalue(markdown ?? string.Empty, position, keepUndoBuffer);

    ReflectionUtils.CallMethodCom(AceEditor, "setvalue", markdown ?? string.Empty, position,
        keepUndoBuffer);
}

It's doable, but besides being less efficient (dynamic does good job caching Reflection details) but fixing this mess would be a heck of a nightmare even though all of the Interop calls are mostly localized in the single MarkdownDocumentEditor class.

I can't quickly fix all of this, but after fixing a few strategic calls that set and retrieve the Markdown document using Reflection instead of dynamic I am now able to get the Markdown Monster editor to come up.

It works, but it's far from functional. The editor works but most commands won't, the refresh and browser sync isn't working.

Other Issues

Addins

The next thing that is causing me problems is how to deal with addins. Markdown Monster is based on a core editor, that you then plug additional features into. A number of base features like the Weblog Publishing, Screen Capture and Template Snippet engine are built using Addins that are completely separate from the main editor. The running app above is at this point not using any of the addins which I initially disabled to keep the migration process managable. Now it's time to add at least one back in.

Addins are separate DLL assemblies that are loaded from a special folder - Addins - in the bin folder for the stock addins that ship with MM, or in the %appdata\Markdown Monster\Addins folder. As such I need to build them into a special output folder when building and testing because MM expects them in these special folders.

It turns out that's not so easy to do with SDK projects, as the build output either doesn't pull any dependencies (default behavior), or pulls every dependency from all the project and NuGet packages. Since addins reference the main application, pretty much everything gets pulled in.

OK, here's how to create a WPF support assembly (addin) that may also contain some UI elements and forms in this case. As with the EXE I target netcoreapp3.0 and add <UseWpf>true</UseWpf> to have the compiler automatically pick up Xaml resources.

<Project Sdk="Microsoft.NET.Sdk.WindowsDesktop"><PropertyGroup><TargetFramework>netcoreapp3.0</TargetFramework><AssemblyName>WeblogAddin</AssemblyName><UseWPF>true</UseWPF></PropertyGroup></Project>

This allows me to open the project in Visual Studio. Next I need to add all my existing packages and embedded resources/assets:

<ItemGroup><PackageReference Include="MahApps.Metro" version="1.6.5" /><PackageReference Include="Dragablz" version="0.0.3.203" /><PackageReference Include="Microsoft.Xaml.Behaviors.Wpf" version="1.0.1" /><PackageReference Include="Microsoft.Windows.Compatibility" Version="2.0.1" /><PackageReference Include="FontAwesome.WPF" Version="*" /><PackageReference Include="HtmlAgilityPack" version="1.11.3" /><PackageReference Include="Westwind.Utilities" version="3.0.25" /><!-- these are the only new, project specific ones --><PackageReference Include="xmlrpcnet" version="3.0.0.266" /><PackageReference Include="YamlDotNet" version="6.0.0" /></ItemGroup><ItemGroup><ProjectReference Include="..\..\MarkdownMonster\MarkdownMonster.csproj" /></ItemGroup><ItemGroup><Resource Include="icon.png" /><Resource Include="icon_22.png" /><Resource Include="MarkdownMonster_Icon_128.png" /></ItemGroup>

Notice I also add a project reference back to the main Markdown Monster executable project which holds Addin APIs as well as the entire object model that can be automated from within the addin.

Getting this project to compile was considerably easier - it just worked right away.

Addin Location Madness

Markdown Monster Addins need to live in a very specific location so in order to actually get my addin to work I need to copy the output to a specific output folder. For internal addins like this one that folder lives in the Markdown Monster output folder in an \Addins folder. In classic .NET projects this used to be easy, but it's a bit tricky in .NET SDK projects because project output actually only builds the actual assembly into the output folder.

To make this work I need to add two directives <CopyLocalLockFileAssemblies> and <OutDir>:

<PropertyGroup><TargetFramework>netcoreapp3.0</TargetFramework><AssemblyName>WeblogAddin</AssemblyName><UseWPF>true</UseWPF><CopyLocalLockFileAssemblies>true</CopyLocalLockFileAssemblies></PropertyGroup><PropertyGroup Condition=" '$(Configuration)|$(Platform)' == 'Debug|AnyCPU' "><OutDir>..\..\MarkdownMonster\bin\Debug\netcoreapp3.0\Addins\WebLog</OutDir></PropertyGroup><PropertyGroup Condition=" '$(Configuration)|$(Platform)' == 'Release|AnyCPU' "><OutDir>..\..\MarkdownMonster\bin\Release\netcoreapp3.0\Addins\WebLog</OutDir></PropertyGroup>

<CopyLocalLockFileAssemblies> is used to specify that the output folder should contain not just the target assembly but all of its dependencies. This turns out to be a bit messy, duplicating the entire dependency tree, but this was the only way I could get this to work without using an explicit post build task (which I'd rather avoid). Instead I plan on cleaning up the add-in as part of the final build script that builds final distribution package.

<OutDir> allows you to specify an output folder where you want the final assembly output to go. I know that sounds silly, but standard output creates the whole netcoreapp3.0 hierarchy which wouldn't work in this case. <OutDir> forces the output into the exact folder you specify.

When I build now I end up with an output folder that looks like this:

On the left is the 3.0 output, and on the right is the full framework output of the old project. Yeah - the right is a lot easier. Just to demonstrate without <CopyLocalLockFileAssemblies> I get just this:

That looks more reasonable, but this is actually useless for output as it doesn't include the required dependencies that are unique to this project. It's lacking the crucial dependent assemblies which are yamldotnet.dll and the CookComputing.XmlRpcV2.dll. Oddly this includes the MarkdownMonster assembly reference including the content files which seems crazy. So that wouldn't work. Using <CopyLocalLockFileAssemblies> at least gives me the dependencies I need so that the addin can load and get my final build files and I can clean up the duplicated packages during final packaging into a distributable.

The other alternative to make the output cleaner here would be to do a dotnet publish of the addin project and then copy just the required assemblies from the publish output (same as the previous screenshot) and copy just the files I need as an extra build step but that requires adding build automation even during development that I'd rather avoid if possible.

With all this done the addin now shows up on the tool bar and runs:

Cool. It works, but again a lot of pain trying to get this to work right.

Done Updating for now

For now though - I think I'm done upgrading because it's clear that the next step will be a lot of cleanup work - specifically related to the dynamic COM Interop changes. Not sure I'm ready to get into that with .NET Core 3.0 being still a ways away from release.

Is all of this Worth It?

I went through all of this to see what's involved in the process of conversion. The reality is that MM application has a lot of special things going on that are tripping me up. I think most 'normal' business applications that are pure .NET code, are likely to have a much easier time in a conversion without running into some of these edge cases like COM Interop and Weird Addin Loading scenarios.

he COM Intersop stuff that drives the editor in MM is a big hurdle to working because - even though all editor operations are abstracted in their own editor class - there's a lot of it and almost all parts of MM interact with that class. In order for me to get MM running I have to deal with the COM interop stuff.

At this point I don't know what the status is exactly of the dynamic COM Interop. In the past Microsoft has mentioned that this will be supported but nothing seems to have changed when I tried this last year with 2.2. I posted a Github issue to get some more information - we'll see what comes back from that.

Not Quick and Easy, but Easier than I tought

I do have to say, even though there's a bit of pain in this process it's not as bad as I thought it would be. I'm especially surprised that I'm able to run full framework assemblies that haven't been moved to .NET Standard or .NET Core which I thought was going to be deal breaker in the short term. But it looks like that is not going to be an issue as you can simply reference those packages. The Windows Compatibility Codepack seems to do a great job of providing the needed compatibility.

I forgot to mention that a few weeks ago I ran the .NET Compatibility Analyzer against MM and found that it was 99% compliant. There were some very small things for obsolete method calls that had to be cleaned up but not much else. All of the warnings were actually in code that's not called by this application. So all in all Microsoft has done an excellent job in making sure that your code that is Windows specific will run in .NET Core which is very nice indeed!

Distribution?

The larger concern I have is what .NET Core 3.0 means to distribution of an application. .NET Core 3.0 won't be a built-in Windows component. One of the nice things about full .NET Framework is that it's just there, pre-installed on most machines. That has its pros and cons as we all know, but from a distribution point of view it is very nice as it's guaranteed that any Windows 7 or newer machine these days at least has .NET 4.61 on it.

With .NET Core you have two choices that's not the case so you have two choices for deploying standalone desktop applications:

  • Use a Shared Runtime that may not be installed
  • Ship your runtime with your app and add a huge foot print

So, neither of these deployment scenarios is very appealing.

To give you an idea of the footprint of a dedicated x64 runtime install:

Currently full framework Markdown Monster is a 15 meg download and most of that size actually comes from Chrome related components (PDF generation). That's a 10th of the size of the dedicated runtime install at minimum. Yikes. From a rapid deploy and update cycle perspective the second option would not be an option for me.

I suspect most people will opt for the shared runtime deployment, but depending on your target audience it'll still be very likely your clients will have to download and install a runtime so your footprint won't be small either. The benefit with shared is that hopefully that will be a one time download for most and only an occasional update.

So most likely shared runtime it is. But for those of you that follow my Twitter Feed know how I've been railing against the proliferation of a million minor .NET Core Runtime versions being installed on your system and clogging up your hard drive. Those runtimes have to be maintained and cleaned up but who knows what app needs what?

Some guidance is needed on this point I think because this is likely to become a real nightmare. The good news is that .NET Core runtimes are backwards compatible so newer versions minor updates work if an exact match can be found. Of course then we are essentially back to potentially breaking runtimes with code that worked on one version but not on a newer one, which was one of the main selling points of .NET Core in the first place. Oh well... can't win 'em all.

What do you get?

Right now I'm not so sure that .NET Core 3.0 makes a ton of sense. At this point performance seems drastically worse compared to running the full framework version. Startup time of Markdown Monster is 5-10 seconds with this version (in Release mode) compared to a little over 2 seconds with the full framework version.

I can't compare much beyond that because a lot of features in MM currently don't work due to the Interop features. Regular WPF stuff - animations window opening etc. all feels about the same but UI stuff is usually subjective anyway so it's hard to say.

I think ultimately the benefits of .NET Core over the full framework will be runtime fixes and framework improvements, but right now there's very little of that. One improvement I was able to integrate immediately is the new Folder dialog for the WinForms FolderBrowserDialog which allowed me to remove the (largish) Windows Common Controls library I'd been using for that. It's actually crazy that that was never added to full framework.

Currently there also doesn't appear to be any real difference in the way you build a WinForms or WPF application. Sure it runs on .NET code but the apps still start the same as before and the code you write is not drastically different - unlike ASP.NET which actually had a lot of huge benefits by re-writing the core framework.

So I'm on the fence. For now I think we can treat .NET Core 3.0 as a novelty. But farther down the line we hopefully see some improvements and fixes of old problems and bottlenecks in these old stodgey desktop frameworks.

It'll be interesting to see how these changes will affect Windows desktop development which has been stagnant for so long. We shall see...

Resources

this post created and published with Markdown Monster
© Rick Strahl, West Wind Technologies, 2005-2019
Posted in .NET Core  WPF  Windows  

.NET Core 3.0 SDK Projects: Controlling Output Folders and Content

$
0
0

In my last post I talked about porting my Markdown Monster WPF application to .NET Core 3.0 and one of the problems I ran into was how to deal with properly handling compilation of Addins. In Markdown Monster Addins compile into a non-standard folder in the main EXE's output folder, so when building the project I want my Addin to be pushed right into the proper folder hierarchy inside of the parent project so that I can run and debug my addins along with the rest of the application.

This used to be pretty easy in classic .NET projects:

  • Add NuGet or Project References
  • Mark each assembly reference's Copy Local settings
  • Include new dependencies with Copy Local True
  • Exclude existing dependencies with Copy Local False

In the new .NET SDK projects this is more complicated as there's no simple way to exclude dependencies quite so easily. Either everything but the primary assembly is excluded which is the default, or you can set a switch to copy dependencies which copies every possible dependency into the output folder.

Let's take a look.

Where does output go?

By default .NET SDK projects push compiled output into:

<projectRoot>bin\Release\netcore3.0

The reason for this more complex path that includes a target framework is that SDK projects can potentially have multiple targets defined in the <TargetFramework> element so you can do:

<TargetFrameworks>net462;netcore3.0</TargetFrameworks>

The separate folder structure allow for both targets to get their own respective output folders when you build the project.

For my addins this is not what I want - I want to send output to a very specific folder in the 'parent' Exe project in the Addins\AddinName folder:

Not only that but I also need to write out only the actual assembly for the output plus any new dependencies that aren't already referenced in the main project - rather than all or no dependencies which are the 'default' options.

Sending output to a Custom Folder with Dependencies

So to send output to a non-default folder you can use <OutDir> and to force dependencies to be included in the output rather than the default behavior that just includes the project's assembly you can use <CopyLocalLockFileAssemblies>.

Here's what that looks like in my project:

<PropertyGroup><CopyLocalLockFileAssemblies>true</CopyLocalLockFileAssemblies><OutDir>$(SolutionDir)MarkdownMonster\bin\$(Configuration)\$(TargetFramework)\Addins\Weblog</OutDir></PropertyGroup>

The <OutDir> element points at the Exe's project output folder and copies files directly into the specified folder without a target folder.

If you want to generate output to a new folder and get a target framework root folder there's the <OutputPath> directive.

<CopyLocalLockFileAssemblies> is a very blunt tool. It copies everything related to a dependency so it can produce a boatload of assemblies and content files that you likely don't want, so you likely will need to filter the resulting output.

The <CopyLocalLockFileAssemblies> ensures that all dependencies are copied, not just the one assembly generated for this project. So we need to filter the files somehow. More on that below.

With <OutDir> the output goes into the main project output folder depending on the current target framework (potentially multiples) and the Configuration which is Debug or Release most likely.

Ok - output's now going where it needs to go.

Controlling Output Assemblies

The next problem is that when I now build the project the project output includes all dependencies. That includes all NuGet package assemblies, all dependent assemblies, and also the dependencies for my Main EXE's reference:

Holy crap that's a lot of assemblies and all buy 3 of them are in this case duplicated.

So the next step is to NuGet packages and Assembly References from bringing in all of their dependencies.

For NuGet Packages the element to use is <IncludeAssets> and set the value compile:

<ItemGroup><!-- Assemblies already referenced by mainline --><PackageReference Include="MahApps.Metro" version="1.6.5"><IncludeAssets>compile</IncludeAssets></PackageReference><PackageReference Include="Dragablz" version="0.0.3.203"><IncludeAssets>compile</IncludeAssets></PackageReference>    
    ...<!-- my dependencies that aren't used by main project 
         so I'm not using `<IncludeAssets>`                 --><PackageReference Include="xmlrpcnet" version="3.0.0.266" /><PackageReference Include="YamlDotNet" version="6.0.0" /></ItemGroup>

The point of this to 'exclude' any of the dependencies that are already loaded by the main executable and so don't need to be redistributed again. The <IncludeAssets>compile</IncludeAssets>. The only packages that I actually want to be included in the output folder are those new assemblies that are not already loaded by the main Exe.

There's more info on the various <IncludeAssets> and related elements values that you can provide in the NuGet documentation.

Project or Assembly References also Copy Files

I'm still not done - I also have an assembly reference that points back at the main EXE project. My first try used a project reference, but this would pull in the entire project including all related assets. Ouch.

So this didn't work:

<ItemGroup><ProjectReference Include="$(SolutionDir)MarkdownMonster\MarkdownMonster.csproj" ><IncludeAssets>compile</IncludeAssets></ProjectReference></ItemGroup>  

I couldn't find a setting for <IncludeAssets> or <ExcludeAssets> that works for the Project Reference. No matter what I did the depedencies were copied in.

So - instead of a project reference I can also use an Assembly Reference instead pointing at the compiled EXE. Then I can mark it as Private which won't copy all of the project's content into the output folder:

<ItemGroup><Reference Include="..\..\MarkdownMonster\bin\$(Configuration)\$(TargetFramework)\MarkdownMonster.exe"><Private>false</Private></Reference></ItemGroup>

Success. The end result of both the package references and project reference now is:

Just to summarize here's the complete project file for the WeblogAddin project:

<Project Sdk="Microsoft.NET.Sdk.WindowsDesktop"><PropertyGroup><TargetFramework>netcoreapp3.0</TargetFramework><AssemblyName>WeblogAddin</AssemblyName><UseWPF>true</UseWPF><GenerateAssemblyInfo>false</GenerateAssemblyInfo><CopyLocalLockFileAssemblies>true</CopyLocalLockFileAssemblies><OutDir>$(SolutionDir)MarkdownMonster\bin\$(Configuration)\$(TargetFramework)\Addins\Weblog</OutDir><Authors>Rick Strahl, West Wind Technologies</Authors></PropertyGroup><ItemGroup><!-- Assemblies already referenced by mainline --><PackageReference Include="MahApps.Metro" version="1.6.5"><IncludeAssets>compile</IncludeAssets></PackageReference><PackageReference Include="Dragablz" version="0.0.3.203"><IncludeAssets>compile</IncludeAssets></PackageReference><PackageReference Include="Microsoft.Xaml.Behaviors.Wpf" version="1.0.1"><IncludeAssets>compile</IncludeAssets></PackageReference><PackageReference Include="FontAwesome.WPF" Version="4.7.0.9"><IncludeAssets>compile</IncludeAssets></PackageReference><PackageReference Include="HtmlAgilityPack" version="1.11.3"><IncludeAssets>compile</IncludeAssets></PackageReference><PackageReference Include="Newtonsoft.Json" version="12.0.1"><IncludeAssets>compile</IncludeAssets></PackageReference><PackageReference Include="Westwind.Utilities" version="3.0.26"><IncludeAssets>compile</IncludeAssets></PackageReference><!-- my dependencies that aren't used by main project 
         so I'm not using `<IncludeAssets>`                 --><PackageReference Include="xmlrpcnet" version="3.0.0.266" /><PackageReference Include="YamlDotNet" version="6.0.0" /></ItemGroup><ItemGroup><!--<ProjectReference Include="$(SolutionDir)MarkdownMonster\MarkdownMonster.csproj" ><IncludeAssets>compile</IncludeAssets></ProjectReference>--><Reference Include="$(SolutionDir)MarkdownMonster\bin\$(Configuration)\$(TargetFramework)\MarkdownMonster.exe"><Private>false</Private></Reference></ItemGroup>  <ItemGroup><Resource Include="icon.png" /><Resource Include="icon_22.png" /><Resource Include="MarkdownMonster_Icon_128.png" /></ItemGroup>  </Project>

Harder than it should be

What I'm describing here is a bit of an edge case because of the way the addins are wired up in my application, but it sure feels like these are a lot of hoops to jump through for behavior that used to work in classic projects by simply specifying an alternate output folder. I also find it very odd that all dependencies are pulled in from an assembly reference (my main Markdown Monster project DLL which references The World).

To be clear having all assemblies in the output folder doesn't break the application so the default settings work just fine. But by default you do end up with a bunch of duplicated assemblies that likely don't want and have to explicitly exclude using the steps provided in this post.

In the end it all works and that that's the important thing, but it's a bit convoluted to make this work and wasn't easy to discover. A few pointers from Twitter is what got me over the hump.

And that's what this post is for - so I (and perhaps you) can come back to this and remember how the heck to get the right incantation to get just the right files copied into the output folder.

this post created and published with Markdown Monster
© Rick Strahl, West Wind Technologies, 2005-2019
Posted in .NET Core  

Accessing RouteData in an ASP.NET Core Controller Constructor

$
0
0

Routing in ASP.NET Core 2.2 and below is closely tied to the ASP.NET Core MVC implementation. This means that if you're trying to access RouteData outside of the context of a Controller, the RouteData on HttpContext.GetRouteData() is going to be - null. That's because until the application hits MVC processing the RouteData is not configured.

Routing == MVC

If you recall when you configure ASP.NET Core applications the routing is actually configured as part of the MVC configuration. You either use:

app.UseMvcWithDefaultRoute();

or

app.UseMvc(routes =>
{
    routes.MapRoute("default", "{controller=Home}/{action=Index}/{id?}");
});

and as a result route data is not actually available in Middleware that fires before the MVC processing. This is different than classic ASP.NET where route data was part of the the main ASP.NET pipeline and populated before MVC actually was fired. You could also easily inject additional routes into the routing table, which you can't easily do in Core (at least not until 3.0 - more on that later).

When does this matter?

In most situations it's totally fine to only deal with RouteData inside of your MVC controller logic. After all it is a specific concern to the Web application layer and it's easy to pull out route data as part of a route in the parameter list.

You can access route data easily in a few ways:

public IList<Audit> GetData([FromRoute] string tenant, string id)

or

// inside controller code
string tenant = RouteData.Values["tenant"].ToString();

But recently I had an application that needed access to the Route Data in Dependency Injection in the constructor. Specifically I have a multi-tenant application and based on the tenant ID I need to use a different connection string to the database in order to retrieve the customer specific data. Since the DbContext context is also injected the tenant Id needs to be available as part of the Constructor injection in the controller.

Cue the false starts…

So my first approach was to create an ITenantProvider with a GetTenant() method with an HTTP specific implementation that uses IHttpContextAccessor. The accessor has an instance of the current HttpContext object, with a GetRouteData() method which sounds promising. Alas, it turns out that doesn't work because the HttpContext does not have the route data set yet. The route data on HttpContext isn't available until the MVC Controller makes it available to the context. Ouch! This is obvious now, but at the time that seemed unexpected.

Not trusting the injection code I also tried using a middleware hook to see if I could pick out the route data there and then save it in Context.Items.

This also does not work in 2.2:

app.Use(async (context, next) =>
{
    var routeData = context.GetRouteData();
    var tenant = routeData?.Values["tenant"]?.ToString();
    if(!string.IsNullOrEmpty(tenant))
        context.Items["tenant"] = tenant;

    await next();
});

In both of the approaches above the problem is simply that the raw context doesn't have access to the route data until the controller starts running and initializes it.

Using IActionContextAccessor

It turns out I had the right idea with my IHttpContextAccessor injection (I'm still working on thinking in terms of DI) except that I should have injected a different object that gives me access to the actual controller context: IActionContextAccessor.

Jamie Ide came to my rescue on Twitter:

And that actually works.

Setting up Injection with IActionContextAccessor

I've been a late starter with Dependency Injection and I still don't think naturally about it, so these nesting provider type interfaces seem incredible cumbersome to me. But I got it to work by created an ITenantProvider to inject into the context:

public interface ITenantProvider 
{
    string GetTenant();
    string GetTenantConnectionString(string tenantName = null);
}

and the MVC specific implementation so I can get the context out of the controller context:

public class HttpTenantProvider : ITenantProvider
{
    private readonly IHttpctionContextAccessor _actionContext;

    private static Dictionary<string, string> TenantConnectionStrings = new Dictionary<string, string>();


    public HttpTenantProvider(IActionContextAccessor actionContext)
    {
        _actionContext = actionContext;
    }

    public string GetTenant()
    {
        var routes = _actionContext.ActionContext.RouteData;
        var val = routes.Values["tenant"]?.ToString() as string;
        return val;
    }


    public string GetTenantConnectionString(string tenantName = null)
    {
       ...
       
        return connectionString;
    }
}

So now that that's set I can inject the ITenantProvider into the context:

public class AuditContext : DbContext
{
    public  readonly ITenantProvider TenantProvider;
    public AuditContext(DbContextOptions options,
                        ITenantProvider tenantProvider) : base(options)
    {
        TenantProvider = tenantProvider;
    }
    protected override void OnConfiguring(DbContextOptionsBuilder optionsBuilder)
    {
        // *** Access the Tenant here! ***
        string conn = TenantProvider.GetTenantConnectionString();
        base.OnConfiguring(optionsBuilder);
        optionsBuilder.UseSqlServer(conn);
    }
    ...
}

The API controller now can simply inject the context:

[Route("[Controller]/{tenant}")]
public class WeatherController : Controller
{
    private readonly AuditContext _context;

    // *** Injecting the DbContext here *** 
    public WeatherController(AuditContext context)
    {
        _context = context;
    }

and at this point the context is ready to go inside of the controller:

public IList<Audit> Index()
{
    var data = _context.Audits.Where( a=> a.Time > DateTime.UtcNow.AddDays(-2)).ToList();
    return data;
}

Now this may seem odd that this works where other operations didn't but the reason it does is that the actual call to GetTenant() doesn't occur until there's an ActionContext in place - usually when I actually access the DbContext to retrieve data which typically happens inside of an Action method. Trying to access the DbContext in the constructor however would still fail because the route data wouldn't be set yet!

Finally I need to make sure that everything is provided by the DI pipeline in Startup.ConfigureServices():

services.AddDbContext<AuditContext>();
services.AddTransient<ITenantProvider,HttpTenantProvider>();
services.AddTransient<IActionContextAccessor, ActionContextAccessor>();

Note that I'm not configuring the context in ConfigureServices() which is common since that's now happening internally inside of the context that gets the tenant out.

Ugh… Frankly, that's a lot of crap and mental gynmnastics you have to go through for this to come together!

.NET Core 3.0

So .NET Core 3.0 is supposed to fix these routing issues in that it provides a global routing architecture that's not tied to MVC.

Sometimes when these things get announced I feel like, “yeah, so what?” but the above is actually a practical example of how that solves a very specific problem. In .NET Core 3.0 you will be able to access the Context.GetRouteData() method to retrieve the route data directly which lets you capture route data in middleware and/or the constructor of your MVC Controllers.

For the Tenant context in the example, it would be much nicer to create some simple middleware that pulls out the tenant ID if available on every request and simply stores it away for later uses in the Items collection perhaps.

Recall my earlier example that didn't work, but should work in .NET Core 3.0:

app.Use(async (context, next) =>
{
    var routeData = context.GetRouteData();
    var tenant = routeData?.Values["tenant"]?.ToString();
    if(!string.IsNullOrEmpty(tenant))
        context.Items["tenant"] = tenant;

    await next();
});

With this middleware injected into the pipeline in front of MVC anywhere in the application I can retrieve the tenant simply with context.Items["tenannt"] as string which is much easier to manage than the timing critical code above.

So the global routing feature in .NET Core 3.0 looks like it solves a number of problems.

Incidentally while searching on routing solutions, there are a lot of questions about this issue of accessing RouteData outside of MVC on StackOverflow and in various repositories so this is definitely something that comes up frequently. I think this is going to be a welcome change.

Summary

Tracking this bit of code with the right incantation down took a while. The solution here is a bit torturous, but it does work. As usual, this may not be news to anybody and I'm writing this down for my own memory, so I can remember next time I run into this.

It's already been twice I've been down this path, so I hope there won't be a third time by just reviewing this post.

this post created and published with Markdown Monster
© Rick Strahl, West Wind Technologies, 2005-2019
Posted in ASP.NET Core  

Live Reloading Server And Client Side ASP.NET Core Apps

$
0
0

Client side in-browser hot reloading is one of the most compelling features of client side development. If you're using any client side framework like Angular, Vue or React they all come with integrated CLIs that provide instant live reloading of content as soon as you make a change.

If you've never used live reload functionality before it's quite a game changer for productivity, while working on iterative code - especially HTML and CSS Layout tweaks that often go through the “make a tiny change, see what it looks like and then tweak it some more” phase.

Live Reload is like WYSIWYG on steroids

That's all nice and neat for client side code where live reload is common, but on the server side there isn't really an easy comprehensive solution that provides similar functionality. Microsoft sort of added some tooling into Visual Studio called Browser Link a long time ago with Visual Studio tooling, but this originally promising project died a quiet death and never really took off. It's still there, neglected and there are options on the debug toolbar, but other than for CSS Browser Link it never really worked reliably for me. That's too bad because it looked really promising. It also only works in Visual Studio so if you're not on Windows or use another tool like Rider or VS Code it's not useful.

Server Side Live Reloading

There are however other, better solutions and in this post I'll talk about using a couple of tools in combination to provide pretty good Live Reload functionality for:

  • Static HTML, CSS, JavaScript Files (client side)
  • Razor Pages (server side)
  • Compiled Code Changes in your ASP.NET Core App (server side)

To do this I'll use:

You also need to run 2 terminal windows for this particular solution to work.

Here's what the end result looks like:

AspNet Live Reload with BrowserSync nad Dotnet Watch

The process I describe deals with two distinct scenarios: Server side code change detection and restarting, that require recompilation and re-running of your server app, followed by a refresh of client pages. Client side refresh for static content like HTML, CSS, JavaScript/TypeScript as well as for Razor pages/views which update client side using Browser Sync.

Let's take a look.

ASP.NET Core Application Execution

Server side ASP.NET Core applications are command line Console applications that are compiled and executed via dotnet.exe. It's compiled code, so if you make a code change the server has to be restarted because your project is one or more compiled assemblies that are running inside the launched dotnet.exe process. There are other ways .NET Core can be ‘hosted’, but for this article I only deal with dotnet.exe.

The execution process for ASP.NET Core is very different than the way it worked in classic ASP.NET where any time you updated your DLL the ASP.NET Runtime and the application that knew about .NET Application would automatically ‘hot swap’ the code and then immediately run the new application. It also required restarting, but the logistics for that process were part of the ASP.NET runtime itself that would detect changes to binaries and configuration and would automatically shut down the application's AppDomain and start a new one with the updated code - it was all built-in. Because this happened in-process it also tended to be relatively quick. With classic ASP.NET you recompile your code and on the next request the new code is running.

.NET Core is Different

Not so with .NET Core applications which run as a standalone application launched via dotnet.exe. If you make a change to your source and recompile your project, you're not actually updating the running application but shutting down the currently running application and starting a new one. .NET Core applications also don't run ‘in place’ like ASP.NET did, but they need to be published to an output folder and then run from there after the original EXE was shut down.

Long story short, restarting a .NET Core application requires a few external steps. For deployed applications this is usually just what you want - a stable process that can be automated and configured consistently without any black box logic that handles administration tasks.

However, for development this makes things more complicated when you make a change to your code and you want to see that change.

dotnet watch run

To make this process easier Microsoft provided some tooling - specifically a tool called dotnet watch which is now included as part of the .NET SDK. You use dotnet watch to watch for file changes and then execute a specific dotnet.exe command - typically run:

dotnet watch run

You run this command in your Web project folder. It works the same as plain dotnet run, except it also watches files and restarts when a change is detected. watch is just a pass-through command, so all the dotnet run (or whatever other command you use) command line parameters work with dotnet watch run.

dotnet watch run monitors source files and if a file changes, shuts down the application that it started, rebuilds and publishes the project, and then restarts the application.

It's a simple, single focus tool, but it's one of the most useful dotnet tools that ship in the box. Personally, I use almost explicitly for running my .NET application during development with the exception when I'm explicitly debugging code.

IIS Express and Auto Restart

IIS Express can also manage automatically updating a compiled application without a full restart, but only in non-debug mode. You can start IIS Express from Visual Studio with Ctrl-F5 and make a change in code and keep running. Unlike dotnet watch run you have to manually re-compile your project though.

In a way dotnet watch run is nicer than the old ASP.NET behavior because it takes out the extra compilation step. You go straight from file change to the updated application running.

The process for using dotnet watch run looks like this:

  • Open a command Window in your Web project's folder
  • Type dotnet watch run
  • Open your browser and navigate to an API or Page
  • Make a change to source code
  • Save the file
  • Go back to the browser and refresh manually
  • You should see the change reflected

Notice that these steps don't include any explicit compilation step - dotnet watch run handles that process for you transparently.

Figure 1 - dotnet watch run runs, watches and restarts your app when a file change is made

Browser Sync

dotnet watch handles the server side reloading of code and Browser Sync provides the second piece in this setup that refreshes the browser when either server side or ‘client side’ code and markup is changed.

Browser Sync is an easy to use web server/proxy that provides a very easy and totally generic way to provide simple browser page reloading. It's a Node component and it installs as a global NPM tool:

npm install -g browser-sync

After that you can just use browser-sync from your terminal as it's available on your Path.

Proxying ASP.NET Core for Code Injection

Browser-sync can run as a Web server to serve static files directly out of a folder, or - more useful for server side scenarios - it can act as a proxy for an already running Web site - like say… an ASP.NET Core Web site.

The proxy intercepts each request via a different site port (localhost:3000 by default), injects some web socket script code into each HTML page it renders, and then routes the request to the original site URL (localhost:5000 typically for ASP.NET Core).

Once running any changes made to files in the folder cause the browser to refresh the currently active page and remember its scroll position.

You can run Browser Sync from the command line like this:

browser-sync start `
            --proxy http://localhost:5000/ `
            --files '**/*.cshtml, **/*.css, **/*.js, **/*.htm*'             

which detects changes for all of the different files you want to monitor. You can add add folders, files or wild cards as I've done here. The above only handles client side files, plus Razor pages - I'll come back how we can also detect and refresh on server side application changes.

I put the above into a browsersync.ps1 script file in my project folder so it's easier to launch.

Once you do this you can now navigate to your proxy URL at:

http://localhost:3000

Note that the URL is now pointing to port 3000 instead of the ASP.NET Core port of 5000. 5000 still works, but the live reload functionality is only available on port 3000.

Nice.

Use Other Live Reload Servers?

I should point out that Browser Sync isn't the only live reload solution. There are quite a few others and most client side bundling/packaging solutions like WebPack also include live reload servers. I prefer Browser-Sync for the simple reason that it's easy to use with a single lightweight focus and simple command line interface that's easy to automate.

Not quite There Yet - Server Side Code Change Refreshing

So with dotnet watch run and Browser Sync running as I've shown above we can now live reload client pages as well as Razor pages/views since those are dynamically compiled at runtime in dev mode. We can also automatically reload our server when a code change is made.

But if a code change is made in server side code in say a controller or business object, that code is not updating yet.

While it's possible to add server side file extensions to browser sync like **/*.cs or even ../**/*.cs the reality is that while the change might be detected a browser refresh at the time of the change isn't going to work.

That's because restarting a .NET Core application is relatively slow. Making changes to a CSS, HTML or JavaScript file, and even a Razor page or view is very quick and nearly instant. But making a code change, recompiling, then restarting the application can take a bit and it will vary with the size of the application. For one of my medium sized applications the process takes about 10 seconds locally.

The problem is that Browser Sync doesn't wait for 10 seconds to refresh but rather it starts refreshing immediately which then results in a hanging operation because the server is in the middle of restarting. Browser Sync does have a --reload-delay option you can use to delay reloading but that's not really practical because you do want static client files to refresh as quickly as possible.

Writing out a File Browser Sync can check for

To solve this problem is actually pretty simple. We know when our project is restarting because we are executing start up code, and in that startup sequence we can simply write out a file to disk in the project folder (or anywhere really) with changed content that can then be detected by Browser Sync.

I put the following at the bottom of my Startup.Configure() method:

#if DEBUG
    try
    {
        File.WriteAllText("browsersync-update.txt", DateTime.Now.ToString());
    }
    catch { 
        // ignore
    }
#endif

I can then change the Browser Sync command line to include the browsersync-update.txt file:

browser-sync start `
    --proxy http://localhost:5000/ `
    --files '**/*.cshtml, **/*.css, **/*.js, */*.ts, browsersync-update.txt'

And voila - now when you make a server change anywhere in your application, Browser Sync is notified and can reload your the active page.

Note that server side restarts will be slow - it can take some time so it's not anywhere as fast refreshing as client side files. My medium'ish app takes nearly 10 seconds to refresh, so maybe live reload in that case is more like delayed reload. Even so this is still much quicker than manually recompiling, restarting, and then refreshing the browser and the browser does refresh as soon as the server is done restarting, which is pretty damn nice.

To finish this off, here's a video capture of what this looks like:

AspNet Live Reload with BrowserSync nad Dotnet Watch

Note that in order to use this solution you need to run 2 command window Terminals for dotnet watch and Browser Sync. However, you can also cut out dotnet watch if you want to just run from your IDE. it also works in Debug mode, but if you do you will have to manually restart - but the startup output file will still be detected by browser sync and refresh the active browser page when you restart.

Summary

The concepts I'm describing here aren't new. I've been using this solution for some time now yet every time I show it to someone they go “how does that work”? Well here you go - this post is for you 😃.

But for me it's been quite a while since I've built an application that uses MVC (even this app is a MVC/Vue Hybrid). In recent years, I've been mostly building client side applications and APIs and have gotten so used to live reload, so much so that I missed it immediately when I started working on the server side MVC code and I went back to my old solution from some time back.

I also like the fact that Browser Sync is totally generic and easy to set up without any custom configuration or downloading half a disk drive's worth of NPM dependencies. I can also use Browser Sync with other tools and pretty much just plug it into any Web project however small, which is very cool.

If I had the time I would love to build something more integrated for this like directly build ASP.NET Core middleware that would essentially combine what browser sync with dotnet watch does: Monitor for file changes and then automatically inject Web Socket code into each request to send the refresh message into the browser. Heck it might even exist already…

For now this solution works well enough - even with the two command windows that need to keep running it's not a big deal. Using a multi-tabbed terminal like ConEmu or inside for Rider or Visual Studio Code is a big help.

Lock and load…

Resources

this post created and published with Markdown Monster
© Rick Strahl, West Wind Technologies, 2005-2019
Posted in ASP.NET Core  HTML  

Building a Live Reload Middleware Component for ASP.NET Core

$
0
0

In my last post I discussed how to integrate Live Reload in ASP.NET Core using a third party NodeJs application loaded from NPM called BrowserSync. While that works just fine, having to run yet another command line utility on top of dotnet watch runjust to provide Live Reload functionality is a bit of a pain.

Also in the last post I mentioned that it would be nice to build some middleware to provide the live client reloading functionality… well, I got that itch to sit down and take a stab at it and the result is this ASP.NET Core Live Reload Middleware Component.

In this post I'll describe how to build this middleware component that handles the Live Reload functionality natively in ASP.NET Core simply by hooking a couple of middleware directives into your Startup configuration. The end result is much quicker and more reliable refreshes of content than with BrowserSync. You still need to run dotnet watch run for server side code restarts for hard code changes, but for all client side static and Razor file refreshing that is not required.

Here's what the new functionality looks like in action when editing Razor Views/Pages, static CSS and HTML, and server side source code in a controller.

ASP.NET Core Live Reload Middleware in Action

Figure 2 - Live Reload in action on static content, Razor pages and server code.

All that's running here (in my Rider IDE) is dotnet watch run to refresh the server when source code changes are made. All changes auto-refresh in the browser without user intervention.

Using the Live Reload Middleware

You can install this middleware from NuGet:

PS> Install-Package WestWind.AspnetCore.LiveReload

or

dotnet add package  WestWind.AspnetCore.LiveReload 

It works with:

  • Client side static files (HTML, CSS, JavaScript etc.)
  • ASP.NET Core Views/Pages (.cshtml)
  • Server Side compiled code updates (combined w/ dotnet watch run)

The Middleware is self-contained and has no external dependencies - there's nothing else to install or run. To server code changes (.cs files) you should run dotnet watch run to automatically reload the server. The middleware can then automatically refresh the browser. The extensions monitored for are configurable.

Configuration

The full configuration and run process looks like this:

  • Add services.AddLiveReload() in Startup.ConfigureServices()
  • Add app.UseLiveReload() in Startup.Configure()
  • Run dotnet watch run to run your application

Add the namespace in Startup.cs:

using Westwind.AspNetCore.LiveReload;

Startup.ConfigureServices()

Start with the following in Startup.ConfigureServices():

services.AddLiveReload(config =>
{
    // optional - use config instead
    //config.LiveReloadEnabled = true;
    //config.FolderToMonitor = Path.GetFullname(Path.Combine(Env.ContentRootPath,"..")) ;
});

// for ASP.NET Core 3.0 add Runtime Razor Compilation
// services.AddRazorPages().AddRazorRuntimeCompilation();
// services.AddMvc().AddRazorRuntimeCompilation();

The config parameter is optional and it's actually recommended you set any values via configuration (more info below).

Startup.Configure()

In Startup.Configure() add:

// Before any other output generating middleware handlers
app.UseLiveReload();

app.UseStaticFiles();
app.UseMvcWithDefaultRoute();

anywhere before the MVC route. I recommend you add this early in the middleware pipeline before any other output generating middleware runs as it needs to intercept any HTML content and inject the Live Reload script into it.

And you can use these configuration settings:

{"LiveReload": {"LiveReloadEnabled": true,"ClientFileExtensions": ".cshtml,.css,.js,.htm,.html,.ts,.razor,.custom","ServerRefreshTimeout": 3000,"WebSocketUrl": "/__livereload","WebSocketHost": "ws://localhost:5000""FolderToMonitor": "~/"
  }
}

All of these settings are optional.

  • LiveReloadEnabled
    If this flag is false live reload has no impact as it simply passes through requests.
    The default is:true.

    I recommend you put: "LiveReloadEnabled": false into appsettings.json and "LiveReloadEnabled": true into appsettings.Development.json so this feature isn't accidentally enabled in Production.

  • ClientFileExtensions
    File extensions that the file watcher watches for in the Web project. These are files that can refresh without a server recompile, so don't include source code files here. Source code changes are handled via restarts with dotnet watch run.

  • ServerRefreshTimeout
    Set this value to get a close approximation how long it takes your server to restart when dotnet watch run reloads your application. This minimizes how frequently the client page monitors for the Web socket to become available again after disconnecting.

  • WebSocketUrl
    The site relative URL to the Web socket handler.

  • WebSocketHost
    An explicit WebSocket host URL. Useful if you are running on HTTP2 which doesn't support WebSockets (yet) and you can point at another exposed host URL in your server that serves HTTP1.1. Don't set this unless you have to - the default uses the current host of the request.

  • FolderToMonitor
    This is the folder that's monitored. By default it's ~/ which is the Web Project's content root (not the Web root). Other common options are: ~/wwwroot for Web only, ~/../ for the entire solution, or ~/../OtherProject/ for another project (which works well for client side Razor).

How does Live Reload work?

The Live Reload functionality is pretty straight forward, but there are a few moving parts involved.

File Watcher

Live Reload works by having a FileWatcher on the server that is created as part of the middleware instantiation. When the middleware is hooked up the file watcher starts watching for files of interest and when one is changed notifies any connected browsers to refresh themselves.

JavaScript Injection into HTML

Whenever you hit an HTML page in your ASP.NET Core application - whether it's a static page or a Razor page, or MVC view that returns HTML, heck even an error page - the middleware spies on all text/html content and injects a block of Javascript into the HTML response just before the </body> element. This small bit of JavaScript code that is injected, basically establishes a Web Socket connection to the server and ensures that the connection stays alive while the page is loaded.

The middleware intercepts every request and checks for HTML result content and if it finds it rewrites the HTML to include the WebSocket script code.

Note that if content is compressed or otherwise encrypted/encoded the JavaScript injection will not work. The page will still render, but Live Reload won't work.

Web Socket Server

When the client makes the socket connection to the server, the server receives the connection request and upgrades it to a WebSocket connection. The connection stays open and the server can use this connection to push a notification to the client to tell it to refresh itself. The message is nothing more than a simple Refresh (or RefreshDelayed) string which the script in the browser receives and then uses to refresh the page.

Once running the FileWatcher monitors for file changes, and when a file of interest is changed sends a notification to any WebSocket connected browsers. If multiple pages or browsers are open, they are all refreshed simultaneously.

Simple Page Reloading

By default the FileWatcher monitors for static content files and Razor files: .html,.htm,.css,.js,.ts,.cshtml. When any of these files are changed the FileWatcher sees the change and triggers a browser refresh. For static pages the notification is nearly instance - for Razor pages it's a little slower because the Razor page has to be recompiled. But it's still pretty quick.

ASP.NET Core 3.0 Requires Explicit Razor Compilation

In ASP.NET Core 3.0 Razor Views no longer compile at runtime by default and you have to explicitly add a NuGet and add a runtime option. Add the following NuGet package to your .NET Core 3.0 project:Microsoft.AspNetCore.Mvc.Razor.RuntimeCompilation

and add the following to `ConfigureServices():

services.AddRazorPages().AddRazorRuntimeCompilation();
services.AddMvc().AddRazorRuntimeCompilation();

Server Reloading

Server reloading is a little more complicated because the process of reloading the server takes a bit of time. The process even for a tiny project takes a few seconds. So rather than directly monitoring for changes of .cs files in the project, Live Reload relies on the fact that when the server shuts down, the connection is lost. The client code tries to reconnect and when it reconnects automatically refreshes the browser.

Initially I didn't realize that this was just going to work like this and I explicitly sent a refresh message when the middleware was hooked up, but it turned out that wasn't necessary - the connection loss and reconnect is enough to force the page to refresh on its own. Cool!

Voila - Live Reload!

Building Live Reload Functionality in ASP.NET Core

This is a perfect job for ASP.NET Core middleware which can plug into the ASP.NET Core pipeline to intercept requests and start the process and also to modify HTML output to inject the necessary WebSocket JavaScript code.

In order to build this component I need the following:

  • A Middleware Component to:
    • Intercept all HTML requests and inject WebSocket JavaScript
    • Listen for WebSocket Connection Requests
    • Route to the WebSocket Session Handler
  • File Watcher that monitors for source code changes
  • WebSocket Session Handler

Middleware in ASP.NET Core

One of the nice improvements in ASP.NET Core is the middleware pipeline. Middleware is a bi-directional pipeline through which each incoming request flows. Any middleware that is plugged into the pipeline essentially gets passed a request delegate that is called to pass on the request to the next item in the middleware chain. The delegate is passed in and the middle ware implementation can choose to implement both inbound and outbound processing before or after the delegate is called to ‘pass on’ the request. Figure 2 shows what the middle ware pipeline looks like.

Middleware in ASP.NET CoreFigure 2 - The Middleware Pipeline in ASP.NET Core

For Live Reload the two-way passthrough is perfect as I need to both handle incoming requests and check for Web Socket requests and hand them off to my WebSocket Session handler, as well as check for incoming HTML requests capture the output response and rewrite it on the outbound pass to inject the JavaScript.

Middleware Implementation

The first thing to implement is the actual middleware (full code on GitHub).

public class LiveReloadMiddleware
{
    private readonly RequestDelegate _next;
    internal static HashSet<WebSocket> ActiveSockets = new HashSet<WebSocket>();

    public LiveReloadMiddleware(RequestDelegate next)
    {
        _next = next;
    }
   
    public async Task InvokeAsync(HttpContext context)
    {
        var config = LiveReloadConfiguration.Current;

        if (!config.LiveReloadEnabled)
        {
            await _next(context);
            return;
        }

        // see if we have a WebSocket request. True means we handled
        if (await HandleWebSocketRequest(context))
            return;

        // Check other content for HTML
        await HandleHtmlInjection(context);
    }
}

This is a typical middleware component in that it receives a next delegate that is used to continue processing the middleware chain. The code before the call to _next() lets me intercept the request on the way in, and any code after _next() lets me look at the response.

Let's look at the HTML injection first.

Html Injection

The first thing that happens for the user is that they navigate to an HTML on the site. With Live Reload enabled every HTML page should inject the WebSocket code needed to refresh the page. Live Reload does this by capturing the Response.Body stream on the inbound request, and then checking for a text/html content type on the outbound pass. If the content is HTML, Live Reload reads the HTML content and injects the Web Socket client code and it then takes the updated HTML stream and writes it into the original response stream.

If the code is not HTML it just writes the captured Response output and writes it back into the original content stream.

private async Task HandleHtmlInjection(HttpContext context)
{
    // Inject Refresh JavaScript Into HTML content
    var existingBody = context.Response.Body;

    using (var newContent = new MemoryStream(2000))
    {
        context.Response.Body = newContent;

        await _next(context);

        // Inject Script into HTML content
        if (context.Response.StatusCode == 200 &&
            context.Response.ContentType != null &&
            context.Response.ContentType.Contains("text/html", StringComparison.InvariantCultureIgnoreCase) )

        {
            string html = Encoding.UTF8.GetString(newContent.ToArray());
            html = InjectLiveReloadScript(html, context);

            context.Response.Body = existingBody;

            // have to send bytes so we can reset the content length properly
            // after we inject the script tag
            var bytes = Encoding.UTF8.GetBytes(html);
            context.Response.ContentLength = bytes.Length;

            // Send our modified content to the response body.
            await context.Response.Body.WriteAsync(bytes, 0, bytes.Length);
        }
        else
        {
            // bypass - return raw output
            context.Response.Body = existingBody;
            if(newContent.Length >0)
                await context.Response.Body.WriteAsync(newContent.ToArray());
        }
    }
}

This is pretty much brute force code that's not very efficient as it captures the response into memory, then copies it again before writing it back out into the response stream. But keep in mind this is essentially development time code so the overhead here is not really an issue.

The way this works is that the original Response stream is captured, and replaced with a memory stream. All output is then written to the memory stream. On the return pass, the middleware checks for text/html and if it is, injects the JavaScript into the response captured. The memory stream is then written back into the original Response stream.

Sniffing the HTML content will not work if the HTML is compressed or otherwise encoded and so won't find a ` tag to replace. The code won't fail, but also won't inject the necessary client code and so live reload won't work with encoded content. If you are using compression (the most likely culprit) and you want to use Live Reload you might want to turn it off for Development mode operation.

The Web Socket Server

Live Reload uses raw WebSockets to push Refresh messages to the client. This is my first time of using Web Sockets in ASP.NET Core and it turns out it's pretty simple to get socket connections to work.

To initiate the connection I can just check for a socket connection request on a specific URL (config.WebSocketUrl). ASP.NET Core's WebSocket implementation then allows getting access to the Socket after its connected via WebSockets.AcceptSocketConnection(). Once I have the socket I can pass it to handler that can run in an endless loop to keep the WebSocket connection alive and check for disconnects.

The socket hook up code looks like this:

private async Task<bool> HandleWebSocketRequest(HttpContext context)
{
    var config = LiveReloadConfiguration.Current;

    // Handle WebSocket Connection
    if (context.Request.Path == config.WebSocketUrl)
    {
        if (context.WebSockets.IsWebSocketRequest)
        {
            var webSocket = await context.WebSockets.AcceptWebSocketAsync();
            if (!ActiveSockets.Contains(webSocket))
                ActiveSockets.Add(webSocket);

            await WebSocketWaitLoop(webSocket); // this waits until done
        }
        else
        {
            // this URL is websockets only
            context.Response.StatusCode = 400;
        }

        return true;
    }

    return false;
}

I also keep track of the connected WebSockets in an ActiveSockets dictionary - this will be the list of connected clients that need to be refreshed when a refresh request is made.

Once a WebSocket is available I can create a handler that keeps the connection open:

private async Task WebSocketWaitLoop(WebSocket webSocket)
{
    var buffer = new byte[1024];
    while (webSocket.State.HasFlag(WebSocketState.Open))
    {
        try
        {
            var received = await webSocket.ReceiveAsync(buffer, CancellationToken.None);
        }
        catch
        {
            break;
        }
    }

    ActiveSockets.Remove(webSocket);
    await webSocket.CloseAsync(WebSocketCloseStatus.NormalClosure, "Socket closed", CancellationToken.None);
}

This code basically sits and waits for some incoming data from the socket. Now my client code never sends anything so the socket just sits and waits indefinitely until the connection dies. The connection can die because the user navigates or refreshes the connected page. But as long as the page is active this connection remains alive. When the connection breaks the Socket is removed from the active list of ActiveSockets.

During a typical cycle of a page that sees changes WebSockets constantly get created and removed as the page refreshes in the browser. At any point in time there should only be as many active connections as there are HTML pages open on the site.

The Injected JavaScript

The client side WebSocket code that gets injected then connects to the server code shown above. It does little more than create the connection and then accept onmessage events when a push notification is fired form the server.

Here's what the injected code looks like (the WebSocket URL is injected into the script when it's generated):

<!-- West Wind Live Reload --><script>
(function() {

var retry = 0;
var connection = tryConnect();

function tryConnect(){
    try{
        var host = 'wss://localhost:5001/__livereload';
        connection = new WebSocket(host); 
    }
    catch(ex) { console.log(ex); retryConnection(); }

    if (!connection)
       return null;

    clearInterval(retry);

    connection.onmessage = function(message) 
    { 
        if (message.data == 'DelayRefresh') {
                    alert('Live Reload Delayed Reload.');
            setTimeout( function() { location.reload(true); },3000);
                }
        if (message.data == 'Refresh') 
          location.reload(true); 
    }    
    connection.onerror = function(event)  {
        console.log('Live Reload Socket error.', event);
        retryConnection();
    }
    connection.onclose = function(event) {
        console.log('Live Reload Socket closed.');
        retryConnection();
    }

    console.log('Live Reload socket connected.');
    return connection;  
}
function retryConnection() {   
   retry = setInterval(function() { 
                console.log('Live Reload retrying connection.'); 
                connection = tryConnect();  
                if(connection) location.reload(true);                    
            },3000);
}

})();
</script><!-- End Live Reload -->

This is super simple. The code basically creates the connection and sets up event handlers for onmessage which is fired when a refresh message is received and onerror and onclose which are fired when the connection is lost. onclose fires when the user navigates away or refreshes (ie. the client closes), and onerror fires if the server disconnects (ie. the server disconnects). For both of these ‘error’ events I want to retry the connection after a couple of seconds. The most common case will be that the server was shut down and if it's dotnet watch run that reloaded the server it'll be down for a second or less and a retry will then automatically refresh the page.

Forcing the Browser To Refresh from the server

Finally I also need a way to actually trigger a browser refresh from the server by sending data into each of the connected sockets. To do this I have a static method that goes through the ActiveSockets dictionary and fires a simple Refresh method using SendAsync() on the socket:

public static async Task RefreshWebSocketRequest(bool delayed = false)
{
    string msg = "Refresh";
    if (delayed)
        msg = "DelayRefresh";

    byte[] refresh = Encoding.UTF8.GetBytes(msg);
    foreach (var sock in ActiveSockets)
    {
        await sock.SendAsync(new ArraySegment<byte>(refresh, 0, refresh.Length),
            WebSocketMessageType.Text,
            true,
            CancellationToken.None);
    }
}

It's pretty nice how relatively simple it is to interact with a raw Web Socket in ASP.NET Core! I can now call this method from anywhere I want to refresh. That ‘somewhere’ in this middleware component is from the FileWatcher.

File Watcher

The file watcher is started as part of the middleware startup. The watcher monitors a specified folder for all files and the change detection code checks for specific file extensions that trigger a call to the RefreshWebSocketRequest() method shown above. (code)

public class LiveReloadFileWatcher
{

    private static System.IO.FileSystemWatcher Watcher;

    public static void StartFileWatcher()
    {
        var path = LiveReloadConfiguration.Current.FolderToMonitor;
        path = Path.GetFullPath(path);

        Watcher = new FileSystemWatcher(path);
        Watcher.Filter = "*.*";
        Watcher.EnableRaisingEvents = true;
        Watcher.IncludeSubdirectories = true;

        Watcher.NotifyFilter = NotifyFilters.LastWrite
                               | NotifyFilters.FileName
                               | NotifyFilters.DirectoryName;

        Watcher.Changed += Watcher_Changed;
        Watcher.Created += Watcher_Changed;
        Watcher.Renamed += Watcher_Renamed;
    }

    public void StopFileWatcher()
    {
        Watcher?.Dispose();
    }

    private static void FileChanged(string filename)
    {
        if (!LiveReloadConfiguration.Current.LiveReloadEnabled ||
            filename.Contains("\\node_modules\\"))
            return;

        if (string.IsNullOrEmpty(filename) ||
            !LiveReloadConfiguration.Current.LiveReloadEnabled)
            return;

        var ext = Path.GetExtension(filename);
        if (ext == null)
            return;

        if (LiveReloadConfiguration.Current.ClientFileExtensions.Contains(ext))
            LiveReloadMiddleware.RefreshWebSocketRequest();
    }

    private static void Watcher_Renamed(object sender, RenamedEventArgs e)
    {
        FileChanged(e.FullPath);
    }

    private static void Watcher_Changed(object sender, System.IO.FileSystemEventArgs e)
    {
        FileChanged(e.FullPath);
    }
}

All change events are routed to the FileChanged() method which checks for a few exceptions, and then checks for the interesting extensions and whether it matches the configuration list. If it does the refresh request is sent to WebSocket which then refreshes the browser.

Middleware Extensions Hookups

The final bit is to hook up the middleware to the Web application.

Middleware by convention has methods that make it easier to configure and hook up middleware components. For Live Reload these are services.AddLiveReload() in ConfigureServices() and app.UseLiveReload() in the Configure() method (code)

 public static class LiveReloadMiddlewareExtensions
{
    /// <summary>
    /// Configure the MarkdownPageProcessor in Startup.ConfigureServices.
    /// </summary>
    /// <param name="services"></param>
    /// <param name="configAction"></param>
    /// <returns></returns>
    public static IServiceCollection AddLiveReload(this IServiceCollection services,
        Action<LiveReloadConfiguration> configAction = null)
    {
        var provider = services.BuildServiceProvider();
        var configuration = provider.GetService<IConfiguration>();
        var config = new LiveReloadConfiguration();
        configuration.Bind("LiveReload",config);

        LiveReloadConfiguration.Current = config;

        if (config.LiveReloadEnabled)
        {
            if (string.IsNullOrEmpty(config.FolderToMonitor))
            {
                var env = provider.GetService<IHostingEnvironment>();
                config.FolderToMonitor = env.ContentRootPath;
            }
            else if (config.FolderToMonitor.StartsWith("~"))
            {
                var env = provider.GetService<IHostingEnvironment>();
                if (config.FolderToMonitor.Length > 1)
                {
                    var folder = config.FolderToMonitor.Substring(1);
                    if (folder.StartsWith('/') || folder.StartsWith("\\")) 
                        folder = folder.Substring(1); 
                    config.FolderToMonitor = Path.Combine(env.ContentRootPath,folder);
                    config.FolderToMonitor = Path.GetFullPath(config.FolderToMonitor);
                }
                else
                    config.FolderToMonitor = env.ContentRootPath;
            }

            if (configAction != null)
                configAction.Invoke(config);

            LiveReloadConfiguration.Current = config;
        }

        return services;
    }


    /// <summary>
    /// Hook up the Markdown Page Processing functionality in the Startup.Configure method
    /// </summary>
    /// <param name="builder"></param>
    /// <returns></returns>
    public static IApplicationBuilder UseLiveReload(this IApplicationBuilder builder)
    {
        var config = LiveReloadConfiguration.Current;

        if (config.LiveReloadEnabled)
        {
            var webSocketOptions = new WebSocketOptions()
            {
                KeepAliveInterval = TimeSpan.FromSeconds(240),
                ReceiveBufferSize = 256
            };
            builder.UseWebSockets(webSocketOptions);

            builder.UseMiddleware<LiveReloadMiddleware>();

            LiveReloadFileWatcher.StartFileWatcher();
        }

        return builder;
    }

}

The main job of AddLiveReload() is to read configuration information from the from .NET Core's IConfiguration and mapping the configuration values to the internal configuration object used throughout the component to control behavior. Configuration comes from the standard .NET configuration stores (JSON, CommandLine, Environment, UserSecrets etc.) and can also be customized with the delegate passed to .AddLiveReload() that gives a chance for code configuration after all the other configuration has happened. This is pretty common convention middleware components, and pretty much any middleware I've built uses code just like this.

useLiveReload() then is responsible for hooking up the middleware with UseMiddleware<LiveReloadMiddleware>();. Both methods also make sure that required services like WebSockets are loaded and that the file watcher is launched during startup. If EnableLiveReload=false nothing gets loaded so the middleware is essentially inert as a no-op.

These two methods are hooked up in ConfigureServices and Configure() respectively and they are the only things that need to realistically be hooked up.

Easy, Peasy?

And there you have it - all the pieces needed for this to work. I started in on this project not really knowing anything about WebSocket programming or exactly how the dotnet watch run behavior would interact with the browser reload functionality, but all of this came together rather quickly. Kudos for the ASP.NET team for having a really simple WebSocket server implementation that literally just took a few lines of code to integrate with. Granted the socket ‘interaction’ is extremely simple, but even so it's nice to see how little effort it took to get this simple connection up and running.

Caveats

I did run into a few snags and there are a few things to watch out for.

Http2

If you are using Kestrel and have HTTP2 enabled, make sure you also enable Http 1 on the connection. WebSockets don't work over HTTP2 so if you are running on an HTTP2 only connections the socket connection will fail.

You can configure HTTP2 in the startup program and ensure you use both Http1AndHttp2:

public static IWebHostBuilder CreateWebHostBuilder(string[] args) =>
        WebHost.CreateDefaultBuilder(args)
            .ConfigureKestrel(options =>
            {
                // allow for Http2 support - make sure use Http1AndHttp2!
                options.ConfigureEndpointDefaults(c => c.Protocols = HttpProtocols.Http1AndHttp2);
            })
            .UseStartup<Startup>();

ASP.NET Core 3.0 defaults to Runtime Razor Compilation even in Dev

In ASP.NET Core 3.0 Razor Views no longer compile at runtime by default and you have to explicitly add a NuGet package and add some additional middleware.

Add the following NuGet package to your .NET Core 3.0 project:

Microsoft.AspNetCore.Mvc.Razor.RuntimeCompilation

and add the following to ConfigureServices():

services.AddRazorPages().AddRazorRuntimeCompilation();
services.AddMvc().AddRazorRuntimeCompilation();

Also if you recently upgraded to Windows 1903 note that the development certificates on your machine might have gone stale. This didn't cause a problem for HTTP request but for me WebSocket connections were failing until I reset the dev certificates.

You can do this from the command line:

dotnet dev-certs https --clean
dotnet dev-certs https --trust

This creates a new localhost user specific certificate used for Kestrel and IIS Express.

Blazor

Several people have asked about whether this middleware component works with Blazor. The answer is - it depends.

Server Side Blazor

If you are using a server side Blazor project you can just use dotnet watch run which automatically provides browser refresh (unreliable but it sort of works) so realistically you shouldn't need to use this Live Reload Middleware

You'll need to add:

<ItemGroup><Watch Include="**\*.razor" /></ItemGroup>

and that should work to refresh pages. In my experience this is really flakey though and you can double that up with this Live Reload addin which will also refresh the page when the project restarts.

Client Side Blazor

For client side Blazor the story is more complex and there's no real good solution for quick auto-reload, because client side blazor has no individual page recompile, but has to completely recompile the blazor project.

Live Reload can work with this but it's slow as both the Blazor project has to be recompiled and the server project restarted (don't know if there's a way to just trigger a recompile of the client project on its own - if you think of a way please file an issue so we can add that!)

The following is based on the default project template that uses two projects for a client side blazor: The ASP.NET Core hosting project and the Blazor client project.

  • Add LiveReload to the ASP.NET Core Server Project
  • Set up monitoring for the entire solution (or the Blazor Project only)
  • Add the Blazor extension

You can do this in configuration via:

{"LiveReload": {"LiveReloadEnabled": true,"ClientFileExtensions": ".css,.js,.htm,.html,.ts,.razor,.cs","FolderToMonitor": "~/.."
  }
}

This adds the .razor,.cs extensions and it basically monitors the entire Solution (~/..) for changes. Alternately you can also point at the Blazor project instead:

"FolderToMonitor": "~/../MyBlazorProject"

Since Blazor projects tend to not care about the .NET Core backend that just acts as static file service you probably only need to monitor the client side project in Blazor projects. Either the entire solution or Blazor project folders work.

  • Start the application with dotnet watch run (required or you need to manually restart)
  • Open the Index Page
  • Open Pages/Index.razor
  • Make a change in the page
  • Save the file

Reload will not be quick because the Blazor client project and the .NET Core project will recompile and restart. For a simple hello world it takes about 5 seconds on my local setup. For a full blown applications this may be even slower.

Obviously this is not ideal, but it's better than nothing. Live Reload works as it should but the underlying problem is that the actual content is not refreshing quickly enough to make this really viable.

We can only hope Microsoft come up with a built-in solution to trigger the recompilation of the client project or better yet recompilation of a single view as it's changed.

Summary

Live Reload for server side code is pretty sweet - it provides much of the same functionality that you've come to expect from client side applications but now on the server. For me it's been a huge timesaver on any projects where I use HTML based content, whether it's static content or dynamically generated Razor content.

This middleware is small and lightweight and when turned off completely bypasses the middleware pipeline processing. It's idea to set it on in the Development environment and leave it off for Production.

I hope you found this walk-through useful. I know I probably will be back here to review some of the code especially for the WebSocket bits to recall how to implement a simple server side socket handler. But I also think it's an interesting example how you can mix a number of interesting tool technologies into a useful utility.

If you find this middleware useful go check out hte GitHub repo and don't forget to the Github repo.

Enjoy.

this post created and published with Markdown Monster
© Rick Strahl, West Wind Technologies, 2005-2019
Posted in ASP.NET Core  

Uri.AbsoluteUri and UrlEncoding of Local File Urls

$
0
0

I have a love/hate relationship with the System.Uri class. It's great when it works as you expect, but I've had a few of battles related to Url encoding and decoding and in this post I'll point out one oddity that bit me today.

Url Combining

I frequently use the Uri class to build Urls, both for Web Urls as well as for local Urls. Specifically I commonly use it to normalize relative URLs into absolute Urls or vice versa. One very nice thing about the URI class is that it also works with file paths so it can be quite useful into combining paths and encoding/decoding the URL formatting which is quite useful if you're embedding local file links into things like Markdown documents (imagine that!).

Local file:/// Urls

This particular issue affects file:/// urls and it concerns different behavior for Url Encoding depending on how a file URL is initialized in the Uri class.

My specific scenario in code is that in Markdown Monster I have an output generation class that dumps a generated HTML document as a self contained file to disk by pulling in all related resources and embedding them directly into one large document. To do this a document relative path is required, which in this case I build up using the URI class. I use Uri because the relative path may be relative to an online https:// resource or a local file. If the path is relative it's assumed to be relative to the current document, and I use the URI class to combine the base path with the relative path.

Seems straight forward enough:

// assign base path initially from a filename
var basePath = Path.GetDirectoryName(doc.Filename);
this.BaseUri = new Uri(basePath);

...

// then figure out relative path to retrieve resources
else // Relative Path
{
    var uri = new Uri(BaseUri, url);
    var url = uri.AbsoluteUri;  // here things go awry!
    
    if (url.StartsWith("http"))
    {
        var http = new WebClient();
        imageData = http.DownloadData(uri.AbsoluteUri);
    }
    else
        imageData = File.ReadAllBytes(uri.LocalPath);
}

Unfortunately, this code runs into a serious problem with the Url Encoding:

Specifically when combining the URLs, the second URL is added as a literal string and not considered as encoded. The result is that the %20 space encoding is encoded as %2520 - basically encoding the % and writing out the 20 after that. IOW, the input is treated as a raw unencoded string.

Uri Constructor: Scheme Matters

After a bit of experimenting it turns out that the problem is how the Uri instance is initialized from a string. Specifically, the protocol - or lack thereof - determines how the Uri is treated for file:/// urls.

In the example code above I essentially assigned the Uri like this:

var baseUri = new Uri("c:\\temp\\");

which demonstrates the problem by doing:


var part1 = new Uri("C:\\temp\\"); // double encodes when combining parts 
var part2 = "assets/Image%20File.jpg";


var uri = new Uri(part1, part2);
uri.Dump();  // shows correctly as it shows original url

url = uri.AbsoluteUri;  // Wrong: file:///c:/temp/Image%2520File.jpg 
url.Dump();

It turns out that this can be fixed by explicitly providing the local file scheme as part of the base Uri assignment. So changing the baseUri to:

var baseUri = new Uri("file:///" + "c:\\temp\\");

now correctly returns the

url = uri.AbsoluteUri;  // Right: `file:///c:/temp/Image%20File.jpg` 
url.Dump();

uri.LocalPath.Dump();   // Right: c:\temp\Image File.jpg

Now I'm not sure why this is but presumably assigning the base Uri without an explicit scheme doesn't correctly brand the Uri as an escaped url, whereas using the scheme prefix does.

Looking at the content of the Uri instance's properties I don't see any difference between the two other than the level of escaping which is odd.

Fixing the Problem

So then to fix my problem in code I can now do:

// assign base path initially from a filename
var basePath = Path.GetDirectoryName(doc.Filename);
this.BaseUri = new Uri($"file:///{basePath}");

var uri = new Uri(BaseUri, partialUrlPath);

and the code now correctly escapes and unescapes in a predictable manner. Note that basePath is a standard Windows OS path with backwards slashes but because the file:/// protocol is specified the Uri constructor properly fixes up the Uri so it works.

I can then simply use uri.LocalPath to retrieve the full, unescaped filename:

imageData = File.ReadAllBytes(uri.LocalPath);

If you want to play around and see the behavior differences between the two assignment modes I've put my simple LINQPad tests in a .NET Fiddle.

Relevant Uri Path Properties

For reference, here's a summary of some of the path relative Uri properties and whether they are encoded or not:

Uri MemberUrlEncodedFunctionality
AbsoluteUriYesFully qualified escaped URL
AbsolutePathYesFile: Escaped file path with / path separators
Web: Escaped site relative path
LocalPathNoFor file URLs: Unescaped local file path with file:/// prefix stripped.
For Web URLs: Unescaped site relative path.
.ToString()NoFully qualified URL with all UrlEncoding removed.

Summary

This isn't the first time I've tangoed with the Uri class in regards to url encoding and url formatting. The way Urls are assigned and how UrlEncoding works is not always obvious, and in this case it outright caused my application to break because of an untested scenario (spaces in Urls specificially). I still don't understand why the behavior of the non-file scheme'd url doesn't work the same, since the Uri class properly identifies the Url as a file Url in both cases. But alas - it works as it does and by making sure to explicitly prefix the file:/// scheme the behavior becomes as expected.

Resources

this post created and published with Markdown Monster
© Rick Strahl, West Wind Technologies, 2005-2019
Posted in .NET  
Viewing all 664 articles
Browse latest View live