Quantcast
Channel: Rick Strahl's Web Log
Viewing all 664 articles
Browse latest View live

Visual Studio 2019.2 and .NET 3.0 SDK Projects not Loading

$
0
0

After upgrading to Visual Studio 2019.2.3 you may find that if you're using projects that use the .NET Core 3.0 SDKs will no longer work out of the box.

I have several 3.0 projects, but the one I use the most is my Markdown Monster project which is a .NET SDK WPF project that uses the new project format. This all worked perfectly fine in previously releases but after the update to 2019.2.3 I now get this:

Looking a little closer at the Output window I can see that the problem is the wrong version of an SDK is used, and it looks like by default Visual Studio uses .NET SDK 2.2 (it'll tell you when it's actually building).

The message is:

Unable to locate the .NET Core SDK. Check that it is installed and that the version specified in global.json (if any) matches the installed version.

It would be nice if this was more descriptive and told you a) what version it's looking for and b) what version it's trying to currently use.

The frustrating thing is that the proper SDKs are installed and Visual Studio now installs the appropriate SDKs. Yet it's unable to find the right version anyway.

That's not an improvement!

3.0 SDK Required!

The problem in the project above is that it's a .NET SDK project that requires the V3.0 SDK as it uses WPF which is part of the Windows platform support that was added in the 3.0 SDK versions. This project type doesn't work in older pre-3.0 versions of the SDK. So while other .NET Core 2.x projects compile just fine using the defaults, this particular project does not, even though the proper 3.0 Preview SDK is in fact installed. This worked before, but now fails.

Fix It with global.json - sort of

The solution to SDK versioning problems in projects or Solutions is to use a global.json file in the Solution root to specify a specific version of an SDK to use with your project.

In there I can specify a specific version of my SDK I want to use for this project/solution:

{"sdk": {"version": "3.0.100-preview8-013656"
    }
}

That works, but it is a terrible solution to this problem. It sucks because now I'm pinning my solution to a very specific (preview) version of the SDK. Since this project lives on Github and is shared anybody using the project now too ends up needing to use this same version of the SDK. Worse - if SDKs are updated now, I have to remember to update the global.json version to get the latest SDK, instead of the latest installed.

For now I decided to not include the global.json in the Github repo, which is also a sucky proposition as that likely means that after people pull the project it likely won't build unless a global.json is explicitly added with a valid SDK version.

I tried using more generic version numbers (3.0 and 3.0.*), but no luck with that - the only thing that worked for me was using a very specific version number.

Updated: Use Previews of the .NET Core SDK

Of course moments after I posted somebody from Microsoft mentioned that there's a switch for that that you can use in the current 2019.2 release of Visual Studio to essentially force it to also look at preview SDKs for versioning.

You can use Tools->Options->Environment->Preview Features to specify that you want to enable Preview SDKs:

This enables finding the latest version rolling forward to the latest preview SDK installed.

After setting that switch - my project now works without requiring an explicit global.json.

It looks like Visual Studio by default uses the latest Release SDK installed and the flag above forces also looking at preview releases, so that it can use the latest preview release

Use Visual Studio Preview 2019.3

Another option is to use the latest Preview release of Visual Studio - VS 2019.3 which has support for .NET Core 3.0 and the 3.0 SDKs. It automatically recognizes the current preview SDKs and so also works with the projects as is.

SDK Tooling Delivery and Usage Improvements?

Microsoft has stated that they are trying to address the SDK install problems and that the current releases (rtm and preview) of Visual Stuio are starting to reflect that. The new SDK installers are supposed to clean up old SDKs and leave behind only one version plus specific preview SDKs. Since SDKs are backwards compatible and can compile older versions or project formats there should be little reason to keep older SDKs around.

We can hope that this will get better as time goes on. It took a note from a Microsoft developer to find the Preview switch in options, but this sort of thing should be more prominent especially given the high turn over for preview releases that are coming out these days.

this post created and published with Markdown Monster
© Rick Strahl, West Wind Technologies, 2005-2019
Posted in Visual Studio  .NET  

Programmatically Opening Windows Terminal in a Specific Folder

$
0
0

I've been using Windows Terminal for a while now since it was announced and made available in the Windows Store a few months back.

There are lots of reasons to like this new Terminal and I don't want to get into all of them here. For me, the main reason is that it ships with a new ConHost.exe, that is considerably faster than the ConHost shipped with Windows which results in much faster terminal painting and scrolling.

Keep in mind that Windows Terminal is a Terminal UI, plus the Console Host, and it's not a replacement for the Powershell, CMD or Bash shells or any other shell. The Terminal acts as a host to those shells that are loaded inside of it. Any shell application uses ConHost and the Terminal UI provides the hosting UI for these shell instances.

A few reasons to check it out:

  • Multiple tabs of Shell Instances
  • Very fast text rendering
  • Smooth text scaling
  • Better terminal spec compliance
  • Open source on GitHub and under active development
  • Many improvements expected…

If you haven't yet, check it out

No Automation Yet

The terminal works great, but it's still in the early stages of development. The core terminal functionality is rock solid, but the Windows UI shell and command interface are not very feature rich around the edges yet. It's all very utilitarian which is to be expected - after all the focus first and foremost is on building a better Console Host and it's an early preview.

To make it easy to load, Microsoft provides a globally mapped executable - wt.exe - that you can launch without providing a path from anywhere in your system: From Windows-R, from another console or from another application using CreateProcess() related APIs.

You can launch Windows Terminal from anywhere with:

wt.exe

or by using the installed shortcut.

One problem currently is that you can't easily automate the terminal application when it launches. There are no command line options supported yet (although there's discussion around this and it will come eventually), which means you can't start up the shell in a specific folder, execute a startup command or even pick a profile to start with.

Recently I had several people asking about Windows Terminal in Markdown Monster:

How can I launch Windows Terminal as my Terminal Viewer in Markdown Monster

The short answer is:

  • You can customize the startup default Terminal Shell Profile
  • Set "startingDirectory" : "%__CD__%"
    which starts the Shell out of the active OS folder
  • Side effect: Windows shortcut launching launches from System folder

For more information read on.

Markdown Monster and Terminals

Markdown Monster has configuration options that let you customize the Terminal executable and Command Arguments so you can customize which terminal gets launched. The default is Powershell but it's easy to add a commandline to switch the Cmd.exe or WSL or another version of Bash. In the program the terminal launching is provided via context menu options from with from various folder related operations:

MM does this from number of places:

  • From the current document tab or document
  • From the Folder Browser Folder
  • From a file or folder in the Folder Browser
  • From the Git Commit Dialog

I get a lot of use out of that feature and I suspect others use it quite a bit as well especially given several of the Window Terminal requests.

Unfortunately if I want to use wt.exe as my shell option, I can't pass the command parameters the way I currently do with the other shells, which is by using custom launch commands in the shell to change to a specific folder.

For example for the default Powershell terminal the default is:

powershell.exe     -NoExit -Command  "& cd '{0}'"

Since Windows Terminal is really a shell host, rather than an actual shell, you can't pass parameters directly to the shell. wt.exe currently doesn't have any command line parameters (AFAIK) so there's no way to set the working folder or push a command to the launched shell.

I also can't specify which configured terminal to start up via an option - basically all you can do is wt.exe without arguments at the moment and hope for the best.

Automating anyway

To launch Windows Terminal programmatically I can use code like the following:

var pi = new ProcessStartInfo{
	FileName = "wt.exe",
	WorkingDirectory = "c:\\temp", 	    
	UseShellExecute = false		
};
Process.Start(pi);

and that works, except it fails to load out of the WorkingDirectory.

The problem with this approach is that you get only the default configuration, and the folder - even though set via the WorkingDirectory in the start info - is completely ignored by the wt.exe startup due to a default profile setting. Hrmph!

Windows Terminal Profiles

The bad news is that you can't pass a working folder to wt.exe via a startup command yet.

What you can do however is to customize the startup Profile and change it so the profile starts the shell in the currently active folder. You can make a change to a configuration key in the default Windows Terminal Shell profile.

This works, but it means it's up to the user to customize their default profile, which isn't terribly user friendly, but it's a workaround that works for now.

You can access the Windows Terminal profile JSON file by going to Settings in the Terminal itself using the down button:

If you edit that file you'll find:

Here you can specify multiple profiles for each type of shell window, and you can add additional profiles of your own or customize the existing ones.

Each profile has a guid key that uniquely identifies it and the startup profile is referenced by a defaultProfile key that points at one of these profile guids.

Forcing the Startup Path

So in Markdown Monster I would love to use Windows Terminal and after searching around a little bit unsuccessfully to find command line options I posted a message on Twitter asking if anybody had gotten this launching WT in a specific folder to work.

@ChristofJans ended up helping me out:

Here are the relevant keys:

"defaultProfile": "{61c54bbd-c2c6-5271-96e7-009a87ff44bf}",
..."profiles" : 
[
    {"commandline" : "powershell.exe","guid" : "{61c54bbd-c2c6-5271-96e7-009a87ff44bf}","name" : "Windows PowerShell","startingDirectory" : "%USERPROFILE%",
    },
    { ... }
]    

The gist of is that by default all profiles are configured with a hard coded startingDirectory setting to the user profile

"startingDirectory" : "%USERPROFILE%","

You can change this folder to use the active working directory with the following change:

"startingDirectory" : "%__CD__%",

And voila WT now opens in the specified path if you set the path prior or provide a WorkingDirectory to the CreateProcess APIs.

Side Effects

Unfortunately, there's a side effect: Now when you start wt.exe from your default shortcut it'll start in your SYSTEM folder:

That's not ideal, but I can live with that. It's easy to cd ~.

I suspect there's a way to fix the startup path the Windows shortcut somehow by setting the shortcut starting directory, but - it's a bloody Windows Store app and that shit is buried somewhere and not worth the effort to have it blown away on the next update anyway.

The ideal solution here would be for WT.exe to provide a way to select a profile to invoke, then setup a custom profile that's not the default and add the %__CD__% pathing there, which would provide the features needed for applications, while leaving the default profile intact.

Overall profiles are great because they do make it easy to create new shell configurations quickly simply by copying profile entries and modifying a couple of obvious settings.

Summary

The good news is that with the StartingDirectory value set in the default profile, it works and I can now use wt.exe as my terminal command in Markdown Monster:

and it works just dandy now!

The terminal has been a joy to use, which is why I'm mucking around with all this in the first place. I'm following up on the request I got earlier because - heck - I want to use the Windows Terminal in MM too 😃. And now I can…

this post created and published with Markdown Monster
© Rick Strahl, West Wind Technologies, 2005-2019
Posted in Windows  .NET  

WPF Window Closing Errors

$
0
0

For quite a while in Markdown Monster I've had a number of errors showing up in my logs from users getting errors when the application is shutting down. The errors have been making up around 80% of my critical log errors to the tune of 2-3 errors every other day or so. It's not enough to be too concerned since it's a tiny fraction of actual uses, but it is annoying in that these requests are clogging up the logs.

More importantly though I've not been able to reproduce the problem reliably myself - I can see the errors, and even got an occasional bug report with steps, but I was unable to reproduce those steps and see the failure myself. Don't you just love bugs like that?

WPF Closing Error

The error specifically is this one:

Cannot set Visibility to Visible or call Show, ShowDialog, Close, or WindowInteropHelper.EnsureHandle while a Window is closing.

When I drill into the stack trace of the captured error I can see the following:

Most of this is deep inside the WPF stack, except for the outlined block which is in MahApps Metro which is the UI framework I use. MahApps intercepts the default close button management as it custom draws the window to provide custom window styling for themed windows and custom control boxes which I use in Markdown Monster:

My first inclination was to put the blame for these close errors on MahApps since after all the problem points straight at the MahApps close handler. But after doing some searches for this issue I quickly realized that this is a more generic WPF issue. I still ended up posting a Github issue in the MahApps repo which started a great discussion on what might be causing the problem. Thanks to @batzendev who pointed me in the right direction of the solution(s) I talk about here.

What's the problem?

WPF is not happy if you close a window, while a window is already closing. That sounds silly, and while in normal operation this likely doesn't happen, there are certain circumstances where multiple nested close operations can occur.

In async code you may run into timing issues where multiple clicks on the close button may create multiple .Close() calls on a form, or you may have a prompts that fire as part of the OnClosing() event that cause the form to be held open and then ‘re-closed’. Another scenario that can cause problems is if a fatal error occurs in the application that causes the form to be closed non-interactively and then an explicit close operation is later applied by the application. Most of these issues come down to timing which is why it's such a pain to duplicate the error.

Avoiding double Closing

The simplest failure scenario that I was actually able to duplicate was:

  • Double click the Close button
  • Have a document with changes
  • Which causes a dialog to prompt for saving

The second click hits the already running Close() event that's now held up running by open dialog and Bamm!, it breaks.

A very simple solution to the double click problem is to not allow closing if already closing:

bool IsClosing = false;

protected override void OnClosing(CancelEventArgs e)
{
    if (IsClosing)
        return;

    IsClosing = true;
  
   .. 
   
   // Code that might hold things open
   if (!CloseAllTabs())   // Save dialog may happen here
   {
        // tab closing was cancelled
        e.Cancel = true;
        
        // this allows closing again
        IsClosing = false;
        return;
   }   
   
   ...
}

This was my initial fix and while it worked to bring down the error counts, it didn't eliminate them entirely, because it didn't address the second scenario caused by a crash shutdown. This scenario displays a dialog but in this case outside of the Close() handler.

Deferring Close() Handler Logic

In the MahApps Github issue @batzendev provided the solution, but initially I figured this would be difficult to manage deferring operations because of the potential to abort shutdown. But after I continued to see errors with the simple solution above, I realized this had to be fixed properly using deferred execution as @batzendev suggested..

The idea is that the Close() handler shouldn't execute any code directly but always defer operation. To make this work the handler should by default always be set to not close the form unless an explicit flag is set to force the form closed. IOW, the application has to be in charge of when to actually shut down the window. Anything that fires OnClosing() is initially deferred.

Luckily WPF makes deferring operations pretty easy using a Dispatcher and Async invocation. The only other thing needed is the logic to flag the shutdown operation via a ForceClose flag.

Here's what that code looks like:

bool ForceClose = false;

protected override void OnClosing(CancelEventArgs e)
{
    // force method to abort - we'll force a close explicitly
    e.Cancel = true;

    if (ForceClose)
    { 
        // cleanup code already ran - shut down
        e.Cancel = false;
        return;
    }

    // execute shutdown logic - Call CloseForced() to actually close window
    Dispatcher.InvokeAsync(ShutdownApplication, DispatcherPriority.Normal);
}

public void CloseForced()
{
    ForceClose = true;
    Close();
}

// Application specific window shutdown
private void ShutdownApplication()
{
    try
    {
        // have to do this here to capture open windows etc. in SaveSettings()
        mmApp.Configuration.ApplicationUpdates.AccessCount++;      
        SaveSettings();

        if (!CloseAllTabs())
        {
            // tab closing was cancelled - no forced close
            mmApp.Configuration.ApplicationUpdates.AccessCount--;
            return;
        }

        // hide the window quickly
        Top -= 10000;

        FolderBrowser?.ReleaseFileWatcher();
        bool isNewVersion = CheckForNewVersion(false, false);

        PipeManager?.StopServer();

        AddinManager.Current.RaiseOnApplicationShutdown();
        AddinManager.Current.UnloadAddins();
        
        App.Mutex?.Dispose();
        PipeManager?.WaitForThreadShutDown(5000);
        mmApp.Shutdown();

        // explicitly force the window to close
        CloseForced();
    }
    catch(Exception ex)
    {
        mmApp.Log("Shutdown: " + ex.Message, ex, logLevel: LogLevels.Error);
        CloseForced();
    }
}

The key here is that any call to OnClosing() immediately returns with the Window not left in a closing state except when the ForceClose flag is set to true. When starting the shutdown logic, the code just calls an async dispatcher, but leaves the closing state unset. This means the code keeps running while the actual closing processing is handled in the separate operation that on the Dispatcher.

If OnClosing() is actually going to close, the closing logic then explicitly call the CloseForced() method to explicitly close the form. The code boils down to this:

if (PotentialUiHoldUp())
{
    // just exit - No close state set
    return;
}

// Force the window to be closed
CloseForced();

This solution is hacky, but it seems to work well. Initially I thought it was going to be difficult to handle the out of band logic of prompting for confirmation on open documents but due to the easy way you can use Dispatchers that really isn't an issue - you can just throw those operations onto an out of band dispatcher operation and it just works. Nice.

Proof's in the Pudding

The change has been running in Markdown Monster for a couple of weeks now and and since implementation the errors in the logs have disappeared for the new versions. Big improvement and a much cleaner log although I see plenty of the errors from previous versions.

Summary

This is an edge case error and workaround, but it's common enough based on the number of questions I've seen in regards to this error message while tracking this down. The solution is pretty simple once you understand the problem and how to offload the OnClosing() logic via out of band operation on a Dispatcher.

this post created and published with Markdown Monster
© Rick Strahl, West Wind Technologies, 2005-2019
Posted in WPF  

Upgrading my AlbumViewer Sample Application to ASP.NET Core 3.0

$
0
0

ASP.NET Core 3.0 shipped yesterday and it's a big release with many new features and a huge batch of performance updates. Although this is a major release that touches a lot of the existing framework code, a lot of the big changes happen under the covers. For the most part this is an incremental update and doesn't require monumental changes to upgrade. Some changes are required to be sure - mainly in the Startup class configuration - but considering the feature changes and enhancements they are pretty tame.

To give an idea of what's involved in updating an application - even if a very small one - I'll describe the steps I went through to upgrade my AlbumViewer Angular ASP.NET Core application from .NET Core 2.2 to 3.0 as I've done for most of the previous major releases.

To give you an idea, here's the application:

AlbumViewer Sample Application

You can find the source code at:

Upgrading .NET Core/ASP.NET Core Versions

Every time an update rolls around there are things that change and it's not immediately obvious what has to be changed. But the good news is that most of the changes are isolated and related to how the application is configured.

Most of the changes in these updates have to do with Startup configuration changes. To help with this, the first thing I do when updating to a new version is to create a separate, new project to use as a template to see how the base application features are supposed to be configured and then match those changes into my existing project. Since this is an ASP.NET Core backend for an Angular application, I use the stock API template as a starting point - pick whatever most closely matches your current application.

Then it's time to compare what the new template generates and what your code does. If you're doing this from scratch be prepared to do a little research on the changed options as often not only does the syntax change, but also the behavior (as you'll see later).

.NET Core First Impressions

There's tons of new stuff in .NET Core 3.0, but the really good news is that most of the new features really are behind the scenes so they don't require massive reworking of existing applications. To be honest in the 3 applications I've done this with to date, the vast majority of changes need to be applied in the configuration of the application, and almost none inside of my own actual application code. Other than a few interface type name changes that can ripple through an application, actual application changes are minimal which means the changes are really isolated in the configuration portion of each application.

The second thing that is very noticable is that performance of .NET Core 3.0 applications seems to be drastically improved. Startup speed feels dramatically faster, as does the build tooling. It seems that the build tooling is much better at taking advantage of incrmental builds so full builds of the entire project are much rarer.

I tend to run projects with dotnet watch run from the command line and the auto-restarts now seem considerably quicker than in 2.x.

.NET Core 3.0 Updates

Ok, so now let's take a look through a few of the changes I had to make to the AlbumViewer application in order to make it work with .NET Core 3.0. All of these are configuration changes that are essentially isolated to Startup.cs, which is a testament to the nice organization of configurability in ASP.NET Core. While configuration can become quite complex in large projects, at least it's easy to find where you need to look for the configuration options.

You can see most of the updates in this commit on GitHub.

EndPoint Routing

One of the new features of ASP.NET Core that was already introduced in 2.2 and has been moved front and center in 3.0 is EndPoint Routing.

This new routing mechanism is global to the ASP.NET hosting infrastructure, rather than directly tied to the ASP.NET MVC framework as it was before. Previously routing was closely tied to MVC controllers, whereas now routing is managed at the host endpoint level.

This addresses a number of common use cases that makes it now possible to access routes as part of the middleware pipeline without having to use MVC specific mechanisms to access routing info. This was very difficult previously, but with EndPoint routing route data is now available as part of the pipeline.

In addition the same top level routing mechanism is used for MVC, SignalR and gRPC and any other framework that requires routing. The all can take advantage of this functionality without having to create their own framework specific routing semantics.

That's a nice enhancement, but it requires a few changes in the way routing and MVC is set up in the application.

In ConfigureServices() and the old code I explicitly used AddMvc() to set up MVC controller handling as well as configuring JSON API options:

old code

services
    .AddMvc(options =>
    {
        // options.Filters.Add(new ApiExceptionFilter());
    })
    .SetCompatibilityVersion(Microsoft.AspNetCore.Mvc.CompatibilityVersion.Version_2_2)
    .AddJsonOptions(opt =>
    {
        var resolver = opt.SerializerSettings.ContractResolver;
        if (resolver != null)
        {
	        var res = resolver as DefaultContractResolver;
	        res.NamingStrategy = null;
        }

        if (HostingEnvironment.IsDevelopment())
            opt.SerializerSettings.Formatting = Newtonsoft.Json.Formatting.Indented;
    });

The updated version uses AddControllers():

new code

services.AddControllers()
     // Use classic JSON 
     .AddNewtonsoftJson(opt =>
     {
         var resolver = opt.SerializerSettings.ContractResolver;
         if (resolver != null)
         {
             var res = resolver as DefaultContractResolver;
             res.NamingStrategy = null;
         }

         if (HostingEnvironment.IsDevelopment())
             opt.SerializerSettings.Formatting = Newtonsoft.Json.Formatting.Indented;
     });

In Configure() method then the hookup for using MVC and Controllers has also changed. Rather than specifying:

old code

app.UseMvcWithDefaultRoute();

you now have to add UseRouting() - which is the endpoint routing feature - plus you set up an endpoint for the MVC application:

new code

app.UseRouting();

// authentication / CORS have to follow .UseRouting! but before endpoints

app.UseEndpoints(endpoints =>
{
    endpoints.MapControllers();
});

Gotcha: Order Matters!

This new routing configuration is a little more finicky and I ran into a big Gotcha here with Authentication due to the order of the middleware components where Authentication/Authorization was not working if the order is not correct.

Very specifically it's important that UseRouting() is applied before you apply behavior that relies on routing such as authentication or authorization that is tied to specific routes on a controller or other endpoint.

The proper order for Routing, Auth/CORS and Endpoint mapping is:

// First
app.UseRouting();

app.UseCors("CorsPolicy");

app.UseAuthentication();
app.UseAuthorization();

app.UseStatusCodePages();
app.UseDefaultFiles(); 
app.UseStaticFiles();

// put last so header configs like CORS or Cookies etc can fire
app.UseEndpoints(endpoints =>
{
  endpoints.MapControllers();
});

JSON Changes

As you can see in the code above JSON configuration is also changing. The JSON configuration used above is for controller JsonResult returns.

ASP.NET Core 3.0 by default now uses a new set of high peroformance, built-in JSON parsing support classes including a new JSON parser and serializer that is higher performance and less featured than the old JSON.NET parser. Microsoft decided that such a core component should be part of the core framework rather than requiring a separate library that has to be added to each project.

The new parser is very fast and memory efficient as it is built from scratch using the new low level memory features like Span<T> and Memory<T> to take maximum advantage of these new features at the framework level.

If you're using basic JSON results and always receive return strongly typed results then the new Json parser features work great and give you an extra performance boost.

However, if you also return things like dynamic data, anonymous types or using the LINQ to JSON features for JSON.NET in the past, then you likely have to stick with the JSON.NET parser. I for one frequently return anonymous objects to clients in order to combine multiple resultsets into a single result object and for that I need to use the old JSON parser.

To do this you have to add an extra assembly now, as JSON.NET is no longer included in the framework dependency list by default:

<PackageReference Include="Microsoft.AspNetCore.Mvc.NewtonsoftJson" Version="3.0.0" />

And then explicitly configure it as part of the AddControllers() definition:

services.AddControllers()
    // Use classic JSON 
    .AddNewtonsoftJson(opt =>
    {
        var resolver = opt.SerializerSettings.ContractResolver;
        if (resolver != null)
        {
            var res = resolver as DefaultContractResolver;
            res.NamingStrategy = null;
        }

        if (HostingEnvironment.IsDevelopment())
            opt.SerializerSettings.Formatting = Newtonsoft.Json.Formatting.Indented;
    });

Note the additional configuration is optional, but in this particular application I needed to make sure I use PascalCase naming (the default had changed in .NET Core 2.0 to camelCase) in order to keep the original application's JSON client naming requirement intact. The default for .NET Core 2.x and later has been to use CamelCase and the code above removes the CamelCase contract resolver that's used by default.

Similar options are available for the new JSON parser, but the configuration syntax is somewhat different.

CORS Changes

I also ran into issues with CORS - specifically in HTTP DELETE requests, not working. In the AlbumViewer when I delete an Artist I get this HTTP response:

Even though AllowAnyMethod() is set on the CORS configuration it looks like DELETE is not working.

After a bit of experimenting (and remembering something similar with AllowAnyOrigin() in 2.2) I had to explicited specify the supported methods using WithMethods():

services.AddCors(options =>
{
    options.AddPolicy("CorsPolicy",
        builder => builder
            //.AllowAnyOrigin() // doesn't work
            .SetIsOriginAllowed(s=> true)
            //.AllowAnyMethod()  // doesn't work for DELETE!
            .WithMethods("GET","POST","DELETE","OPTIONS","PUT")
            .AllowAnyHeader()
            .AllowCredentials()
        );
});

And that works.

It would be nice if AllowAnyOrigin() and AllowAnyMethod() don't support any Origin and any Method, they should be obsoleted or at the very least there should be some information in the help text to specify how it doesn't work - neither of those worked as what their naming advertises.

It also looks like you're supposed to configure CORS slightly different in 3.0.

In 2.2 I used the above Policy definition in ConfigureServices() and then apply the policy globally.

old

 app.UseCors("CorsPolicy");

In 3.0 it looks like you're supposed to explicitly attach the policy to an endpoint. You still need to specify app.UseCors() (without a policy just to enable it), and then add it to the controller mapping:

**new (but doesn't work!)

app.UseCors()

...

app.UseEndpoints(endpoints =>
{
    endpoints.MapControllers()
        .RequireCors("CorsPolicy");  
});

However I had no luck getting that to work. Using the above combination netted me no CORS headers when accessing the app from a cross-domain (Angular Dev Server) site.

I had to go back to the original app.UseCors("CorsPolicy") to get CORS work…

This is a bit frustrating. The CORS documentation is very complex mainly because there are a number of combinations, and the fact that there seems to be some duplication and non-functionality of features seems odd.,

IHostingEnvironment to IWebHostEnvironment

Another minor change due to the endpoint routing changes is that the Startup class now by default injects an IWebHostEnvironment instead of a more generic IHostEnvironment. The naming reflects Web specific features as well as some new functionality that's more specific to Web applications.

The change is basically a search and replace for IHostingEnvironment to IWebHostingEnvironment. This affects the startup class and any other places where you might be injecting the hosting environment. In my AlbumViewer I use the Hosting Environment to extract some status information about the application to be displayed in the about page as well as finding the Content and Web roots for the application for reading the intial album data file for import.

Entity Framework 3.0 Fail

The final migration bits are related to Entity Framework and here I ran into some serious issues that I couldn't resolve. In fact I ended up going back to EF Core 2.2 because EF Core 3.0 just didn't work correctly with the data I was working with even for a really simple use case.

The very specific scenario that was giving me trouble had to do with a simple list query that returns Albums and artists as a list of nested objects. Specifically in .NET Core 3.0 the list would fail to return the Artist record for any album where there are multiple albums for an Artist. First albumn for the artist shows, any subsequent Artist for albums by the same artist would return empty objects.

This is a pretty basic query over data:

public async Task<List<Album>> GetAllAlbums(int page = 0, int pageSize = 15)
{
    IQueryable<Album> albums = Context.Albums
        .Include(ctx => ctx.Tracks)
        .Include(ctx => ctx.Artist)
        .OrderBy(alb => alb.Title);

    if (page > 0)
    {
        albums = albums
                        .Skip((page - 1) * pageSize)
                        .Take(pageSize);
    }

    return await albums.ToListAsync();
}

Yet it fails. I couldn't find a workaround and an issue on GitHub is pending for this.

There were also changes in the way that child entities are handled in one to many relationships - whereas in previous versions you didn't have to explicitly have to Context.Add() new or Context.Update() existing entities when you added them to a loaded parent object, you now always have to explicit add, update and remove entities. This is perhaps more consistent as there can be scenarios where your entity may not be loaded from the DB and so adding wouldn't do anything, but still this is a breaking change that is likely to affect a lot of people because it worked previously. In my scenario I didn't have any places where this was an issue but in several other applications I did.

Roll back to Entity Framework 2.2

The first problem above though was a show stopper for me. I couldn't get past that issue, so I ended up rolling back to EF Core 2.2 which just worked without the former error.

The good news is that EF Core 2.2.6 works just fine in .NET Core 3.0 applications - I didn't see any side effects due to old dependencies and existing functionality worked just fine with the 2.2.6 libraries. For now and for me at least I can't justify dealing with the issues in EF Core 3.0.

This is obvious not idea, but until EF Core 3.0 can iron out some of these issues using 2.2 is the only way I can move forward for the moment.

EF Core Problems Continue

It's disheartening to see where EF Core is headed. This and previous releases removed features, changed a number of core behaviors, and apparently has a number of show stopper issues that as far as I can tell don't have a workaround.

Database applications are at the core of the vast majority of applications that are built, and having a solid data stack is a vital component of any application stack. EF Core seems barely able to fill that role. While there are better alternatives, they are not an easy sell with many customers due to the perception that EF comes from Microsoft and so that has to be the good enough solution. Only it shouldn't be the good enough data solution, it should be as kick ass as the rest of the .NET stack.

I realize that it's difficult to build a reliable, consistent and performant data access layer/platform and that it takes time to get that right. But at the same time the EF Core team has had a lot of time and 3 major versions (with several major sub-versions) to build out a mature and reliable platform. Instead EF Core still feels like a V1 product with all the inherent inconsistencies and behavior and API changes.

Summary

Overall the upgrade process for ASP.NET Core 3.0 was pretty painless. The bulk of it - sans the debugging of the EF Core data issue and the CORS config issue - took around 20 minutes. The data issue took a while to track down and then some additional time going back to EF Core 2.2 and re-testing. But even so the process is relatively minor as there are just a few places that need to be updated.

At the end of the day make sure you double check each of the Startup class configuration section for things like Authentication, CORS, Routing, Logging and see if the syntax or behavior has changed.

Once that's done the rest is very likely to just work. And be noticably faster.

this post created and published with Markdown Monster
© Rick Strahl, West Wind Technologies, 2005-2019
Posted in ASP.NET Core  

Serving ASP.NET Core Web Content from External Folders

$
0
0

ASP.NET Core makes it easy to create a Web application regardless of whether you want to create code in raw middleware, using traditional MVC Controllers and Views, or by using Razor Pages as well as static content.

I love the fact that you can easily create a self-contained, local web server with ASP.NET Core. I have a lot of scenarios in desktop applications that need access to local Web content for rendering or preview functionality and having a quick way to display content is useful. I also have a host of local static documentation sites that I need to often tweak the HTML with and having a local Web Server that includes LiveReload functionality is very useful for quickly making small quick-fix changes.

One scenario I've been thinking about recently is to build a generic Web server that makes it easy to serve Web content from an arbitrary local folder - generically. Yeah I know there are lots of NodeJs tools that do this, but it's just as easy to create a standalone server in .NET now. By writing my own I can customize and provide exactly the features I need.

It's easy to build and just as easy to then publish that customized generic server as a .NET tool or as a self-contained EXE, so it's easy to share - even if it's just for myself on other machines.

I've talked a lot about Live Reload recently because, I ended up integrating it into a number of applications and frameworks to make it that much easier to build and debug applications. So my use case is to have a local Web static file Web Server that automatically has Live Reload enabled. Point it at a foler of HTML resources and go. Make changes to resources in that folder and see the page in the browser updated. As a bonus it also works with Razor Pages (with limitations) - all in a folder that you specify (or launch in).

If you want to take a look at the generic static file Web server you can install the LiveReloadServer .NET Tool like this (requires that the Dotnet Core 3.0 SDK is installed):

dotnet install -g LiveReloadServer

# run in current folder
LiveReloadServer

# point at a folder elsewhere
LiveReloadServer --WebRoot c:/temp/mysite/web --port 5500 --UseSsl true

Just in case you're unfamiliar with how LiveReload functionality works, here's the Westwind.AspnetCore.LiveReload middleware in action inside of a Web application. It's slightly different for the generic LiveReloadServer as there's no code - only file resources. You get the same features in this LiveReloadServer, with the exception of controller source code change refreshing:

In this post I'll describe how to build this generic standalone Web server that can serve static files and also - in limited capacity - Razor Pages. The server also supports fast and efficient, built-in LiveReload functionality which is enabled by default and so makes it perfect for developer scenarios.

Standard ASP.NET Core Site vs Generic Site

By default ASP.NET Core's services are fairly statically bound to a HostingEnvironment and a ContentRoot folder in which the application is installed. The ContentRoot is the binary folder where the application's binary and configuration files live. There's also a WebRoot folder and typically this is the wwwroot folder where the Web application expects static content to be served from. Static HTML files and CSS, Images and JavaScript resources typically live in this static wwwroot folder.

This is pretty accepted common ground and almost every ASP.NET Core application uses that same pattern. This is totally fine for typical custom Web application.

But if you want to serve content from other locations than the host folder or dynamically configure your application to process files from other locations, some additional setup is required. Turns out though, that ASP.NET Core makes this fairly easy via configuration once you find the right dials to tweak. Specifically various ASP.NET frameworks support specifying a FileProvider that determines where files are loaded from and by customizing paths it's relatively easy to serve content from other locations.

ASP.NET Core's File Providers

IFileProvider is a base interface that is used to as the name suggest provide files to the application. Files can come from different locations and rather than hard coding physical paths there are various file providers.

One of those providers is a PhysicalFileProvider which is used to specify a physical disk path from which to serve file resources. Other providers can serve files directly from embedded resources, from a stream or from custom data providers.

For loading content out of folders other than the default folder I'll use a PhysicalFileProvider and point it at application provided path.

Static Files from external Folders

My specific use case is to build a generic Live Reload static file Web server that I can run from either a folder to launch a static Web site in that folder or provide a --WebRootPath parameter to point at a folder.

ASP.NET Core uses the StaticFiles middleware, so to serve static files out of a different folder we can configure the .UseStaticFiles() initialization in Startup.Configure():

WebRootPath = Configuration["WebRootPath"];  // from config/CommandLine/Env
if(string.IsNullOrEmpty(WebRootPath))
    WebRootPath = Environment.CurrentPath;
...
app.UseStaticFiles(new StaticFileOptions
{
    FileProvider = new PhysicalFileProvider(WebRoot),
    RequestPath = new PathString("")
});

One of the options of the StaticFiles middleware is to specify a file provider which determines which folder to use for static files to serve. This folder location is set as the root path, with the context.Request.Path appended to find the file to serve.

Here I assign a PhysicalFileProvider with a new root path. I also set the RequestPath to "" which is the Root Path - normally this defaults to /wwwroot which is the location in default ASP.NET Core project where static content is served from. But in this case I want my server to serve directly out of the root folder I specify via config or the command line - as provided by a WebRoot configuration switch. RequestPath is set to empty to use the root folder.

That's literally all it takes to create a generic static file server.

This is a very simple, yet powerful use case: doing literally nothing more than adding the StaticFile middleware into a new application and setting the path gives you a generic static file Web server. Nice!

Now all that's left to do is to make this easily accessible to me and others. You can now build this application into an easy self-contained EXE console application, or to take it one level further make it into an easily shared dotnet tool that can be installed via the .NET SDK similar to an NPM install. The latter is likely the preferred use case, but I'll show both.

I've created the dotnet tool and have published it on NuGet. So if you're interested in a local static file Web server with LiveReload, you can install the server and run it with a couple of commands:

dotnet tool install -g LiveReloadServer

# Start in any folder or provide a --webroot
LiveReloadServer --webroot c:/sites/test site/web --port 5300 --UseSsl True

This fires up the local file server and includes the LiveReload functionality. Open a Web Page or dependent resource in the folder, make a change to the page or one of the dependent resources and see those the active page in the browser auto-refresh almost immediately.

Note that you can turn that off --LiveReloadEnabled False but the idea is to have ready to go pre-configured, fast live reload HTTP server to local content. It's great for quickly testing and tweaking a local HTML page or JavaScript library.

More on that later.

This tool fits a practical use case for me. I maintain a number of small Javascript libraries and running and modifying code and HTML layout is made much easier by using a local server with Live Reload. There are existing tools - mostly NodeJs based and NPM hosted - that do this including Browser-Sync and while this tool works, it's relatively slow and for me at least unreliable forcing me to frequently have to restart the server. So I've wanted to have a static file server that I can tweak and customize easily, and more importantly can create my own custom versions of.

Razor Pages

My primary use case was for static files, but as I was playing around with the static file functionality I thought to myself we should also be able to do the same thing with Razor Pages - in a limited fashion at least.

It turns out you can! You can redirect the Razor Pages base folder to a different location on disk at runtime and serve Razor Pages from that folder. This means I can start my generic server point it at an external folder and serve Razor pages out of that! Instant Razor Web Server - pretty cool, right?

Razor and Dynamic Compilation: Sharp Edges

Well, sort of - it totally works, but there are some big limitations in terms of what you can with your Razor Pages in this dynamically loaded site.

The idea is that you can simply drop a .cshtml page into a folder and it runs with access to in-page code Razor code, as long as it doesn't depend on external libraries or externally compiled code (.cs files).

In a nutshell the dynamic location suffers these shortcomings:

  • No source code compilation (no loose .cs files)
  • No way to add Nuget packages or assembly references

That's a pretty big disclaimer and yes this isn't suitable to build full-fledged applications, but that's not the use case - at least not for me.

The use case is what I call static content with benefits: Simple scripting scenarios common in Web pages. It works for what it is: Script page only Razor code and expressions, without adding explicit source code files, or external packages and assemblies.

Note that all of the file based Razor features work: You can use Layout and Partial Pages, you can use __ViewStart etc. And you can access Razor code inside of your Razor pages so it's fully functionalt, but only with those components and packages that the original application is compiled for.

It's certainly possible to recompile the main server application and manually add additional dependencies that are then available in the dynamically accessed site, but it's not possible (AFAIK) to dynamically add packages or assemblies once the application has started.

Disclaimer: I didn't look too hard, since that scenario isn't part of my use case so there might be a way to actually do this. But comments from David Fowler suggested that it's not and if it does not a recommended use case.

Why all the disclaimers? Because as Damien Edwards so eloquently pointed out:

“You're trying to re-create ASP.NET Web Pages”

While that would be super cool if that was possible, unfortunately due to the dynamic loading limitations it's more like what I mentioned earlier:

Static Pages with Benefits

Still Useful

That's still pretty powerful though - you can use this for simple page logic for simple fixups like adding a current year to a copyright notice, or doing an HttpClient lookup for a a latest version number for a download, load files from a different location etc. There are lots of use cases that are for mostly static pages that need a few simple helpers.

But it's not useful for creating full applications with custom code logic broken out into separate assemblies and complex business logic. There's no reason for not using a regular .NET Core project for this and have proper support for all the features that Razor Pages and the eco-system provides. If you need Live Reload services, you just add the Live Reload middleware into your project directly.

Hooking up Generic Razor Support

Ok, disclaimers or no, here's what it takes to hook up Razor Pages in an external folder. It's not very different from what I did earlier with the Static File Provider:

public void ConfigureServices(IServiceCollection services)
{
    services.AddLiveReload();

    WebRoot = Configuration["WebRoot"];
    if (string.IsNullOrEmpty(WebRoot))
        WebRoot = Environment.CurrentDirectory;
    var razEnabled = Configuration["RazorEnabled"];
    UseRazor = string.IsNullOrEmpty(razEnabled) ||
               !razEnabled.Equals("false", StringComparison.InvariantCultureIgnoreCase);


#if USE_RAZORPAGES
    if (UseRazor)
    {
        services.AddRazorPages(opt => { opt.RootDirectory = "/"; })
            .AddRazorRuntimeCompilation(
                opt =>
                {
                    // This would be useful but it's READ-ONLY
                    // opt.AdditionalReferencePaths = Path.Combine(WebRoot,"bin");

                    opt.FileProviders.Add(new PhysicalFileProvider(WebRoot));
                });
    }
#endif
}

You also need to add the Razor Runtime Compilation Package:

<ItemGroup><PackageReference Include="Microsoft.AspNetCore.Mvc.Razor.RuntimeCompilation" Version="3.0.0" /></ItemGroup>

Excluding Razor Conditionally

Adding Razor to the local file server has a price - it adds significant size to the tool and/or EXE. By adding the Razor Compilation package to the application the size goes up by nearly 20 megs for an EXE and close to 8megs for the .NET tool.

I made the Razor functionality compile conditionally using a Compiler Constant, because if you truly just need a static file server, removing the Razor dependency results in a much leaner package with faster startup time and much smaller footprint (especially if you create a standalone EXE).

To conditionally include the RazorCompilation NuGet package I can use a conditional in the .csproj file:

<PropertyGroup Condition="'$(Configuration)|$(Platform)'=='Debug|AnyCPU'"><DefineConstants>TRACE;USE_RAZORPAGES</DefineConstants></PropertyGroup><ItemGroup Condition="$(DefineConstants.Contains(USE_RAZORPAGES))"><PackageReference Include="Microsoft.AspNetCore.Mvc.Razor.RuntimeCompilation" Version="3.0.0" /></ItemGroup>

For the startup configuration too I need to make sure that the Razor Libraries never get referenced if Razor is excluded - otherwise I end up with compiler errors for missing Razor dependencies.

To do this I can use a bracketing block:

#if USE_RAZORPAGES
    if (UseRazor)
    {
         services.AddRazorPages(opt => { opt.RootDirectory = "/"; })
            ...
    }
#endif

This works great. Now I can easily switch back and forth between the Razor inclusive or exclusive build just by adding or removing the USE_RAZORPAGES compiler constant. Remove the Compiler Constant and I get a lean static files only build. Add it back in and Razor is added, but I get a decidedly larger build with Razor Pages support.

Creating a Generic LiveReload Web Server for Local Static Files

So my particular use case for this tooling is to build a static file Web server I can use to quickly preview and edit static Web sites locally. I have a number of documentation ‘sites’ that are static and having them quickly browsable is very useful. I also manage a number of small JavaScript libraries and being able to quickly run the demos and tests, and also have LiveReload to make iterative changes is nice.

This is nothing new. There are plenty of NodeJS based tools that do similar things. I've used http-server for static file serving and browser-sync for LiveReload functionality. However, I've always had issues with browser-sync getting… wait for it… out of sync 😃 and requiring refresh, plus it generally tends to be pretty slow.

Dotnet Tool Functionality

.NET now provides an NPM like experience for publishing and sharing tools much in the same way you can on NPM. In fact, it's even easier because you can simply build a Nuget package and publish that to NuGet to make it available as a .NET Tool by specifying a couple of extra project tags.

To do this all I need to do is:

Dotnet Tool

A Dotnet Tool is basically a Console application that is turned into a NuGet package. This ends up creating a special package that the Dotnet SDK can unpack and execute once it's been installed.

The first step is to create a Console Application. Note that my project should be a Console application rather than a Web application. Technically a Web Application is also a console application, but the project types and how they build and how dependencies are included are slightly different.

A Web project uses:

<Project Sdk="Microsoft.NET.Sdk.Web">

while a Console app uses:

<Project Sdk="Microsoft.NET.Sdk">

so I want to use the latter.

In order to pull in ASP.NET Core's feature support in the EXE I also have to add the Microsoft.AspNetCore.App so that the base ASP.NET Core libraries are available:

<ItemGroup><FrameworkReference Include="Microsoft.AspNetCore.App" />
  ...</ItemGroup>

With .NET 3.0 Microsoft recommends this approach over adding individual packages as it keeps the package list lean, and automatically ensures you get patched updates. Note that although this screams add the whole enchilada, the compiler is actually smart enough to add only assemblies out of that framework reference that you actually are using/referencing. I was skeptical at first, looking at the executables I can see only a small number of libs are included in the final output.

A custom Program Class

This is a special use case so rather than using the Default Builder, I explicitly specify what features I want to use in the Web startup so I use a custom host builder setup in program.cs (GitHub):

public static IHostBuilder CreateHostBuilder(string[] args)
{
    // Custom Config
    var config = new ConfigurationBuilder()
        .AddJsonFile("LiveReloadServer.json", optional: true)
        .AddEnvironmentVariables("LiveReloadServer_")
        .AddCommandLine(args)
        .Build();


    if (args.Contains("--help", StringComparer.InvariantCultureIgnoreCase) ||
        args.Contains("/h") || args.Contains("-h"))
    {
        ShowHelp();
        return null;
    }

    return Host.CreateDefaultBuilder(args)
        .ConfigureWebHostDefaults(webBuilder =>
        {
            webBuilder
                .UseConfiguration(config);

            string sport = config["Port"];
            bool useSsl = config["UseSsl"].Equals("true",StringComparison.InvariantCultureIgnoreCase);
            int.TryParse(sport, out int port);
            if (port == 0)
                port = 5000;

            webBuilder.UseUrls($"http{(useSsl ? "s" : "")}://0.0.0.0:{port}");

            webBuilder
                .UseStartup<Startup>();
        });
}

Specifically I want to limit the configuration providers used and explicitly specify my host urls as provided either by the defaults of the app or from the user's command line options (or LiveReload.json config).

The other thing thing the startup class needs to do is dynamically assign the host URL used to map the port provided and whether plain HTTP or HTTPS is used in the server which has to be done before the app gets bootstrapped.

This code also handles the help page, and displaying an error message if the builder fails to start the application which most commonly is due to the host port already being in use.

A simple Startup Class

The startup class is almost ridiculously simple - it only includes configuration for my LiveReload and the StaticFiles middleware, plus the Razor Pages config (GitHub):

public void ConfigureServices(IServiceCollection services)
{
    // Get Configuration Settings
    UseLiveReload = GetLogicalSetting("LiveReloadEnabled");
    UseRazor = GetLogicalSetting("RazorEnabled");
    WebRoot = Configuration["WebRoot"];
    if (string.IsNullOrEmpty(WebRoot))
        WebRoot = Environment.CurrentDirectory;
    else
        WebRoot = Path.GetFullPath(WebRoot,Environment.CurrentDirectory);

    if (UseLiveReload)
    {
        services.AddLiveReload(opt =>
        {
            opt.FolderToMonitor = WebRoot;
            opt.LiveReloadEnabled = UseLiveReload;
        });
    }


#if USE_RAZORPAGES
    if (UseRazor)
    {
        services.AddRazorPages(opt => { opt.RootDirectory = "/"; })
            .AddRazorRuntimeCompilation(
                opt =>
                {
                    // This would be useful but it's READ-ONLY
                    // opt.AdditionalReferencePaths = Path.Combine(WebRoot,"bin");
                    opt.FileProviders.Add(new PhysicalFileProvider(WebRoot));
                });
    }
#endif    
}    

The Configure() implementation has a little more code, primarily because it maps some of the configuration parameters onto features provided. Here I pull out the WebRoot and Port plus a few other items:

public void Configure(IApplicationBuilder app, IWebHostEnvironment env)
{
    bool useSsl = GetLogicalSetting("useSsl");
    bool showUrls = GetLogicalSetting("ShowUrls");
    string defaultFiles = Configuration["DefaultFiles"];
    if (string.IsNullOrEmpty(defaultFiles))
        defaultFiles = "index.html,default.htm,default.html";

    var strPort = Configuration["Port"];
    if (!int.TryParse(strPort, out Port))
        Port = 5000;

    if (UseLiveReload)
        app.UseLiveReload();

    if (showUrls)
    {
        app.Use(async (context, next) =>
        {
            var url = $"{context.Request.Scheme}://{context.Request.Host}  {context.Request.Path}{context.Request.QueryString}";
            Console.WriteLine(url);
            await next();
        });
    }

    app.UseDefaultFiles(new DefaultFilesOptions
    {
        FileProvider = new PhysicalFileProvider(WebRoot),
        DefaultFileNames = new List<string>(defaultFiles.Split(',',';'))
    });

    app.UseStaticFiles(new StaticFileOptions
    {
        FileProvider = new PhysicalFileProvider(WebRoot),
        RequestPath = new PathString("")
    });

#if USE_RAZORPAGES
    if (UseRazor)
    {
        app.UseRouting();
        app.UseEndpoints(endpoints => { endpoints.MapRazorPages(); });
    }
#endif
}

This code sets up the StaticFile and - if enabled - the Razor Pages middleware. It also adds another bit of optional inline middleware for echoing out the active URL to the console via the --ShowUrls flag which is fired on every request if enabled.

This is all there's to this little Console app that acts as a static file and Razor Page Web server with Live Reload. You should be able to run this application now with a command line like this:

LiveReload --UseSsl True --WebRoot c:\MySite\web --port 5310 --ShowUrls True 

At this point I've created a .NET Console application which has a folder full of files:

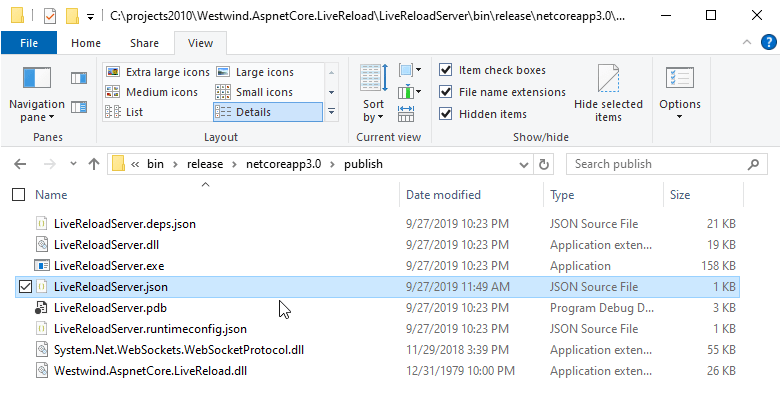
As you can see not much in the way of hard dependencies. Basically the only hard dependencies are the my own LiveReload dll from a package and its own WebSocket dependency. This is not bad, but let's deploy this a little bit cleaner by re-publishing as a Dotnet Tool that can be easily shared and updated.

Creating the Dotnet Tool

A dotnet tool is a special NuGet package that can be installed locally and run as a tool. Some dotnet tools you may be familiar with is dotnet watch, the User Secrets manager, the EF Core Migrations manager. Each of these is installed as a Dotnet Tool that happens to be preinstalled, but you can also install your own tools.

The process is simple:

  • Create a Console App
  • Add special Packaging Tags to the Project that identifies as tool
  • Recompile your project
  • Publish (or share) the NuGet Package

We already have a Console app, so the next step is to add some additional tags into the project file to identify this project as a Dotnet Tool:

<PropertyGroup>
    ...<PackAsTool>true</PackAsTool><ToolCommandName>LiveReloadServer</ToolCommandName><PackageOutputPath>./nupkg</PackageOutputPath><GeneratePackageOnBuild>true</GeneratePackageOnBuild><PackageRequireLicenseAcceptance>false</PackageRequireLicenseAcceptance></PropertyGroup>    

This creates the package locally in the ./nupkg folder. Build the project…

Now you can test the tool locally by installing it from the output folder:

dotnet tool install -g LiveReloadServer --add-source ./nupkg

If all goes well you should then be able to run the tool:

LiveReloadServer --WebRoot c:\temp\MySite\web

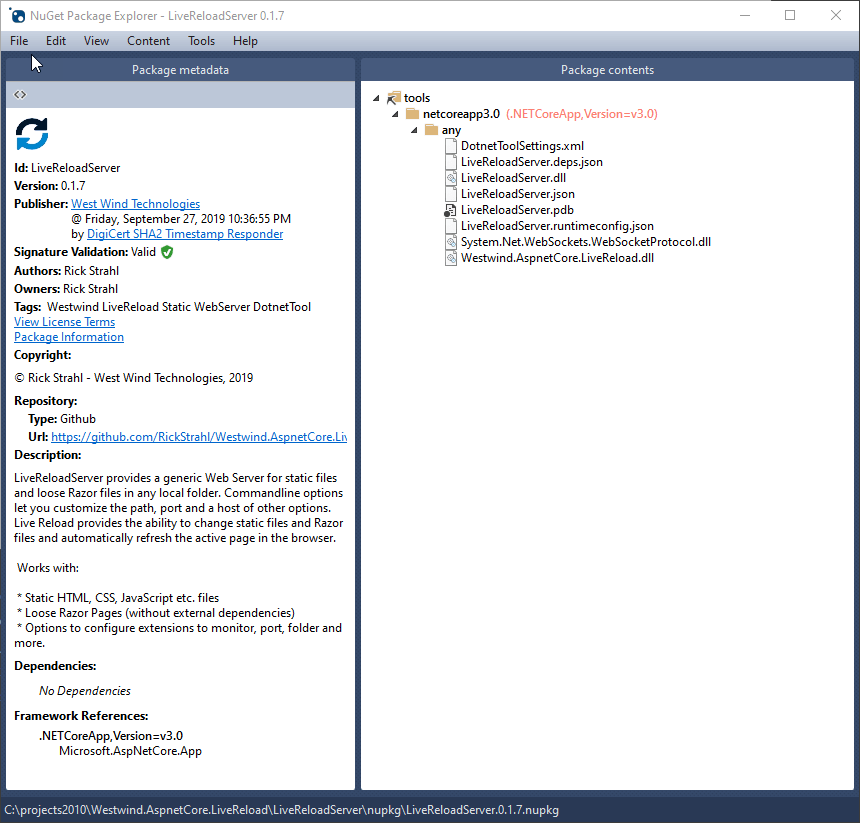
If that all works, the next step is to publish the package to NuGet. I like to use the NuGet Package Explorer for this (but you can also use command line tools to do it if you choose):

From here I typically use File->Sign, to first sign the package, and then using File->Publish using my NuGet publish key to publish the package.

Once pushed to NuGet you can now install the global tool on any machine that has the Dotnet Core SDK installed:

dotnet tool install LiveReloadServer -g

and then run it:

# run in current folder
LiveReloadServer

#specify a WebRoot
LiveReloadServer --WebRoot c:/temp/mysite/web

Using a global tool for this Live Reload Server is useful as it makes it extremely easy to install the tool on any machine that has the SDK installed. This includes machines on other platforms. I built this on Windows, but it'll work just the same on a Mac or Linux assuming the .NET SDK 3.0 is installed on those platforms.

Single EXE

Another option is publishing to a self-contained EXE. A self-contained EXE can contain everything it needs to run - including the .NET Core Runtime - in a single self-contained EXE.

To do this again you need to add some settings to your project file.

Note that EXE Single File publishing and NuGet Tool Packaging are mutually exclusive. So you can only use one or the other. I comment out the appropriate sections depending on how I want to build the application.

The configuration settings required look like this:

<PropertyGroup>  <PublishSingleFile>true</PublishSingleFile><PublishTrimmed>true</PublishTrimmed><RuntimeIdentifier>win-x64</RuntimeIdentifier><!--<PackAsTool>true</PackAsTool><ToolCommandName>LiveReloadServer</ToolCommandName><PackageOutputPath>./nupkg</PackageOutputPath><GeneratePackageOnBuild>true</GeneratePackageOnBuild><PackageRequireLicenseAcceptance>false</PackageRequireLicenseAcceptance>
    --></PropertyGroup>      

Note that you have to specify a specific platform to compile to - in this case win-x64. In order to publish this file go to the command line and run this command to build:

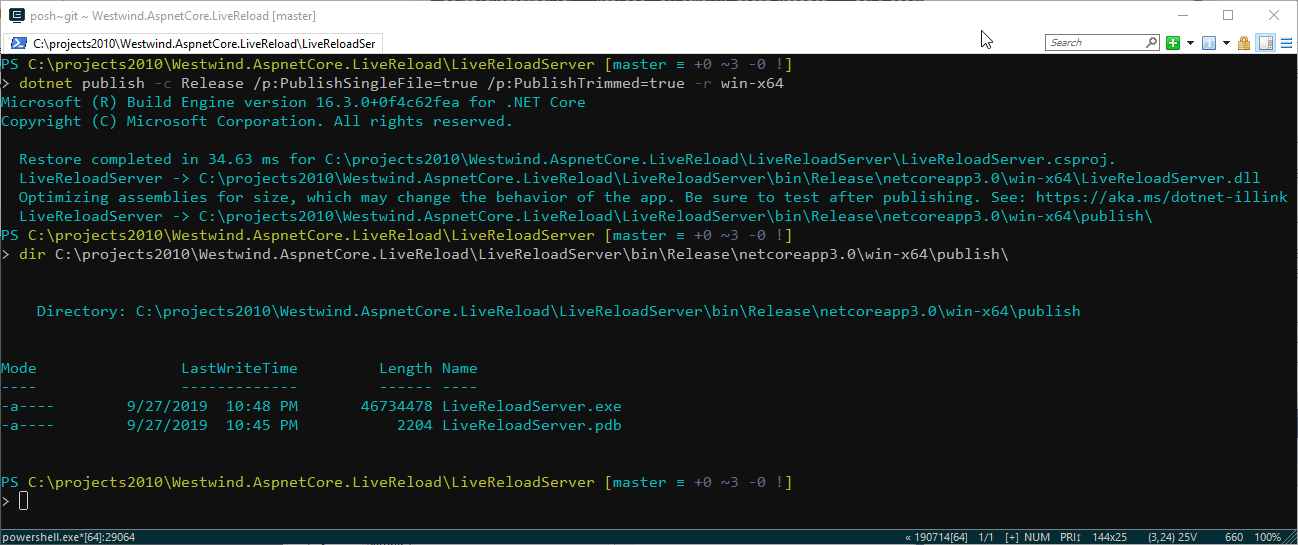
dotnet publish -c Release /p:PublishSingleFile=true /p:PublishTrimmed=true -r win-x64

Here's what that looks like as is churns for a minute or so:

This produced a 46mb Exe that is 100% self contained and has no external dependencies. Not exactly small, but still not too bad given that it includes all the dependencies - .NET Core and ASP.NET - to run the application. I can take that file and drop onto any 64 bit Windows box and it'll just work without installing anything else. If I want this to work on other platforms I have to explicitly build and compile for those platforms by changing the RuntimeIdentifier shown above.

This addresses a nice use case where you might want to provide a fully self contained tool without telling users to install an SDK or runtime first.

Which Distribution Model?

Which publish path you choose is up to you obviously - you've got choices and it depends on your target audience.

Here are some of the trade offs:

Dotnet Tool Pros

  • Easy to install with dotnet tool install
  • Easy to update with dotnet tool update
  • Works cross platform

Dotnet Tool Cons

  • Requires Dotnet SDK is installed

Self Contained Exe Pros

  • Single File you can place somewhere and run
  • No pre-requisites at all

Self Contained Exe Cons

  • Large file size (zip cuts 60-70%)
  • Separate Files for each Platform

At the end of the day it's a matter of preference. I have a few different use cases for this. As a simple HTTP server, the dotnet tooling is perfect because it's easy to grab the tool from any machine as long as the .NET SDK is installed.

But I also have some legacy applications with which I would like to ship a local Web Server. For that scenario a self-contained EXE is a much better choice, although the large size is not so cool.

Summary

This is a long winded post that talks about some of the cool things you can do fairly easily with .NET Core. It's literally just a handful of lines of code to spin up a generic local Web server you can use to serve local file resources, plus provide Live Reload services. The server spins up super fast and the integrated Live Reload functionality using WebSockets is also very responsive and quick.

The fact that you can build self contained server applications so easily and launch them from the command line is incredibly liberating. Even cooler is that this even works on multiple platforms. The tool I showed here works both on Windows, Linux and Mac.

Although the code in this tool is ridiculously simple as it defers all the heavy lifting to other middleware components, it provides a lot of value to me and fits in right with the idea of being able to repackage functionality into something new and useful.

Having a very simple Live Reload server locally that I can fire with a single simple command is a big improvement over the mish-mash of tools I was using before. The fact that I can easily customize this code to add on additional features with a few lines of code that I easily understand is even more of a bonus.

It's great to see the scenarios like this that .NET Core enables with minimal effort. There's a lot of interesting stuff that the hosting runtime provides that was very difficult to do in older versions of .NET - HTTP hosting, hosting HTTPS requests, Web Sockets etc. All of that is so much easier it opens up many opportunities… take advantage of it!

Resources

this post created and published with Markdown Monster
© Rick Strahl, West Wind Technologies, 2005-2019
Posted in ASP.NET Core  

Open Internet Settings Dialog directly on Windows

$
0
0

I've been recently working on an application that works with Windows Authentication and Active Directory and I'm finding myself frequently trying to hunt down the Internet Settings Dialog in Windows. You know the one that typically was opened through Internet Explorer:

It's getting increasingly more difficult to get to this dialog, because the new Windows Networking dialogs don't appear to link to it from anywhere anymore. The only interactive way to get there is through another application that brings up that dialog. Internet Exploder's settings get you there, or Chrome → Settings → Proxy Settings for example, but it's a pain to bring up these apps and then navigate the menus to bring up the dialog.

You can still find it in the old Control Panel settings. To do this type Control Panel into the Windows Search box, then go to Networking where you find Internet Options:

Directly open the Control Panel Applet

Luckily there's a much quicker way to get there.

First you can just type Internet Options into the search box and that takes you there directly:

You can also directly go there from the command line or the Windows Run box with:

control /name Microsoft.InternetOptions

and if you really need this frequently you can create a shortcut for it.

I'm leaving this here so I may find it in the future again after I've forgotten exactly what to search for or which control panel applet to load so I don't have to fire up Internet Explorer and use it's settings option to get there 😃

this post created and published with Markdown Monster
© Rick Strahl, West Wind Technologies, 2005-2019
Posted in Windows  

Windows Authentication and Account Caching on Web Browser Auto-Logins

$
0
0

Last week I ran into a nasty issue that had me seriously stumped. I've been working on an ASP.NET Core application that uses Windows Authentication to capture the network Active Directory login and needs access the user's AD and Windows group membership.

Seems easy enough - ASP.NET Core includes support for Windows Authentication including in Kestrel and on Windows this works as you would expect it to.

To set up Windows Authentication you need to add a Nuget package:

<PackageReference Include="Microsoft.AspNetCore.Authentication.Negotiate" Version="3.0.0" />

and then hook it up in ConfigureServices():

services
    .AddAuthentication(NegotiateDefaults.AuthenticationScheme)
    .AddNegotiate();

and in Configure():

// Enable System Authentication
app.UseAuthentication(); 
app.UseAuthorization();
Middleware Order Matters

Make sure you hook up Windows Authentication .UseAuthentication() and .UseAuthorizationafter.AddRouting() but before any other middleware that uses authentication like MVC or Pages or StaticFiles. If the order is wrong, authentication won't work.

Once hooked up authentication works as you would expect it to: You can apply it via an [Authorize] attribute on a controller or you can simply check context.User.Identity for the Windows WindowsIdentity or WindowsPrincipal. You can also explicitly challenge with a 401 response. The authentication provider gives you the authentication status, user account info along with the all the Windows or Active Directory Groups the user is part of.

Simple enough.

Auto-Logons vs Explicit Logins: Different Results?

I've been working on an application that relies on ActiveDirectory Group membership, to validate access to modules and components and since I don't actually have an AD server running on my local setup I've been using local Windows groups. The behavior of these groups vs. AD groups is not very different. So while I explicitly created a few custom groups that I can work with in this application locally.

But I ran into a perplexing snag that took me a few days to track and eventually solve with the help of a Stack Overflow question I posted (more on this below).

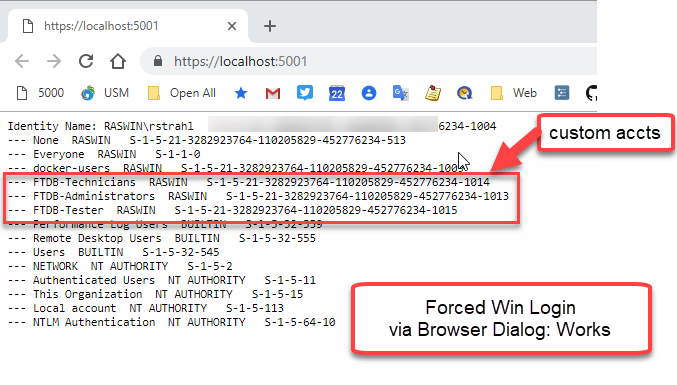
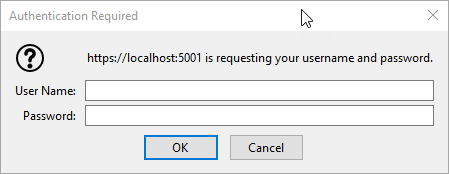
Depending on how I logged into my local development Web site I was getting a different set of groups returned to me. Explicitly logging in with a browser dialog would net an accurate list of groups, but automatically getting logged in by Windows auto-login in Chromium browsers or classic Edge would only show me a truncated list.

Explicit Login


Figure 1 - An explicit login via Browser Login Dialog properly returns the new groups.

Automatically Logged in


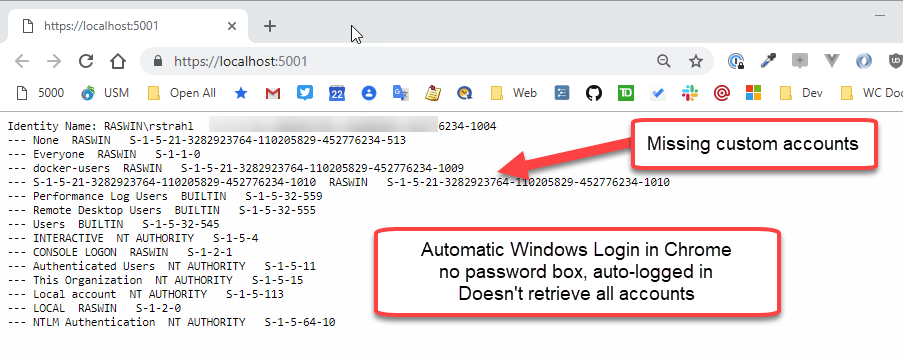
Figure 2 - Result from an automatic login is missing the the custom groups.

Yikes what the heck is going on here? Two very different results for the same exact Windows User! Notice those custom groups I created for the application are not showing up in Figure 2.

Testing Forced Login

Windows by default is set up to use automatic logins. Chromium browsers (Chrome, Edgium, Brave, Vivaldi etc.) and classic Edge use this setting to automatically try and authenticate the current Windows User when an NTLM or Negotiate 401 request is received logging you in with your current Windows or AD account.

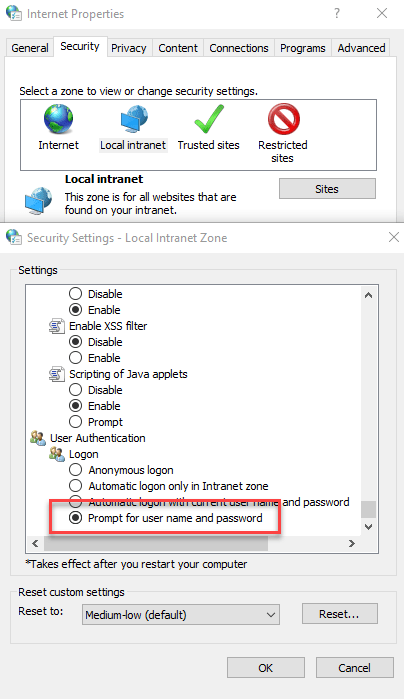
You can change this behavior and explicitly force Windows to always authenticate instead by using the Internet Settings from task bar, then digging into Local Intranet → Custom Level. At the bottom of the list you'll find an option to specify how Windows logins are handled:


Figure 3 - The Internet Settings dialog lets you customize how Windows gets your current Windows Login in a Browser

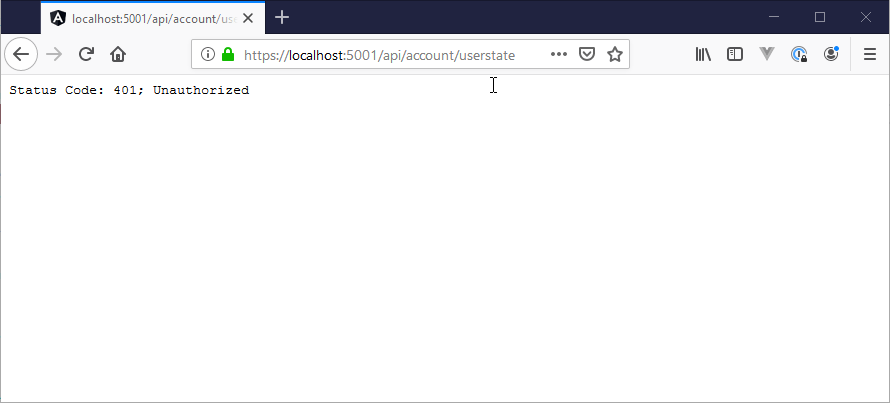
Note that FireFox doesn't do automatic Windows logins and always forces a browser dialog for explicitly logging in.

Watch for Cached Windows Logins

I'm going to spare you all the false starts I tried in trying to resolve this and cut straight to the solution which was pointed out to me on my Stack Overflow post by Gabriel Luci quite a few days after the initial question was posted. Thanks Gabriel!

The short of it is this: I created the new accounts listed in Figure 1, in my currently logged in Windows Profile. In other words - New Accounts!

When using automatic login it appears that Windows is using a cached account snapshot captured when you last logged on to Windows for the current session. This resulted in the missing groups shown in Figure 2, because the account snapshot apparently doesn't see these newly added accounts.

When Gabriel first pointed this out in the Stack Overflow post, I didn't believe it because:

  • I'd been fighting this issue for nearly week by then
  • I thought I had rebooted the machine

It turns out that apparently I did not reboot or log out. I did however, eventually explicitly log out of my Windows box, and logged back in, and lo and behold all the accounts are showing up now.

Summary

This is one of those things that makes a good deal of sense once you understand what's happening, but while it's happening it seems incredibly broken. In fact, I posted an issue on the ASP.NET Core repo for this, because I was sure this had to be a bug in how groups were handled - either in Windows or inside of ASP.NET Core. I went to extreme lengths to validate this with different scenarios - running with Kestrel, running with IIS Express, running under IIS proper.

In the end this is a problem in Windows behavior with a relatively simple solution: Log out to see your new group memberships and other updated user account info. This isn't ideal, because I suspect I'm not the only user who rarely logs out or reboots his machine these days. It's not uncommon for me to be logged in this way for a few weeks at a time. In an application that means that if users are added to groups and your application depends on that you have to have some sort of notification that reminds people to log off to see those new groups which isn't a great user experience to say the least.

It's an edge case to be sure, but if you have long logged in accounts which is not uncommon these days, this issue might come to bite you too… now you know what to do 😃

© Rick Strahl, West Wind Technologies, 2005-2019
Posted in ASP.NET Core  Windows  IIS  

Watch out for Windows Authentication, Groups and Added Groups

$
0
0

I've been struggling with a strange problem in an application that's using Windows Authentication against Active Directory domains. The application picks up the Windows user credentials including the Windows groups the user is a part of as part of the Windows Identity claims available in the WindowsIdentity object.

Ok - figured it out. Turns out it's sort of Operator Error, but related to the way Windows logons are apparently handled.

The issue is that I created new groups in Windows and then tried to use these groups in the application. These days, I don't reboot or log out of Windows very much so even though this discussion has dragged on for a week and more, I never logged out.

Apparently when you do Auto-Logon, Windows picks up a cached token of the user when the logon occurred. IOW, it looks like it shows only the groups that were present when I logged in. When logging in explicitly it refreshes credentials completely rather than re-using the cached credential.

When I finally decided to reboot my machine, the automatic login started returning the missing groups just fine. I verified if I add additional groups after the logon, they don't show up until I either log out or reboot.

This might be worthwhile to document in relation to groups with Windows Authentication.

this post created and published with Markdown Monster
© Rick Strahl, West Wind Technologies, 2005-2019

Don't let ASP.NET Core Console Logging Slow your App down

$
0
0
Today I ran into a self-inflicted problem with Console logging while playing with a toy test project. By accident I ran the application under load and Console Logging was on and performance was horrendous. In fact nearly 40x slower horrendous. Although my error, there are a few ways this can happen and it's important to understand that Console logging is very, very slow and in this post I show how this happened and why you want to be careful with Console logging in production.

Dynamically Loading Assemblies at Runtime in RazorPages

$
0
0

I've been working on some standalone tools that are generically serving static content as well as ASP.NET Core content from an arbitrary folder. With ASP.NET Core it's now possible using several different approaches to create standalone server applications that provide all sorts of utility with relative ease.

The tool I've built recently is a .NET based, standalone local dev server with built-in Live Reload functionality and it's main purpose is to serve static content locally in a self-contained fashion.

If you're interested you can grab the Dotnet Tool or a Standalone Exe (zipped).

To install the Dotnet Tool (requires .NET Core 3.0 SDK):

dotnet tool install --global LiveReloadServer

Install from Chocolatey as a standalone EXE (no dependencies):

choco install LiveReloadWebServer

Once installed you can run:

# dotnet tool
LiveReloadServer --WebRoot c:\temp\mysite\web 

# chocolatey install or EXE
LiveReloadWebServer --WebRoot c:\temp\mysite\web 

Note the different names for the dotnet tool and the standalone EXE, so it's possible to run both side by side in case both are installed.

There a few options for configuring the server, live reload, what to look for etc by using the --help command line switch.

Code for the LiveReload Middleware and generic Web Server can be found on GitHub:

Westwind.AspNetCore.LiveReload

First a little background.

Static Content First

My original goal for this generic server implementation was borne out of the frequent need to generically serve local HTTP content. I maintain several old JavaScript libraries as well as working on a number of locally maintained (static) documentation sites, plus several legacy tools that work with static content. For these a local Web Server with built-in Live Reload functionality is a incredibly useful and productive.

The goal originally was to simply support Static Content because that's the most common use case. The idea is that you simply start LiveReloadServer out of a folder with Web content and go or use the --WebRoot <path> command line to point at a different folder and you're up and running with a Live Reload Web Server.

There are other tools like BrowserSync, but they are Node based. For me personally these node based tools have been pretty flakey. They work for a bit but eventually have to be restarted to keep reloading content or they slow down to the point of unusability. By building my own I can easily tweak the way it works and fix any issues as they come up. To top it off ASP.NET Core makes this functionality relatively trivial to implement and I can customize it for my exact needs.

For static content this has all been a no-brainer and it works beautifully.

Limited Razor Pages Content

But I also got to thinking that it would be nice to support semi-dynamic content via Razor Pages in the referenced site. Razor Pages allow for self-contained .cshtml Razor pages on disk to be served including dynamic content via it's built-in support for C# Razor syntax.

Essentially you can create something like hello.cshtml and then serve that as https://localhost:5200/hello. The Razor page can then contain dynamic C# content.

Turns out it's very easy to route Razor pages to look for content in a non-install location:

if (UseRazor)
{
    services.AddRazorPages(opt => { opt.RootDirectory = "/"; })
        .AddRazorRuntimeCompilation(
            opt =>
            {
                opt.FileProviders.Add(new PhysicalFileProvider(WebRoot));
            });
}

In order for this dynamic Web Server concept to work, the first thing needed is to add .AddRazorRuntimeCompilation() and adding the following Nuget Package:

<ItemGroup><PackageReference Include="Microsoft.AspNetCore.Mvc.Razor.RuntimeCompilation" Version="3.0.0" /></ItemGroup>

Runtime compilation in ASP.NET Core 3.0 is disabled by default, which means you're expected to pre-compile all your RazorPages (and MVC Views), so there is no runtime recompilation when changes are made. The goal is for much faster startup time and that works, at the cost of development time convenience (or runtime changes).

Once the above configuration has been added I can now easily create a Razor Page (hello.cshtml) somewhere in the target folder hierarchy and then add something like this:

@page<html><body><h1>Hello World</h1><p>Time is: @DateTime.Now.ToString("hh:mm:ss tt")</p><hr>

@{
    var client = new System.Net.WebClient();
    var xml = await client.DownloadStringTaskAsync("https://west-wind.com/files/MarkdownMonster_version.xml");
    var start = xml.IndexOf("<Version>") + 9;        
    var end = xml.LastIndexOf("</Version>");
    var version = xml.Substring(start, end - start);
}<h3>Latest Markdown Monster Version: @version</h3><hr></body></html>

Not surprisingly this works just fine because all the dependencies in this code are directly contained in the .NET Core and ASP.NET Core runtimes.

Is this useful? It depends - you certainly wouldn't want to create a complex site with this, but it's quite useful for a number of simple use cases:

  • Create a local site that has some simple dynamic content
    • Adding current dates to pages
    • Looking up and displaying version numbers
    • Looking up and display status information retrieved from monitoring sites
  • Cross site search support for a documentation site

Not quite Full Razor Pages

So far everything I've described works just fine with runtime compilation. And it works because I've used only built-in features that are part of the .NET Core and ASP.NET runtimes plus whatever dependencies I compile in - Live Reload mainly.

Out of the Box this sort of generic Razor Rendering has a couple of drawbacks that don't work:

  • Loading external Assemblies
    Because runtime compiled Razor Pages are not pre-compiled you can't easily add assemblies to access at runtime. All that's available by default is what is compiled into the application when the static server was built originally - it doesn't look for other assemblies in the startup folder or elsewhere at least not automatically.

  • Compiling ‘code-behind’ code for Page Models
    Razor Pages supports both script-only and Page Model pages. With Page Models you provide a C# class that inherits from PageModel that has page lifecycle event hooks that can be overridden and provide the ability to create support functions to minimize code inside of scripted Razor Page. These CodeBehind code files also don't work at runtime - even with RazorCompilation enabled.

    While quite useful, Runtime Compilation is not something I have a solution for, nor is it something that really fits the generic Web Server scenario that is supposed to provide ‘static pages with benefits’.

Dynamically Load Assemblies for Razor Pages at Runtime

It turns out that runtime loading of assemblies however is possible, although it requires some special handling using a built in, and not very obvious support feature built into ASP.NET Core and MVC/Pages for just this purpose.

To make this work, my idea is to allow the --WebRoot folder that is the base Web folder to have a \PrivateBin subfolder into which assemblies can be placed.

When the server starts, the server looks for all the assemblies in that folder and then loads the assemblies at runtime.

Sounds simple enough right?

I can hook up the assembly loading when Razor Pages is configured:

#if USE_RAZORPAGES
    if (UseRazor)
    {
        var mvcBuilder = services.AddRazorPages(opt => opt.RootDirectory = "/")
            .AddRazorRuntimeCompilation(
                opt => { opt.FileProviders.Add(new PhysicalFileProvider(WebRoot)); });

        LoadPrivateBinAssemblies(mvcBuilder);
    }
#endif

Then:

private void LoadPrivateBinAssemblies(IMvcBuilder mvcBuilder)
{
    var binPath = Path.Combine(WebRoot, "privatebin");
    if (Directory.Exists(binPath))
    {
        var files = Directory.GetFiles(binPath);
        foreach (var file in files)
        {
            if (!file.EndsWith(".dll", StringComparison.CurrentCultureIgnoreCase))
                continue;

            try
            {
                var asm = AssemblyLoadContext.Default.LoadFromAssemblyPath(file);
            }
            catch (Exception ex)
            {
                FailedPrivateAssemblies.Add(file + "\n    - " + ex.Message);
            }
        }
    }
}

Well it turns out it's not quite that simple and the above code doesn't work to make the assemblies available in Razor.

While this loads the assemblies into the server process, they are not actually visible to the RazorPages engine. Say what?

This was frustrating as heck: I could see the assemblies being loaded into the server process - it shows in loaded assembly list, and I can even see it in Process Explorer's view of loaded assemblies. But even so Razor Pages refuses to reference any of the embedded types resulting in type loading errors.

It turns out, not only does the assembly have to be loaded, but you have to also let ASP.NET know that it's available.

There are a couple of ways to do this but the recommended way is to using mvcBuilder.AddApplicationPart():

try
{
    // Load the assembly manually
    var asm = AssemblyLoadContext.Default.LoadFromAssemblyPath(file);
    // Let Razor know about the assembly
    mvcBuilder.AddApplicationPart(asm);
}

You need to explicitly load the assembly and then notify the MVC/Razor engine that this assembly is available so that it can be referenced in our runtime compiled Razor Pages.

And voila this actually works to allow me to access my assemblies in Razor Pages now.

Assemblies? What's that?

Yeah, right?

We've been trained to use NuGet packages, so much so that it actually took me a bit to figure out a good way to actually retrieve the needed assemblies for a given package I wanted to use.

For example, I wanted to a Markdown library in one of my applications using the Westwind.AspNetCore.Markdown package.

This package has a dependency on another package - MarkDig - and so in order to actually use this functionality I have to make sure I get both dependencies into the PrivateBin folder where my custom application assembly loader looks for assemblies.

Easy enough, but it now becomes your responsibility to make sure all dependencies can be found and can be loaded.

Finding actual raw assemblies to pick out of NuGet packages is actually not so easy anymore in .NET Core, because unless you built a full, self-contained runtime publish pass, the output generated doesn't actually include all of the dependencies.

Short of extracting files directly from a .nupkg zip file, the only good way I could think of getting my raw assemblies was to create quick dotnet new console project and then doing a full self-contained publish to get at the assemblies.

If you can think of an easier way to pick assemblies out of packages short of unzipping .nupkg files, please leave a comment.

At the end of the day this is a pain, but if you need to use external functionality it's possible by compiling code into an assembly that's referenced this way. Cool.

Summary

Loading assemblies at runtime is not something that a typical application does, but it's something a generic tool like my static Web server requires. While it's not obvious how to load assemblies and it requires some explicit notification APIs to let Razor know about dynamically loaded assemblies, the good news is that it's quite possible to do this which opens up a lot of functionality that otherwise wouldn't be available.

Resources

this post created and published with the Markdown Monster Editor
© Rick Strahl, West Wind Technologies, 2005-2019
Posted in ASP.NET Core  

Dynamically Loading Assemblies in RazorPages

$
0
0

I've been working on some standalone tools that are generically serving static content as well as ASP.NET Core content from an arbitrary folder. With ASP.NET Core it's now possible using several different approaches to create standalone server applications that provide all sorts of utility with relative ease.

The tool I've built recently is a .NET based, standalone local dev server with built-in Live Reload functionality and its main purpose is to serve static content locally in a self-contained fashion.

If you're interested you can grab the Dotnet Tool or a Standalone Exe (zipped).

To install the Dotnet Tool (requires .NET Core 3.0 SDK and works on Windows, Mac, Linux):

dotnet tool install --global LiveReloadServer

Install from Chocolatey as a standalone EXE (no dependencies, Windows only):

choco install LiveReloadWebServer

Once installed you can run:

# dotnet tool
LiveReloadServer --WebRoot c:\temp\mysite\web 

# chocolatey install or EXE
LiveReloadWebServer --WebRoot c:\temp\mysite\web 

Note the different names for the dotnet tool and the standalone EXE, so it's possible to run both side by side in case both are installed. For the remainder of this post I'll use LiveReloadServer but it replies to LiveReloadWebServer as well

There a few options for configuring the server, live reload, what to look for etc by using the --help command line switch.

Static Content First

My original goal for this server was to simply support Static Content because that's the most common use case. The idea is that you simply start LiveReloadServer out of a folder with Web content and go or use the --WebRoot <path> command line to point at a different folder and you're up and running with a Live Reload Web Server.

There are other tools like BrowserSync, but they are Node based and for me personally these node based tools have been pretty flakey. They work for a bit but eventually have to be restarted constantly. By building my own, I can easily tweak the way it works and fix any issues as they come up. To top it off ASP.NET Core makes this functionality relatively trivial to implement. For more info on the Live Reload middleware see my Building a Live Reload Middleware Component for ASP.NET Core.

For static content this has all been a no-brainer and it works beautifully.

Limited Razor Pages Content

But I also got to thinking that it would be nice to support Razor Pages in the referenced site. Razor Pages allow for self-contained .cshtml Razor pages on disk to be served including dynamic content via it's built-in support for C# Razor syntax.

Essentially you can create something like hello.cshtml and then serve that as https://localhost:5200/hello. The Razor page can contain dynamic C# content.

Turns out it's very easy to route Razor pages to look for content in a non-install location:

if (UseRazor)
{
    services.AddRazorPages(opt => { opt.RootDirectory = "/"; })
        .AddRazorRuntimeCompilation(
            opt =>
            {
                opt.FileProviders.Add(new PhysicalFileProvider(WebRoot));
            });
}

In order for this dynamic Web Server concept to work, the first thing needed is to add .AddRazorRuntimeCompilation() and adding the following Nuget Package:

<ItemGroup><PackageReference Include="Microsoft.AspNetCore.Mvc.Razor.RuntimeCompilation" Version="3.0.0" /></ItemGroup>

Runtime compilation in ASP.NET Core 3.0 is disabled by default, which means you're expected to pre-compile all your RazorPages (and MVC Views), so there is no runtime recompilation when changes are made. The goal is for much faster startup time and that works, at the cost of development time convenience (or runtime changes).

Once the above configuration has been added I can now easily create a Razor Page (hello.cshtml) somewhere in the target folder hierarchy and then add something like this:

@page<html><body><h1>Hello World</h1><p>Time is: @DateTime.Now.ToString("hh:mm:ss tt")</p><hr>

@{
    var client = new System.Net.WebClient();
    var xml = await client.DownloadStringTaskAsync("https://west-wind.com/files/MarkdownMonster_version.xml");
    var start = xml.IndexOf("<Version>") + 9;        
    var end = xml.LastIndexOf("</Version>");
    var version = xml.Substring(start, end - start);
}<h3>Latest Markdown Monster Version: @version</h3><hr></body></html>

Not surprisingly this works just fine.

This works because all the dependencies in this code are directly contained in the .NET Core and ASP.NET Core runtimes.

No Runtime Compiled C# Code Files

So far everything I've described works just fine with runtime compilation.

But there are two things that don't work out of the box:

  • Loading of additional Assemblies
  • Compiling C# code for ‘code-behind’ Page Model files

The latter is something that hasn't been addressed, but the former surprisingly is possible with relatively little effort. However, it's not obvious.

© Rick Strahl, West Wind Technologies, 2005-2019

FireFox, Windows Security and Kestrel on ASP.NET Core

$
0
0

I've been working on an application that's using Windows Authentication for an intranet application. Windows authentication is used because some of the business rules are deeply dependent on Active Directory roles and authorization information and the most efficient way to get this information is through the built-in Windows authentication mechanisms that .NET Core provides.

I've run into issues with this application where the application refused to authenticate using Kestrel on my local machine when using the FireFox browser. Everything works with Chrome, Edgium and Edge, but FireFox, just returned an endless loop of login dialogs:

Figure 1 - FireFox Login dialogs galore

or - even worse refuses to even authenticate and just returns the stock ASP.NET Core 401 response:

Figure 2 - Default Kestrel Response to an Negotiate request in FireFox

Hrmmph!

Adding Windows Authentication to ASP.NET Core

I've written about using Windows Authentication not long ago, but it can't hurt to review the basics of setting up Windows Authentication again here since it doesn't take much to set up.

Start by adding a reference to the Negotiate Authentication package:

<PackageReference Include="Microsoft.AspNetCore.Authentication.Negotiate" Version="3.0.0" />

Negotiate is the authentication scheme (Negotiate) used that works with Windows auth. There's also NTLM, but as we'll see Kestrel actually doesn't support that out of the box. However, Negotiate will work in most cases.

and then hook it up in ConfigureServices():

services
    .AddAuthentication(NegotiateDefaults.AuthenticationScheme)
    .AddNegotiate();
and in Configure():

and turn it on in Configure():

// Enable System Authentication
app.UseAuthentication(); 
app.UseAuthorization();

The built-in middleware will pick up Windows Authentication ticket headers and create a a WindowsPricipal and WindowsIdentity which are derived from ClaimsPrincipal, which means that groups and other AD settings are provided as claims.

Middleware Order Matters

Make sure you hook up Windows Authentication .UseAuthentication() and .UseAuthorization after .AddRouting() but before any other middleware that uses authentication like MVC or Pages or StaticFiles. If the order is wrong, authentication won't work.

Once hooked up authentication works you can force authentication it via an [Authorize] attribute on a controller or you can simply check context.User.Identity for the Windows WindowsIdentity.

Using [Authorize] on a controller:

[Authorize]
public class AccountController : BaseController 
{ ... }

or you can access the User information in the HttpContext property of the controller:

var user = this.HttpContext.User.Identity;

You can also explicitly challenge with a 401 response from your code, for example in custom authentication middleware (as I'm doing in this application I'm working on):

if (!context.User.Identity.IsAuthenticated)
{
    context.Response.StatusCode = 401;
    context.Response.Headers.Add("www-authenticate",
        new StringValues(new string[] {"Negotiate", "NTLM"}));

    Logger.LogInformation("Login request from " + context.Connection.RemoteIpAddress);

    await context.Response.WriteAsync("Unauthorized Windows User");
    return null;
}

The authentication provider gives you the authentication status, user account info along with the all the Windows or Active Directory Groups the user is part of in the embedded Claims.

Simple enough.

It works, but… FireFox

So I've been building my application happily using the Chromium based version of Edge and it's been working without any issues. I've also check the app with classic Edge and actual Chrome and everything works as it should.

However, using Firefox I found that app was not authenticating at all. This particular app is an Angular application and so I'm running the local Dev Server on port 4200 and the .NET server on port 5001 in Kestrel with Kestrel providing the Windows authentication.

In FireFox this turned out to result in an endless loop of windows login dialogs. I was getting tired of this (and you will be too if I keep posting this image 😄):

When running from the Angular app, I would see the dialog because the Angular app is redirecting to the .NET server for authentication to pick up the authentication status. But each request just ends with the dreaded login dialog in an endless loop.

If I access the application directly and access one of the endpoints with FireFox, however I get no authentication at all, but just the authentication message.

This was made even more frustrating in that this wasn't working using Kestrel as the Web Server, but it was working with IIS Express. What the heck?

I captured the output from requests for both servers to see what the difference could be and found this:

Kestrel:

HTTP/1.1 401 Unauthorized
Date: Fri, 15 Nov 2019 00:51:46 GMT
Content-Type: text/plain
Server: Kestrel
WWW-Authenticate: Negotiate
Proxy-Support: Session-Based-Authentication
Content-Length: 530

Status Code: 401; Unauthorized                                              

IIS Express:

HTTP/1.1 401 Unauthorized
Content-Type: text/html; charset=us-ascii
Server: Microsoft-HTTPAPI/2.0
WWW-Authenticate: NTLM TlRMTVNTUAACAAAADAAMADgAAAAFgoqiVKtwQ7croagAAAAAAAAAAFAAUABEAAAACgDqSQAAAA9SAEEAUwBXAEkATgACAAwAUgBBAFMAVwBJAE4AAQAMAFIAQQBTAFcASQBOAAQADABSAEEAUwBXAEkATgADAAwAUgBBAFMAVwBJAE4ABwAIAH1CVNlNm9UBAAAAAA==
Date: Fri, 15 Nov 2019 00:44:33 GMT
Content-Length: 341
Proxy-Support: Session-Based-Authentication<!DOCTYPE HTML PUBLIC "-//W3C//DTD HTML 4.01//EN""http://www.w3.org/TR/html4/strict.dtd"><HTML><HEAD><TITLE>Not Authorized</TITLE><META HTTP-EQUIV="Content-Type" Content="text/html; charset=us-ascii"></HEAD><BODY><h2>Not Authorized</h2><hr><p>HTTP Error 401. The requested resource requires user authentication.</p></BODY></HTML>

Kestrel is sending a Negotiate header, while IIS is sending an NTLM authenticate header. Apparently, FireFox treats NTLM different than Negotiate and NTLM works without any special configuration. Negotiate however does not.

However, AFAIK there's no way to configure Kestrel to send an NTLM header as it defaults to Negotiate. Hrmph.

Configure FireFox

I knew that there are configuration options for Windows Authentication in FireFox and I started looking at those. The first thing I did is look at the NTLM settings (before I looked at the headers) - which as it turns out was the wrong set to change. NTLM works without configuration and that's why IIS Express ‘just worked’.

It wasn't until I saw the Negotiate header that I checked for the negotiate specific settings by configuring FireFox via its about:config settings.

To do this:

  • Open FireFox
  • Type about:config into the address bar
  • Type negotiate into the search box

This brings up these settings:

Set the network-negotiate-auth.trusted-uris which is a comma delimited list of domains that you need Windows/AD Auth to work with. The settings above are for negotiate. Add LOCALHOST for local development, and any other domains you are interested in.

Note I'm using both LOCALHOST and my local machine name - the latter is not really required, but I'm adding it just in case as I do have a few scenarios where I'm using a machine name.

And boom! That worked!

I am now able to properly log into the application with FireFox including auto-logins for local domains or workstation accounts.

It's great that this works, but this is still a bummer because it looks like this requires explicitly configuring FireFox manually in order to properly work with Windows Authentication. This isn't ideal for a Web application to say the least - even an intranet one, but presumably companies that are using FireFox and Windows or AD Auth have a standard policy for this already in place.

It would be nice if the behavior between Kestrel and IIS wasn't different and wouldn't require custom settings in FireFox to work…

Summary

I continue to find stumbling blocks with Windows Authentication in ASP.NET Core. It works, but there are rough edges. Windows Auth of course isn't an ideal solution to authentication, and wouldn't be my first choice, but alas due to requirements that's what has to be used in many cases.

Hopefully this post helps some of you and avoids the pain of trying to figure out why FireFox isn't authenticating with Windows Auth.

this post created and published with the Markdown Monster Editor
© Rick Strahl, West Wind Technologies, 2005-2019
Posted in ASP.NET Core  Authentication  

Creating Angular Synchronous and Asynchronous Validators for Template Validation

$
0
0

This isn't a new topic, but I've had a hard time to find consolidated information on Validators for the scenario I describe here so I decided to write this down. Although not complicated, it took me way too much time to hunt down all the information to make Async validators work, and I hope this post makes that process a little easier. I'm writing this, while using the current version which is Angular 8.

Angular provides a bunch of validation features and validators out of the box for the built-in HTML validations. So things like required, min-width and max-width and a generic RegEx validator just work without creating any custom validators.

But if you're building any type of reasonably complex application you're likely to require custom validations that require firing of custom business logic and at that point you'll have to dig in and create custom validators. If that business logic happens to live in data that's only on the server you will need to call an async validator which is just a little different.

The process for creating custom validators is:

  • Create a class derived from Validator or AsyncValidator
  • Implement the validate() method
  • Return null for valid, or an ValidationErrors object for invalid
  • Async Validators return an Observable<ValidationErrors> instead
  • Add the class to Module Declarations
  • Add the class to the component Provider list

To use it then:

  • Create declarative Validator(s) on HTML Template controls
  • Add error blocks for validation errors

Synchronous and asynchronous Validators are very similar - the main difference is that a sync Validator returns an error object instance directly, while the async version returns an Observable of the the same object. The most common use case for async Validators is doing a server validation via an HTTP Callback. I'll look at creating the sync version first, then modify for simulated async, and then finish off with an example AsyncValidator that makes an HTTP call to a server to validate some server side business logic.

Note, I prefer to use declarative validation with validators applied in the HTML template, so that's what I'll talk about here. But all of this also works with Reactive Forms where you can just provide the validator directly to the FormControl creation process.

Sync Validatators First

Let's create a very simple validator - a YesNoValidator. The validator takes an optional input value which is an attribute assignment of yes or no:

<input name="Name" yesNoValidator="no" />

If the key item in the above is the yesNoValidator="yes" on the <input> element no error is shown as the validation is valid. yesNoValidator="no" should display an error message. Note that validators don't require a value so you could have a validator like:

<input name="Name" yesNoValidator />

and that would still work. But if you do need to pass a value to the to the validator you can access it via the passed in control.value property. It's more typical to not have explicit values as in the latter example.

Validator Naming Conventions

The docs show validator selector names without a Validator postfix as I do here. I find that problematic because in a lot of cases it's not very obvious that the attribute is a validator. yesNo as an attribute is pretty ambiguous and to me at least yesNoValidator is not, so I'm leaving the Validator on in my selectors unless the name is obviously for validation.

Create the Validator Class

Lets start with the sync implementation by deriving a class from Validator and implementing the validate() method:

import {
    AbstractControl,
   NG_VALIDATORS,
    ValidationErrors, Validator
} from '@angular/forms';
import {Directive} from '@angular/core';

@Directive({
    selector: '[yesNoValidator][ngModel],[yesNoValidator][FormControl]',
    providers: [
        {provide: NG_VALIDATORS, useExisting: YesNoValidator, multi: true}
    ]
})
export class YesNoValidator implements Validator {

    constructor() {
    }

    validate(control: AbstractControl): ValidationErrors | null {
        const val = control.value;

        console.log("yesno validator: ",val);
        if (!val || val.toLowerCase() === 'yes') {
            return null;
        }
        return {yesNoValidator: 'You chose no, no, no!'};
    }
}

Register the Validator as a Validator and Provider

Make sure you provide the Validator to Angular's validator provider list in the class header using NG_VALIDATIONS in the provider list:

providers: [
    {provide: NG_VALIDATORS, useExisting: YesNoValidator, multi: true}
]

If you're building an async Validator use NG_ASYNC_VALIDATIONS. This is an easy thing to miss if you're converting a Validator from sync to Async so heads up!

Register the Validator Declaration in the Module

Finally, register the Validator with a module (or root module) where it's to be used:

@NgModule({
  declarations: [
      ...
      YesNoValidator
  ],

Use it in the Template

Then to actually use it in an HTML Template:

<mat-form-field><input matInput name="units" 
           [(ngModel)]="activeEffect.measurement.units"
           yesNoValidator="yes" required><mat-error *ngIf="form1.controls['units']?.errors?.required">
        Units is required.</mat-error><mat-error *ngIf="form1.controls['units']?.errors?.yesNoValidator">
        {{ form1.controls['units']?.errors?.yesNoValidator }}</mat-error></mat-form-field>

If I run this now and use no as the value I get:

If I run it with yes no error shows.

The validate() method

The validate(control:abstractControl): ValidationErrors|null implementation of a Validator works by returning null if the validation is valid (no error), or returning a ValidationErrors object that contains an error key/value.

The error value can be something that's simply a single true/false value, which is what some of the built-in Validators do For example required returns:

{ required:  true; }

I find it more useful to return an error message, so in the above yesNoValidator I return:

{ yesNoValidator: "You said, no, no, no." }

You can make this more complex as well to return an object:

{ 
    yesNoValidator: {
        isValid: false,
        message: "You said, no, no, no." 
    }
}    

IOW, it's up to you what to return, and what is then exposed to your error display logic in the template.

This object is then available on the form1.controls['name']?.errors?.yesNoValidator?.message property and you can then decide how to work with the values. I recommend keeping it simple and personally I like to use strings.

In a nutshell, for errors return an object with a single property and value that can produce a thruthy expression (which is just about anything).

Displaying Errors on a Declarative Form

Errors can be displayed based on the error status of a control. You can reference a Form Control and its .errors property to determine whether the are any errors. By convention it's something like:

form1.controls['name']?.errors?.yesNoValidator

and you can bind that or use it as an expression.

Note the ? for null handling, which you'll want to add since you otherwise end up with potential binding errors due to the missing errors object when there are no errors yet.

To put this into form error handling you can now use this with the simple string value:

<mat-error *ngIf="form1.controls['units']?.errors?.required">
    Units is required.</mat-error><mat-error *ngIf="form1.controls['units']?.errors?.yesNoValidator"><!-- I use an error string for the validator result value -->
    {{ form1.controls['units']?.errors?.yesNoValidator }}</mat-error>

And that works just fine! Make sure to use the nullable values (?s) to ensure there are no binding errors before there are errors or before the form has rendered.

If static values work for the messages, by all means use a static string in the UI. If the error message is dynamic and generated as part of the validator, it's nice to embed the customized message like yesNoValidator example.

Note that I'm using Angular Material which automatically detects validator errors and automatically fixes up the UI and styling. It actually displays errors without any conditional *ngIf expressions.

With plain HTML you have to use something <div *ngIf='...' to trigger rendering of errors explicitly. For Angular Material, the *ngIf expressions are necessary only if you have multiple validators and you want to selectively display one or the other.

Async Validators

The good news is that if you need an Async validator, the process is pretty much the same. The main difference is that you will be returning an Observable<ValidationErrors> rather than a the object directly and setting a couple of configuration strings differently.

Updated Async Validator

Since we've already seen the majority of the code that is required for a validator and that is also used from an AsyncValidator here's the AsyncValidator implementation:

import {
    AbstractControl, AsyncValidator,
    NG_ASYNC_VALIDATORS,
    ValidationErrors, Validator
} from '@angular/forms';
import {Directive} from '@angular/core';
import {Observable, of} from 'rxjs';


@Directive({
    selector: '[yesNoValidator][ngModel],[yesNoValidator][FormControl]',
    providers: [
        {provide: NG_ASYNC_VALIDATORS, useExisting: YesNoValidator, multi: true}
    ]
})
export class YesNoValidator implements AsyncValidator {

    constructor() {}

    validate(control: AbstractControl): Observable<ValidationErrors | null> {
        // turn into an observable
        return of( this._validateInternal(control));
    }

    _validateInternal(control: AbstractControl):ValidationErrors | null {
        const val = control.value;

        console.log('yesno async validator: ',val);
        if (!val || val.toLowerCase() === 'yes') {
            return null;
        }

        return {yesNoValidator: 'You chose no, no, no!'};
    }
}

I moved the old validation function into an private function to call, and then simply used the of rxJs operator to turn that result ValidationErrors value into an Observable. This is super contrived since there's nothing async happening here, but it demonstrates the async setup in the most minimal fashion possible.

Key Changes

The key code changes are:

  • Derive from AsyncValidator rather than Validator:
    export class YesNoValidator implements AsyncValidator
  • Return an Observable instead of a concrete value:
    validate(control: AbstractControl): Observable<ValidationErrors|null> {
        // turn into an observable
        return of( this._validateInternal(control));
    }
  • Make sure to add to NG_ASYNC_VALIDATORS providers instead of NG_VALIDATORS:
    providers: [
        {provide: NG_ASYNC_VALIDATORS, useExisting: YesNoValidator, multi: true}
    ]

There are no implementation changes in the HTML template - the same exact syntax is used. The same .errors object is returned along with the validated values.

A more practical Async Validation Example

The more common scenario for async Validations is to run some server side validation with an HTTP call.

Here's an example of an application level Validator that calls back to a server to determine whether an entered name already exists:

@Directive({
    selector: '[instrumentationNameValidator][ngModel],[instrumentationNameValidator][FormControl]',
    providers: [
        {provide: NG_ASYNC_VALIDATORS, useExisting: InstrumentationNameValidator, multi: true}
    ]
})
export class InstrumentationNameValidator implements AsyncValidator {

    constructor(private http: HttpClient,
                private config: AppConfiguration,
                private user: UserInfoService) {
    }

    validate(control: AbstractControl): Observable<ValidationErrors | null> {
        const url = this.config.urls.url('instrumentation-name-exist',
                                         control.value,
                                         this.user.userPk);
        const obs = this.http.get<boolean>(url)
            .pipe(
                debounceTime(350),   // from keyboard input
                map((isUsed) => {
                    // null no error, object for error
                    return !isUsed ? null : {
                        instrumentationNameValidator: 'Name exists already.'
                    };
                })
            );
        return obs;
    }
}

To use it:

<mat-form-field class="third-width"><input matInput placeholder="Name"
           name="name"
           [(ngModel)]="measurement.name"
           instrumentationNameValidator required><mat-error *ngIf="form1.controls['name']?.errors?.required">
        The name cannot be empty.</mat-error><mat-error *ngIf="form1.controls['name']?.errors?.instrumentationNameValidator">
        {{form1.controls['name']?.errors?.instrumentationNameValidator}}</mat-error></mat-form-field>

Any keystroke in the field triggers the validate method which creates a delayed (debounced) server request to check against an API whether the name entered already exists. The service returns true or false and map() turns that into null for false (no errors) or a ValidationErrors object if the value is true (has errors). Same as in the sync sample, but wrapped into the Observable.

When not valid, it triggers the second <mat-error> block and that displays the error message generated by the validator:

Voila - an async Validator at work.

Summary

There you have it. Validators are not complex to create, but it's a bit tedious to declare and hook them up so that Angular can find and use them. There are a few magic string combinations that can easily screw you up. Ask me how I know 😃 - operator error opportunities abound here. I've written down the things that helped me and that put all the pieces in context, so I hope that this is useful for some of you as well.

this post created and published with the Markdown Monster Editor
© Rick Strahl, West Wind Technologies, 2005-2019
Posted in Angular  

COM Object Access and dynamic in .NET Core 2.x

$
0
0
I was surprised to find out that COM Interop works in .NET Core when running on Windows. It's possible to access COM components via Reflection easily enough in .NET Core 2.x. Unfortunately use of the `dynamic` keyword does not work in .NET Core 2.x so for the moment COM interop is limited to using Reflection.

VSIX Installer Manifest and Visual Studio Version Numbers

$
0
0

I ran into a problem with my VSIX installer today when I tried to install my updated Visual Studio addin for the Markdown Monster Addin Project Template. This is a Visual Studio 2019 Project Template for Markdown Monster that creates a ready to run addin for Markdown Monster that can then be customized to build a custom addin to integrate into a variety of features of Markdown Monster.

Anyway today I needed to update this template to use a new version of .NET since I recently switched Markdown Monster to require .NET 4.7.2 due to .NET Standard compatibility (you can read about some of the why's here). In order to do this I had to update the old template which used the .NET 4.6.2 framework.

So I updated the framework version in my project template to 4.7.2 and happily recompiled my VSIX project expecting it to just work. I ran it in Debug mode and it worked so I was like "Cool - that was easy for a change.".

But that was where the cool part stopped.

Visual Studio Version Install Option Missing

My very first attempt to try to install the compiled VSIX from disk, didn't show me Visual Studio 2019 as an installation option Instead the installer only installed for Visual Studio 2017. My first thought was that the addin was already installed in 2019, but when I looked in the extensions dialog - nothing; it's not installed. Huh?

Turns out, the problem was the version configuration for Visual Studio versions because - surprise surprise - Visual Studio uses some funky wanna be SemVer version scheme for its versioning that doesn't work like you'd expect SemVer to work.

You need to specify which versions of Visual Studio your addin supports. I want to support VS 2017 and VS 2019 so it seems reasonable to set the following in source.extension.vsixmanifest:

<Installation><InstallationTarget Version="[15.0,16.0)" Id="Microsoft.VisualStudio.Community" /><InstallationTarget Version="[15.0,16.0)" Id="Microsoft.VisualStudio.Pro" /><InstallationTarget Version="[15.0,16.0)" Id="Microsoft.VisualStudio.Enterprise" /></Installation>

Versions 15 and 16 refer to Visual Studio 2017 and Visual Studio 2019 respectively. This works for Visual Studio 2017 (v15), but fails for my current Visual Studio 2019 Enterprise installation.

Turns out the reason is that my version of Visual Studio is not 16.0 but 16.4 which is the 4th revision of 2019. The only way I could get this to work is to use 17.0 as the version number:

<Installation><InstallationTarget Version="[15.0,17.0)" Id="Microsoft.VisualStudio.Community" /><InstallationTarget Version="[15.0,17.0)" Id="Microsoft.VisualStudio.Pro" /><InstallationTarget Version="[15.0,17.0)" Id="Microsoft.VisualStudio.Enterprise" /></Installation>

and that worked to now at least show me Visual Studio 2019 as an installation option.

Note Visual Studio doesn't use SemVer but some funky versioning scheme that requires that you use the next full .0 version. I tried using 16.5 and 16.9 for the upper bound and those values did not work. I had to use 17.0. Thanks to Mads' Blog Post to discover that little unobvious gem which eventually ended my version number bingo.

Disabled Visual Studio Version Checkboxes

Ok so that gets me my Visual Studio 2019 Addin installation prompt, but… it still wasn't working correctly. I ended up with disabled checkboxes when running the installer:

This time the issue was caused by the missing core editor despendency which also needs to have a version range defined. I had updated the installation targets but didn't update the Prerequisites which caused the disabled checkboxes.

<Prerequisites><Prerequisite Id="Microsoft.VisualStudio.Component.CoreEditor" Version="[15.0,17.0)" DisplayName="Visual Studio core editor" /></Prerequisites>

Once I fixed this setting I finally had success:

Note that both of these settings - the Installation Targets and Prerequisites - can also be set through the Addin Project dialog:

So you can set those same values there instead of in the source.extension.vsmanifest file.

Summary

Visual Studio Addins are always a pain in the ass. The documentation is terrible and VSIX installer is absolutely god-awful. Every single thing i've built as a VSIX has major problems as part of the install process, and this is just one more thing to add to the long list of UI and functionality failures of this whole process.

It is a great example of user hostile UI! How hard would it be instead of just displaying and disabling checkboxes, to display an error message or at the very least a more info Web link? But no - let's let users and the developers just poke around in the dark.

Hopefully this post helps you find the information to solve this particular issue if this same kind of version conflict happens to you, so you don't have to waste an hour or a few trying to randomly change things in hope that it'll fix the problem…

© Rick Strahl, West Wind Technologies, 2005-2019
Posted in Visual Studio  Addins  

A HighlightJs Copy Code Badge Component

$
0
0

HighlightJs-Badge in action

A while back I created a small addon component for use with HighlightJs that provides the ability to copy a code snippet and display the active language in a little badge above the code snippet. HighlightJS is a JavaScript based syntax highlighter that can pick out code snippets based on a simple and commonly used convention which uses <pre><code class="hljs language-javascript"> as it's trigger to render code snippets with one of several code styles.

If you're using HighlightJs for your code snippets in your blog, documentation or dynamic Markdown parsing on your Web site you might find this a useful enhancement for your code snippets.

Here's what the code-badge looks like:

The badge picks up and displays the language that HighlightJs renders. This is either the explicit value specified or the inferred value that HighlightJS tries to auto-discover. The badge is shown in low opacity that gets solid when hovering over the badge and you can click on the copy icon to copy the code block's content to the clipboard.

Here are some live example of code blocks in this Weblog you can play with:

Single Line Code

let x = 1;

Code block

public static string GetChecksumFromFile(string file)
{
    if (!File.Exists(file))
        return null;

    try
    {
        byte[] checkSum;
        using (FileStream stream = File.Open(file, FileMode.Open, FileAccess.Read, FileShare.Read))
        {
            var md = new MD5CryptoServiceProvider();
            checkSum = md.ComputeHash(stream);
        }

        return StringUtils.BinaryToBinHex(checkSum);
    }
    catch
    {
        return null;
    }
}

Auto-Detected (no language specified)

Content-Type: text/html
Accept: application/json
Content-Length: 12332

Why this Component?

This is not exactly a complex component, so why a whole component? Well, the devil's in the details as always and it's not actually as trivial as it looks to handle the code display and copy/paste generically. Building a non-custom version is easy enough but in order for it to work in various scenarios and without requiring explicit dependencies (CSS) takes a little more work.

The main reason I built this is that I have quite a few content Web sites and tools that use code snippets:

  • Several blogs
  • Tons of documentation sites
  • Markdown Monster uses HighlightJS code snippets

All of these Web based content generating tools and engines use code blocks, and can use this same component now (or will be anyway 😃). Originally I had just a few hacked scripts in several different sites and decided that I should consolidate them into something that can be more easily shared amongst all of my content.

This component is the result. I've been using this on this blog for a few months and it works well, albeit it required a few small fixes that made me come back to it this week. I'll talk about some of these later in this post because I think they are kind of interesting HTML errata items.

Install from NPM or Grab the Source Code

You can install it from NPM:

npm install highlightjs-badge

and you can pick up the source and latest dev versions from Github:

HighlightJs-badge on Github

If you want to play around with it you can look at a CodePen sample:

Sample on CodePen

Usage

To use this library is very simple - you add a script file and call highlightJsBadge() after highlightJS has been applied.

<!-- load highlightjs first --><link href="scripts/highlightjs/styles/vs2015.css" rel="stylesheet" /><script src="scripts/highlightjs/highlight.pack.js"></script><!-- then add this badge component --><script src="scripts/highlightjs-badge.min.js"></script><script>
    // apply HighlightJS
    var pres = document.querySelectorAll("pre>code");
    for (var i = 0; i < pres.length; i++) {
       hljs.highlightBlock(pres[i]);
    }
    // add HighlightJS-badge (options are optional)
    var options = {   // optional
       contentSelector: "#ArticleBody",
       // CSS class(es) used to render the copy icon.
       copyIconClass: "fas fa-copy",
       // CSS class(es) used to render the done icon.
       checkIconClass: "fas fa-check text-success"
    };
    window.highlightJsBadge(options);</script>

Styling

The default script includes default styling that should work great with dark themed syntax, and fairly well with light themed syntax.

You can customize the styling and the layout of badge by either overriding existing styles or by:

  • Overriding styles
  • Copying complete styles and template into page

Overriding styles

The easiest way to modify behavior is to override individual styles. The stock script includes a hardcoded style sheet and you can override the existing values with hard CSS overrides.

For example to override the background and icon sizing you can:

<style>
    .code-badge {
        padding: 8px !important;
        background: pink !important;
    }
    .code-badge-copy-icon {
        font-size: 1.3em !important;
    }</style>

Replace the Template and Styling Completely

Alternately you can completely replace the template and styling. If you look at the source file at the end of the file is a commented section that contains the complete template and you can copy and paste that template into your HTML page - at the bottom near the </body> tag.

<style>"@media print {
        .code-badge { display: none; }
    }
    .code-badge-pre {
        position: relative; 
    }
    .code-badge {
        display: flex;
        flex-direction: row;
        white-space: normal;
        background: transparent;
        background: #333;
        color: white;
        font-size: 0.8em;
        opacity: 0.5;
        border-radius: 0 0 0 7px;
        padding: 5px 8px 5px 8px;
        position: absolute;
        right: 0;
        top: 0;
    }
    .code-badge.active {
        opacity: 0.8;
    }
    .code-badge:hover {
        opacity: .95;
    }
    .code-badge a,
    .code-badge a:hover {
        text-decoration: none;
    }

    .code-badge-language {
        margin-right: 10px;
        font-weight: 600;
        color: goldenrod;
    }
    .code-badge-copy-icon {
        font-size: 1.2em;
        cursor: pointer;
        padding: 0 7px;
        margin-top:2;
    }
    .fa.text-success:{ color: limegreen !important}   </style><div id="CodeBadgeTemplate" style="display:none"><div class="code-badge"><div class="code-badge-language">{{language}}</div><div title="Copy to clipboard"><i class="{{copyIconClass}} code-badge-copy-icon"></i></div></div></div>

This is the same template that the library internally holds and injects into the page, but if #CodeBadgeTemplate exists in the document then that is used instead of the embedded template. When using your own template no styling is applied. so you neeed to include both the CSS and the CodeBadgeTemplate.

You can optionally separate out the CSS into a separate file and only include the #CodeBadgeTemplate<div> element - that's sufficient for your custom template and styling to kick in.

Component Design

The component is fully self contained and has no external dependencies other than highlightjs itself and - optionally, a font library (FontAwesome by default) - to display the copy icon. The icon styling can be customized so you can use just text or some other icon format like material design.

It's been a while since I've built a raw component without any dependencies oir jQuery and given that we can now pretty much count on ES6 support and features it's a lot easier than it used to be. In the past I probably would have made this a jquery component, but there's nothing here that really requires that, including support for IE 10/11.

So this component has no dependencies other than HighlightJs itself which obviously has to be loaded prior to using this component.

How does it work?

The component looks for the same container that highlightJs looks for and then injects the little code badge into the page after the <pre> tag. To do this it uses a template, which is a `

`` tag with the required template HTML that is then appended into the document for each code block:
<style>
    /* formatting for the code-badge */</style><div id="CodeBadgeTemplate" style="display:none"><div class="code-badge"><div class="code-badge-language">{{language}}</div><div title="Copy to clipboard"><i class="{{copyIconClass}} code-badge-copy-icon"></i></div></div></div>

The template includes a couple of replacable placeholders {{language}} and {{copyIconClass}} that are replaced when the template is rendered.

This template is internally provided in the code, but it can also be overridden simply by placing a #CodeBadgeTemplate element into the page - if it exists, that and existing styling will be used instead of the embedded template. This allows for any HTML/CSS customization you want to apply.

The code first checks to see if a template has been provided and if not reads the static template:

if (!document.querySelector(options.templateSelector)) {
    var node = document.createElement("div");
    node.innerHTML = getTemplate();   // internal template
    var style = node.querySelector("style");
    var template = node.querySelector(options.templateSelector);
    document.body.appendChild(style);
    document.body.appendChild(template);
}

Alternately the styling can be overridden more simply by applying style overrides:

<style>
    .code-badge {
        padding: 8px !important;
        background: #ccc !important;
        color: black !important;
    }
    .code-badge-copy-icon {
        font-size: 1.3em !important;
    }</style>

Processing Code Blocks

The core of code runs through the same code snippets that highlightJs should process which is the pre>code.hljs selector. It then inserts the new element <div class="code-badge"> element after the <pre> tag.

The key bits are simple enough:

var $codes = document.querySelectorAll("pre>code.hljs");        
for (var index = 0; index < $codes.length; index++) {
    var el = $codes[index];
    if (el.querySelector(".code-badge"))
        continue; // already exists
    var lang = "";

    for (var i = 0; i < el.classList.length; i++) {
        // class="hljs language-csharp"
        if (el.classList[i].substr(0, 9) === 'language-') {
            lang = el.classList[i].replace('language-', '');
            break;
        }
        // class="kotlin hljs"   (auto detected)
        if (!lang) {
            for (var j = 0; j < el.classList.length; j++) {
                if (el.classList[j] == 'hljs')
                    continue;
                lang = el.classList[j];
                break;
            }
        }
    }

    if (lang)
        lang = lang.toLowerCase();
    else
        lang = "text";

    var html = hudText.replace("{{language}}", lang)
                      .replace("{{copyIconClass}}",options.copyIconClass)
                      .trim();

    // insert the Hud panel
    var $newHud = document.createElement("div");
    $newHud.innerHTML = html;
    $newHud = $newHud.querySelector(".code-badge");        
    if(options.copyIconContent)
      $newHud.querySelector(".code-badge-copy-icon").innerText = options.copyIconContent;

    // make <pre> tag position:relative so positioning keeps pinned right
    // even with scroll bar scrolled
    var pre = el.parentElement;
    pre.style.position = "relative";

    // insert into the <pre> tag as first element
    el.insertBefore($newHud, el.firstChild);
}

The code loops through all snippets, and if it needs to add a badge, reads the template, copies it, replaces the language and icon and then embeds the newly created element into the document before the main <code> element.

Here's what the HTML for a code snippet looks like after this process has completed:

<pre class="code-badge-pre"><div class="code-badge"><div class="code-badge-language">javascript</div><div title="Copy to clipboard"><i class="code-badge-copy-icon fa-copy fa"></i></div></div>  <code class="hljs language-js javascript"><span class="hljs-keyword">let</span> x = <span class="hljs-number">1</span>;</code></pre>

The <div class="code-badge"> element has been injected as has the class="code-badge-pre" in the <pre> tag.

Relative Content

The <pre class="code-badge-pre"> in the snippet above is injected into the <pre> tag when the page is processed. This is unfortunately required because the <pre> tag on its own is not uniquely identifiable as a hljs code snippet - there could be other non hljs <pre> tags on the page and we need to explicitly set position: relative in order to be able to render the code badge reliable in the right corner of the code snippet.

Initially, I didn't use the <pre> container for the position: relative as I was trying to embed the code-badge into the inner <code class="hlks"> element. While this worked on the surface, it had a nasty side-effect with scrolled code blocks. For scrolled code content the badge was not sticking to the right side of the code block:

Notice how the code-badge in the middle doesn't stay pinned to the right of the code snippet 'container'.

This is a funky HTML behavior where the absolute positions are not updated based on scroll position for <pre> blocks, keeping the right: 0px location at it's original content location rather than pinning to the end of the content. Ugly. I would argue this is a browser bug, as absolute and 0px right certainly should never end up in the middle of the page regardless of scroll position. But alas, Chromium, FireFox and Edge all display the same (funky) behavior, so I guess it must follow some part of the spec that makes sense of this non-sensical behavior.

Anyway, the problem is that postion: absolute and right: 0 on scrolled content does not work if you want the content pinned to the right of the container. The solution is to move the position:relative up to the <pre> container which is a fixed and non-scrolling container into which the scrolling <code> tag is rendered.

In CSS this looks like this:

.code-badge-pre {
    position: relative; 
}
.code-badge {
    ...
    position: absolute;
    right: 0;
    top: 0;
}

That works, but there's still one more problem: How to select the <pre> tag as it doesn't have any identifiable information that identifies it as a hljs code-block. So the solution is to inject a class explicit at render time when the badge is injected as <pre class="code-badge-pre">:

var el = $codes[index];
...

// insert the Hud panel
var $newHud = document.createElement("div");
$newHud.innerHTML = html;  // assign template
$newHud = $newHud.querySelector(".code-badge"); 

// make <pre> tag position:relative so positioning keeps pinned right
// even with scroll bar scrolled
var pre = el.parentElement;            
pre.classList.add("code-badge-pre");
pre.insertBefore($newHud, el);

It's ugly, but it works.

Copying Code to the Clipboard

Once the the code badges have been created for all code blocks, we still need to handle the content click events. Since there may be quite a few code snippets on a large page, the clicks are consolidated via a single click handler on the content container (or body if not provided) which checks for specific instances of click targets against a .code-badge-copy-icon. This provides behavior similar to $el.on() 'late' event binding in jQuery:

var content = document.querySelector(options.contentSelector);

// single copy click handler
content.addEventListener("click",
   function (e) {                               
       var clicked = e.srcElement;
       if (clicked.classList.contains("code-badge-copy-icon")) {
           e.preventDefault();
           e.cancelBubble = true;
           copyCodeToClipboard(e);
       }
       return false;
   });

For the actual clipboard copying, I use a fairly generic routine. Since you can't directly copy text to the clipboard a workaround using an intermediary textarea and a text selection is required:

function copyCodeToClipboard(e) {
    // walk back up to <pre> tag
    var $origCode = e.srcElement.parentElement.parentElement.parentElement;

    // select the <code> tag and grab contained code as text
    var $code = $origCode.querySelector("pre>code");
    var text = $code.textContent || $code.innerText;
    // Create a textblock and assign the text and add to document
    var el = document.createElement('textarea');
    el.value = text.trim();
    document.body.appendChild(el);
    el.style.display = "block";

    // select the entire textblock
    if (window.document.documentMode)
        el.setSelectionRange(0, el.value.length);
    else
        el.select();
    
    // copy to clipboard
    document.execCommand('copy');
    
    // clean up element
    document.body.removeChild(el);
    
    // show the check icon (copied) briefly
    swapIcons($origCode);     
}

The code retrieves the content of the code block, creates a new TextArea node, copies the text into it, selects the text of the textarea and then uses the document.execCommand("copy") to copy the selected text to the clipboard. The node is then deleted. This convoluted approach makes it possible to copy aribtrary text to the clipboard as there's no explicit API to copy text directly.

innerText vs. textContent

When I originally created this component I had been using the codeElement.innerText to retrieve the text of the code block. Although that worked fine for Chromium and FireFox browsers, Internet Explorer 11 and 10 would return text with all the linebreaks and some spaces stripped.

After a bit of experimenting I realized that .innerText is probably not the right property to use, but it's much cleaner to use .textContent instead. For both IE and Chromium, .textContent returns the raw content while .innerText performs some browser depedent fix up on the string text. If you need to retrieve text that includes line breaks and significant white space make sure you use .textContent instead of .innerHtml or better yet using something like this:

// back up to the `<pre>` tag
var $origCode = e.srcElement.parentElement.parentElement.parentElement;

// Get Code Text
var $code = $origCode.querySelector("pre>code");
var text = $code.textContent || $code.innerText;

At Work: Using This Component

As mentioned I have a lot of places where I use code blocks with rendered Markdown and I use this component now in all of them. The code is portable and works with minimal additional code beyond what's already required in order for highlightJs to work. It's literally a single line (or a few more if you explicitly set options) plus the script tag to get this hooked in.

This seems like a minor feature for code snippet rendering and when a user request came in for this into Markdown Monster over a year ago I kind of dismissed as "can live without that". But when I sat down to actually add it some time ago to my blog, I all of a sudden found myself using the copy code button a lot. It's one of those features you don't know you need until you use it a few times on a largish code block - it's a lot easier to press on a single button than scroll and select two pages of code.

So yeah, it was worth the effort.

As is often the case for me, it's a very specialized type of component, but if you're using highlightJs you might find this useful as a ready-to-go addin. If you're using something else for code highlighting it probably wouldn't be hard to adjust the badge injection code to work with an alternate syntax highlighter either. Enjoy...

this post created and published with the Markdown Monster Editor
© Rick Strahl, West Wind Technologies, 2005-2019
Posted in Javascript  Blogging  

ASP.NET Core IIS InProcess Hosting Issue in .NET Core 3.1

$
0
0

I ran into a nasty issue yesterday related to hosting an ASP.NET Core 3.1 server application in IIS using the default InProcess hosting. If you're not familiar with ASP.NET Core hosting in IIS, here is a previous post that provides more insight on the two hosting modes, how they work and how they differ (post is for 2.2 but still applies for 3.x):

In .NET Core 3.x InProcess hosting for IIS is the default. OutOfProcess hosting externally runs Kestrel.exe and has IIS proxying requests into the external Kestrel HTTP host. InProcess hosting uses a custom IIS Module that bootstraps a custom .NET Core host right into the IIS host process which provides better performance and a smaller footprint.

Running my .NET Core 3.1 server OutOfProcess was working without problems, but as soon as I tried switching the server to InProcess I get this dreaded ANCM In-Process Start Failure error page:

.NET Core 3.0/3.1 has InProcess hosting on by default, but you can explicitly configure the value in the project via the AspNetCoreHostingModel explicitly.

<AspNetCoreHostingModel>OutOfProcess</AspNetCoreHostingModel>

or the now default value:

<AspNetCoreHostingModel>InProcess</AspNetCoreHostingModel>

This project configuration value translates to a web.config setting in the IIS publish output folder:

<system.webServer><aspNetCore processPath="dotnet.exe" 
                arguments="..\WebConnectionWebServer\WebConnectionWebServer.dll"
                stdoutLogEnabled="true"
                stdoutLogFile=".\logs\stdout"
                hostingModel="InProcess" /></system.webServer>

So in this case InProcess hosting is failing while OutOfProcess hosting is working. What gives?

Debugging Server Startup Failures

The ANCM (ASP.NET Core Module) error message page is scary because it doesn't provide much in the way of debugging information on the page itself. The link at the bottom takes you to a detailed page that talks about a number of hosting failures but didn't help much in the case of InProcess startup failures.

The specific advice is:

The ASP.NET Core Module attempts to start the .NET Core CLR in-process, but it fails to start. The cause of a process startup failure can usually be determined from entries in the Application Event Log and the ASP.NET Core Module stdout log.

First things First: Turn on Logging

So the first thing I always do when I have IIS hosting startup problems is to enable the logs by turning on the stdoutLogEnabled="true" in the web.config of your server installation (or you can add a pre-configured web.config to your project).

stdoutLogEnabled="true"

What this does is log stdOut into a file in the logs folder which should in most cases given you some additional information. This logs out Console output as well as logging output.

In my case it gave me some additional - albeit not very useful - information on what is failing in the form of a stack trace that I'm outputting as part of my main program error handling. I write out the exception info which in this case turns out to be rather verbose due to a deep callstack into the runtime itself:

Object reference not set to an instance of an object.
---
   at Microsoft.AspNetCore.Hosting.WebHostBuilderIISExtensions.<>c__DisplayClass0_0.<UseIIS>b__2(IISServerOptions options)
   at Microsoft.Extensions.Options.ConfigureNamedOptions`1.Configure(String name, TOptions options)
   at Microsoft.Extensions.Options.OptionsFactory`1.Create(String name)
   at Microsoft.Extensions.Options.OptionsManager`1.<>c__DisplayClass5_0.<Get>b__0()
   at System.Lazy`1.ViaFactory(LazyThreadSafetyMode mode)
   at System.Lazy`1.ExecutionAndPublication(LazyHelper executionAndPublication, Boolean useDefaultConstructor)
   at System.Lazy`1.CreateValue()
   at System.Lazy`1.get_Value()
   at Microsoft.Extensions.Options.OptionsCache`1.GetOrAdd(String name, Func`1 createOptions)
   at Microsoft.Extensions.Options.OptionsManager`1.Get(String name)
   at Microsoft.Extensions.Options.OptionsManager`1.get_Value()
   at Microsoft.AspNetCore.Server.IIS.Core.IISHttpServer..ctor(IISNativeApplication nativeApplication, IHostApplicationLifetime applicationLifetime, IAuthenticationSchemeProvider authentication, IOptions`1 options, ILogger`1 logger)
   at System.RuntimeMethodHandle.InvokeMethod(Object target, Object[] arguments, Signature sig, Boolean constructor, Boolean wrapExceptions)
   at System.Reflection.RuntimeConstructorInfo.Invoke(BindingFlags invokeAttr, Binder binder, Object[] parameters, CultureInfo culture)
   at Microsoft.Extensions.DependencyInjection.ServiceLookup.CallSiteRuntimeResolver.VisitConstructor(ConstructorCallSite constructorCallSite, RuntimeResolverContext context)
   at Microsoft.Extensions.DependencyInjection.ServiceLookup.CallSiteVisitor`2.VisitCallSiteMain(ServiceCallSite callSite, TArgument argument)
   at Microsoft.Extensions.DependencyInjection.ServiceLookup.CallSiteRuntimeResolver.VisitCache(ServiceCallSite callSite, RuntimeResolverContext context, ServiceProviderEngineScope serviceProviderEngine, RuntimeResolverLock lockType)
   at Microsoft.Extensions.DependencyInjection.ServiceLookup.CallSiteRuntimeResolver.VisitRootCache(ServiceCallSite singletonCallSite, RuntimeResolverContext context)
   at Microsoft.Extensions.DependencyInjection.ServiceLookup.CallSiteVisitor`2.VisitCallSite(ServiceCallSite callSite, TArgument argument)
   at Microsoft.Extensions.DependencyInjection.ServiceLookup.CallSiteRuntimeResolver.VisitIEnumerable(IEnumerableCallSite enumerableCallSite, RuntimeResolverContext context)
   at Microsoft.Extensions.DependencyInjection.ServiceLookup.CallSiteVisitor`2.VisitCallSiteMain(ServiceCallSite callSite, TArgument argument)
   at Microsoft.Extensions.DependencyInjection.ServiceLookup.CallSiteRuntimeResolver.VisitCache(ServiceCallSite callSite, RuntimeResolverContext context, ServiceProviderEngineScope serviceProviderEngine, RuntimeResolverLock lockType)
   at Microsoft.Extensions.DependencyInjection.ServiceLookup.CallSiteRuntimeResolver.VisitRootCache(ServiceCallSite singletonCallSite, RuntimeResolverContext context)
   at Microsoft.Extensions.DependencyInjection.ServiceLookup.CallSiteVisitor`2.VisitCallSite(ServiceCallSite callSite, TArgument argument)
   at Microsoft.Extensions.DependencyInjection.ServiceLookup.CallSiteRuntimeResolver.Resolve(ServiceCallSite callSite, ServiceProviderEngineScope scope)
   at Microsoft.Extensions.DependencyInjection.ServiceLookup.DynamicServiceProviderEngine.<>c__DisplayClass1_0.<RealizeService>b__0(ServiceProviderEngineScope scope)
   at Microsoft.Extensions.DependencyInjection.ServiceLookup.ServiceProviderEngine.GetService(Type serviceType, ServiceProviderEngineScope serviceProviderEngineScope)
   at Microsoft.Extensions.DependencyInjection.ServiceLookup.ServiceProviderEngineScope.GetService(Type serviceType)
   at Microsoft.Extensions.DependencyInjection.ServiceProviderServiceExtensions.GetService[T](IServiceProvider provider)
   at Microsoft.Extensions.Hosting.Internal.Host.StartAsync(CancellationToken cancellationToken)
   at Microsoft.Extensions.Hosting.HostingAbstractionsHostExtensions.RunAsync(IHost host, CancellationToken token)
   at Microsoft.Extensions.Hosting.HostingAbstractionsHostExtensions.RunAsync(IHost host, CancellationToken token)
   at Microsoft.Extensions.Hosting.HostingAbstractionsHostExtensions.Run(IHost host)

The code in question in my code ends at the builder.Build() call in Program.cs, which then goes into the internal CreateBuilder() functionality which then internally ends up calling the app.UseIIS() functionality that hooks up the IIS hosting. And that's when things go boom. Given that I'm failing at InProcess hosting only this doesn't exactly tell me anything new.

Still this logging output can be quite useful in other situations including the ability to quickly add some additional output that can tell you how far the code is getting during a startup failure.

This information is also available on Azure if you go into the log viewer - you don't even need to enable the logs they are on by default although at logging only error information.

The startup works perfectly fine for my server in OutOfProcess hosting, but fails InProcess which is very frustrating because the expectation is that InProcess and OutOfProcess should behave very closely the same - which they mostly do, but there are subtle differences. In this case the error trace doesn't provide much help because it ends up pointing into internal code related to loading the hosting runtime dlls.

Additional Debugging Detail

In addition here are additional debugging suggestions from David Fowler and Damien Edwards:

To set the Environment and turn on Detailed Error logging in web.config:

<aspNetCore processPath="dotnet.exe" 
        arguments="..\WebConnectionWebServer\WebConnectionWebServer.dll"
        stdoutLogEnabled="true"
        stdoutLogFile=".\logs\stdout"
        hostingModel="inprocess"><environmentVariables><environmentVariable name="ASPNETCORE_ENVIRONMENT" value="Development" /><environmentVariable name="WEBCONNECTION_DETAILEDERRORS" value="1" /><environmentVariable name="WEBCONNECTION_USELIVERELOAD" value="False" /><environmentVariable name="WEBCONNECTION_OPENBROWSER" value="False" /><environmentVariable name="WEBCONNECTION_SHOWURLS" value="False" /></environmentVariables></aspNetCore>             

Turns out in this case that didn't help and I didn't actually get more detailed error info because this happened as part of the initial startup sequence, but this is good advice nevertheless for startup debugging.

Damien Edwards also chimed in with looking in the Event Log:

Doing this I found the following in the event log:

which gives a slight hint into what's going on. It claims that the hosting DLL aspnetcoreV2_inprocess.dll which provides the interfacing between IIS and the .NET Core code, couldn't be found. It makes sense in hindsight now that I know what's going on, but initially when I looked at the error, there was no co-relation to the fix.

More on that in a minute...

.NET Core 3.x Regression with .NET Core Specific Pre-3.x Dependencies

It turns out that this problem was caused by regression in .NET Core 3.1 when certain, older .NET Core 2.x packages/assmeblies are referenced.

This project was originally built for 2.2 and then moved to 3.0 and then finally updated to 3.1 yesterday.

@JustinKotalik on the ASP.NET team spotted my Github Issue and pin-pointed the solution only a little while after posting on Github:

The problem is that my project had a reference to a 2.2 dependency which likely got added when the project was originally created in 2.2 (or perhaps referencing some IIS specific component that I no longer use):

<PackageReference Include="Microsoft.AspNetCore.Server.IIS" Version="2.2.6" />

I removed this reference since I wasn't even sure why it's there in the first place. Nothing broke on compilation, so good on that. As soon as I removed that package reference - BOOM - InProcess hosting started to work.

According to Justin this is caused by a regression in 3.1, that's causing the old 2.2 in process handler being deployed into an unexpected location. Specifically it relates to the following two packages:

  • Microsoft.AspNetCore
  • Microsoft.AspNetCore.Server.IIS

If you have explicit references to them in your 3.x projects you should be able to remove them as they are part of the ASP.NET Core Framework package. They come either from a 2.x project that was upgraded or by some fluke got imported when referencing a specific type and getting multiple choices and choosing the wrong one (ooops! been there done that).

You can read more detail about this regression issue in this issue on Github.

My particular app compiles both into a published folder application as well as into a Dotnet Tool and when I looked at my pre-fix Dotnet Tool package I noticed the following 2.2 references to the Inprocess handler in the Nuget package:

This looks very wrong...

Apparently when there one of these 2.2 ASP.NET Core references are in the project it causes these 2.2 versions of the inprocess.dll to be deployed in the runtimes folder. But if you look back at the event log error message it appears that the application is looking for that dependency in the root side by side to the binaries in the root folder.

In a self contained deployed 3.x application the aspnetcorev2_inprocess.dll is deployed into the root folder, but with the 2.2 reference there the root folder DLL (or one of its dependencies) was not found.

Self-Contained Issue

I haven't tried this but if you build a framework dependent published application this issue likely won't come up because the inprocess hosting dll is part of the shared runtime and will be available as part of the shared runtime folder from which the runtime binaries are loaded.

So this particular failure is specific to self-contained runtime installs and not an issue for shared runtime installs.

Either way, it's a good idea to check for the errant 2.2 packages because... they shouldn't be there regardless of whether it works or not. Once I removed the 2.2 package reference shown above, the runtimes folder was removed from the NuGet Tool package and from the self-contained publish runtimes folder. The standalone published application then started working InProcess.

Summary

Long story short, the 2.2 dependency is what broke the InProcess Hosting in IIS in .NET Core 3.1 for a self-contained runtime install. The 2.2 dependency can come from a direct dependency or potentially from an indirect dependency to other ASP.NET Core 2.2 references in child dependencies, so it may not be quite so easy to see where a 2.2 reference is coming from or potentially be difficult to remove if you don't control some component that's loading it. The IIS assembly should be safe to be only in Application code, buyt the Microsoft.AspNetCore reference could be more tricky if a component is referencing that.

This is a regression bug in .NET Core 3.1 and will be fixed in future updates so this bug won't be around in later updates (current version 3.1.101 which is still broken), but until this is fixed this might bite a few of you as it did me and hopefully this post makes it a little easier to find the solution.

this post created and published with the Markdown Monster Editor
© Rick Strahl, West Wind Technologies, 2005-2020
Posted in ASP.NET Core  

Enabling Internet Explorer Mode in Edge Chromium

$
0
0

Ah, wouldn't it be nice if we could get rid of Internet Explorer for good? Or even the need to launch a separate instance of IE to test some operation for IE?

As much as I hate Internet Explorer, I find that I need it from time to time. Mainly for debugging purposes of Web Browser control based applications with the Internet Explorer Web Browser control embedded into a Windows desktop application which works surprisingly well, but is unfortunately based on the legacy Internet Explorer engine. I often run some of the pages that the application internally renders in the browser if I need to do some thorny debugging of a JavaScript or funky styling issue.

I also need Internet Explorer for a few customer's legacy internal Web Sites/Portals. There's a surprising number of ancient applications out there that still require IE to work. Addins, using Java Components and plugins that no longer run in other browsers. Yech - but it's a fact of life unfortunately.

Enabling Internet Explorer Mode in Edge Chromium

Well, if you're using the new Chromium based Microsoft Edge Browser you can enable Internet Explorer mode, which essentially gives you the ability to open a new tab in IE mode. This was also possible in classic Edge BTW, and as we'll see support there was actually a bit more complete.

Set the IE Integration Flag

To enable IE integration you first have to set a configuration flag that enables this functionality in the browser.

Use the following URL to open the settings page:

edge://flags/#edge-internet-explorer-integration

and select

  • Enable IE Integration - IE mode

Here's what it should look like:

Use Experimental Startup Command Line

Since this feature is still a preview feature you also need to explicitly specify a command line option to enable the IE integration. You can create a separate shortcut for the specific command line:

"C:\Program Files (x86)\Microsoft\Edge Dev\Application\msedge.exe" --ie-mode-test

Here's what this looks like:

Open Windows in IE Mode

Once both the command line is set and the IE Mode flag is enabled you can now open new browser tabs either in Internet Explorer Mode or Edge Mode:

  • Click on the ... menu button
  • More Tools >
  • Choose Open sites in Internet Explorer mode or Open sites in Edge mode

Here's what this looks like:

... and yes you can see the mangled rendering of this Web site which clearly doesn't make any attempt to work with Internet Explorer. 😃

No Developer Tools

So with this feature in place you can now largely do without Internet Explorer, right? But there is one big caveat - if you need the debugger F12 tools for debugging code or HTML, you're out of luck:

Currently IE Mode doesn't appear to support the Internet Explorer developer tools so pressing F12 in IE mode will pop up the Chromium Tools not the Internet Explorer Tools.

Ugh... bummer. So maybe it's not quite yet time to throw out IE entirely.

With the developer tools missing you also don't get to set the Internet Explorer rendering version (IE7-IE11) as you could with the full dev tools available.

A new Web Browser Control? Please?

For me, the real solution for getting rid of Internet Explorer would be for Microsoft to hurry up and provide a decent embeddable version of the new Edge Chromium that can replace the legacy Web Browser control in applications. But Microsoft is dragging their feet after the initial exciting announcements more than 2 years ago that a new control would be forth-coming 'soon'... but here we are with no progress especially for .NET (there is some support for C++ but that too seems to have stalled).

While there are other Chromium based controls (CefSharp primarily) that have performance and deployment size concerns, and the classic Edge based WebView which is now pretty much obsolete, using something other than the Web Browser control today is a major pain in the butt. Say what you will about the Web Browser control it works well for what it does - it's fast, has no additional distribution footprint and it works reasonably well with HTML 5 content as long as you can live with ES5 code. But that's getting to be harder and harder to do, but it depends on your scenario.

So a new more integrated solution that ships as part of the browser platform rather than a separate big distribution certainly would be very welcome...

Summary

So, it looks like while you can now utilize Internet Explorer compatibility mode in Edge Chromium the feature support there is limited with no control over which IE version is used (other than doc meta tags in the content itself), and the inability to use directly use the F12 Dev Tools.

But still this integration might be useful if you just need to use one or two sites that require Internet Explorer, and let you run in a tab that alongside your regular non-legacy content tabs. Hopefully going forward this integration can be made a little more seamless without explicit tabs, but I think that's the goal once this functionality comes out of preview.

Overall though it's good to see this functionality being available to consolidate functionality in a single browser. It sucks having to keep various versions of browsers around just to see how this or that works. It's much cleaner to have it all running under one roof...

© Rick Strahl, West Wind Technologies, 2005-2020
Posted in Edge  Internet Explorer  

Deleting Problem Folders and Files on Windows: Could not find this Item Error

$
0
0

I ran into a nasty folder naming issue recently where I was unable to delete a number of folders on my server.

After some digging I figured out that the folders were created by the FTP server and a client application that was uploading files via FTP, but failed to trim trailing spaces of input on the publish folder. It's an old legacy application and the field input defaults to the extra spaces that weren't trimmed off before sending to the server resulting in the server happily creating folders with spaces.

Windows apparently does not like folders (or files) with trailing spaces.

The problems that Explorer can see the files, but can't delete them. Some applications would see the folders (Explorer primarily) while others (like the Windows Command Prompt) don't. When I tried to delete the folders I'd get this lovely error message:

Could not Find Item
This no longer located in <folder/file location>. Verify the item's location and try again.

The file is obviously there and I'm pointing at the folder to delete, but alas... the folder won't delete. Welcome to Windows using multiple different APIs to work with file information.

It's There - and it's Not

Some interesting things happen with this: If I do a directory listing of the parent folder, the 'misnamed' folder(s) (there are several of them in this root folder) using the command window or powershell they don't show in the listing:

Notice that none of the problem folders are showing up in the directory listing except the gorgeview-guidebook which was manually created without trailing spaces. Even using DIR /x which should show short/fixed up filenames, in a command window didn't show those missing folders.

I tried a bunch of stuff that didn't work:

  • Renaming the folder (file can't be found or file exists already)
  • Moving the folder to a new folder to delete the parent (didn't find to move)
  • Using Windows Terminal commands (REN/DEL) even with full paths

None of that worked. What's going on?

Part of the confusion seems to be that some operations/applications can see the files and others can't, sometimes even inside of the same application - like seeing the file in Explorer and then not finding it trying to delete it. It looks like two different APIs being used - one that can deal with extended files and one that cannot.

Files and Folders with Trailing Spaces

It turns out the issue is in my case is trailing spaces in the folder names.The folder names include trailing spaces and this appears to throw off some of the older Windows APIs that return directory information.

Here's what this looks like in Explorer:

Notice how the cursor in the folder edit textbox is way out to the right which is indicative of the extra spaces in the file name. Renaming here fails, too. Any file operation in Explorer fails as a matter of fact. It appears the file/folder list API can see the files but any of the actual file operations to act on the folder don't. As I mentioned I wasn't able to rename or move the folders containing the trailing spaces.

This behavior is similar to files that have full paths longer than the old 256 char MAX_LENGTH. If an application creates filenames or nested paths that are longer than 256 chars long Explorer and most commands can't deal with those either using standard file operations.

Deleting the Folders

The solution to deleting the files is to use the Windows Extended Path Format (\\?\ path prefix) when deleting the folder from the command line.

So rather than using just a simple path like this, which you'd expect to use but doesn't work:

rd /s "C:\Web Sites\docs.west-wind.com\faq                           "

you have to use the extended path syntax that supports long paths and apparently various special cases like trailing spaces. This does work:

rd /s "\\?\C:\Web Sites\docs.west-wind.com\faq                           "

The \\?\ relates to extended path syntax that supports long filenames as well as apparently being more lax with spaces in path names. The paths I use above still need to be fully qualified and must include the trailing spaces! To capture those trailing spaces I go into Explorer and copy the path from the address bar and paste it into the command line surrounded by quotes.

There's more info on the extended path syntax in the Microsoft Docs:

Naming Files, Paths and Namespaces

Although I'm having this issue with folders here, the same issues and solutions apply to files as well as folders. I didn't try it but I suspect you can also use other commands like REN to rename files as long as you use long path syntax for both files.

Summary

It's good to know that the extended path syntax using the \\?\ prefix can solve some funky filename issues. It solved the trailing space issue here and it can also be useful for dealing file deeply nested paths or extra long file names in nested paths that exceed 256 characters.

It'd be even nicer if Windows just worked with long and 'spaced out' file names all the time, but there are a million file APIs and most of them only support extended format paths with the \\?\ syntax. It's a good reminder - and an easy one to forget since I've been here before - and one of the reasons I decided to write this down in this post. Hopefully this might prove useful to a few others as well.

this post created and published with the Markdown Monster Editor
© Rick Strahl, West Wind Technologies, 2005-2020
Posted in Windows  

Null API Responses and HTTP 204 Results in ASP.NET Core

$
0
0

ASP.NET Core 3.x has a behavior that results in API results that return null from the controller action returning a HTTP 204 - No Content response rather than a null JSON result. Presumably the idea is that if you return null from an API, your intention is to return 'no content' and that sort of make sense in some cases. Except... when you're building an API null actually may actually have a meaning on the client or the client at minimum may be expecting a proper JSON response.

I've never been a fan of ASP.NET's API controllers 'helpfully' fixing up content like this. String API results also don't return an application/json string result, but rather unhelpfully return text/plain raw text. That has never made sense to me and the auto 204 result is no better.

Why so angry?

The reason this is a problem is because some frameworks that use HTTP clients look for specific HTTP result codes or expect a specific content type result for a 'data request'. Specifically Angular's HttpClient expects a 200 response (or perhaps an application/json content type?) for successful requests. Fire back a 204 and it turns the response into an error result which is a pain in the ass to work with at that point.

That's not helpful.

What does this look like?

To give you a better idea what I'm talking about here is a simple controller that demonstrates 3 different results using the default behaviors:

  • A full object response (JSON)
  • A null response (204)
  • And an explicit NoContent Action (204)

Here's the simple controller:

[ApiController]
[Route("api")]
public class HttpResultController : Controller
{
    [HttpGet,  Route("Http200")]
    public ResponseResult Http200()
    {
        return new ResponseResult {ResultValue = "Hello World"};
    }

    [HttpGet, Route("Http204")]
    public ResponseResult Http204()
    {
        return null;
    }
    [HttpGet, Route("HttpExplicitNoContent")]
    public IActionResult HttpExplicitNoContent()
    {
        return new NoContentResult();
    }
}

public class ResponseResult
{
    public bool IsError { get; set; }
    public string ResultValue {get; set;}
    public DateTime Timestamp { get; set; } = DateTime.UtcNow;
}

The first response from this request:

[HttpGet,  Route("Http200")]
public ResponseResult Http200()
{
    return new ResponseResult {ResultValue = "Hello World"};
}

as you would expect returns a JSON object:

The result content-type is application/json and the output is a JSON string of the object's result.

The second request returns null from the controller action:

[HttpGet, Route("Http204")]
public ResponseResult Http204()
{
    return null;
}

but returns a HTTP 204 response:

As you can see the result is HTTP 204 and there's no application/json content type set for the Response. It's a pure No Content result.

Finally the last request is just for reference to demonstrate how to explicitly return a no content result:

[HttpGet, Route("HttpExplicitNoContent")]
public IActionResult HttpExplicitNoContent()
{
    return new NoContentResult();
}

It also returns an HTTP 204 response which mirrors the previous request's HTTP 204 output.

My point in showing this last request is that if you intend to return a no content result, it's not exactly difficult to do. So, having a shortcut that turns nulls into HTTP 204's seems... superfluous to say the least.

Personally I prefer the last method when I explicitly want to return a HTTP 204 response. As mentioned a 204 or non JSON result may be interpreted incorrectly by a client framework as an error rather than a successful request and for that reason alone being explicit is a good idea.

Whether Angular's handling of the No Content Response is appropriate is up for debate (IMHO - no!), but that's another matter.

Working around the Default Null to Http 204 Conversion

So, to fix the auto 204 conversion, there's an easy workaround: You can remove the HttpNoContentOutputFormatter in Startup.cs and your ConfigureServices()method:

services.AddControllers(opt =>  // or AddMvc()
{
    // remove formatter that turns nulls into 204 - No Content responses
    // this formatter breaks Angular's Http response JSON parsing
    opt.OutputFormatters.RemoveType<HttpNoContentOutputFormatter>();
})

Et voila! Now when you re-run the null result request - it no longer produces a HTTP 204 response, but rather creates the full JSON null result:

Problem solved.

Other solutions: Using a Result Message Type

This cat can also be skinned a different way by returning richer result values that guarantee that an object is return for any valid result.

Rather than returning null or any simple type values like strings, you can use a result message object that includes some status properties to indicate success and failure or a no data status. It always returns an object even if the actual result data might be null.

This pushes the check for no data or null to the client rather than the framework intercepting the HTTP call and guarantees that there's always a value returned, and non-value results only occur when an actual error occurs.

This also solves the problem in the aforementioned Angular example.

A typical result type might look like this:

public class ResponseResult
{
    public string ResultValue {get; set;}
    public bool IsError { get; set; }
    public bool NoData { get; set; }
    public string Message {get; set;}
    public DateTime Timestamp { get; set; } = DateTime.UtcNow;
}

Rather than returning null, perhaps you set IsError = true or NoData = true to indicate the actual result state to the client. But you can still set ResultValue = null if that means anything to your client application.

While this works, it does add some overhead in the form of extra types that have to be created. This is made even worse by the new System.Json Serializer which can't serialize dynamic or anonymous types, so you can't do something like this:

return new { ResultValue = null, IsError = false };

unless you re-enable JSON.NET as I tend to do in just about any project as I often return anonymous type results.

This approach is not my preference, but it's a good way to get around the null result issue described in this post.

Summary

Yeah, I can bitch and moan about the choices the ASP.NET Core team is making for 'fixed up' API results, but at least there are always work arounds available to make this work as your application requires.

The solution for the null result is simple, by removing the HttpNoConteOutputFormatter in the configuration. For the string issue there's more work required unfortunately and for that you can check my older blog post on Accepting and Returning Raw Content.

Hopefully this post will help a few of you to resolve HTTP 204 issue if it crops up for you more quickly than I did...

this post created and published with the Markdown Monster Editor
© Rick Strahl, West Wind Technologies, 2005-2020
Posted in ASP.NET Core  
Viewing all 664 articles
Browse latest View live