Quantcast
Channel: Rick Strahl's Web Log
Viewing all 664 articles
Browse latest View live

Working with IWebHostEnvironment and IHostingEnvironment in dual targeted ASP.NET Core Projects

$
0
0

With .NET Core 3.1 Microsoft broke a fairly low level abstraction by effectively renaming IHostingEnvironment and replacing it with IWebHostEnvironment. IHostingEnvironment still exists in .NET Core 3.x and can still be used and it still works, but it's been marked as deprecated and will be removed in a future version. It is recommended that you use IWebHostEnvironment instead.

The reasoning behind this presumably was that IHostingEnvironment has multiple implementations for the same type in .NET Core in different packages.

The AspNetCore specific version in Microsoft.AspNetCore.Hosting looks like this:

public interface IHostingEnvironment
{
    string EnvironmentName { get; set; }
    string ApplicationName { get; set; }
    string ContentRootPath { get; set; }
    IFileProvider ContentRootFileProvider { get; set; }
    string WebRootPath { get; set; }
    IFileProvider WebRootFileProvider { get; set; }
}

while the base Extensions version in Microsoft.Extensions.Hosting doesn't have the WebRoot folder related properties:

public interface IHostingEnvironment
{
    string EnvironmentName { get; set; }
    string ApplicationName { get; set; }
    string ContentRootPath { get; set; }
    IFileProvider ContentRootFileProvider { get; set; }
}

The idea was to use the Web version in ASP.NET projects, while using the plain extensions versions for non-Web apps like Console or Desktop apps.

The type duplication isn't very clean, and somewhat understandable that that should this got cleaned up. Unfortunately, in doing so a few problems have been introduced if you need to build libraries that need to work both in .NET Core 2.x and 3.x.

Out with old in with the new: IWebHostEnvironment

So in .NET Core 3.0 there's a new IWebHostEnvironment and IHostEnvironment that separate out the two behaviors:

public interface IWebHostEnvironment : IHostEnvironment
{
   IFileProvider WebRootFileProvider { get; set; }
   string WebRootPath { get; set; }
}

public interface IHostEnvironment
{
   string ApplicationName { get; set; }
   IFileProvider ContentRootFileProvider { get; set; }
   string ContentRootPath { get; set; }
   string EnvironmentName { get; set; }
}

which admittedly is cleaner and more obvious. Since the interfaces are related they can be used interchangeably in many situations and non-Web applications can just stick with IHostEnvironment while Web apps can use IWebHostEnvironment. Presumably in the future there maybe other environments to run in and they may get their own extensions to IHostEnvironment.

All good right?

Multi-Targeting Required?

It's all good if you're creating an ASP.NET core Web application. When you're at the application level, you're not multi-targeting typically, so a 3.x app can use IWebHostEnvironment while a 2.x app can use IHostingEnvironment.

In 3.x ASP.NET's default dependency injection provides IWebHostEnvironment as well as IHostingEnvironment (for now) in the default DI container and your .NET Core 3.x single targeted project can just use that.

No problemo.

But now consider a library that might have to work both in .NET Core 2.x and 3.x. I have a not insignificant number of library projects/packages both public and internal and every single one of them has to be multi-targeted in order to work reliably in both versions of .NET Core without a number of warnings and type reference errors.

I ran into this originally from an issue submitted by Phil Haack on my Westwind.AspnetCore.Markdown package where the use of IHostingEnvironment in 3.x results in an empty reference through DI (I think this has since been fixed tho) possibly because the wrong type was injected (from extensions rather than the ASP.NET version). But regardless using the 'old' IHostingEnvironment results in a slew of warnings in the code due to the deprecation.

Easy to fix you say - reference the new one and we're off right? Except the new interface doesn't exist in 2.x so now you have a situation where you have to multi-target in order to use the new interface in the component.

Mind you there's no new functionality, no new behavior - nothing really has changed except the abstraction so yes this is pretty grumble worthy because it's essentially a cosmetic change.

Originally my packages were either .NET Standard or .NET Core 2.x targeted projects and they would work fine in 3.x. All the functionality introduced works in both framework and so there really was not specific reason to force these projects to dual target - the single 2.1 target works for both.

But alas, this IWebHostEnvironment change forces me to use multi-targeted projects in order to use both IHostingEnvironment and IWebHostEnvironment. Hrmph.

Multi-Targeting - maybe not so bad?

Thankfully multi-targeting is not too hard with the new SDK style project. You can just specify multiple <TargetFrameworks> and a few target specific overrides to reference the appropriate ASP.NET Core framework.

That solves the type availability, but it doesn't solve access to the proper hosting environment type in each version.

Hacking Around This

I haven't really found a good way to do this without using a mulit-targeted project. I can if I continue using IHostingEnvironment but then I'm stuck with a slew of warnings in the project, and the threat of the interface disappearing in future versions. So regardless it's probably necessary to multi-target so that the new interface can be used.

Given that here's a hacky way I've used to make this work:

  • Multi-target the project
  • Add a NETCORE2 compiler variable
  • Bracket code that wraps IWebHostEnvironemnt in a #if NETCORE2

To multi-target the project is pretty easy with SDK projects thankfully:

<PropertyGroup><TargetFrameworks>netcoreapp3.1;netcoreapp2.1;</TargetFrameworks></PropertyGroup>    

You also have to fix up a few depedencies potentially with target framework specific version directives. For example:

<ItemGroup Condition="'$(TargetFramework)' == 'netcoreapp3.1'"><FrameworkReference Include="Microsoft.AspNetCore.App" /></ItemGroup><ItemGroup Condition="'$(TargetFramework)' == 'netcoreapp2.1'"><PackageReference Include="Microsoft.AspNetCore.App" /></ItemGroup>

You can add other framework specific package dependencies into those blocks if there's a difference for 2.x and 3.x which might actually be a good argument for explicitly multi-targeting.

Then I add a NETCORE2 compiler flag, which I set when the code is compiled .NET Core 2.x:

<PropertyGroup Condition="'$(TargetFramework)' == 'netcoreapp2.1'"><DefineConstants>NETCORE2</DefineConstants></PropertyGroup>

So now I can selectively determine which version I'm running and based on that use the appropriate host environment. Yeah that's freaking ugly, but it works to consolidate the two types:

#if !NETCORE2
    protected IWebHostEnvironment Host { get; }
    public JavaScriptLocalizationResourcesController(
        IWebHostEnvironment host,
        DbResourceConfiguration config,
        IStringLocalizer<JavaScriptLocalizationResourcesController> localizer)
#else
    protected IHostingEnvironment Host { get; }
    public JavaScriptLocalizationResourcesController(
        IHostingEnvironment host,
        DbResourceConfiguration config,
        IStringLocalizer<JavaScriptLocalizationResourcesController> localizer)
#endif
{
    Config = config;
    Host = host; 
    Localizer = localizer;
}

The above is a controller, but the same type of logic can be applied inside of middleware (which also receives DI injection) or even manual provider.GetService<T> requests.

If you have one or two places where you use IWebHostEnvironment, this is a quick and dirty way to do it. However if your library needs access to the hosting environment in a lot of places this kind of code gets really ugly fast.

Take 1 - HostEnvironmentAbstraction

My first cut to address this was to build - yup - another abstraction. Wrap the native host environment into a container and basically isolate the multi-target logic that I showed above in a single place. That makes for one ugly class, but once that's done I can use the host container anywhere I would normally use the host.

Here's the abstration that provides both a DI injectable and static Host property:

/// <summary>
/// A Hosting Environment Abstraction for ASP.NET Core that
/// can be used to provide a single .Host instance that works
/// for both .NET Core 3.x and 2.x
///
/// Requires dual targeting for 2.x and 3.x
/// </summary>
/// <example>
/// var hostAbstraction = new HostingAbstraction( app.ApplicationServices);
/// app.AddSingleton<HostingAbstraction>(hostAbstraction);
///
/// then either:
/// 
///  * Use HostEnvironmentAbstraction.CurrentHost
///  * Or inject `HostEnvironmentAbstraction` with DI
/// </example>
public class HostEnvironmentAbstraction
{
    private IHostingEnvironment env;

    public HostEnvironmentAbstraction(IServiceProvider provider)
    {
        if (CurrentHost == null)
            InitializeHost(provider);
    }
    
#if NETCORE2
    /// <summary>
    /// Active Web Hosting Environment instance appropriate for the
    /// .NET version you're running.
    /// </summary>
    public static IHostingEnvironment CurrentHost { get; set; }


    /// <summary>
    /// Active Web Hosting Environment instance appropriate for the
    /// .NET version you're running.
    /// </summary>
    public IHostingEnvironment Host
    {
        get { return CurrentHost; }
    }
#else
    /// <summary>
    /// Active Web Hosting Environment instance appropriate for the
    /// .NET version you're running.
    /// </summary>
    public static IWebHostEnvironment CurrentHost {get; set;}


    /// <summary>
    /// Active Web Hosting Environment instance appropriate for the
    /// .NET version you're running.
    /// </summary>
    public IWebHostEnvironment Host
    {
        get { return CurrentHost; }
    }
#endif

    /// <summary>
    /// Initializes the host by retrieving either IWebHostEnvironment or IHostingEnvironment
    /// from DI 
    /// </summary>
    /// <param name="serviceProvider"></param>
    public static void InitializeHost(IServiceProvider serviceProvider)
    {

#if NETCORE2
        CurrentHost = serviceProvider.GetService<IHostingEnvironment>();
#else
        CurrentHost = serviceProvider.GetService<IWebHostEnvironment>();
#endif
    }

}

To use this requires a little setup - you basically have to initialize the hosting environment somewhere once during startup. This can be in startup.cs or if you're creating middleware in the middleware hookup code.

In Startup.cs and ConfigureServices() you'd use:

var provider = services.BuildServiceProvider();
var host = new HostEnvironmentAbstraction(provider);
services.AddSingleton<HostEnvironmentAbstraction>(host);

You can then inject the HostEnvironmentAbstraction and use the .Host property:

private IHostingEnvironment Host {get;} 

public JavaScriptLocalizationResourcesController(
    HostEnvironmentAbstraction hostAbstraction,
    DbResourceConfiguration config,
    IStringLocalizer<JavaScriptLocalizationResourcesController> localizer)
{
     Host = hostAbstraction.Host;
}

Alternately you can skip DI and just use the Singleton directly:

var host = HostEnvironmentAbstraction.Host;

Both give you the right hosting environment for your .NET Core version.

This works and certainly is cleaner the ugly conditional code inside of your application. It basically isolates that ugly code into a single ugly library class.

The downside with this is that it requires that you use a different object to get the host than you naturally would if you were running on either platform. Yet another abstraction... and going forward that code will not be standard. But again it's unlikely this is heavily used so probably just fine.

Take 2 - Use IWebHostEnvironment in 2.x too

Another approach is perhaps more user friendly in that it allows for working with IWebHostEnvironment both .NET Core 2.x as well 3.x.

The idea with this is basically that on .NET Core 2.x we can duplicate the .NET Core 3.x IWebHostEnvironment interface and pass an existing IHostingEnvironment to populate the values.

This is a more verbose implementation, but the usage is cleaner once implemented as you can basically write 2.x the same way you would 3.x by using IWebHostEnvironment code.

Here's the implementation of the LegacyHostEnvironment class that implements the faked IWebHostEnvironment and IHostEnvironment interfaces that don't exist in 2.x:

#if NETCORE2
using Microsoft.Extensions.FileProviders;

namespace Microsoft.AspNetCore.Hosting
{
    public class LegacyHostEnvironment : IWebHostEnvironment
    {
        public LegacyHostEnvironment(IHostingEnvironment environment)
        {
            ApplicationName = environment.ApplicationName;
            ContentRootFileProvider = environment.ContentRootFileProvider;
            ContentRootPath = environment.ContentRootPath;
            EnvironmentName = environment.EnvironmentName;
            WebRootFileProvider = environment.WebRootFileProvider;
            WebRootPath = environment.WebRootPath;
        }

        public string ApplicationName { get; set; }
        public IFileProvider ContentRootFileProvider { get; set; }
        public string ContentRootPath { get; set; }
        public string EnvironmentName { get; set; }
        public IFileProvider WebRootFileProvider { get; set; }
        public string WebRootPath { get; set; }
    }
    
    public interface IWebHostEnvironment : IHostEnvironment
    {
        IFileProvider WebRootFileProvider { get; set; }
        string WebRootPath { get; set; }
    }

    public interface IHostEnvironment
    {
        string ApplicationName { get; set; }
        IFileProvider ContentRootFileProvider { get; set; }
        string ContentRootPath { get; set; }
        string EnvironmentName { get; set; }
    }
}
#endif

To use this now you want to create an instance of this environment and add it to DI, but it's only necessary on 2.x. You basically need to get an instance of the IHostingEnvironment during startup and then create the new type.

The following code is what you can use in middleware initialization code in your AddMyMiddleware() implementation:

// Initialize the fake IWebHostingEnvironment  for .NET Core 2.x

#if NETCORE2
    // we need a provider to retrieve IHostingEnvironment on 2.x
    // or you can inject `IServiceProvider`
    provider = services.BuildServiceProvider();      
    
    var ihHost = provider.GetService<IHostingEnvironment>();
    var host = new LegacyHostEnvironment(ihHost);
    services.AddSingleton<IWebHostEnvironment>(host);   
#endif

Once that's done though you can now use IWebHostEnvironment in .NET Core 2.x and that controller implementation just becomes:

private IWebHostEnvironment Host {get;} 

public JavaScriptLocalizationResourcesController(
    IWebHostEnvironment host,
    DbResourceConfiguration config,
    IStringLocalizer<JavaScriptLocalizationResourcesController> localizer)
{
     Host = host;
}

even in .NET Core 2.x code.

Summary

Phew - yeah all of this is ugly, and regardless of what you do, if you need to support both .NET Core 2.x and 3.x and you need IWebHostEnvironment you need to multi-target. I haven't found a way around that even with this re-implementation of the last example. The NETCORE2 block is what makes that work and that requires multi-targeting.

Maybe there's a better way but I can't think of one for libraries that need to support both .NET Core 2.x and 3.x and require access to IWebHostEnvironment or IHostingEnvironment.

This seems like a lot of effort but I was tired of having to remember how to do this on several of my library projects and even more tired of the bracketed #if NETCORE2 code. I guess eventually this will go away as 2.x usage fades away but at the moment support for 2.x for libraries still seems important as there's more 2.x code out there than 3.x at this point.

Resources

this post created and published with the Markdown Monster Editor
© Rick Strahl, West Wind Technologies, 2005-2020
Posted in ASP.NET Core  

Troubleshooting Windows Sleep Insomnia

$
0
0

This isn't anything new, but I I've struggled with Windows machines that don't stay asleep when you shut them down. It's been going on for years and across many different machines and configurations.

Right now I have 3 different Windows laptops of various makes and age, and none of them sleep properly. They pretend to sleep, but as soon as you walk away - like a petulant child - the machine wakes up and parties on its own all night long!

You know the problem, right:

  • You shut down for the night
  • The machine goes to sleep
  • You walk by the office a bit later
  • The screen is on and the machine sits at the Login screen
  • All...night...long

It doesn't stay asleep and it doesn't go to sleep again when the Windows idle timeout is reached.

Seems Windows is not sleepy...

Another favorite in this Hit Parade:

  • Close the lid or explicitly sleep the computer
  • Put it into your computer bag
  • Take the bag and computer and go about your business
  • An hour or two later take the machine out of the bag
  • It's breakfast time: You can now fry an egg on the surface of the laptop
  • The fans are ready for internal drone liftoff

Both of these happen to me all the time. New machines, old machines, machines with one set of drivers, or with others, from this manufacturer or that. It doesn't matter, Windows is an equal opportunity insomniac.

Who do we blame? Windows? Yeah I do! regardless of whether this is a hardware issue or not, or the hardware? Both? The latter is probably right.

But this is a problem that simply should not happen. While I understand that it's nice to be able to have some devices wake the computer, there's a lot of things that Windows should be able to do to determine the state of the machine to figure out whether it actually should wake up. A finger print reader that activates while the lid is closed and the reader is hidden is not something that would ever be useful...

Windows could certainly provide better troubleshooting for this, given that I've heard this complaint from sooooo many people besides myself. It's low hanging usability fruit given how much of a pain this issue is, and how many people it affects. And... how often that's held up as one of the pain points Windows haters loooove to point out.

Apple certainly has that one figured out with Macs, but to be fair they control the hardware in addition to the software so they certainly have more control over what triggers system wake events. But hey even running Windows on a Mac with Parallels will cause these problems. So there's that!

Using PowerCfg

Over the weekend I ended up in a discussion of Windows problems on Twitter and I was - yup once again - complaining about the constant and very annoying sleep issues I've been experiencing.

Thanks to @philliphaydon and @hhrvoje who both pointed me at powercfg.exe which lets you check for all things that affect power operations. Using powercfg I was actually able to address the sleep insomnia.

With powercfg there are two things you can check:

  • WakeTimers
    These are operations or events (like Windows updates) that can trigger the machine to wake up.

  • Wake Armed Devices
    These are hardware devices that can trigger the machine to wake up from sleep.

Wake Timers

In my case I don't have any Wake Timers on my machine, so there's no hardware or software drivers that trigger waking up the computer.

To check of you have any Wake Timers:

# list wake timers
powercfng /waketimers

# show last item that woke Windows
powercfng /lastwake

Since I don't have any devices that are using wake timers I couldn't play around with this much, but if you have one that wakes up you can use the Device Manager settings to disable the wake up features for the device(s) listed or temporarily disable the device(s) to see if that helps.

Wake Armed Devices

The second and probably more important option lets you worked with armed devices which are devices that have sleep waking enabled.

There are three commands in powercfg:

  • powercfg /devicequery wake_armed
  • powercfg /devicedisablewake
  • powercfg /deviceenablewake

In my case putting it all together looked like this:

# list devices
powercfg /devicequery wake_armed"Goodix fingerprint"

# disable wake for specific device
powercfg /devicedisablewake "Goodix fingerprint"
# reenable  wake for specific device
powercfg /deviceenablewake "Goodix fingerprint"

The /devicequery command has a number of options you can work with powercnfg /devicequery /? but for this discussion the wake_armed parameter is probably the only one that is significant.

As you can see above, the only device that is armed (according to the command anyway) is my Fingerprint Reader on this Dell XPS 15. Once I disabled the device wake option, my machine now gets a good night's rest both when I put it to sleep explicitly at night and when I close the lid and stick it in a bag to carry around.

For the last 3 days - no problems with random wake ups and no fried eggs after bagging it either. Yay!

Oddly though, I know that there are other devices that will wake the computer. The mouse and keyboard certainly will bring the laptop back from the dead, as will the lid and powerbutton obviously. None of these devices show in the /devicequery, but perhaps these are the base, essential devices that are not even considered in the list of uh... potential wake event abusers.

Using Device Manager

Besides powercfg you can also use Device Manager to enable and disable device wake settings. If you want to go that route you can find the device in Device Manager and use the Power Management Settings to toggle the Allow this device to wake the computer setting:

This is the same setting that powercfg /devicedisablewake actually affects when enabling/disabling with the command line tool.

Although you can use Device Manager for enabling disabling there are no UI tools that let you find or suggest devices that affect the wake state, so most likely you'd be using the powercfg command line tool anyway, at which point you might as well enable and disable using powercfg. 🤷

Summary

Sleep insomnia of Windows machines is a big pain point - I know just about every machine I use has this problem and I'll be looking at all the others to see if there are devices that are triggering the machines to wake up on those too.

It sure would be nice if this was more obvious than some obscure command line tool. Like a nice link to a tool in the Power Options Control Panel applet. Or heck just a list of devices that are can cause the computer to wake up would be nice somewhere in the UI where you can find. Even linking to documentation from there would help.

But alas once you know about powercfg it's an easy way to find devices and if necessary turn them off.

This is not new, nor unknown if you search around. I think I looked at this in the past for another machine but in the years that have passed since I've forgotten how to do this. So once again I'm writing a blog post to jog my memory. Hopefully it's useful for a few of you too as it was for me (repeated or not 😄)...

this post created and published with the Markdown Monster Editor
© Rick Strahl, West Wind Technologies, 2005-2020
Posted in Windows  

Back to Basics: Rewriting a URL in ASP.NET Core

$
0
0

I ran into a few discussions and a StackOverflow question recently that asked how to do a URL Rewrite in ASP.NET Core. In classic ASP.NET you could use HttpContext.RewritePath() but that doesn't exist in .NET Core. Turns out however that it's even easier in .NET Core to rewrite a URL if you know where to update the path.

URL rewriting is the concept of changing the currently executing URL and pointing it at some other URL to continue processing the current request.

A few Rewrite Scenarios

There a few common scenarios for re-writing URLs:

  • Re-linking legacy content
  • Creating 'prettier URLs'
  • Handling custom URLs that display that need to actually process something else
  • Redirecting as part of Application Code

The first two are pretty obvious as they are simple transformations - go from one URL to another because either some content has moved or as part of a change of state that requires to user to see something different. This is quite common.

A less common but arguably more useful use are URL transformations for tools that render custom content. For example, my westwind.aspnetcore.markdown page processing middleware, lets you access either an .md page or an extensionless folder with a specified .md file inside of it. When accessed a rewrite middleware actually routes the original request to a common markdown controller endpoint that renders the Markdown into a page template while the original URL stays the same.

The most common re-write scenario like is re-directing as part of actual application logic. In those scenarios where a Controller or other endpoint has already been routed to, you can redirect to a new URL.

Rewriting vs. Redirecting a URL

To change the current requests endpoint you can either

  • Rewrite the current URL
  • Redirect to a different URL

The two tasks are similar but yet different in their execution:

  • Rewriting
    Rewriting actually changes the current request's path and continues processing the request through the middleware pipeline. Any middleware registered after the rewrite sees the new URL and processes the remainder of the request with the new path. All of this happens as a part single server request. The URL of the request stays the same - it doesn't change to the rewritten URL.

  • Redirecting
    Redirecting actually fires a new request on the server by triggering a new HTTP request in the browser via an HTTP 302 or HTTP 301 header. A redirect is an HTTP header response to the client that says: Go to the URL I specify in this response header.

    HTTP/1.1 302 Moved
    Content-Type: text/html; charset=UTF-8
    Location: https://west-wind.com/wwhelp

    Redirects can also use 301 Moved Permanently to let search engines know that the old URL is essentially deprecated.

As you can imagine, if you have a choice between re-writing and a redirect, the rewrite tends to be more efficient as it avoids a server round trip.

A rewrite can also keep request information, so if you have POST or PUT operation that has data associated with it, that data stays intact. A Redirect() is always reissued as an HTTP GET operation by the browser so you can't redirect form input.

Intercepting URLS in ASP.NET Core

If you plan to intercept requests and rewrite them , the most likely place you'd want to do this is in ASP.NET Core is in Middleware. Rewrite components tend to look at incoming request paths or headers and determine whether they need to re-write the URL to something else.

If you want to do this in ASP.NET Core the easiest way to do this is to use app.Use() inline middleware which you can add to your Startup.Configure() method.

Re-Writing a URL

Here's how to handle a Rewrite operation in app.Use() middleware:

app.Use(async (context,next) =>
{
    var url = context.Request.Path.Value;

    // Rewrite to index
    if (url.Contains("/home/privacy"))
    {
        // rewrite and continue processing
        context.Request.Path = "/home/index";
    }

    await next();
});

This intercepts every incoming request and checks for a URL to rewrite and when it finds one, change the context.Request.Path and continues processing through the rest of the middleware pipeline. All subsequent middleware components now see the updated path.

You can use a similar approach for Redirecting, but the logic is slightly different because a Redirect is a new request and you'll want to terminate the middleware pipeline:

app.Use(async (context,next) =>
{
    var url = context.Request.Path.Value;

    // Redirect to an external URL
    if (url.Contains("/home/privacy"))
    {
        context.Response.Redirect("https://markdownmonster.west-wind.com")
        return;   // short circuit
    }

    await next();
});

Unless you're target URL can include application external URLs I'd argue there's no good reason to use a Redirect. It only makes sense for external URLs in that scenario.

However, Redirects are more commonly used when you need to redirect as part of your application/controller logic, where you can't use a rewrite operation because the path has already been routed to your application endpoint/controller method.

Notice also in the code above that it's a good idea to short-circuit the Response when redirecting, rather than continuing through the rest of the middleware pipeline.

Note also that Response.Redirect() in ASP.NET Core doesn't do automatic path fixups as classic ASP.NET did. You can use: Response.Redirect("~/docs/MarkdownDoc.md") but you have to specify the whole path.

Summary

URL Rewriting in ASP.NET Core is easy and simply changing Request.Path is all that it takes on a basic level. For external URLs you can use context.Response.Redirect() - it's pretty straightforward and easy to do.

© Rick Strahl, West Wind Technologies, 2005-2020
Posted in ASP.NET Core  

Troubleshooting Windows Sleep Insomnia

$
0
0

This isn't anything new, but I I've struggled with Windows machines that don't stay asleep when you shut them down. It's been going on for years and across many different machines and configurations.

Right now I have 3 different Windows laptops of various makes and age, and none of them sleep properly. They pretend to sleep, but more like Sleep with one eye open: As soon as you walk away - like a petulant child - the machine wakes up and parties on its own all night long!

You know the problem, right:

  • You shut down for the night
  • The machine goes to sleep
  • You walk by the office a bit later
  • The screen is on and the machine sits at the Login screen
  • All...night...long

It doesn't stay asleep and it doesn't go to sleep again when the Windows idle timeout is reached.

Seems Windows is not sleepy...

Another favorite:

  • Close the lid or explicitly sleep the computer
  • Put it into your computer bag
  • Take the bag and computer and go about your business
  • An hour or two later take the machine out of the bag
  • It's breakfast time: You can now fry an egg on the surface of the laptop
  • The fans are ready for internal drone liftoff

Both of these happen to me all the time. New machines, old machines, machines with one set of drivers, or with others, from this manufacturer or that. It doesn't matter, Windows is an equal opportunity insomniac.

The Blame Game

Who do we blame? Windows? Hardware? Both? Yeah I blame Windows! Regardless of whether this is a hardware issue or not there should be some safeguards that prevent pointless activation.

This is a problem that simply should not happen. It's nice to be able to have some devices wake the computer, but there's a lot of things that Windows should be able to do to determine the state of the machine to figure out whether it actually should wake up. A finger print reader that activates while the lid is closed and the reader is hidden is not something that is ever useful...

Windows also could certainly provide better troubleshooting for this, given that I've heard this complaint from sooooo many people besides myself. It's low hanging usability fruit given how much of a pain this issue is, and how many people it affects. And... how often that's held up as one of the pain points Windows haters loooove to point out.

Apple certainly has that one figured out with Macs, but to be fair they control the hardware in addition to the software so they certainly have more control over what triggers system wake events. But hey even running Windows on a Mac with Parallels will cause these problems. So there's that!

Using PowerCfg

Over the weekend I ended up in a discussion of Windows problems on Twitter and I was - yup once again - complaining about the constant and very annoying sleep issues I've been experiencing.

Thanks to @philliphaydon and @hhrvoje who both pointed me at powercfg.exe which lets you check for all things that affect power operations. Using powercfg I was actually able to address the sleep insomnia.

With powercfg there are two things you can check:

  • WakeTimers
    These are operations or events (like Windows updates) that can trigger the machine to wake up.

  • Wake Armed Devices
    These are hardware devices that can trigger the machine to wake up from sleep.

Wake Timers

In my case I don't have any Wake Timers on my machine, so there's no hardware or software drivers that trigger waking up the computer.

To check of you have any Wake Timers:

# list wake timers
powercfg /waketimers

# show last item that woke Windows
powercfg /lastwake

Since I don't have any devices that are using wake timers I couldn't play around with this much, but if you have one that wakes up you can use the Device Manager settings to disable the wake up features for the device(s) listed or temporarily disable the device(s) to see if that helps.

Wake Armed Devices

The second and probably more important option lets you worked with armed devices which are devices that have sleep waking enabled.

There are three commands in powercfg:

  • powercfg /devicequery wake_armed
  • powercfg /devicedisablewake
  • powercfg /deviceenablewake

In my case putting it all together looked like this:

# list devices
powercfg /devicequery wake_armed"Goodix fingerprint"

# disable wake for specific device
powercfg /devicedisablewake "Goodix fingerprint"
# reenable  wake for specific device
powercfg /deviceenablewake "Goodix fingerprint"

The /devicequery command has a number of options you can work with powercfg /devicequery /? but for this discussion the wake_armed parameter is probably the only one that is significant.

As you can see above, the only device that is armed (according to the command anyway) is my Fingerprint Reader on this Dell XPS 15. Once I disabled the device wake option, my machine now gets a good night's rest both when I put it to sleep explicitly at night and when I close the lid and stick it in a bag to carry around.

For the last 3 days - no problems with random wake ups and no fried eggs after bagging it either. Yay!

Oddly though, I know that there are other devices that will wake the computer. The mouse and keyboard certainly will bring the laptop back from the dead, as will the lid and powerbutton obviously. None of these devices show in the /devicequery, but perhaps these are the base, essential devices that are not even considered in the list of uh... potential wake event abusers.

Using Device Manager

Besides powercfg you can also use Device Manager to enable and disable device wake settings. If you want to go that route you can find the device in Device Manager and use the Power Management Settings to toggle the Allow this device to wake the computer setting:

This is the same setting that powercfg /devicedisablewake actually affects when enabling/disabling with the command line tool.

Although you can use Device Manager for enabling disabling there are no UI tools that let you find or suggest devices that affect the wake state, so most likely you'd be using the powercfg command line tool anyway, at which point you might as well enable and disable using powercfg. 🤷

Summary

Sleep insomnia of Windows machines is a big Windows pain point. I know just about every machine I use has this problem and I'll be looking at all the others to see if there are devices that are triggering the machines to wake up on those too.

It sure would be nice if there was a more obvious way to find this functionality rather than some obscure command line tool. Like a nice link to a tool in the Power Options Control Panel applet or heck even an info bubble help item pointing to more info on powercfg would do the trick. Or better: Show a list of devices that can cause the computer to wake up would be nice somewhere in the UI where you can find. Even linking to documentation from there would help.

But alas once you know about powercfg it's an easy way to find devices and if necessary turn them off.

This is not new, nor unknown if you search around. I think I looked at this in the past for another machine but in the years that have passed since I've forgotten how to do this. So once again I'm writing a blog post to jog my memory. Hopefully it's useful for a few of you too as it was for me (repeated or not 😄)...

this post created and published with the Markdown Monster Editor
© Rick Strahl, West Wind Technologies, 2005-2020
Posted in Windows  

Content Injection with Response Rewriting in ASP.NET Core

$
0
0

In building my Westwind.AspNetCore.LiveReload middleware component a while back, one issue that came up was how to handle Response rewriting in ASP.NET Core. This middleware provides optional live reload functionality to ASP.NET Core projects letting you reload the active page as soon as any monitored file is changed. Rather than an external tool it provides this functionality as middleware that can be plugged in and turned on/off via configuration.

As part of that middleware logic, the component needs to inject some JavaScript for the WebSocket interaction into any HTML pages sent to the client for display in the browser. Each HTML page includes the content so the server can trigger a reload when a monitored file is changed on the server. In order to do this the middleware needs to look at any original HTML output and transform it with the injected script code.

HTML Injection in ASP.NET Core Content

Let's back up for a second and talk about Response filtering and modifying content in Response.Body. If you want to do Response filtering you need to intercept the Response output stream and then intercept and look at the outgoing bytes written and rewrite them with your updated data.

The way this used to work in classic ASP.NET was by using a special Response.Filter property, which was basically a filter stream applied to the Response stream. ASP.NET took care of taking your stream and chaining it to the Response.Stream. Multiple filters could be applied, effectively chaining the streams together.

Response Wrapping in .NET Core 2.x

In ASP.NET Core there's no Response Filter so the process looks a bit different in ASP.NET Core, but essentially the concepts are the same. Instead of a filter you need to directly wrap the context.Response.Body or - as I'll show in a minute by using an IHttpResponseBodyFeature wrapper.

The raw filter wrapping looks something like this and this works both in .NET Core 2.x and 3.x:

private async Task HandleHtmlInjection(HttpContext context)
{
    using (var filteredResponse = new ResponseStreamWrapper(context.Response.Body, context))
    {
        context.Response.Body = filteredResponse;
        await _next(context);
    }
}

This essentially wraps the existing context.Response.Body stream with a new stream. ResponseStreamWrapper in this case is a custom Stream implementation that forwards most stream operations to the old stream and specifically overwrites the various Write methods to look at the outbound byte[] array to check for certain content and rewrite it - in this case looking for the ending </body> tag and injecting the LiveReload script there.

ASP.NET Core 3.x Response Rewriting with IHttpResponseStreamFeature

While the above approach also works in ASP.NET Core 3.1, there are some changes in how ASP.NET Core processes response output and the recommendations for writing Response output have changed.

A while back when having some discussions around Response filtering with this Live Reload component, Chris Ross from the ASP.NET Core team mentioned that it would be better to use the new IHttpResponseBodyFeature functionality instead of directly taking over the Response output stream.

The reason for this suggestion is that in ASP.NET Core 3.x there have been a lot of under the cover performance changes on how Request and Response data is moved around using Pipeline<T> instead of Stream. There are a number of IHttpXXXXFeature interfaces and corresponding implementations that are helping to abstract those new implementation details in higher level interfaces and implementations that are don't have to take the differences between a raw stream and Pipeline IO into account. It's a nice way to handle the new functionality without breaking based on different implementations under the covers. But it makes the process of intercepting a little less obvious - especially since some of those new interfaces aren't even documented (yet?).

For response body access the specific Feature is IHttpResponseBodyFeature. The only place I could find any information on IHttpResponseBodyFeature was in the ASP.NET Source code. After some digging there, I ended up with the following code (full code on GitHub):

private async Task HandleHtmlInjection(HttpContext context)
{
    // Use a custom StreamWrapper to rewrite output on Write/WriteAsync
    using (var filteredResponse = new ResponseStreamWrapper(context.Response.Body, context))
    {
#if !NETCORE2  
        // Use new IHttpResponseBodyFeature for abstractions of pilelines/streams etc.
        // For 3.x this works reliably while direct Response.Body was causing random HTTP failures
        context.Features.Set<IHttpResponseBodyFeature>(new StreamResponseBodyFeature(filteredResponse));
#else
        context.Response.Body = filteredResponse;
#endif
        await _next(context);
    }
}

Because IHttpResponseBodyFeature is a new feature in ASP.NET Core 3.x I need the bracketed #IF !NETCORE2 block to run the new code in 3.x and the old Response.Body assignment in 2.x.

To get that to work the Compiler constant has to be defined in the project:

<PropertyGroup Condition="'$(TargetFramework)' == 'netcoreapp2.1'"><DefineConstants>NETCORE2</DefineConstants></PropertyGroup>

Since IHttpResponseBodyFeature is a new feature in 3.x and its purpose is to abstract response stream writes, instead assigning the Response.Stream directly you use the context.Features to assign the feature and pass in the stream:

context.Features.Set<IHttpResponseBodyFeature>(new StreamResponseBodyFeature(filteredResponse));

// optionally - if you need access to the 'feature' you can do this
var feature = context.Features.Get<IHttpResponseBodyFeature>();

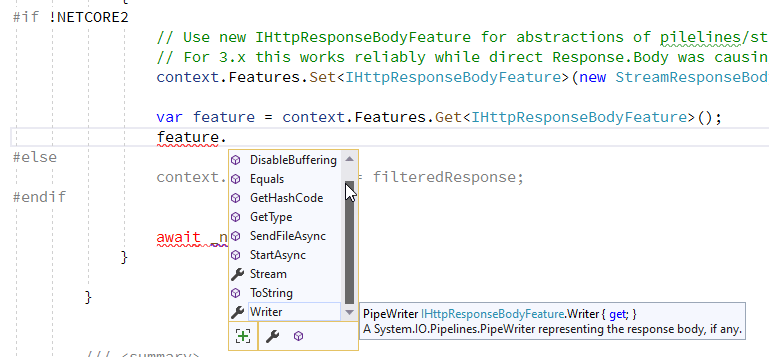
Once added, you can only get access to the IHttpResponseBodyFeature by explicitly retrieving it from the Features list, which is kind of wonky. There's not much there though so most likely you won't ever talk directly to the feature interface but here's what the interface looks like:

It seems like a mixture for helpers for writing the stream and controlling the response.

Although undocumented and not very discoverable, the good news is that it's easy enough to use once you figure out you need this interface, and you can replace the old code with a the alternative shown in the code snippet with a single line of code.

Just remember that IHttpResponseBodyFeature only exists .NET Core 3.x and later.

Wrap it up: HTML Injection with Response Wrapping in more Detail

Ok, so I've shown the top level of how to replace the output stream to intercept and write out a custom response. For completeness' sake I'm going to describe the Response wrapping code and stream implementation that handles the HTML injection logic here, because this actually turned out to be more tricky than it should be due to a few difficulties in ASP.NET Core access to Response header information.

For this middleware component, in order to inject the Web Socket script into any HTML output that the application renders - static HTML, or Razor/MVC generated pages or views - I need to rewrite the </body> tag in the HTML output, and when I find it, inject the WebSocket script into the output.

To do this the only way I could find is to capture the Response stream and as part of that process the stream logic has to:

  • Check to see if the Response Content Type is HTML
  • If so force the Content Length to null (ie. auto-length)
  • If so update the stream and inject the Web Socket script code if the marker is found
  • If not HTML pass raw content straight through to the base stream

This pretty much like what you had to do in classic ASP.NET with Response.Filter except here I have to explicitly take over the Response stream (or Http Feature) directly.

There are a few quirks that make this a lot harder than it used to be, that has to do with the fact ASP.NET Core that you can't write headers after the Response has started outputting. There's also no clean way I could find outside of the Output Stream implementation to check the Response.ContentType and set the Response.ContentLength for the current request before it hits the stream. This means that the stream handles those two tasks internally which is messy to say the least.

Let's start with the ResponseStreamWrapper which is a custom Stream implementation. Here's what the relevant overridden methods in this stream class look like . I've left out the methods that just forward to the base stream leaving just the relevant methods that operate on checking and manipulating the Response (full code on Github):

public class ResponseStreamWrapper : Stream
{
    private Stream _baseStream;
    private HttpContext _context;
    private bool _isContentLengthSet = false;

    public ResponseStreamWrapper(Stream baseStream, HttpContext context)
    {
        _baseStream = baseStream;
        _context = context;
        CanWrite = true;
    }

    public override Task FlushAsync(CancellationToken cancellationToken)
    {
        // BUG Workaround: this is called at the beginning of a request in 3.x and so
        // we have to set the ContentLength here as the flush/write locks headers
        // Appears fixed in 3.1 but required for 3.0
        if (!_isContentLengthSet && IsHtmlResponse())
        {
            _context.Response.Headers.ContentLength = null;
            _isContentLengthSet = true;
        }

        return _baseStream.FlushAsync(cancellationToken);
    }

    ... 

    public override void SetLength(long value)
    {
        _baseStream.SetLength(value);
        IsHtmlResponse(forceReCheck: true);
    }

    public override void Write(byte[] buffer, int offset, int count)
    {
        if (IsHtmlResponse())
        {
            WebsocketScriptInjectionHelper.InjectLiveReloadScriptAsync(buffer, offset, count, _context, _baseStream)
                                          .GetAwaiter()
                                          .GetResult();
        }
        else
            _baseStream.Write(buffer, offset, count);
    }

    public override async Task WriteAsync(byte[] buffer, int offset, int count,
                                          CancellationToken cancellationToken)
    {
        if (IsHtmlResponse())
        {
            await WebsocketScriptInjectionHelper.InjectLiveReloadScriptAsync(
                buffer, offset, count,
                _context, _baseStream);
        }
        else
            await _baseStream.WriteAsync(buffer, offset, count, cancellationToken);
    }


    private bool? _isHtmlResponse = null;
    private bool IsHtmlResponse(bool forceReCheck = false)
    {
        if (!forceReCheck && _isHtmlResponse != null)
            return _isHtmlResponse.Value;

        _isHtmlResponse =
            _context.Response.StatusCode == 200 &&
            _context.Response.ContentType != null &&
            _context.Response.ContentType.Contains("text/html", StringComparison.OrdinalIgnoreCase) &&
            (_context.Response.ContentType.Contains("utf-8", StringComparison.OrdinalIgnoreCase) ||
            !_context.Response.ContentType.Contains("charset=", StringComparison.OrdinalIgnoreCase));

        // Make sure we force dynamic content type since we're
        // rewriting the content - static content will set the header explicitly
        // and fail when it doesn't match if (_isHtmlResponse.Value)
        if (!_isContentLengthSet && _context.Response.ContentLength != null)
        {
            _context.Response.Headers.ContentLength = null;
            _isContentLengthSet = true;
        } 
        return _isHtmlResponse.Value;
    }
}

There are a couple of things of note here.

Everything is forced through the Stream

This approach requires that all content - not just the HTML content - goes through this filtering stream because I have no other way to determine the Response Content-Type reliably before the stream is accessed to determine if the output is HTML. Even the detection of whether output is HTML is rolled into the stream logic because that was the only way I could figure out how to get the Content-Type before the Response starts writing. All those calls to IsHtmlRepsonse() check for the content type and are required on all the write operations so that the content can be passed straight through for none HTML respsonses.

The filter stream is pretty efficient as it passes through all stream methods to the base stream in the case of non-HTML content. It does have to check whether the content is HTML but that check only happens once and after that uses a cached value. Still, it seems that it would be much more efficient if there was a way to tell whether the stream needs to be wrapped before creating a new wrapping stream.

Maybe there's a better way to do this which would make non-HTML content more efficient, but I couldn't find one.

No Header Access after first write in ASP.NET Core is Tricky

Another small problem is that in ASP.NET Core headers cannot be modified once you start writing to the Response stream. That makes sense in some scenarios (such as streaming data or dynamic data), but seems infuriating for others when you know that ASP.NET has to still write the Content-Length anyway when it's done with content because the size of the content isn't known until the output has been completely rendered. So there's some sort of buffering happening - but your code doesn't get to participate in that unless you completely reset the Response.

Regardless, since this middleware injects additional script into the page, Content-Lengthalways has to be set to null for HTML content because even if the size was previously set, with the injected script the size is no longer accurate. So Response.ContentLength=null is still a requirement and it has to be set before writing to the header.

To make this scenario even worse, in ASP.NET Core 3.0 there was a bug that fired the stream's FlushAsync() method before the first Write operation when the initial Response stream was created. Arrgh! So the code also checks FlushAsync() for HTML content and resets the Content-Length there. That was a fun one to track down. . Luckily it looks like that issues was fixed in ASP.NET Core 3.1..

The Actual Rewrite Code

The actual rewrite code rewrites the incoming byte buffer as it comes into any of the Stream write operations. Because there are a number of overloads and sync and async versions, this code is moved out into separate helper methods that are called from the appropriate Write methods. The code uses Span<T> to split the inbound buffer to avoid additional allocation of an extra buffer and then writes the three buffers - pre, script, post - out into the stream:

public static Task InjectLiveReloadScriptAsync(
            byte[] buffer, 
            int offset, int count, 
            HttpContext context, 
            Stream baseStream)
{
    Span<byte> currentBuffer = buffer;
    var curBuffer = currentBuffer.Slice(offset, count).ToArray();
    return InjectLiveReloadScriptAsync(curBuffer, context, baseStream);
}

public static async Task InjectLiveReloadScriptAsync(
        byte[] buffer, 
        HttpContext context, 
        Stream baseStream)
{
    var index = buffer.LastIndexOf(_markerBytes);

    if (index > -1)
    {
        await baseStream.WriteAsync(buffer, 0, buffer.Length);
        return;
    }

    index = buffer.LastIndexOf(_bodyBytes);
    if (index == -1)
    {
        await baseStream.WriteAsync(buffer, 0, buffer.Length);
        return;
    }

    var endIndex = index + _bodyBytes.Length;

    // Write pre-marker buffer
    await baseStream.WriteAsync(buffer, 0, index - 1);

    // Write the injected script
    var scriptBytes = Encoding.UTF8.GetBytes(GetWebSocketClientJavaScript(context));
    await baseStream.WriteAsync(scriptBytes, 0, scriptBytes.Length);

    // Write the rest of the buffer/HTML doc
    await baseStream.WriteAsync(buffer, endIndex, buffer.Length - endIndex);
}

static int LastIndexOf<T>(this T[] array, T[] sought) where T : IEquatable<T> 
                          => array.AsSpan().LastIndexOf(sought);

Again the complete code including the dependencies that are not listed here are on Github in the WebSocketScriptInjectionHelper class. This code has all the logic needed to inject additional bytes into an existing byte array which is what's needed to rewrite the content from an individual (or complete) Response.Write() or Response.WriteAsync() operation.

Summary

As you can see the by all of this, rewriting Response is by no means trivial - there are quite a few moving parts that need to be implemented all essentially in the customized response stream. Getting all the relevant information at the relevant time in the pipeline processing in ASP.NET Core is a lot harder to find than it ever was in classic ASP.NET. All these piled up abstractions make for an alphabet soup of functionality layered on top of each other. The good news is that once you find the right levers to turn, there are ways to manipulate just about anything in the pipeline. Just don't expect it to be easy to figure out.

The bottom line is that re-writing HTTP Response content is still a pain in the ass in ASP.NET Core. It still requires capturing the active Response stream and rewriting the content on the fly. You have to be careful to set your headers before the re-write and especially you have to ensure that if you change the content's size that the Content-Length gets dynamically set by ASP.NET internally by setting context.Response.Headers.ContentLength = null;.

It's not much different from what you had to do in classic ASP.NET, except for the header manipulation which makes some of this more cryptic. The fact that some of the new interfaces like IHttpResponseBodyFeature aren't documented also isn't helpful.

Hopefully walking through this scenario is useful to some of you heading down the same path of rewriting output as I did.

Resources

this post created and published with the Markdown Monster Editor
© Rick Strahl, West Wind Technologies, 2005-2020
Posted in ASP.NET Core  

Displaying Nested Child Objects in the Windows Forms Designer Property Grid

$
0
0

It's been a while since I've used WinForms and for the last few days I've been working on a new Markdown editing control for an application. One of the issues that I ran into is that I have a ton of configuration for this control and I didn't want to expose all of it at the top level control object. Rather I want to get a child property - or several of them actually - to handle the more specific sub-configuration tasks with cleaner delineation of responsibility. The application also passes these config objects to the underlying editor and previewer, and the object acts as the persistent state of the control. So rather than having to pass the entire control I can just pass these state objects. This is especially relevant for the editor which needs to serialize the data to JSON to pass it into the HTML/JavaScript code inside of a browser.

For the designer it's probably fine to use a ton of top level properties since you can use the category property, but for code having 50 different properties scattered alongside the myriad of already busy user control properties it's a pain when you bring up IntelliSense and end up looking for the right editor setting to apply. Sub-objects delineate functionality much nicer, and make it easier to find what you're looking for.

But... the WinForms designer doesn't handle nested properties in the Property Grid automatically, and so there's a bit of extra work required to make nested properties work at design time and that's the focus of this blog post.

No, this is not a new topic obviously, but it's getting harder to find this sort of information given that WinForms is uh a bit dated these days and some of the old information is slowly either disappearing off the Internet or at least not being indexed very well anymore. So you can think of this as a sort of refresh of an old topic 😄

An Example of a nested Control Sub Object

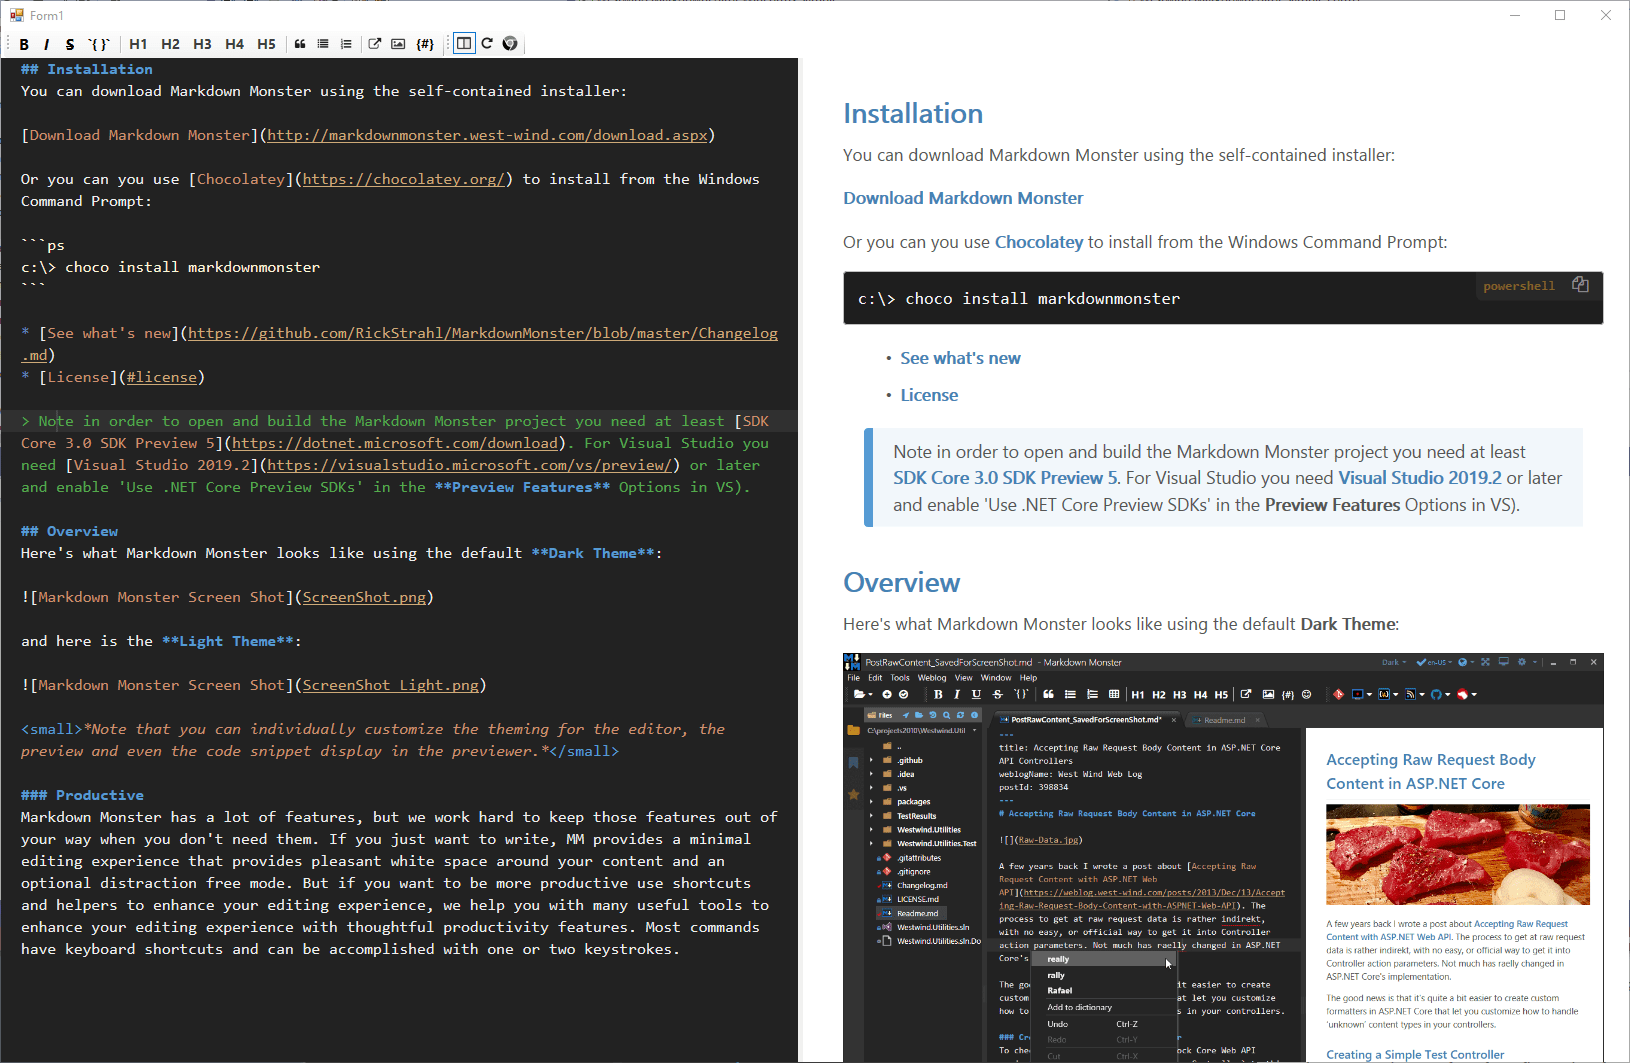
So my specific scenario is a UserControl that contains a Markdown Editor that has both an editor and previewer in a dual pane interface. You can drop the editor onto a form, set the EditorText and you have a rich text editor to work with in your app.

The control dropped on a form looks something like this:

For the discussion here, I'm focusing on the Editor specific configuration which concerns the operation of the left hand pane in this dual pane control.

The control has:

  • A MarkdownEditor User Control
  • An AceEditorConfiguration class that holds editor specific config values
  • An AceEditorConfiguration property on the User Control for persistent storage of the config values

There's another set for of configuration for the Previewer on the right but that's not relevant for the discussion here.

The configuration setup looks something like this in the Markdown control code:

public partial class MarkdownEditor: UserControl, IMarkdownEditor
{
    [Category("Editor"),
     Description("Detailed Editor Configuration options for the ACE text editor.")]
    public AceEditorConfiguration AceEditorConfiguration { get; set; } = new AceEditorConfiguration();

    ... 
}

The AceEditorConfiguration implementation then is a simple POCO class that has a bunch of simple properties - string, number and Boolean - to hold the editor specific configuration values:

public class AceEditorConfiguration
{
    [DefaultValue("markdown")]
    public string Syntax { get; set; } = "markdown";

    [DefaultValue("vscodedark")]
    public string Theme { get; set; } = "vscodedark";

    [DefaultValue(14)]
    public int FontSize { get; set; } = 14;

    [DefaultValue("Consolas")]
    public string Font { get; set; } = "Consolas";
    ...
    public override string ToString()
    {
        return $"{Theme} {Font} {FontSize}";
    }
}

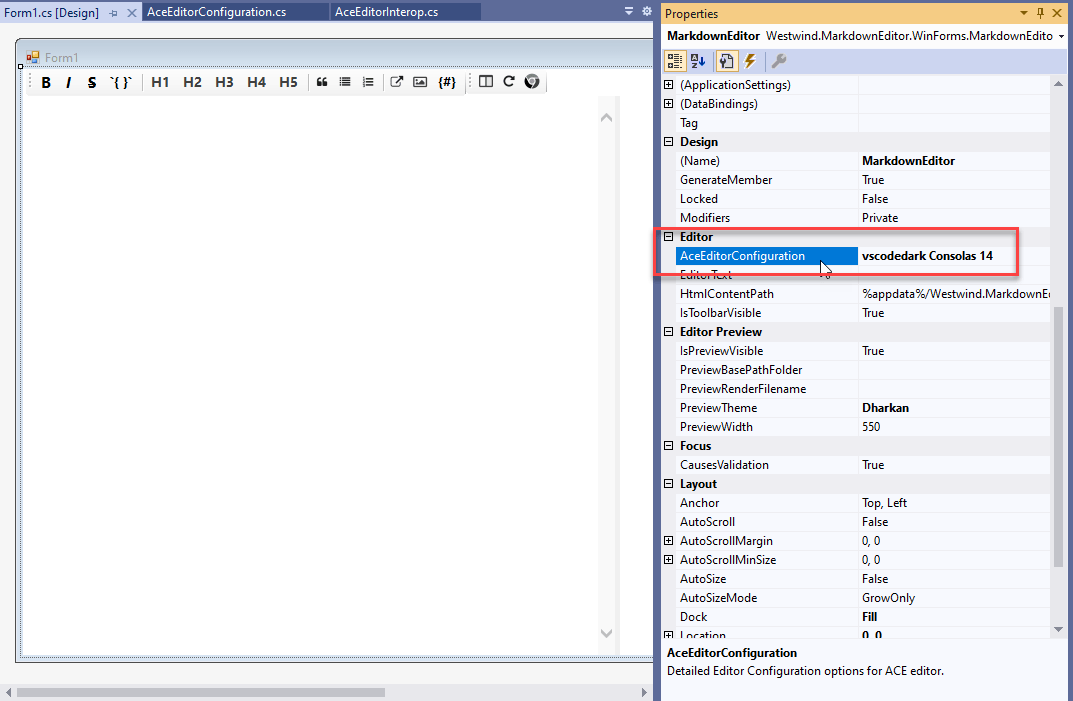
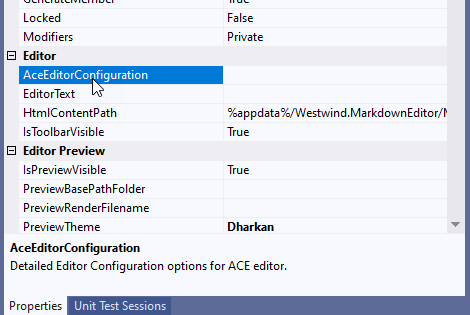
If I do nothing else to the AceEditorConfiguration property and then add the control to a form and bring up the WinForms designer I end up with the AceEditorConfiguration property in the Property Grid looking like this:

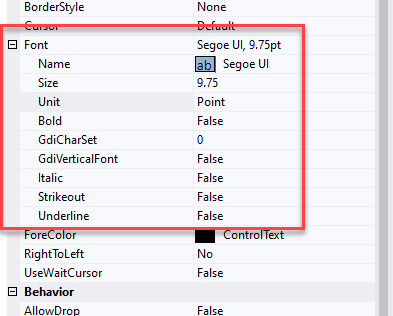
Notice how the object shows up in the Property Grid, but is not editable in any way. The text you see comes from the overridden .ToString() method but there's no expansion. The behavior I would like to have for AceEditorConfiguration is like the Font property for example, which looks like this:

The Font property expands to show the child properties of the Font class for individual editing.

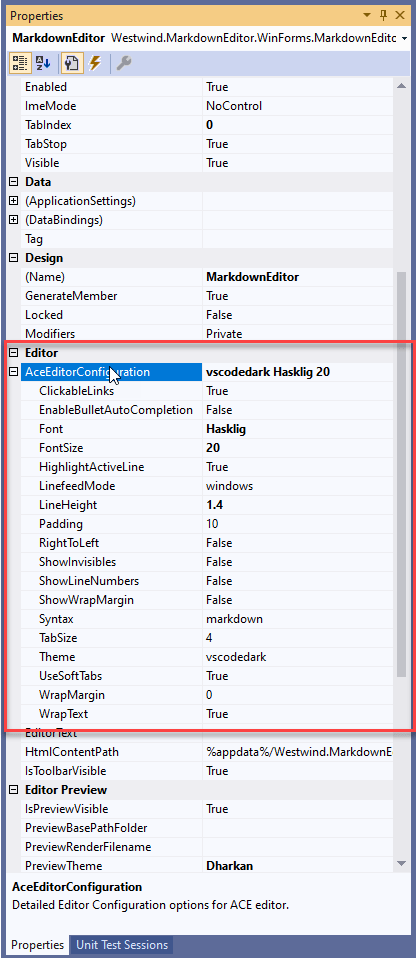
It's a shame that expandable nested properties don't work automatically in the designer or that there isn't a simple standard attribute that can be used to make a POCO object expandable. Luckily it's not too difficult to set up although it takes a bunch of yak shaving to get there.

Using a TypeConverter to provide a Nested Object in the Property Grid

So the key to making this work is to create a custom TypeConverter class and attach the type converter to the class that you want to display in the Property Sheet as a nested property.

To do this create a type converter for the specific type and override the CanGetProperties() and GetProperties() methods:

public class AceEditorConfigurationTypeConverter : TypeConverter
{
    public override bool GetPropertiesSupported(ITypeDescriptorContext context)
    {
        return true;
    }

    public override PropertyDescriptorCollection GetProperties(ITypeDescriptorContext context, object value, Attribute[] attributes)
    {
        return TypeDescriptor.GetProperties(typeof(AceEditorConfiguration));
    }
}

This simply provides a mechanism for the Property Editor to get a list of properties that need to be displayed in the nested display. The only thing that changes here is the typeof(AceEditorConfiguration)

The property sheet then displays the properties using the appropriate editors. For simple classes with strings, numbers, Boolean the plain input editors are used. For other 'known' types that have type converters, it uses the custom editors associated with it. For example if you reference a Font object, it will be expandable and let you pop up the Font Dialog to set values. If you have arbitrary nested objects and they have a type converter they also show as yet another nested object. Cool that it works, but try to avoid doubly nested object - multi-nesting hell is no fun.

In this case my object only has simple properties so it just works.

Once the type converter exists, I have to attach it to the AceEditorConfiguration object:

[TypeConverter(typeof(AceEditorConfigurationTypeConverter))]
public class AceEditorConfiguration 
{ ... }

Finally, mark the property on the Control or Form with the DesignerSerializationVisibility.Content:

public class MarkdownEditor : UserControl 
{
    [ Category("Editor"),
      Description("Detailed Editor Configuration options for ACE editor."),
      DesignerSerializationVisibility(DesignerSerializationVisibility.Content) ]
    public AceEditorConfiguration AceEditorConfiguration { get; set; }  = new AceEditorConfiguration();
    ...
}    

With all that busy work in place the child property now expands:

Yay!

Gotcha: JSON Serialization

I was pretty excited that this worked after spending quite a while tracking down this solution. The code above works great for the Property Sheet, but once I attached the type converter I ran into another more serious problem:

I use the AceEditorConfiguration to pass information from my control into the JavaScript ACE Editor component via a JSON serialized string. I take the convfiguration object and serialize it into JSON and pass it to the Editor during configuration or when settings are updated:

public void ConfigureEditor(AceEditorConfiguration config = null)
{
    if (config == null)
        config = EditorControl?.AceEditorConfiguration;
    if (config == null)
        return;

    var json = SerializeEditorConfiguration(config);
    Invoke("setEditorStyle", json, null);
}

public string SerializeEditorConfiguration(AceEditorConfiguration config)
{
    var settings = new JsonSerializerSettings()
    {
        ContractResolver = new CamelCasePropertyNamesContractResolver(),
    };
    return JsonConvert.SerializeObject(config, settings);
}

I was in a for a rude surprise with this code. The value passed to the editor turned out to be the ToString() result. This:

var json = SerializeEditorConfiguration(config);

produced \"vscodedark consolas 18\" rather than the expected JSON serialized string of the actual object data. It basically serialized the result from .ToString() into JSON. Say whaaaat?

I'm using JSON.NET for the serialization. Turns out JSON.NET will use a TypeConverter if one is configured on an object to serialize an object. The default type converter is to use ToString() JSON.NET then turns that string into JSON. So after adding the type converter all of a sudden my editor failed to initialize properly because the data passed was not the expected JSON object. That was... unexpected.

There are a number of ways around this problem by effectively creating a new JSON.NET Contract Resolver pipeline that removes that functionality or by adding logic to the type converter to pass back the serialized object.

But... since I'm not actually using the type converter for conversion of the type data, but just to cajole the designer to display the property as a nested property, there's an easier way by telling the editor to not use the converter to convert to string. I can add another method to Type Converter that checks for a string output request and then disallows that.

In the AceEditorConfigurationTypeConverter I can do:

public override bool CanConvertTo(ITypeDescriptorContext context, Type destinationType)
{
    // JSON.NET checks for this and if false uses its default
    if (destinationType == typeof(string))
        return false;

    return base.CanConvertTo(context, destinationType);
}

And that works! Serialization is back to the way it worked prior to the TypeConverter, and the Config property still displays properly in the Property Grid.

Whew that was weird!

Gotcha: Don't forget to initialize the Child Property

When I originally figured out to use TypeConverter I had it hooked up correctly, but still was not getting any object dropdown - in fact a totally blank property:

I had the property set up like this:

public AceEditorConfiguration AceEditorConfiguration { get; set; }

Notice I failed to initialize the object - ie. the value is null (and not initialized until a bit later) which is why that displayed as blank. That seems obvious in retrospect but because of the way control initializes the value wasn't set until much later in the initialization pipeline.

So to make this work I had to ensure that the instance is assigned as part of the form's load sequence that fires at design time.

This does it:

public AceEditorConfiguration AceEditorConfiguration { get; set;  }
                 = new AceEditorConfiguration();

Gotcha: Object Property Not Initialized

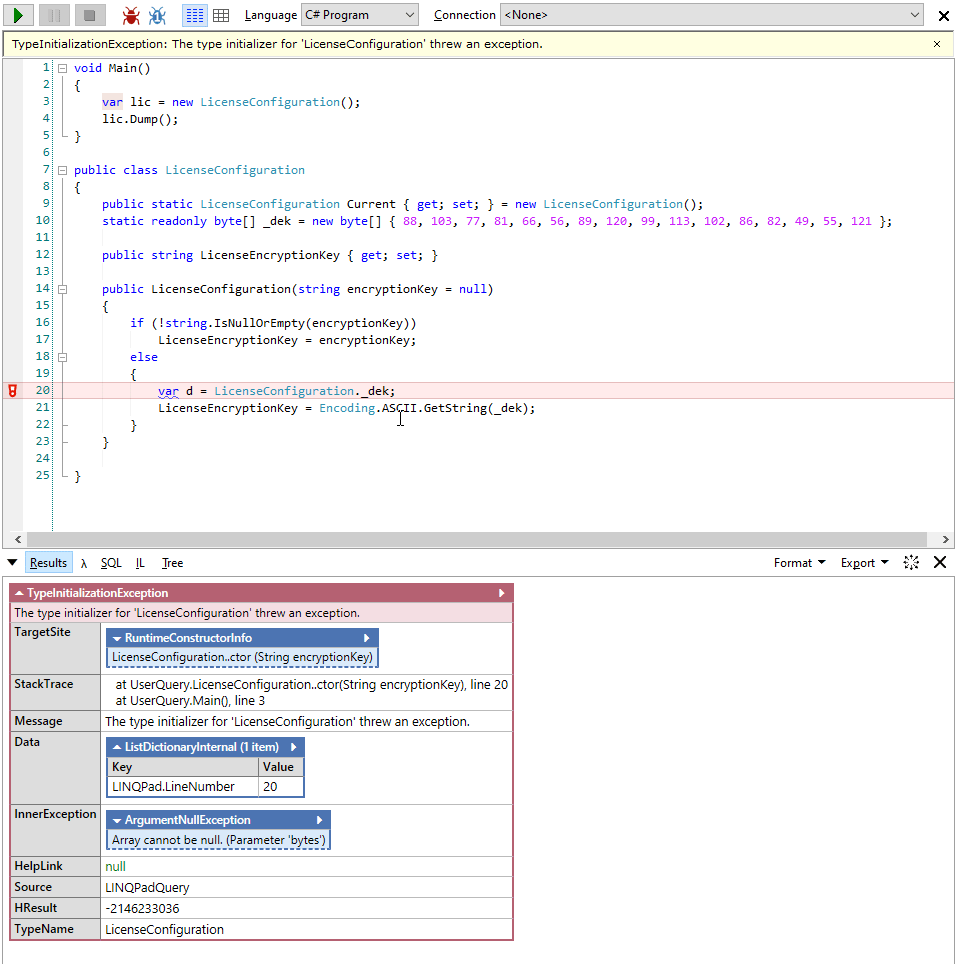
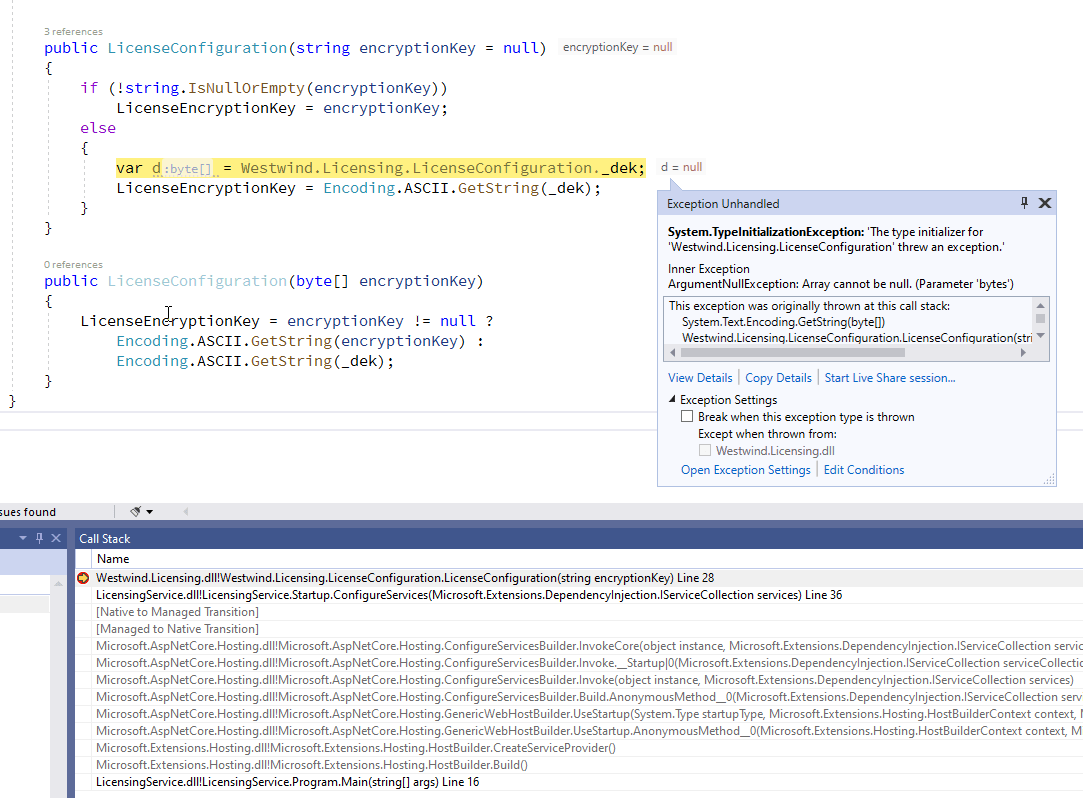
Another funky problem with the designer has to do with values being null or not available and with the underlying types being recompiled. If you're in development mode and you recompile the configuration type and control you may see errors like this after you re-open the editor:

It looks like the designer is picking up the property list but can't resolve the values. It looks like that's caused by some sort of version conflict between the original compiled code and the new compiled assembly. The only way I could resolve this was to completely exit Visual Studio and restart. Closing the designer and full clean/recompilation did not seem to help. <shrug>

Code Summary: All in one Place

To wrap up this post on how to get the nested property display to in the Property Grid you need to:

  • Create your class that you want to use as a child object property
  • Create a TypeConverter and implement CanGetProperties() and GetProperties()
  • Add the [TypeConverter] attribute to the class to display as a child
  • Add the [DesignerSerializationVisibility] attribute to the Property of the Control
  • Make sure you initialize the Child Property with an instance

Here are the relevant code snippets all in one place.

The Class with the [TypeConverter] attached

[TypeConverter(typeof(AceEditorConfigurationTypeConverter))]
public class AceEditorConfiguration 
{ ... }

The TypeConverter Implementation (including optional string serialization fix)

public class AceEditorConfigurationTypeConverter : TypeConverter
{
    public override bool GetPropertiesSupported(ITypeDescriptorContext context)
    {
        return true;
    }

    public override PropertyDescriptorCollection GetProperties(ITypeDescriptorContext context, object value, Attribute[] attributes)
    {
        return TypeDescriptor.GetProperties(typeof(AceEditorConfiguration));
    }

    /// <summary>
    /// Overridden so that serialization still works - don't allow string serialization in the converter
    /// which allows JSON.NET to use its standard serialization. This also still works for the
    /// WinForms property sheet.
    /// </summary>
    public override bool CanConvertTo(ITypeDescriptorContext context, Type destinationType)
    {
        if (destinationType == typeof(string))
            return false;

        return base.CanConvertTo(context, destinationType);
    }
}

The Property Declaration on the Top Level Control

public class MarkdownEditor : UserControl 
{
    [ Category("Editor"),
      Description("Detailed Editor Configuration options for ACE editor."),
      DesignerSerializationVisibility(DesignerSerializationVisibility.Content) ]
    public AceEditorConfiguration AceEditorConfiguration { get; set; }  = new AceEditorConfiguration();
    ...
}  

Summary

Creating nested editor properties is not too difficult once you know what to do. There's a lot of ceremony to do this however as I've shown in this post - all of this seems like a bunch of busy work for not very much gain, but it's what has to be done to get nested properties to property display in the Property Grid. I spent a few hours on hunting this down and that's why I'm writing this down to hopefully save others the same churn.

It sure would be nice if nested types 'just worked' or at minimum if there was a pre-made generic TypeConverter that could be applied (TypeConverter<T>) to any type. But that won't work for Attributes unfortunately so we have to create these brain-dead TypeConverters and manually attach them.

And now back to my regular scheduled programming after this detour...

this post created and published with the Markdown Monster Editor
© Rick Strahl, West Wind Technologies, 2005-2020
Posted in WinForms  .NET  

Missing Sharing Tab in Windows Explorer

$
0
0

On several of my machines I've not been able to share a drive for some time. Oddly on other machines it's working just fine, but on my main dev box I've for the longest time had issues sharing a drive. As I'm starting to do most of my work on a separate Ubuntu box lately being able to push data into the Windows machine is pretty useful, but alas I was unable to do it.

Specifically I wanted to share my projects work folder with development work but here's what that looks like:

Nope - no soup - eh sharing for you!

Blocked Shell Extensions

After a long bit of searching I ran into an obscure comment on a Windows Club post which points at the solution:

Windows has a Blocked Shell Extensions Section in the registry and in my case the Sharing Tab somehow ended up on that list.

The Windows Club article shows how to enable the sharing tab in Windows in general, by enabling it in the registry:

  • Use RegEdit
  • Create HKEY_CLASSES_ROOT\Directory\shellex\PropertySheetHandlers\Sharing
    if it doesn't exist
  • and add {f81e9010-6ea4-11ce-a7ff-00aa003ca9f6}

The latter is the shell identifier for the Sharing addin.

In my case that addin already existed, so I didn't have to add anything. However, the Sharing Tab still was not working for me.

The actual problem in my case is that the extension is blocked.

  • Use RegEdit
  • Goto HKEY_LOCAL_MACHINE\SOFTWARE\Microsoft\Windows\CurrentVersion\Shell Extensions\Blocked
  • Check for the {f81e9010-6ea4-11ce-a7ff-00aa003ca9f6} Id

If that id is present then the Sharing Tab is blocked. For me it was in there and hence - no Sharing Tab.

To fix the problem then:

  • Remove the {f81e9010-6ea4-11ce-a7ff-00aa003ca9f6} entry
    from the Blocked list
  • Shut down and restart all Explorer Shell Instances

And voila it's working:

Sharing with Powershell

The sharing tab works, but it would a lot easier if we can just do this from the command line. And it turns out you can do this with PowerShell:

# requires an Administrator Console
New-SMBShare –Name "projects" –Path "C:\projects"  –FullAccess INTERACTIVE

This creates the same share I showed above using powershell.

Note that this works even if the Sharing Shell Addin is disabled as I showed above because this actually doesn't use the shell but directly manipulates the shares.

You can then list all the shares:

Get-SMBShare

And you can then also remove a share:

Remove-SMBShare projects

Here's what the sequence of those 3 commands looks like in Powershell:

There are a number of other SMB related commands to control folder shares or mappings, set permissions and control access etc. For my purposes the above 3 commands are all I'm likely to need.

Summary

Cool both of these work. I have no idea what screwed up my sharing Wizard and forced it onto the Shell Exclusion list - it certainly wasn't any consious decision of mine. All I can think of is perhaps some issue with an Insider build update. I can't think of what else could possibly be mucking with Sharing settings on my machine.

The PowerShell commandlets are a bonus and although I was looking for the UI solution at the time, I suspect I'll revert to using the command line version instead because it's just quicker. Hopefully this post is visible enough to come up on a search because I'm almost certain I'll forget I wrote this post, next time I need to review this same topic... Carry on.

this post created and published with the Markdown Monster Editor
© Rick Strahl, West Wind Technologies, 2005-2020
Posted in Windows  

Content Injection with Response Rewriting in ASP.NET Core 3.x

$
0
0
If you're creating middleware components you might need at some point to inject content in the existing HTTP output stream in ASP.NET Core. In this post I discuss how to intercept Response output by using a customized stream, modify the data and update the final output generated, effectively providing response filtering.

Content Injection with Response Rewriting in ASP.NET Core 3.x

$
0
0

In building my Westwind.AspNetCore.LiveReload middleware component a while back, one issue that came up was how to handle Response rewriting in ASP.NET Core. This middleware provides optional live reload functionality to ASP.NET Core projects letting you reload the active page as soon as any monitored file is changed. Rather than an external tool it provides this functionality as middleware that can be plugged in and turned on/off via configuration.

As part of that middleware logic, the component needs to inject some JavaScript for the WebSocket interaction into any HTML pages sent to the client for display in the browser. Each HTML page includes the content so the server can trigger a reload when a monitored file is changed on the server. In order to do this the middleware needs to look at any original HTML output and transform it with the injected script code.

HTML Injection in ASP.NET Core Content

Let's back up for a second and talk about Response filtering and modifying content in Response.Body. If you want to do Response filtering you need to intercept the Response output stream and then intercept and look at the outgoing bytes written and rewrite them with your updated data.

The way this used to work in classic ASP.NET was by using a special Response.Filter property, which was basically a filter stream applied to the Response stream. ASP.NET took care of taking your stream and chaining it to the Response.Stream. Multiple filters could be applied, effectively chaining the streams together.

Response Wrapping in .NET Core 2.x

In ASP.NET Core there's no Response Filter so the process looks a bit different in ASP.NET Core, but essentially the concepts are the same. Instead of a filter you need to directly wrap the context.Response.Body or - as I'll show in a minute by using an IHttpResponseBodyFeature wrapper.

The raw filter wrapping looks something like this and this works both in .NET Core 2.x and 3.x:

private async Task HandleHtmlInjection(HttpContext context)
{
    using (var filteredResponse = new ResponseStreamWrapper(context.Response.Body, context))
    {
        context.Response.Body = filteredResponse;
        await _next(context);
    }
}

This essentially wraps the existing context.Response.Body stream with a new stream. ResponseStreamWrapper in this case is a custom Stream implementation that forwards most stream operations to the old stream and specifically overwrites the various Write methods to look at the outbound byte[] array to check for certain content and rewrite it - in this case looking for the ending </body> tag and injecting the LiveReload script there.

ASP.NET Core 3.x Response Rewriting with IHttpResponseStreamFeature

While the above approach also works in ASP.NET Core 3.1, there are some changes in how ASP.NET Core processes response output and the recommendations for writing Response output have changed.

A while back when having some discussions around Response filtering with this Live Reload component, Chris Ross from the ASP.NET Core team mentioned that it would be better to use the new IHttpResponseBodyFeature functionality instead of directly taking over the Response output stream.

The reason for this suggestion is that in ASP.NET Core 3.x there have been a lot of under the cover performance changes on how Request and Response data is moved around using Pipeline<T> instead of Stream. There are a number of IHttpXXXXFeature interfaces and corresponding implementations that are helping to abstract those new implementation details in higher level interfaces and implementations that are don't have to take the differences between a raw stream and Pipeline IO into account. It's a nice way to handle the new functionality without breaking based on different implementations under the covers. But it makes the process of intercepting a little less obvious - especially since some of those new interfaces aren't even documented (yet?).

For response body access the specific Feature is IHttpResponseBodyFeature. The only place I could find any information on IHttpResponseBodyFeature was in the ASP.NET Source code. After some digging there, I ended up with the following code (full code on GitHub):

private async Task HandleHtmlInjection(HttpContext context)
{
    // Use a custom StreamWrapper to rewrite output on Write/WriteAsync
    using (var filteredResponse = new ResponseStreamWrapper(context.Response.Body, context))
    {
#if !NETCORE2  
        // Use new IHttpResponseBodyFeature for abstractions of pilelines/streams etc.
        // For 3.x this works reliably while direct Response.Body was causing random HTTP failures
        context.Features.Set<IHttpResponseBodyFeature>(new StreamResponseBodyFeature(filteredResponse));
#else
        context.Response.Body = filteredResponse;
#endif
        await _next(context);
    }
}

Because IHttpResponseBodyFeature is a new feature in ASP.NET Core 3.x I need the bracketed #IF !NETCORE2 block to run the new code in 3.x and the old Response.Body assignment in 2.x.

To get that to work the Compiler constant has to be defined in the project:

<PropertyGroup Condition="'$(TargetFramework)' == 'netcoreapp2.1'"><DefineConstants>NETCORE2</DefineConstants></PropertyGroup>

Since IHttpResponseBodyFeature is a new feature in 3.x and its purpose is to abstract response stream writes, instead assigning the Response.Stream directly you use the context.Features to assign the feature and pass in the stream:

context.Features.Set<IHttpResponseBodyFeature>(new StreamResponseBodyFeature(filteredResponse));

// optionally - if you need access to the 'feature' you can do this
var feature = context.Features.Get<IHttpResponseBodyFeature>();

Once added, you can only get access to the IHttpResponseBodyFeature by explicitly retrieving it from the Features list, which is kind of wonky. There's not much there though so most likely you won't ever talk directly to the feature interface but here's what the interface looks like:

It seems like a mixture for helpers for writing the stream and controlling the response.

Although undocumented and not very discoverable, the good news is that it's easy enough to use once you figure out you need this interface, and you can replace the old code with a the alternative shown in the code snippet with a single line of code.

Just remember that IHttpResponseBodyFeature only exists .NET Core 3.x and later.

Wrap it up: HTML Injection with Response Wrapping in more Detail

Ok, so I've shown the top level of how to replace the output stream to intercept and write out a custom response. For completeness' sake I'm going to describe the Response wrapping code and stream implementation that handles the HTML injection logic here, because this actually turned out to be more tricky than it should be due to a few difficulties in ASP.NET Core access to Response header information.

For this middleware component, in order to inject the Web Socket script into any HTML output that the application renders - static HTML, or Razor/MVC generated pages or views - I need to rewrite the </body> tag in the HTML output, and when I find it, inject the WebSocket script into the output.

To do this the only way I could find is to capture the Response stream and as part of that process the stream logic has to:

  • Check to see if the Response Content Type is HTML
  • If so force the Content Length to null (ie. auto-length)
  • If so update the stream and inject the Web Socket script code if the marker is found
  • If not HTML pass raw content straight through to the base stream

This pretty much like what you had to do in classic ASP.NET with Response.Filter except here I have to explicitly take over the Response stream (or Http Feature) directly.

There are a few quirks that make this a lot harder than it used to be, that has to do with the fact ASP.NET Core that you can't write headers after the Response has started outputting. There's also no clean way I could find outside of the Output Stream implementation to check the Response.ContentType and set the Response.ContentLength for the current request before it hits the stream. This means that the stream handles those two tasks internally which is messy to say the least.

Let's start with the ResponseStreamWrapper which is a custom Stream implementation. Here's what the relevant overridden methods in this stream class look like . I've left out the methods that just forward to the base stream leaving just the relevant methods that operate on checking and manipulating the Response (full code on Github):

public class ResponseStreamWrapper : Stream
{
    private Stream _baseStream;
    private HttpContext _context;
    private bool _isContentLengthSet = false;

    public ResponseStreamWrapper(Stream baseStream, HttpContext context)
    {
        _baseStream = baseStream;
        _context = context;
        CanWrite = true;
    }

    public override Task FlushAsync(CancellationToken cancellationToken)
    {
        // BUG Workaround: this is called at the beginning of a request in 3.x and so
        // we have to set the ContentLength here as the flush/write locks headers
        // Appears fixed in 3.1 but required for 3.0
        if (!_isContentLengthSet && IsHtmlResponse())
        {
            _context.Response.Headers.ContentLength = null;
            _isContentLengthSet = true;
        }

        return _baseStream.FlushAsync(cancellationToken);
    }

    ... 

    public override void SetLength(long value)
    {
        _baseStream.SetLength(value);
        IsHtmlResponse(forceReCheck: true);
    }

    public override void Write(byte[] buffer, int offset, int count)
    {
        if (IsHtmlResponse())
        {
            WebsocketScriptInjectionHelper.InjectLiveReloadScriptAsync(buffer, offset, count, _context, _baseStream)
                                          .GetAwaiter()
                                          .GetResult();
        }
        else
            _baseStream.Write(buffer, offset, count);
    }

    public override async Task WriteAsync(byte[] buffer, int offset, int count,
                                          CancellationToken cancellationToken)
    {
        if (IsHtmlResponse())
        {
            await WebsocketScriptInjectionHelper.InjectLiveReloadScriptAsync(
                buffer, offset, count,
                _context, _baseStream);
        }
        else
            await _baseStream.WriteAsync(buffer, offset, count, cancellationToken);
    }


    private bool? _isHtmlResponse = null;
    private bool IsHtmlResponse(bool forceReCheck = false)
    {
        if (!forceReCheck && _isHtmlResponse != null)
            return _isHtmlResponse.Value;

        _isHtmlResponse =
            _context.Response.StatusCode == 200 &&
            _context.Response.ContentType != null &&
            _context.Response.ContentType.Contains("text/html", StringComparison.OrdinalIgnoreCase) &&
            (_context.Response.ContentType.Contains("utf-8", StringComparison.OrdinalIgnoreCase) ||
            !_context.Response.ContentType.Contains("charset=", StringComparison.OrdinalIgnoreCase));

        // Make sure we force dynamic content type since we're
        // rewriting the content - static content will set the header explicitly
        // and fail when it doesn't match if (_isHtmlResponse.Value)
        if (!_isContentLengthSet && _context.Response.ContentLength != null)
        {
            _context.Response.Headers.ContentLength = null;
            _isContentLengthSet = true;
        } 
        return _isHtmlResponse.Value;
    }
}

There are a couple of things of note here.

Everything is forced through the Stream

This approach requires that all content - not just the HTML content - goes through this filtering stream because I have no other way to determine the Response Content-Type reliably before the stream is accessed to determine if the output is HTML. Even the detection of whether output is HTML is rolled into the stream logic because that was the only way I could figure out how to get the Content-Type before the Response starts writing. All those calls to IsHtmlRepsonse() check for the content type and are required on all the write operations so that the content can be passed straight through for none HTML respsonses.

The filter stream is pretty efficient as it passes through all stream methods to the base stream in the case of non-HTML content. It does have to check whether the content is HTML but that check only happens once and after that uses a cached value. Still, it seems that it would be much more efficient if there was a way to tell whether the stream needs to be wrapped before creating a new wrapping stream.

Maybe there's a better way to do this which would make non-HTML content more efficient, but I couldn't find one.

No Header Access after first write in ASP.NET Core is Tricky

Another small problem is that in ASP.NET Core headers cannot be modified once you start writing to the Response stream. That makes sense in some scenarios (such as streaming data or dynamic data), but seems infuriating for others when you know that ASP.NET has to still write the Content-Length anyway when it's done with content because the size of the content isn't known until the output has been completely rendered. So there's some sort of buffering happening - but your code doesn't get to participate in that unless you completely reset the Response.

Regardless, since this middleware injects additional script into the page, Content-Lengthalways has to be set to null for HTML content because even if the size was previously set, with the injected script the size is no longer accurate. So Response.ContentLength=null is still a requirement and it has to be set before writing to the header.

To make this scenario even worse, in ASP.NET Core 3.0 there was a bug that fired the stream's FlushAsync() method before the first Write operation when the initial Response stream was created. Arrgh! So the code also checks FlushAsync() for HTML content and resets the Content-Length there. That was a fun one to track down. . Luckily it looks like that issues was fixed in ASP.NET Core 3.1..

The Actual Rewrite Code

The actual rewrite code rewrites the incoming byte buffer as it comes into any of the Stream write operations. Because there are a number of overloads and sync and async versions, this code is moved out into separate helper methods that are called from the appropriate Write methods. The code uses Span<T> to split the inbound buffer to avoid additional allocation of an extra buffer and then writes the three buffers - pre, script, post - out into the stream:

public static Task InjectLiveReloadScriptAsync(
            byte[] buffer, 
            int offset, int count, 
            HttpContext context, 
            Stream baseStream)
{
    Span<byte> currentBuffer = buffer;
    var curBuffer = currentBuffer.Slice(offset, count).ToArray();
    return InjectLiveReloadScriptAsync(curBuffer, context, baseStream);
}

public static async Task InjectLiveReloadScriptAsync(
        byte[] buffer, 
        HttpContext context, 
        Stream baseStream)
{
    var index = buffer.LastIndexOf(_markerBytes);

    if (index > -1)
    {
        await baseStream.WriteAsync(buffer, 0, buffer.Length);
        return;
    }

    index = buffer.LastIndexOf(_bodyBytes);
    if (index == -1)
    {
        await baseStream.WriteAsync(buffer, 0, buffer.Length);
        return;
    }

    var endIndex = index + _bodyBytes.Length;

    // Write pre-marker buffer
    await baseStream.WriteAsync(buffer, 0, index - 1);

    // Write the injected script
    var scriptBytes = Encoding.UTF8.GetBytes(GetWebSocketClientJavaScript(context));
    await baseStream.WriteAsync(scriptBytes, 0, scriptBytes.Length);

    // Write the rest of the buffer/HTML doc
    await baseStream.WriteAsync(buffer, endIndex, buffer.Length - endIndex);
}

static int LastIndexOf<T>(this T[] array, T[] sought) where T : IEquatable<T> 
                          => array.AsSpan().LastIndexOf(sought);

Again the complete code including the dependencies that are not listed here are on Github in the WebSocketScriptInjectionHelper class. This code has all the logic needed to inject additional bytes into an existing byte array which is what's needed to rewrite the content from an individual (or complete) Response.Write() or Response.WriteAsync() operation.
Summary

As you can see the by all of this, rewriting Response is by no means trivial - there are quite a few moving parts that need to be implemented all essentially in the customized response stream. Getting all the relevant information at the relevant time in the pipeline processing in ASP.NET Core is a lot harder to find than it ever was in classic ASP.NET. All these piled up abstractions make for an alphabet soup of functionality layered on top of each other. The good news is that once you find the right levers to turn, there are ways to manipulate just about anything in the pipeline. Just don't expect it to be easy to figure out.

The bottom line is that re-writing HTTP Response content is still a pain in the ass in ASP.NET Core. It still requires capturing the active Response stream and rewriting the content on the fly. You have to be careful to set your headers before the re-write and especially you have to ensure that if you change the content's size that the Content-Length gets dynamically set by ASP.NET internally by setting context.Response.Headers.ContentLength = null;.

It's not much different from what you had to do in classic ASP.NET, except for the header manipulation which makes some of this more cryptic. The fact that some of the new interfaces like IHttpResponseBodyFeature aren't documented also isn't helpful.

Hopefully walking through this scenario is useful to some of you heading down the same path of rewriting output as I did.

Resources

this post created and published with the Markdown Monster Editor
© Rick Strahl, West Wind Technologies, 2005-2020
Posted in ASP.NET Core  

Static Constructor Failures and Declaration Order

$
0
0

I ran into a weird and hard to identify error today that wasted way more time than I care to admit because you know... assumptions on what you know when you don't actually know 😄

Check out the following bit of code and see why this would fail (you can paste this into LinqPad to execute):

void Main()
{
	var lic = new LicenseConfiguration();
	lic.Dump();
}

public class LicenseConfiguration
{
	public static LicenseConfiguration Current { get; set; } = new LicenseConfiguration();
	
	static readonly byte[] _dek = new byte[] { 88, 103, 77, 81, 66, 56, 89, 120 };

	public string LicenseEncryptionKey { get; set; }

	public LicenseConfiguration(string encryptionKey = null)
	{
		if (!string.IsNullOrEmpty(encryptionKey))
			LicenseEncryptionKey = encryptionKey;
		else
		{
			var d = LicenseConfiguration._dek;
			LicenseEncryptionKey = Encoding.ASCII.GetString(d);
		}
	}
}

In LinqPad this fails with the following error:

Can you spot the problem here? No? Yeah well, me either at least for a while! If you did figure this out just by looking at it your eye to code coordination is much better than mine 😄.

The problem in the code as shown is that the LicenseConfiguration._dek value is always null when accessed in the constructor, even though there's a field initializer on the field. This in turn blows up the .GetString() call that cannot be passed a null value. But that value should never be null because it's assigned with the (implicit) static constructor - but there it is blowing up in my face.

I tried a few different things like explicitly adding a static constructor and assigning the byte[] value there, but the static CTOR never actually fired. Double WTF? But it did give a hint to the problem.

Order Matters

To make a very long story short the problem is

  • Static Declaration Order matters!

Notice the order in how I have the two static properties declared:

public static LicenseConfiguration Current { get; set; } = new LicenseConfiguration();
static readonly byte[] _dek = new byte[] { 88, 103, 77, 81, 66, 56, 89, 120 };

Notice that Current comes before the private _dek declaration and it does... drum roll please: a new LicenseConfiguration(). Classic case of recursive ctor calls.

More explicitly the compiler translates the implicit property/field declarations into a static CTOR which does something like this:

static LicenseConfiguration() 
{ 
    Current = new LicenseConfiguration();
    _dek = new byte[] { 88, 103, 77, 81, 66, 56, 89, 120 };
}

Now can you spot the problem? 💡

When the non-static constructor fires it does:

var d = LicenseConfiguration._dek;
LicenseEncryptionKey = Encoding.ASCII.GetString(_dek);

So it tries to get the _dek property, which triggers the static CTOR. Then it tries to create the .Current instance and here's where the recursive call happens launching into another static initialization. At this point the _dek field still has not been initialized. When the code falls through to the .GetString() call with the _dek default value in the constructor the value is null and things go boom.

Oddly when looking at the Visual Studio call stack display, it doesn't show the recursive constructor nesting:

But the error message in Visual Studio provides a hint in that it points GetString() where it blows up.

I'm sitting on the first use of the _dek field when the type initialization error occurs. In that scope .GetString(_dek)has not fired yet, but the error says it errors at .GetString(_dek). It's the nested CTOR call that's blowing up. Aha! 💡

Notice that the exception message correctly points at the nested .GetString() call which hasn't fired in the top level constructor, but is being fired for the nested static constructor initialization of the .Current instance.

Yikes - how is that for an esoteric error?

The quick fix for this is to shuffle the declarations into desired execution order where the byte array is initialized before the Current instance is set.

static readonly byte[] _dek = new byte[] { 88, 103, 77, 81, 66, 56, 89, 120 };
public static LicenseConfiguration Current { get; set; } = new LicenseConfiguration();

This lets the non-static constructor work without a failure and the code goes on its merry way without errors.

Since the declaration order is significant here, it's probably a good idea to be explicit and create a static constructor instead of the auto-declarations, which makes it more obvious and allows for a comment notice:

static LicenseConfiguration() 
{
     // Note: Declaration Order is important!
     _dek = new byte[] { 88, 103, 77, 81, 66, 56, 89, 120 };
     LicenseConfiguration Current = new LicenseConfiguration();
}

And now it works:

Summary

Another one of those edge case scenarios where you look at code and go "How could this possibly be failing?" Yet there's a fairly logical reason why this is actually failing the way it is, once you look at the whole picture.

The moral of this little fable is: Make sure you know how automatic properties are assigned and ensure that the order is such that each property has what it needs before it auto-initializes, including potentially properties/fields that were declared first.

Auto-initialization is nice compiler sugar, but it's not magic, so you're still responsible for making sure the initialization fires in the right order.

If you have a bunch of properties that do depend on others, it's probably a very good idea to create explicit constructors, static or otherwise. Note that although this post is about a static constructor blowing up due to declaration order, the same rules apply for non-static auto initialized fields and properties. Order matters no matter what.

Constructor nesting calls are always tricky and usually unintended or a side effect. When something goes wrong with constructor code it's often difficult to debug, because it's easy to lose sight of what's firing when, unless you look very closely. And apparently the debugger can be deceiving you you too sometimes, not stepping into the nested calls as is the case here.

This is clearly an edge case but that makes it all the more annoying to track down. A silly mistake was causing me an unexpected error and a good hour of wasted time. Hopefully this post can save someone from wasting that hour and doubting their sanity as I did 😄...

this post created and published with the Markdown Monster Editor
© Rick Strahl, West Wind Technologies, 2005-2020
Posted in .NET  C#  

Using WSL to Launch Several Bash Command from an Application

$
0
0

Failure to Launch

I just spent way too much time trying to figure out a way on how to launch the Windows Subsystem for Linux to run a server script from a full framework desktop application and I want to share some of the pain with this so hopefully you won't have to go through this. I'm also hopeful that some of the issues I saw here will be resolved in some way.

The Premise

I'm working on Jekyll Weblog publishing in Markdown Monster. Basically I want to allow editing a post like you normally would and then - when ready - 'publish' the Markdown file and related resources into the appropriate folders in the Jekyll template project.

Once the files are copied, I then want to launch the Jekyll build process and server to rebuild the site and view the site and new post. For the purpose of this post the launching of the Jekyll build is what my application needs to do.

WSL Awesome Tool - not so awesome if you need to launch it

Using WSL from the command line to 'simulate' the operation I'm trying to automate from Markdown Monster, looks something like this:

# Start WSL
wsl   

cd /mnt/c/projects/Test/jekyll/help
bundle exec jekyll serve;

Simple right?

So it would be nice if you could just do the following:

wsl "cd /mnt/c/projects/Test/jekyll/help; bundle exec jekyll serve;"

But that does not actually work. While WSL has a 'command' parameter, it only allows a single command (or chained commands). So the above syntax doesn't work.

However the following works:

bash -c "cd /mnt/c/projects/Test/jekyll/help; bundle exec jekyll serve;"

Running this from within Windows Terminal with a Powershell prompt to start it looks like this:

It works!

So... Ugh! wsl and bash are the same but not the same. It was suggested to me that wsl.exe is the recommended command line to use because it uses the Linux Distro you have configured as your preferred distro. bash apparently always uses the default distro.

The two commands also have different command line options and especially related to executing commands on startup.

Ok - so for what I need here bash is the way this has to go.

Next Problem - invoking WSL from an Application

As if the above wasn't confusing enough, now it gets really odd. First here's the code I'm using to launch an application from Markdown Monster. This is a generic helper function I use that lets you pass in a full command line and has a number of options in a single parameterized method call:

public void ExecuteCommandLine(string fullCommandLine, 
							   string workingFolder = null, 
							   int waitForExitMs = 0, 
							   string verb = "OPEN",
							   ProcessWindowStyle windowStyle = ProcessWindowStyle.Normal)
{
	string executable = fullCommandLine;
	string args = null;
	if (executable.StartsWith("\""))
	{
		int at = executable.IndexOf("\" ");
		if (at > 0)
		{			
			args = executable.Substring(at+1).Trim();
			executable = executable.Substring(0, at);
		}
	}
	else
	{
		int at = executable.IndexOf(" ");
		if (at > 0)
		{
			if (executable.Length > at +1)
				args = executable.Substring(at + 1).Trim();
			executable = executable.Substring(0, at);
		}
	}

	var pi = new ProcessStartInfo();
	//pi.UseShellExecute = true;
	pi.Verb = verb;
	pi.WindowStyle = windowStyle;

	pi.FileName = executable;
	pi.WorkingDirectory = workingFolder;
	pi.Arguments = args;


	using (var p = Process.Start(pi))
	{
		if (waitForExitMs > 0)
		{
			if (!p.WaitForExit(waitForExitMs))
				throw new TimeoutException("Process failed to complete in time.");
		}
	}
}

So using that code what I want to do should look something like this to mimic the command line code that worked above:

ExecuteCommandLine(@"bash -c ""cd /mnt/c/projects/Test/jekyll/help; bundle exec jekyll serve;"" ");

This is basically the same command line I used in Powershell, so I expected this to work - but it doesn't work (running in LinqPad 5 32 bit):

Well... that sucks!

A lot of false starts and some Twitter help from Richard Turner and Martin Sundhaug later, I figured out that the problem here is - Processor Architecture.

Running the same code in LinqPad 6 which is 64 bit works:

Architecture Hell

So Markdown Monster is a 32 bit application running an x86 compiled EXE. It can run 64 bit, but for reasons I've discussed before Markdown Monster is considerably more stable in 32 bit mode, so it defaults to 32 bit.

The differences between 32 bit and 64 bit applications are subtle, but one thing that's different is file locations and paths and where system files are found.

The issue here is this:

wsl.exe and bash.exe live in \Windows\System32. 64 bit applications have that path mapped into their path on where to look for files.

However, 32 bit applications do not look in System32 for files - they look in the SysWow64 folder. Turns out wsl.exe and bash.exe are not in those folders. So trying to load bash or bash.exe or wsl or wsl.exe doesn't find anything.

I'd call that a shortcoming since these executables are only small launchers that don't do much - there should be files in the 32 bit folder location as well.

There's a way around this using a folder SysNative folder alias. Using that alias I can now use the following command:

ExecuteCommandLine(@"C:\Windows\Sysnative\bash.exe -c ""cd /mnt/c/projects/Test/jekyll/help; bundle exec jekyll serve;"" ");

Check for Architecture and Vary Operation

But be aware this only works in x86 architecture mode. For x64 bash.exe is found in the system path and it just works.

So for reliable operation in a .NET application you need something like this:

if (Environment.Is64BitProcess)
	// this works on x64
	ExecuteCommandLine(@"bash -c ""cd /mnt/c/projects/Test/jekyll/help; bundle exec jekyll serve;"" ");
else
	// this works on x86
	ExecuteCommandLine( 
            Environment.GetEnvironmentVariable("WinDir") +"\\SysNative\\bash.exe -c " +"\"cd /mnt/c/projects/Test/jekyll/help; bundle exec jekyll serve;\" ");

And that now works!

Summary

So that's a lot of confusion for a pretty common scenario: Launching a shell process from within another application.

To summarize:

  • wsl.exe only supports single commands via wsl "command or executable"
  • Use bash.exe to allow multiple commands to be executed
  • wsl and bash live in System32 and are auto-mapped only for 64 bit apps
  • 32 bit apps need to use \Windows\SysNative\bash.exe to launch

That's quite a bit of inconsistency. It sure seems that wsl.exe and bash.exe should be available on the path regardless of whether you're running in 64 bit or 32 bit mode.

Also, if wsl.exe is going to be the recommendation for running WSL, it needs a way to reliably support launching with multiple commands similar to the way bash -c works. The command line options for wsl.exe are pretty limited.

What I've described here is not something you're likely to run into often, but if you do, it sure can be a head scratcher. 32 bit and 64 bit differences are always trouble because they are often very difficult to track down as people see different behavior between architectures - 'hey it works for me, but it doesn't work for you' - just because cause you're running 32 bit.

Hopefully this post is useful to some of you so you can avoid some of this pain. And even more hopefully some of these external startup issues can be ironed out in wsl to make it easier and more flexible to launch wsl from other applications.

© Rick Strahl, West Wind Technologies, 2005-2020
Posted in .NET  Windows  WSL  

Uri.AbsoluteUri and UrlEncoding of Local File Urls

$
0
0
Ran into an interesting problem with the Uri class and local file URLs today. The problem is that Urls were not properly Url encoding and decoding with the Url treated incorrectly. After a bit of experimenting it turns out that the way the file URL is created is critical to the Url parsing behavior of the Uri class.

Content Injection with Response Rewriting in ASP.NET Core 3.x

$
0
0
If you're creating middleware components you might need at some point to inject content in the existing HTTP output stream in ASP.NET Core. In this post I discuss how to intercept Response output by using a customized stream, modify the data and update the final output generated, effectively providing response filtering.

Fixing Adsense Injecting 'height: auto !important' into scrolled Containers

$
0
0

Ran into an AdSense problem today with one of my older Web sites. On this Message Board site I maintain, content is split into two split containers that span the height of the page and provide their own customized scrollbars for each 'pane'. It's basically two split <div> tags that are sized inside a flex container that manages the header and the list and content panes to fill the entire page.

One reason for this is specific layout is that FlexBox makes it very easy to create pages that 'fit' properly into a height: 100% page without overflow that requires a page scrollbar. Rather, each of the panes have their own independent scrollbars so the longish content on either side can be navigated independently. Also the header can stay visible on the top of the page.

I use this sort of layout for a number of sites and pages and it has been working great for years.

The way this should work looks like this:

Really AdSense?

Recently however several people complained that their view of this page was not working as it used to - rather than scrolling panes independently, the entire page pops up a browser scrollbar on the right, and both of the 'panes' are not showing any scrollbars.

It turns out that at some point AdSense has changed its scripting behavior to automatically detect when the ad content is placed into some sort of scrolling container. When that's the case the AdSense script code injects a style="height: auto !important attribute into the flex container, which completely changes the behavior of the page behavior:

Notice the big browser scrollbar on the right instead of the custom slim scrollbars which have disappeared. Also notice how the entire page including the header now scrolls down instead of as before the individual panes only scrolled each pane's content.

The script code injected is a style="height: auto !important" and that bit is what's causing the document browser scroll bar to pop up. The document no longer set to height: 100% and the content now overflows, which in turn removes the scrollbars from the the two panes, because the document is now as long as the longer of the two panes.

Grrrrr....

The original layout in my application uses FlexBox to constrain the content to height: 100% and then lets the content and sidebar panels size themselves to the full 100% size of the document.

.flex-master {        
        display: flex;
        flex-direction: column;
        flex-wrap: nowrap;
        flex-grow: 1;
        height: 100%;
    }
.page-content {    
    flex: 1 1 auto;   /* grow & shrink*/

    display: flex;
    flex-direction: row;                         
    
    overflow: auto;
}    
.sidebar-left {
    flex: 0 0 auto; /* don't grow | shrink horizontally */
    width: 400px;
    max-width: 100%;
    overflow-x: hidden;
    overflow-y: auto;
    border: none;
    white-space: normal;
    transition: width 0.2s ease-in-out;
    z-index: 100;

    scrollbar-track-color: #686868;;
    scrollbar-arrow-color: cornsilk;
    scrollbar-face-color: #555;    
    -ms-overflow-style: -ms-autohiding-scrollbar !important;
    -webkit-overflow-scrolling: touch;
}

It's a simple layout and it works well.

But with Google injecting this style tag:

<div class="flex-master" style="height: auto !important">

the flex layout height goes to shit, and all height calculations now are free flowing to whatever the larger of the two panels is. The usability result is that the entire page - header and both panes - scroll tied to the browser's main scrollbar. It still works but behavior has changed drastically!

I suppose this is meant to keep people from running hidden content in frames/panels that are not visible, but this particular use case I'm using seems legit in that I simply want more control over how the content is displayed and navigated independently. By injecting that attribute AdSense is actually completely breaking my page scroll behavior.

Not cool, Google!

The AdSense script does this not only on initial page load, but also after loading additional pages dynamically with a fetch request. The ads are updated via script with:

// fire google ads  
setTimeout(function() {
    (adsbygoogle = window.adsbygoogle || []).push({});
    _gaq.push(['_setAccount', 'UA-9492219-13']);
    _gaq.push(['_trackPageview']);
}, 500);

This code too triggers the attribute injection.

Fixing Google's Overbearing Behavior - Take 1

The simplest solution I could think of was to simply run some script to essentially remove the tags.

// Remove Google fixup code for the Flex scroll box
setTimeout( function() {        
    var flex = document.getElementsByClassName('flex-master')[0];                        
    flex.setAttribute("style","");  
},700);       

And that does work... Note that the update has to be delayed long enough so that the AdSense code has actually applied the style tag.

This code is definitely not ideal: The page jumps around terribly every time content is first shown or updated. First the page shows properly with the custom toolbars and perfectly sized content and list panes, but then the browser toolbar from the AdSense injection pops up a which slightly changes the page dimensions and the entire view shifts a little. Then a fraction of a second later it snaps back to the original view. And - with the timeout it's possible a slow render may be too early to actually update the style attribute before AdSense has updated it.

Yeah - Dumpster Fire! 🔥

A better way - Using MutationObserver

After some experimentation with different things trying to minimize the jitters in the rendering I decided to take another shot at searching for this problem, because it certainly seems that somebody must have run into this before. And sure enough now that I knew what I was looking for exactly, I ran into this StackOverflow post that uses a MutationObserver. Of course, I should have thought of that myself.

MutationObserver is a DOM API that allows you to watch for changes on DOM elements and get notified when a change occurs. It's very powerful and while you don't need it often in normal page level development, it can be very useful if you need to generically trap changed content which is exactly the scenario I'm looking at here.

I change the setTimeout() code I was using before to this:

<script src="https://pagead2.googlesyndication.com/pagead/js/adsbygoogle.js" async></script> <script>
    // based on code found at:
    // https://stackoverflow.com/questions/55695667/adsense-injecting-style-tag-into-my-page-in-chrome
    var flex = document.getElementsByClassName('flex-master')[0];
    const observer = new MutationObserver(function (mutations, observer) {
        flex.style.height = "";
    });
    observer.observe(flex, {
        attributes: true,
        attributeFilter: ['style']
    });</script>

And this works perfectly.

This code observes the flex-master element and when AdSense changes the value of the style I get the notification that immediately un-sets the style attribute again. This all happens in the same execution cycle as the update so there's no annoying bouncy document to contend with.

One nit here is that the observer fires multiple times - as the height is updated the style changes again and so another event is fired. It's not a big deal, since this code is minimal.

So this works and problem solved for now.

Summary

It sucks that Google is so heavy-handed in explicitly changing content on my page. It's part of the content guidelines, but these days, especially with client side loaded code it's not uncommon to have content that lives in containers that manage their own page scrolling for a cleaner 'application-like' experience. But alas here we are... Google does whatever the heck Google does and we can either take it or leave it.

At least there's a hacky workaround for this, although I suspect this doesn't make Google very happy as this certainly can be abused to hide ads after they are loaded which I suspect is the main reason for this behavior. Who knows, Google is likely to shuffle things around again in the future, but for now this hack works and I have my original navigation back...

this post created and published with the Markdown Monster Editor
© Rick Strahl, West Wind Technologies, 2005-2020
Posted in HTML  

ASP.NET Core WebSockets and Application Lifetime Shutdown Events

$
0
0

A couple of days ago I received a bug report in my Westwind.AspnetCore.LiveReload repository that revolves around the application life cycle handling events. According to the bug report, when Live Reload is enabled in the application, the shutdown IHostApplicationLifetime events are not consistently firing when the application is shutting down.

WebSockets and Persistent Connections

The Live Reload middleware works by running a Web socket between any open HTML page in the browser and the application. When a file of interest is changed in the dev environment, the WebSocket forces the HTML page to be refreshed.

ASP.NET Core makes it pretty easy to handle WebSocket requests as part of an ASP.NET Core application - you can just check a request for the context.WebSockets.IsWebSocketRequest and you're off to the races. You create a connection and then wait to receive data on this connection which looks something like this in this very simple WebSocket implementation that pushes for refresh requests into the browser:

// Handle WebSocket Connection
if (context.Request.Path == config.WebSocketUrl)
{
   if (context.WebSockets.IsWebSocketRequest)
   {
       using (var webSocket = await context.WebSockets.AcceptWebSocketAsync())
       {
           if (!ActiveSockets.Contains(webSocket))
               ActiveSockets.Add(webSocket);

           // do your websocket stuff here    
           await WebSocketWaitLoop(webSocket, context); // waits until socket disconnects
       }
   }
   else
   {
       context.Response.StatusCode = 400;
   }

   return true;
}

private async Task WebSocketWaitLoop(WebSocket webSocket, HttpContext context)
{
    // File Watcher was started by Middleware extensions
    var buffer = new byte[1024];
    while (webSocket.State.HasFlag(WebSocketState.Open))
    {
        try
        {
            var received =await webSocket.ReceiveAsync(buffer);
        }
        catch(Exception ex)
        {
            break; // disconnected most likely
        }
    }

    ActiveSockets.Remove(webSocket);

    if (webSocket.State != WebSocketState.Closed &&
        webSocket.State != WebSocketState.Aborted)
    {
        try
        {
            await webSocket.CloseAsync(WebSocketCloseStatus.NormalClosure,"Socket closed",
                CancellationToken.None);
        }
        catch
        {
            // this may throw on shutdown and can be ignored
        }
    }

}

What's nice about the ASP.NET Core WebSocket implementation is that you still get a request context and a lot of the same semantics of a regular transactional HTTP request, except with the big difference that WebSocket requests are persistent rather than transactional. Basically a WebSocket connects and then sits and waits for incoming data to do it's thing until it's disconnected.

The above code works, but it's completely oblivious to anything else going on. Like say an application shutting down...

WebSockets and Application Lifetime

When the application shuts down, it's possible and quite likely actually that a socket is connected to an HTML page. So there's an active connection while the application is trying to shut down.

In quick testing I was able to verify that the lifetime event handlers in my sample application in Startup.Configure() are not firing if there's a connected socket still running during shutdown.

Luckily ASP.NET Core has built in support for basic Lifetime management that can be used to notify long running tasks like a Web Socket that the application is shutting down.

IHostApplicationLifetime is a simple interface that allows trapping shut down events. It's one of the default services available in a .NET Core application so it's always available for injection. This interface also exposes several CancellationTokens that can be used to notify long running operations that the application is shutting down.

Setting up ApplicationLifetime in Configure() and testing the application with one or more connected pages I would see the following life time events intermittently working or not working (mostly not):

public void Configure(IApplicationBuilder app,
          IWebHostEnvironment env, 
          IHostApplicationLifetime lifetime) 
{
    // ...
    // Check for lifetime shutdown working with WebSocket active
    lifetime.ApplicationStopping.Register(() =>
    {
      Console.WriteLine("*** Application is shutting down...");
    }, true);
    lifetime.ApplicationStopped.Register(() =>
    {
      Console.WriteLine("*** Application is shut down...");
    }, true);
}

Instead the application would shut down without these events firing (after some delay) or worse in some instances the application would crash just before the final shutdown. This often goes unnoticed because by the time this happens the application infrastructure is already unloaded so logging is likely not happening anymore, and so the crashes often occur unnoticed. If running manually and killing with Ctrl-C this would show up as occasional shut down crashes with strangely unrelated framework level error messages.

Not critical but clearly not optimal!

Application Lifetime Cancellation Tokens

As with most things async in ASP.NET Core, most async methods allow you to pass Cancellation Tokens to the async method and the websocket.ReceiveAsync() method is no different.

Cancellation Tokens provide a cancellation context that allow anybody holding the token along the call chain to signal that the operation should be canceled.

The IHostApplicationLifetime object passed has several CancellationTokens it exposes:

  • ApplicationStarted
  • ApplicationStopping
  • ApplicationStopped

These tokens are set as the application goes through the relevant phase of operation.

In my WebSocket loop I need to get a hold of the ApplicationStopping CancellationToken. So to use this functionality I need to:

  • Set up the Application Lifetime event handling in Startup.Configure()
  • Use DI to retrieve the IHostApplicationLifetime reference
  • Pass the Lifetime's ApplicationStopping cancellation token to my Socket function.

IHostApplicationLifetime is a pre-configured service that is available in the default ASP.NET service configuration so it can be injected directly into the Startp.Configure() method. I showed that code above in the previous code snippet.

Likewise I can use Dependency Injection to access the IHostApplicationLifetime in my Middleware component's CTOR:

public class LiveReloadMiddleware
{
    private IHostApplicationLifetime applicationLifetime;
    public LiveReloadMiddleware(RequestDelegate next,
                    IHostApplicationLifetime lifeTime)
    {
        applicationLifetime = lifeTime;
        _next = next;
    }
    // ...
}    

The applicationLifetime.Stopping CancellationToken can then be used to pass the Cancellation token to the ReceiveAsync() call.

private async Task WebSocketWaitLoop(WebSocket webSocket, HttpContext context)
{
    // File Watcher was started by Middleware extensions
    var buffer = new byte[1024];
    while (webSocket.State.HasFlag(WebSocketState.Open))
    {
        try
        {
            var received =
                await webSocket.ReceiveAsync(buffer, applicationLifetime.ApplicationStopping);
        }
        catch(Exception ex)
        {
            break;
        }
    }

    ActiveSockets.Remove(webSocket);

    if (webSocket.State != WebSocketState.Closed &&
        webSocket.State != WebSocketState.Aborted)
    {
        try
        {
            await webSocket.CloseAsync(WebSocketCloseStatus.NormalClosure,"Socket closed",
                applicationLifetime.ApplicationStopping);
        }
        catch
        {
            // this may throw on shutdown and can be ignored
        }
    }

}

With this code in place in the middleware the shutdown events now correctly fire. No more random shutdown crashes and the lifetime events consistently fire now.

Summary

WebSockets in ASP.NET Core are easy to use but due to the simple model that looks similar to typical ASP.NET Core requests, it's easy to forget that socket requests are long lived and can linger for a long time in the background. In order to ensure that an application can shutdown cleanly the sockets have to be disconnected or aborted before the application can shut down.

The IHostApplicationLifetime interface provides the tools to both intercept the shut down operations as well as providing the necessary CancellationToken instances to let other operations safely shut down when a shutdown is requested. It's all quite disconnected but once you know how to get a hold of the Cancellation tokens, making sockets clean to shut down is easy enough to accomplish.

Cancel the shutdown frustrations... onward!

this post created and published with the Markdown Monster Editor
© Rick Strahl, West Wind Technologies, 2005-2020
Posted in ASP.NET Core  WebSockets  ASP.NET  .NET  

Visual Studio 2019.2 and .NET 3.0 SDK Projects not Loading

$
0
0
Recent upgrades to Visual Studio 2019.2 seem to have broken projects that use the 3.0 .NET SDK as Visual Studio is defaulting to a pre-3.0 version of the SDK tools and compilers. The end result is that projects even fail to load in Visual Studio. There are workarounds but ultimately this an issue that Microsoft needs to address better in future updates.

Adding Additional Mime Mappings to the Static File Provider

$
0
0

As you may know, I have a .NET Core based generic LiveReloadWebServer that can serve static (and Razor Pages) Web content generically out of an arbitrary folder.

The other day I tried to fire up a Blazor WASM site to check it out standalone running in a plain old Web server and the LiveReloadServer is perfect for that:

LiveReloadServer --webroot C:\clients\PRA\Blazor\PraMobile\bin\Release\netstandard2.1\publish\wwwroot

But unfortunately it turns out that didn't work and I ended up with a sea of red:

What's happening here is that is that the .dll extension is served as a static file in ASP.NET Core. Although it is a binary file, as far as the server is concerned it's just a static file that's sent to the client, to be processed by the client side Blazor engine.

But, the ASP.NET Core StaticFileProvider by default doesn't serve .dll files that are required for Blazor WASM to work. All those 404 errors are Kestrel rejecting the requests for DLL files that exist, but aren't served by the static file provider.

But it works in a proper Blazor Application?

A proper Blazor application with a Blazor configuration entry point handles adding the appropriate mime type mapping implicitly, so loading .dll files works out of the box. But if you build a custom Web server as I do here in this generic live reload server, the .dll extension has to be explicitly added and that's what I talk about below.

The StaticFiles Middleware

The StaticFile Middleware in ASP.NET Core is at the center of the LiveReloadWebServer application/dotnet tool. It's responsible for serving any non-dynamic files, which in the use case of this server is pretty much everything. Static HTML files, CSS and JavaScript resources, images - all static files served from some folder. The Live Reload Server lets you specify a root folder and the application points the static file provider at that folder using an explicit FileProvider assignment.

In a typical Web application you use the StaticFile middleware to serve well-known static file types very simply by doing this:

app.UseStaticFiles();

But this middleware has an optional parameter that allows you configure a number of options like a FileProvider that can customize and combine multiple locations, add custom mappings and more.

For example, in the LiveReload server I specify a couple of default file locations like the passed in WebRoot folder and a templates folder that provides some support resource files for Markdown pages. Using the CompositeFileProvider() allows combining multiple providers together:

var wrProvider = new PhysicalFileProvider(WebRoot);
var tpProvider= new PhysicalFileProvider(Path.Combine(Startup.StartupPath,"templates"));

// combine multiple file providers to serve files from
var compositeProvider = new CompositeFileProvider(wrProvider, tpProvider);
app.UseStaticFiles(new StaticFileOptions
{
    FileProvider = compositeProvider, //new PhysicalFileProvider(WebRoot),
    RequestPath = new PathString("")
});

The above is the original code I had in the LiveReloadServer and this code does not serve .dll files required for Blazor support.

Adding Additional Extension/Mime Mappings

So the problem in the 404 responses returned by the LiveReloadServer is that the Static File middleware doesn't have .dll in it's mime mappings.

There are a couple of ways around this:

Allowing all unknown Files

There's a ServeUnknownFileTypes option that can be set that effectively allows any and all unknown extensions to be served:

var compositeProvider = new CompositeFileProvider(wrProvider, tpProvider);
app.UseStaticFiles(new StaticFileOptions
{
    FileProvider = compositeProvider, //new PhysicalFileProvider(WebRoot),
    RequestPath = new PathString(""),
    ContentTypeProvider = extensionProvider,
    ServeUnknownFileTypes = true
});

Since LiveReloadServer is a local Web Server that's meant to serve serve static content that's probably OK, but still there might be unforeseen consequences of files being exposed that shouldn't be.

Adding specific File Extensions

The more granular option is to explicitly add content type provider to the Static File Module using the FileExtensionContentTypeProvider and explicitly specify the extensions to use in addition to the many defaults:

var extensionProvider = new FileExtensionContentTypeProvider();
extensionProvider.Mappings.Add(".dll", "application/octet-stream");
if (config.AdditionalMimeMappings != null)
{
    foreach (var map in config.AdditionalMimeMappings)
        extensionProvider.Mappings[map.Key] = map.Value;
}
...
app.UseStaticFiles(new StaticFileOptions
{
    FileProvider = compositeProvider, 
    // add the mimemappings
    ContentTypeProvider = extensionProvider
});

The default extensions provider already supports a huge number of default mime extension mappings:

And you can add additional mappings with:

extensionProvider.Mappings[".dll"] = "application/octet-stream";
extensionProvider.Mappings[".custom"] = "text/html";

So, now when I add the .dll extension I can serve my Blazor assemblies and LiveReload server works with Blazor (well - only in run mode, not live reloading since Blazor has to recompile in order to show changes).

Summary

Extensions don't need to be set often, but you never know if you run into some obscure file type that the default extension mappings don't support, or some potentially insecure extension.

Like the .dll extension, which normally you don't want to serve because it's executable binary data. In an actual Blazor project the extension is internally added by the ASP.NET Core Blazor configuration setup, but if you host your own Web Server from scratch as I do for the LiveReloadWebServer, that extension has to be explicitly add to the content type mappings and using the solutions described in this post you can make short work of adding custom mime type mappings.

Onward - the next issue in getting Blazor to run properly in the LiveReload server is handling the SPA server fallback URLs when refreshing a page. That'll be next in line... Until then rock on!

this post created and published with the Markdown Monster Editor
© Rick Strahl, West Wind Technologies, 2005-2020
Posted in ASP.NET Core  

Using Angular's Live Reload Web Server to Refresh Pages on a Phone

$
0
0

Angular (and really any of the major JavaScript UI frameworks that integrate with the WebPack Dev Server) provides a built-in Live Reload Web server that makes it quick and easy to see UI changes updated in the browser as soon as you make a change to your code, HTML or CSS content.

What's not so obvious: How do you get the live reload functionality to also work on a phone in order to be able to tweak the layout just as easily as in a desktop browser? Turns out it's not that hard, but there's a bit of configuration that's required and that's the topic of this post.

When you get it all going you can happily work like this on a mobile device:

In this post I'll walk you through what you need to know in order to set up the Angular Dev server to:

  • Serve content and allow external IP Access
  • How to connect to the your server on the local network
  • Set up your firewall
  • Bonus: capture the phone output on your desktop screen

Not just for Angular

Although I specifically discuss the Angular Dev Server in this post, most other frameworks like Vue and React also use the same WebPack Dev server, so you can use the concepts described here with those CLIs as well. The syntax may be different so check the specific CLI documentation for host binding.

Live Reload Server

Angular and a number of other tools use the WebPack development server. By default this server is set up to run as a local Web server, but you can set it up quite easily to also serve IP traffic externally. It's not quite obvious, and in the past I've been doing this the hard wrong way, by building the app and then running it through another always on Web server (IIS). This works but it's not exactly quick since building the app for final output can take a while. Making a change then takes some more time.

Turns out - there's an easier way: It's quite easy set up the WebPack Web Server to externally expose an IP address, which would allow your phone to access the live reload server over the local network.

In Angular you run the live reload server with:

ng serve

using the Angular CLI. This starts up the server locally. Using just the default ng serve you generally use localhost:4200 to access the Web server:

http://localhost:4200

This is what the dev server is designed for and that of course works. But if you try to access the local IP address directly:

http://192.168.50.111:4200

you'll find remote access doesn't work with the default configuration.

Exposing your IP Address: Host Ports

The problem is that by default the WebPack server is bound to localhost. localhost is the local loopback adapter or 127.0.0.0 which does not expose itself to the network - it's entirely internal and in fact doesn't even hit the network interface. So using the default is not going to let you connect to the dev server.

This is actually a good default as it ensures that there isn't an accidental security leak via external network access . For typical dev scenarios running on localhost is perfectly reasonable.

Phone Testing is Painful

But if you want to check out your application on the actual phone or other mobile device, the process can be painful. Before I realized I could actually expose an external port in the dev server, I used to:

  • Build my Angular into the distribution folder
  • Point my local Web Server (IIS) at it

That works, but it's sloooooow... the build takes a while and then making changes requires another complete build. Meh!

Exposing a Host Port in Angular

Turns out Angular has easy options via its ng serve can be set up to bind to a specific port. As mentioned localhost or 127.0.0.0 are local IP addresses, so rather than using those you can bind to:

  • A specific machine IP Address
  • 0.0.0.0 which is all local IP Addresses

So to launch the Angular Dev server with external port access enabled you can use:

ng serve --host 0.0.0.0

which gets you:

Notice that the server is letting you know that you're exposing the server to the network and is warning that the server is not meant to be a hardened Web server and not secure for external access. But for development testing it certainly is sufficient.

You can also be more specific about the IP address:

ng serve --host 192.168.50.111

Voila now you can can access the server remotely!

Finally you can also set the host in the angular.json configuration file:

{"projects": {"MyProject": {"architect": {"serve": {"options": {"port": 4200,"host": "0.0.0.0"
            },            
        }
    }
}

}

With this you can now simply run ng serve to get external access.

Firewall

If you're on Windows you'll likely also have to add a Firewall exception rule to enable remote access to the firewall. This creates one using PowerShell:

# Launch as Administrator
netsh advfirewall firewall `
   add rule name="Angular Dev Server :4200" `
   dir=in action=allow `
   protocol=TCP localport=4200

Alternately you can add it in the Firewall app:

Accessing the Application From your Phone

Accessing the application from your phone now should work via the server's IP address. Unfortunately you'll need to use an IP Address rather than a domain name so a local network URL like this works on your local WiFi network:

http://192.168.50.111:4200

Note that the WebPack Dev Server does not support host header resolution, so AFAIK you can't use a domain name like myapp.server.com even if that DNS name is mapped to the appropriate IP address. AFAIK you have to use the IP Address.

If you're testing on your local network, make sure that your mobile device is on the same network segment as your development machine. I often use a wired connection for my laptop and the phone on the wireless subnet - these are different and can't directly see each other on my network.

Several people asked what I was using to mirror the iOS phone screen on my machine. I'm using 5kPlayer, which among many other cool features can act as an Apple Air Play server. You basically start the air play server in the application and then connect to it from the phone. It's very smooth and seems very reliable. Turns out that was very useful for capturing the screen capture at the beginning of this post 😃

Summary

As mentioned at the beginning, this approach should also work with other CLI's that use the WebPack Web server. Both the Vue and React CLIs also use the WebPack web server, so with perhaps slightly different syntax the same approach can be used, so this isn't Angular specific.

I feel a bit silly it took me this long to realize I can get Live Reload to run on my phone. All that wasted time building and explicitly navigating, when all along I could have been just putting the phone in always on mode and watch things change! Having this functionality - especially on the phone - is a huge time saver especially on a recent mobile first project I'm working on.

So maybe I'm not the only one who didn't think or even think about the Angular Dev server as a remote Live Reload server that can work for live reloading on a mobile device. Even though domain names don't work, once you've manually typed in the IP, you're done - just leave it sitting and it'll do its own refreshing. Yay - good times and more productivity ahead...

this post created and published with the Markdown Monster Editor
© Rick Strahl, West Wind Technologies, 2005-2020
Posted in Angular JavaScript  

Mirror your iOS Device Screen on Windows with the free 5KPlayer

$
0
0

After my last post about using Angular Live Reload on a Mobile Device, several people asked me what I was using for displaying my phone screen on my Windows machine. So here's a short post that talks about the tool I'm using and how to set it up:

5KPlayer

If you're doing Mobile Web development on Windows, it's probably not uncommon to run into a scenario where you need to display the content of the mobile device screen. For me that's usually for a screen capture or potentially for a presentation of some sort.

For example here's a screencast capture in the aforementioned blog post. In that post I showed how to use WebPack development Web server in Angular to live reload content directly on an iOS device and I used the Windows screen mirroring to capture the updates as part of a short screencast to demonstrate the feature:

The screen mirroring allowed me to show the interaction between the development editor and my iPhone mobile device. The same thing applies in a live presentation where attendees can't see your phone screen, and need the projected device screen to see what's happening.

iOS Screen Mirroring on Windows: Harder than it should be

Apple being Apple and always poking a stick into competitors' eyes, they don't make it easy to access iOS features from Windows. You can't access the phone directly and screen mirroring is not a thing. On a Mac AirPlay is built in and works in the default media player, so screen mirroring just works - not surprising on Apple's native platform. But no such luck on Windows. And surprisingly there also haven't been a lot of third party solutions available to provide AirPlay services on Windows either...

AirPlay is Apple's screen casting technology that's meant to project iOS device screen content or application output to some other display device like a TV or set top box. Many TVs, and various TV boxes like a Roku support AirPlay so you can cast content from an Apple Device to your TV.

AirPlay is proprietary, but it's a fairly well known protocol and widely used, yet there aren't a lot of Windows implementations of it. So when I ran into 5KPlayer, which is what I use in this post, I was excited to see it and try it out.

5KPlayer and Apple AirPlay

I've been looking for a decent mirroring solution on Windows for years. Sadly I've gone through many, many different and shady tools that have come and gone over that timeframe.

Recently I ran into 5K Player via an unrelated recommendation for a media player. 5KPlayer is first and foremost a Video Player and - as it turns out - a pretty damn good and fast one at that. It's bare bones, but it works much smoother and faster than anything else I've used for quickly scrubbing through and clipping my many 4K GoPro Videos. Given that most video solutions on Windows stutter or downright lock up when scrubbing through video this was a huge win for me.

But... the real highlight of 5KPlayer is that it provides an Apple AirPlay Server that you can use to cast your iOS device to a Window on the Windows desktop. And it works very well for that task. It's fast, doesn't stutter and there's minimal lag so it works fine for capturing smooth animations for example. Again, unlike some of the other solutions I've used in the past which often would disconnect, not keep up or lock up.

5KPlayer is free and no, they're not paying me - I'm just excited to have found a reliable and smooth solution to projecting my iOS devices. Apparently they also make a video editor they sell, which I'll likely buy next time I need to edit my GoPro videos. If that can handle 4k videos even close to as well as the player I'm all in.

Setting up Screen Mirroring with 5kPlayer

Once you've installed 5KPlayer you have to enable the AirPlay server that's built into it when it's running. You have to turn it on in the settings:

Connect your Device

Once it's on you should now be able to connect your iOS device to it.

Make sure that the device and your computer are on the same WiFi network - on the same subnet. I've run into problems when I used a wired connection on my laptop and WiFi on the phone where the two are effectively on separate network segments and so couldn't see each other.

To do this open the iOS device and bring up the iOS control center (swipe from upper left corner diagonally) and choose screen mirroring from that screen:

In the screen shot the mirroring is already set up (otherwise I couldn't capture the image). If not connected the text will read Screen Mirroring.

When you click in the device will display all nearby AirPlay servers and 5KPlayer-YourMachine should be one of them:

Select that and if all is well a new window pops up on your desktop with the mirrored device.

And with that you're on your way:

The mirroring is very smooth and fast - there's minimal lag so animations and transitions display well. The viewer also includes the ability to create a video of the screen operations easily which is useful for phone only content captures.

The pictures above are captured from the mirrored application window and you can see that by default the window is bit oversized and the image isn't Retina sharp so that's a trade off. You can resize the window down a bit but that only seems to make it even more jaggy. This means it's a great tool for projecting for demonstrations but it's not the best tool for catpturing razor sharp videos or screen capture images. For that you should capture video on the device or take a full screen shot there. It's fair tradeoff I think for the excellent responsiveness of the solution.

Also just to be clear, this is screen mirroring not remote access, so you can't control the phone from Windows - all interaction has to happen on the phone while it's connected.

Summary

5KPlayer is a simple and free solution to mirroring an iOS device onto your PC screen and it works very well with little fuss. It makes for a great addition to your developer toolbox that you might not need all the time, but if you're like me there are the occasional situations where I do need to capture or broadcast what's displaying on the phone. This solution fits the ticket nicely - maybe you find it useful too.

Resources

this post created and published with the Markdown Monster Editor
© Rick Strahl, West Wind Technologies, 2005-2020
Posted in Mobile  Windows  

A .NET Color Console Helper

$
0
0

I recently started posting shorter and more basic posts on this blog with some small, but practical things that I've found useful. Incidentally over the years of blogging some of the most popular posts here have been these short and often very simple tips rather than the long form articles which tend to have high short term popularity but less long term appeal. So in the spirit of short posts here's one about a simple ColorConsole helper class I use to add some color to my Console applications more easily.

Color me Console

In this post I'll discuss a small Console helper class I've been using to make it easier and more consistent to use colors with the .NET Console command. While colors are easy enough to access in the Console, to switch colors is a bit of a pain with the plain Console API. The simple class I present here makes it easier to write a line or string in a given color, write a line with multiple colors (using simple [color]text[/color] templating) and an easy way to create a header. The following is a very simple ColorConsole class that provides some useful color helpers:

  • WriteLine() and Write() methods with Color parameters
  • WriteError(), WriteInfo(), WriteSuccess() and WriteWarning() methods
  • A color template expansion WriteEmbeddedColorLine() function
  • A header generation routine

The Write methods let me quickly write output in a specific color without worrying about setting and resetting the color. The output is written with the specified color and the color is always reset to previously active color.

The high level wrappers like WriteError() and WriteSuccess() provide an alternative the raw Write methods and are more explicit about the intent of the message. It makes colors more consistent with color choices for common situations like error or informational statements.

I often find myself writing Console output that requires multiple more than a single color in a line of text when highlighting values over labels or displaying multiple values of difference importance. I can use multiple Write() statements with colors for this, but to make this easier to read I created a templated method that allows delimiting text with [color]text[/color] delimiters in a string.

ColorConsole.WriteEmbeddedColorLine($"Site Url: [darkcyan]{ServerConfig.GetHttpUrl()}[/darkcyan] [darkgray](binding: {HostUrl})[darkgray]");

Try it out

To use the class looks something like this:

static void Main(string[] args)
{
    ColorConsole.WriteWrappedHeader("Color Console Examples");

    Console.WriteLine("\nUsing a splash of color in your Console code more easily... (plain text)\n");

    ColorConsole.WriteLine("Color me this - in Red", ConsoleColor.Red);

    ColorConsole.WriteWrappedHeader("Off with their green Heads!", headerColor: ConsoleColor.Green);


    ColorConsole.WriteWarning("\nWorking...\n");

    Console.WriteLine("Writing some mixed colors: (plain text)");
    ColorConsole.WriteEmbeddedColorLine("Launch the site with [darkcyan]https://localhost:5200[/darkcyan] and press [yellow]Ctrl-c[/yellow] to exit.\n");


    ColorConsole.WriteSuccess("The operation completed successfully.");
}

which produces the following output:

Code

Here's the ColorConsole class:

/// <summary>
/// Console Color Helper class that provides coloring to individual commands
/// </summary>
public static class ColorConsole
{
    /// <summary>
    /// WriteLine with color
    /// </summary>
    /// <param name="text"></param>
    /// <param name="color"></param>
    public static void WriteLine(string text, ConsoleColor? color = null)
    {
        var oldColor = System.Console.ForegroundColor;

        if (color != null)
            Console.ForegroundColor = color.Value;

        Console.WriteLine(text);

        Console.ForegroundColor = oldColor;
    }

    /// <summary>
    /// Writes out a line with a specific color as a string
    /// </summary>
    /// <param name="text">Text to write</param>
    /// <param name="color">A console color. Must match ConsoleColors collection names (case insensitive)</param>
    public static void WriteLine(string text, string color)
    {
        if (string.IsNullOrEmpty(color))
        {
            WriteLine(text);
            return;
        }

        if (!Enum.TryParse(color, true, out ConsoleColor col))
        {
            WriteLine(text);
        }
        else
        {
            WriteLine(text, col);
        }
    }

    /// <summary>
    /// Write with color
    /// </summary>
    /// <param name="text"></param>
    /// <param name="color"></param>
    public static void Write(string text, ConsoleColor? color = null)
    {
        var oldColor = Console.ForegroundColor;

        if (color != null)
            Console.ForegroundColor = color.Value;

        Console.Write(text);

        Console.ForegroundColor = oldColor;
    }

    /// <summary>
    /// Writes out a line with color specified as a string
    /// </summary>
    /// <param name="text">Text to write</param>
    /// <param name="color">A console color. Must match ConsoleColors collection names (case insensitive)</param>
    public static void Write(string text, string color)
    {
        if (string.IsNullOrEmpty(color))
        {
            Write(text);
            return;
        }

        if (!ConsoleColor.TryParse(color, true, out ConsoleColor col))
        {
            Write(text);
        }
        else
        {
            Write(text, col);
        }
    }

    #region Wrappers and Templates


    /// <summary>
    /// Writes a line of header text wrapped in a in a pair of lines of dashes:
    /// -----------
    /// Header Text
    /// -----------
    /// and allows you to specify a color for the header. The dashes are colored
    /// </summary>
    /// <param name="headerText">Header text to display</param>
    /// <param name="wrapperChar">wrapper character (-)</param>
    /// <param name="headerColor">Color for header text (yellow)</param>
    /// <param name="dashColor">Color for dashes (gray)</param>
    public static void WriteWrappedHeader(string headerText,
                                            char wrapperChar = '-',
                                            ConsoleColor headerColor = ConsoleColor.Yellow,
                                            ConsoleColor dashColor = ConsoleColor.DarkGray)
    {
        string line = new StringBuilder().Insert(0, wrapperChar.ToString(), headerText.Length).ToString();

        WriteLine(line,dashColor);
        WriteLine(headerText, headerColor);
        WriteLine(line,dashColor);
    }

    /// <summary>
    /// Allows a string to be written with embedded color values using:
    /// This is [red]Red[/red] text and this is [cyan]Blue[/blue] text
    /// </summary>
    /// <param name="text">Text to display</param>
    /// <param name="color">Base text color</param>
    public static void WriteEmbeddedColorLine(string text, ConsoleColor? color = null)
    {
        if (color == null)
            color = Console.ForegroundColor;

        if (string.IsNullOrEmpty(text))
        {
            WriteLine(string.Empty);
            return;
        }

        int at = text.IndexOf("[");
        int at2 = text.IndexOf("]");
        if (at == -1 || at2 <= at)
        {
            WriteLine(text, color);
            return;
        }

        while (true)
        {
            var match = Regex.Match(text,"\\[.*?\\].*?\\[/.*?\\]");
            if (match.Length < 1)
            {
                Write(text, color);
                break;
            }

            // write up to expression
            Write(text.Substring(0, match.Index), color);

            // strip out the expression
            string highlightText = ExtractString(text, "]", "[");
            string colorVal = ExtractString(text, "[", "]");

            Write(highlightText, colorVal);

            // remainder of string
            text = text.Substring(match.Index + match.Value.Length);
        }

        Console.WriteLine();
    }

    #endregion

    #region Success, Error, Info, Warning Wrappers

    /// <summary>
    /// Write a Success Line - green
    /// </summary>
    /// <param name="text">Text to write out</param>
    public static void WriteSuccess(string text)
    {
        WriteLine(text, ConsoleColor.Green);
    }
    /// <summary>
    /// Write a Error Line - Red
    /// </summary>
    /// <param name="text">Text to write out</param>
    public static void WriteError(string text)
    {
        WriteLine(text, ConsoleColor.Red);
    }

    /// <summary>
    /// Write a Warning Line - Yellow
    /// </summary>
    /// <param name="text">Text to Write out</param>
    public static void WriteWarning(string text)
    {
        WriteLine(text, ConsoleColor.DarkYellow);
    }


    /// <summary>
    /// Write a Info Line - dark cyan
    /// </summary>
    /// <param name="text">Text to write out</param>
    public static void WriteInfo(string text)
    {
        WriteLine(text, ConsoleColor.DarkCyan);
    }

    #endregion
 
    
    private static string ExtractString(this string source,
        string beginDelim,
        string endDelim,
        bool allowMissingEndDelimiter = false,
        bool returnDelimiters = false)
    {
        int at1, at2;

        if (string.IsNullOrEmpty(source))
            return string.Empty;

        at1 = source.IndexOf(beginDelim, 0, source.Length, StringComparison.OrdinalIgnoreCase);
        if (at1 == -1)
            return string.Empty;

        at2 = source.IndexOf(endDelim, at1 + beginDelim.Length, StringComparison.OrdinalIgnoreCase);


        if (at1 > -1 && at2 > 1)
        {
            if (!returnDelimiters)
                return source.Substring(at1 + beginDelim.Length, at2 - at1 - beginDelim.Length);

            return source.Substring(at1, at2 - at1 + endDelim.Length);
        }

        return string.Empty;
    }
}

You can also find a runnable single file Console application in this Gist:

ColorConsole.cs Gist

Nothing fancy, and nothing you couldn't come up with in a few minutes yourself, but I find these super helpful and end up using this in just about any Console application now to make it easier to print help screens and provide basic status and progress information. Maybe some of you will find these useful as well...

this post created and published with the Markdown Monster Editor
© Rick Strahl, West Wind Technologies, 2005-2020
Posted in C#  .NET  
Viewing all 664 articles
Browse latest View live